Table of Contents
Advertisement
Advertisement
Table of Contents

Related Manuals for John Lewis JLBIWM1403


Summary of Contents for John Lewis JLBIWM1403
- Page 1 Washing Machine JLBIWM1403 User Manual...
-
Page 2: Table Of Contents
Contents Setting a programme Safety information Starting a programme with the delay start option Children and vulnerable people safety General Safety Starting a programme without the delay start Safety instructions Installation Cancelling a running programme Electrical connection Interrupting a programme and changing the Water connection options Opening the door when a programme or the... - Page 3 Technical Data Repairs - after sales service...
-
Page 4: Safety Information
Safety information Before the installation and use of the appliance, carefully read the supplied instructions. The manufacturer is not responsible for any injuries or damages that are the result of incorrect installation or usage. Always keep the instructions in a safe and accessible location for future reference. - Page 5 The ventilation opening in the base (if applicable) must not be • covered by a carpet, mat, or any floor covering. The appliance must be connected to the water mains using the new • supplied hose sets, or other new hose sets supplied by the Authorised Service Centre.
-
Page 6: Safety Instructions
Safety instructions that there is access to the mains plug after the Installation installation. • Do not touch the mains cable or the mains plug • Remove all the packaging and the transit bolts. with wet hands. • Keep the transit bolts in a safe place. If the •... -
Page 7: Service
Authorised Service Centre to ensure which accessories can be used. • Do not touch the glass door while a programme is in operation. The glass can get hot. Service • To repair the appliance contact an Authorised Service Centre. • Use original spare parts only. Disposal Warning! Risk of injury or suffocation. -
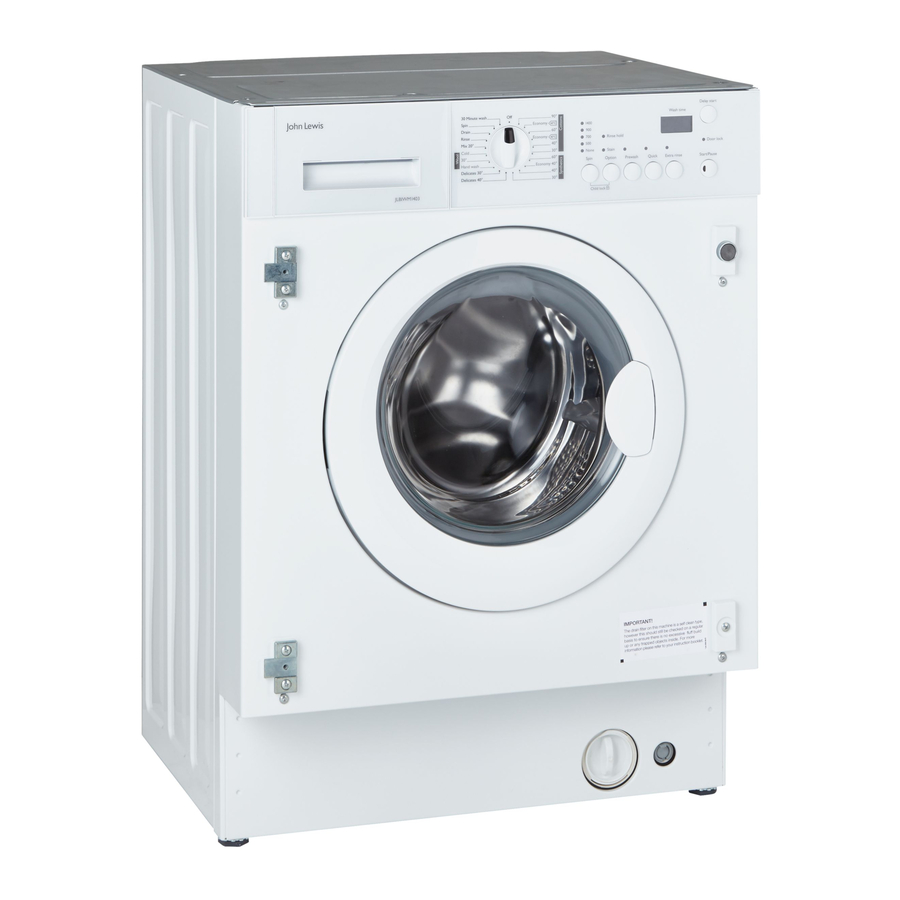
Page 8: Product Description
Product description Appliance overview 1. Detergent dispenser 6. Feet for levelling the appliance 2. Control panel 7. Water drain hose 3. Door handle 8. Mains cable 4. Rating plate 9. Water inlet hose 5. Drain pump filter 10. Feet for levelling the appliance To close the door, turn the device anticlockwise How to activate the child until the groove is vertical. -
Page 9: Control Panel
Control panel Control panel description 1. Programme dial 8. Prewash button 2. Display 9. Option button 3. Delay start button • Stain 4. Door lock indicator • Rinse hold 5. Start/Pause button 10. Spin selection button 6. Extra rinse button 7. - Page 10 Time indicator: Programme duration When the programme starts, the time decreases in one minute steps. Delay start When you press the delay start button, the display shows the delay start time. Alarm codes If the appliance has a malfunction, the display shows alarm codes. Refer to "Trouble- shooting"...
-
Page 11: Programmes
Programmes Turn the dial to the Off position to switch the Programme dial appliance off. Switch the appliance on and select the desired washing programme using the dial. Programme Chart Programme Maximum load Programme description Temperature range Maximum spin (Type of load and soil level) speed 7 kg Cottons... - Page 12 Programme Maximum load Programme description Temperature range Maximum spin (Type of load and soil level) speed Rinses 7 kg To rinse and spin the laundry. All fabrics, except wool- 1400 rpm lens and very delicate fabrics. Reduce the spin speed ac- cordingly to the type of laundry.
- Page 13 Programme Wool ■ ■ ■ ■ Mix 20° ■ ■ ■ ■ Rinses ■ ■ ■ ■ ■ Drain Spin ■ ■ Mini 30' ■ ■ ■ 1) Stain option is not available with a temperature lower than 40°C. 2) If using liquid detergent, a programme without prewash must be selected. 3) If you select this option, we recommend that you decrease the load size.
-
Page 14: Consumption Values
Consumption values The data in this table are approximate. Different variables can affect the data: the quantity and type of laundry, the water and ambient temperature. Programmes Load (kg) Energy con- Water con- Approximate Remaining sumption sumption (li- programme moisture (kWh) tre) duration (mi-... -
Page 15: Options
Options Spin Prewash Press this button to decrease the default spin By selecting this option, the appliance performs speed or select the None option. a prewash phase before the main wash: • The option increases the programme duration. The indicator of the selected speed comes on. This option is recommended for heavily soiled None: laundry. -
Page 16: Settings
Settings Child Lock With this option you can ensure that should children touch the panel, the settings will not be altered. • To activate/deactivate this option, press the Spin button and the Option button simultaneously until the indicator comes on/goes off. You can activate this option: •... -
Page 17: Daily Use
Daily use Warning! Refer to Safety chapters. Before first use 1. Pour 2 litres of water into the detergent compartment for washing phase. This activates the drain system. 2. Pour a small quantity of detergent into the compartment for washing phase. 3. -
Page 18: Setting A Programme
b. Press the Delay start button until the display shows Always follow the instructions that Press the Start/Pause button again to start you find on the packaging of the the programme immediately. detergent products. Starting a programme without Setting a programme the delay start 1. -
Page 19: Opening The Door When A Programme Or The Delay Start Operates
Opening the door when a • The Door lock indicator is on. The Start/Pause indicator flashes. The door stays locked. programme or the delay start • You must drain the water to open the door. operates Draining the water: 1. Select the Drain or the Spin programme. While a programme or the delay start operates, 2. -
Page 20: Hints And Tips
Hints and tips Special stain removers are available. Use the The laundry load special stain remover that is applicable to the type of stain and fabric. • Divide the laundry into: white, coloured, synthetics, delicates and wool. Detergents and other •... - Page 21 softener for washing machines. In areas where the water hardness is soft it is not necessary to use a water softener. To find out the water hardness in your area, contact your local water authority. Use the correct quantity of water softener. Follow the instructions that you find on the packaging of the product.
-
Page 22: Care And Cleaning
Care and cleaning Maintenance wash Warning! Refer to Safety chapters. With the low temperature programmes it is possible that some detergent stays in the drum. Perform a maintenance wash regularly. To do External cleaning this: Clean the appliance with soap and warm water •... -
Page 23: Cleaning The Detergent Dispenser
Cleaning the detergent dispenser Cleaning the drain filter Warning! When the appliance is operating and depending on The pump should be inspected regularly and the programme selected particularly if: there can be hot water in the • The appliance does not empty and/or spin. filter. - Page 24 1. Unplug the appliance. 2. If necessary, wait until the water has cooled down. 3. Place a container close to the pump to collect any spillage. A = Cover filter. B = Emergency emptying hose. 4. Release the emergency emptying hose, place it in the container and remove its cap cover.
-
Page 25: Cleaning The Inlet Hose And The Valve Filter
8. Put the cap back on the emergency emptying hose and push back into position. Use the guides to push the filter pump back into place. Tighten the filter cover by turning it clockwise. Cleaning the inlet hose and the valve filter 45°... -
Page 26: Frost Precautions
The water should drain into the bowl. 5. When the bowl is full, put the cap back on the emergency hose. 6. Empty the bowl. Repeat the procedure until water stops flowing. 7. Clean the pump if necessary as previously described ("Cleaning the drain filter"). -
Page 27: Troubleshooting
Troubleshooting • - The appliance does not drain the Warning! Refer to Safety water. chapters. • - The appliance door is open or not closed correctly. Please check the door! Introduction • - The mains supply is unstable. Wait until the mains supply is stable. - Page 28 Problem Possible solution Make sure that the inlet hose has no kinks or bends. Make sure that the connection of the water inlet hose is correct. The appliance does not fill with Make sure that the drain hose is in the correct position. The hose may be too water and drain immediately.
-
Page 29: Service
Problem Possible solution The washing results are not Increase the amount of detergent or use a different detergent. satisfactory. Use special products to remove stubborn stains before you wash the laundry. Make sure that you set the correct temperature. Decrease the laundry load. You cannot set an option. -
Page 30: Installation
Installation Unpacking Warning! Remove all the packaging and the transit bolts before installing the appliance. 1. Use safety gloves. Remove the external film. If necessary, use a cutter. 2. Remove the cardboard top. Remove the polystyrene packaging materials. 3. Remove the internal film. Washing Machine User Manual... - Page 31 4. Open the door. Remove all the items from the drum. 5. Put one of the polystyrene packaging elements on the floor behind the appliance. Carefully place the appliance rear-side down onto the polystyrene making sure hoses are not damaged. 6.
-
Page 32: Positioning And Levelling
8. Remove the power supply cable and the drain hose from the hose holders. 9. Remove the three bolts. Use the key supplied with the appliance. Pull out the plastic spacers. 10. Cover the holes with the caps you can find inside the user manual bag. -
Page 33: The Inlet Hose
4. The feet may be tight to adjust as they incorporate a self locking nut, but the appliance MUST be level and stable. If necessary, check with a spirit level. Any necessary adjustment can be made with a spanner. Accurate levelling prevents vibration, noise and displacement of the appliance during operation. -
Page 34: Water Drainage
4. Connect the water inlet hose to the cold water tap with 3/4 thread. Caution! Make sure that there are no leaks from the couplings. Use the hose supplied with appliance. Do not use an extension hose if the inlet hose is too short. Contact the Authorised Service Centre for an inlet hose replacement. - Page 35 To a stand pipe with vent-hole • Directly into a drain pipe at a height of not less than 60 cm (23.6”) and not more than 100 cm (39.3”). Refer to the illustration. • The end of the drain hose must always be ventilated , i.e.
-
Page 36: Building In
Building in This appliance has been designed to be built into the 600 mm kitchen furniture. The recess should have the dimensions shown in this picture. min. 596 mm 555 mm 560 mm min. 820 mm 818 mm 75 mm 60 mm 170 mm 100 mm... - Page 37 Hinges To mount the hinges it is necessary to drill two holes (dia. 35 mm, depth12.5-14 mm depending on the depth of door furniture) on the inner side of the door. The distance between the hole fixing centres must be 416 mm.
- Page 38 Warning! Do not remove the screw B. If the door has to be opened from left to right, invert the position of the plates E, the magnet D and the plate C. Mount the counter-magnet D and the hinges A as previously described.
-
Page 39: Technical Data
Technical Data Dimension Width/ Height/ Depth/ Total 596 mm/ 820 mm/ 544 mm/ 560 mm depth Electrical connection Voltage 230-240 V Overall power 2050 Fuse 13 A Frequency 50 Hz Level of protection against ingress of solid particles and moisture IPX4 ensured by the protective cover, except where the low voltage equipment has no protection against moisture... - Page 40 John Lewis, Aberdeen 01224 625000 information contained within this instruction John Lewis, Ashford 01233 811010 manual, the next step is to contact John Lewis technical support on: John Lewis, Bluewater 01322 624123 0330 1230106...
- Page 41 John Lewis, Nottingham 0115 941 8282 John Lewis, Trafford 0161 491 4040 John Lewis, Oxford Street 020 7629 7711 John Lewis at home, Turnbridge Wells 01892 506830 John Lewis, Peterborough 01733 344644 John Lewis, Watford 01923 244266 John Lewis at home, Poole 01202 756020...
-
Page 42: Environment Concerns
ENVIRONMENT CONCERNS marked with the symbol with the household Recycle the materials with the symbol . Put waste. Return the product to your local the packaging in applicable containers to recycle recycling facility or contact your municipal office. it. Help protect the environment and human health and to recycle waste of electrical and electronic appliances. - Page 43 Washing Machine User Manual...
- Page 44 132931200-A-432015 ( Subject to change without notice. )