Advertisement
Advertisement
Table of Contents

Related Manuals for Garmin FORETREX 601


Summary of Contents for Garmin FORETREX 601
- Page 1 FORETREX® 601/701 BALLISTIC EDITION Owner’s Manual...
- Page 2 © 2017 Garmin Ltd. or its subsidiaries All rights reserved. Under the copyright laws, this manual may not be copied, in whole or in part, without the written consent of Garmin. Garmin reserves the right to change or improve its products and to make changes in the content of this manual without obligation to notify any person or organization of such changes or improvements.
-
Page 3: Table Of Contents
Optional Fitness Accessories........7 Using the Backlight ..............1 Pairing Your ANT+ Sensors ............7 Main Pages ................. 1 Tips for Pairing ANT+ Accessories with Your Garmin Device ..7 Status Icons ................2 tempe ..................7 Map Page ................2 Device Information............ -
Page 5: Introduction
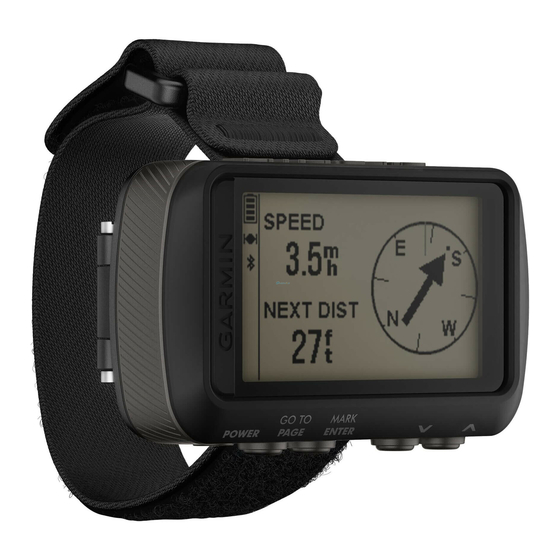
Introduction Keys WARNING See the Important Safety and Product Information guide in the product box for product warnings and other important information. Device Overview Hold to turn the device on and off, enter night vision mode, and enter watch mode. POWER Select to turn the backlight on and off. -
Page 6: Status Icons
® The VIRB remote function allows you to control your VIRB action camera using your device. Go to www.garmin.com/VIRB to purchase a VIRB action camera. Controlling a VIRB Action Camera Before you can use the VIRB remote function, you must enable the remote setting on your VIRB camera. -
Page 7: Creating A Waypoint
Creating a Waypoint Select a waypoint. You can save your current location as a waypoint. Select OPTIONS. Hold MARK. Select an option: If necessary, select to change the symbol, elevation, • To view the predicted best dates and times for hunting latitude, or longitude. -
Page 8: Viewing Track Details
Select an option: WAYPOINTS: Shows or hides waypoints on the map. • To begin navigating the current track, select GO. Compass Settings • To mark a waypoint, select MARK. From the compass page, select ENTER. • To zoom in and out using , select ZOOM. -
Page 9: Customizing The Range Card Fields
Follow the on-screen instructions. MUZZLE VELOCITY, enter the range and true drop, and select USE. Setting the Base Range NOTE: Garmin recommends you calibrate the muzzle ® From the Applied Ballistics page, select ENTER > RANGE velocity prior to the drop scale factor. Calibrating the CARD >... -
Page 10: Editing The Muzzle Velocity And Temperature Table
SETUP: Allows you to customize the device (Device Settings, System Settings page From the menu page, select SETUP > SYSTEM. CONNECT: Allows you to connect to compatible Garmin devices GPS MODE: Sets the satellite system to GPS, GPS + and ANT+ ® sensors... -
Page 11: Jumpmaster
The required information is the same as the HAHO jump • Bring the Garmin device within range 3 m (10 ft.) of the ANT+ type, plus an opening altitude. The opening altitude must not accessory. -
Page 12: Viewing Device Information
OS 10.3 and earlier. ® ® When a compatible Garmin device is found, the status Connecting the Device to Your Computer changes from CONNECTING to RECEIVING DATA. When You can use the Foretrex device as a USB mass storage device data is received, the status changes to TRANSFER COMPLETE. -
Page 13: Troubleshooting
FINAL ETA: The estimated time of day when you will reach the and the Garmin Express application. final destination (adjusted to the local time of the destination). ◦ Sync your device to the Garmin Connect Mobile app using You must be navigating for this data to appear. your Bluetooth enabled smartphone. -
Page 14: Applied Ballistics Glossary Of Terms
ODOMETER: A running tally of the distance traveled for all trips. WINDAGE 1: The horizontal portion of the aiming solution This total does not clear when resetting the trip data. based on the wind speed 1 and wind direction, displayed in MIL (milliradian) or MOA (minute of angle). - Page 15 TIP: You can manually enter the temperature, or you can use SIGHT HEIGHT: The distance from the center axis of the rifle the temperature value from a connected tempe sensor. barrel to the center axis of the scope. Input field. WIND DIRECTION: The direction from which the wind is TIP: You can easily determine this value by measuring from coming.
-
Page 16: Index
4 training 7 transferring, files 8 files, transferring 8 trip computer 4 trip information 1, 4 trip planner. See routes Garmin Connect 7 troubleshooting 9 Garmin Express 9 updating software 9 GPS 1 unit ID 8 satellite page 8 settings 6 connector 1 signal 9 disconnecting 8 user data, deleting 8... - Page 18 July 2017 190-02239-00_0A...