Table of Contents
Advertisement
Advertisement
Table of Contents

Related Manuals for Pioneer S-DV505


Summary of Contents for Pioneer S-DV505
- Page 1 DVD/CD RECEIVER XV-DV505 SPEAKER SYSTEM S-DV505 Operating Instructions...
- Page 2 CONGRATULATIONS ON YOUR PURCHASE OF THIS FINE PIONEER PRODUCT. Pioneer is on the leading edge of DVD research for consumer products and this unit incorporates the latest technological developments. We are sure you will be fully satisfied with the DVD player.
- Page 3 • If you are unsure of the quality and/or strength of the wall, consult a professional for advice. • Pioneer is not responsible for any accidents or damage that result from improper installation. Energy-saving design This system is designed to use 0.5 W of electricity when power is switched to Standby.
-
Page 4: Table Of Contents
Contents 01 Before you start Introduction to home theater ... 6 General disc compatibility ... 6 CD-R/RW compatibility ... 6 DVD-R/RW compatibility ... 7 PC-created disc compatibility ... 7 MP3 audio compatibility ... 7 Titles, chapters and tracks ... 8 DVD Video regions ... - Page 5 07 Playing sources Using the multi-channel sound modes ... 43 Auto ... 43 Surround modes ... 43 Advanced Surround modes ... 43 Stereo ... 44 Listening to multi-channel playback ... 44 Listening to a stereo source ... 45 Using Advanced Surround ... 46 Using the headphones with Advanced Surround ...
-
Page 6: Before You Start
• DVD-R/RW and CD-R/RW discs (Audio CDs and Video CDs) recorded using a DVD recorder, CD recorder or personal computer may not be playable on this machine. This may be caused by a number of possibilities, including but not limited to: the type of disc used;... -
Page 7: Dvd-R/Rw Compatibility
Before you start • This unit cannot record CD-R or CD-RW discs. • Unfinalized CD-R/RW discs recorded as CD Audio can be played, but the full Table of Contents (playing time, etc.) will not be displayed. DVD-R/RW compatibility • This unit will play DVD-R/RW discs that were recorded using the DVD Video format. -
Page 8: Titles, Chapters And Tracks
Before you start • There are many different recording bit- rates available to encode your MP3 files. This unit was designed to be compatible with all of them. Audio encoded at 128Kbps should sound close to regular CD Audio quality. This player will play lower bit-rate MP3 tracks, but please note that the sound quality becomes noticeably worse at lower bit-rates. -
Page 9: Controls And Displays
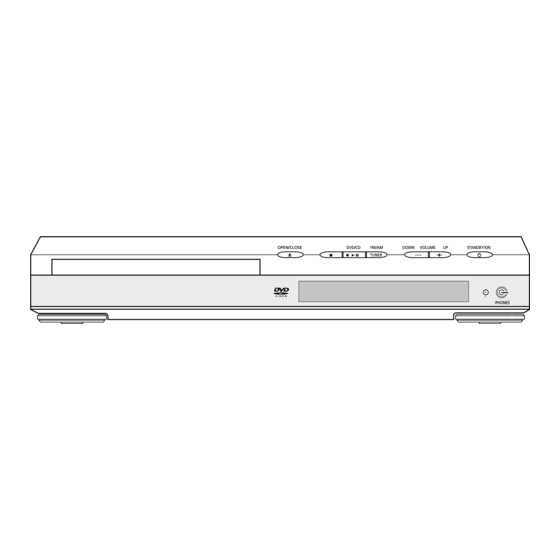
Controls and displays Front panel OPEN/CLOSE Opens the disc tray Stops playback DVD/CD / 6 Switches to the DVD/CD function and starts/ pauses/resumes playback FM/AM (TUNER) Switches to the tuner function and toggles between the AM and FM bands VOLUME buttons Adjusts the volume STANDBY/ON Switches the player on or into standby... -
Page 10: Remote Control
Controls and displays Remote control STANDBY/ON DVD/CD FM/AM AUDIO SUBTITLE AUTO SURROUND ROOM BASS MODE SETUP VOLUME SYSTEM SETUP TUNE + DVD SETUP ST– ENTER SOUND MODE TUNE – FOLDER – PROGRAM REPEAT TEST TONE CH LEVEL DVD DISP INPUT SHIFT STANDBY/ON Switches the player on or into standby... - Page 11 Controls and displays SYSTEM SETUP (SHIFT+DVD SETUP) Press to make various system settings in standby; choose your surround sound settings when the unit is switched on ENTER, TUNE & cursor control buttons Navigates on-screen displays and menus; ENTER selects an option or executes a command 10 SOUND MODE Adjusts the tone and effect level (page 47)
-
Page 12: Display
Controls and displays 14 QUIET/MIDNIGHT Adjusts the sound for low listening levels (page 48) 15 MUTE Mutes the volume 16 SYSTEM DISP Switches between information and clock displays 17 DVD MENU Displays the DVD menu (for CDs, Video CDs and MP3 discs, the Disc Navigator screen appears) TOP MENU (SHIFT + DVD MENU) Displays the top menu of a DVD disc... - Page 13 Controls and displays Lights during program play RPT-1 RPT lights during repeat play (RPT-1 lights during repeat one-track play) Lights during random playback Lights when you attenuate (reduce) the line signal level (can only be used with an analog signal) Surround sound indicators 2 PRO LOGIC II This lights to indicate Dolby Prologic II...
-
Page 14: Getting Started
Press ENTER to move on to the next screen. Welcome to Pioneer DVD! Thank you for purchasing this Pioneer DVD player. Before using, please take a little time to setup your DVD player Put the batteries into the remote control... -
Page 15: Using The Quick Room Setup
Getting started Using the Quick Room Setup • Default setting: M (U.S. model only — see note below) Depending on the distance of your speakers from the listening position, choose between Small, Medium, or Large (see the following table). • Press ROOM SETUP repeatedly to select your room type then press ENTER. -
Page 16: Changing The Clock Format
Getting started Use the buttons to set the minute. Press ENTER to confirm. The display flashes to indicate the clock is set. • Press SYSTEM DISP anytime to cycle through display options to show the current time. See Displaying disc information on pages 33–34 for more on this. -
Page 17: Using The On-Screen Displays
Getting started Using the on-screen displays For ease of use, this player makes extensive use of graphical on-screen displays (OSDs). You should get used to the way these work as you’ll need to use them when setting up the player, using some of the playback features, such as program play, and when making more advanced settings for audio and video. - Page 18 Getting started Press 3 (6) to start playback. If you’re playing a DVD or Video CD, a menu may appear. See pages 20–21 for how to navigate these. If you’re playing an MP3 disc, it may take a few seconds before playback starts, depend- ing on the complexity of the file structure on the disc.
-
Page 19: Basic Playback Controls
Getting started Basic playback controls The table below shows the basic controls on the remote for playing discs. The following chapter covers more playback features in more detail. STANDBY/ON L1/L2 DVD/CD FM/AM LINE AUDIO SUBTITLE ANGLE ZOOM QUIET/ AUTO SURROUND ADVANCED MIDNIGHT ROOM... -
Page 20: Front Panel Controls
Getting started • With Video CDs, the RESUME function is canceled when you switch to another function. Front panel controls The 0 (OPEN/CLOSE) button opens the disc tray. The 7 (stop), and 6 (play/pause) buttons on the front panel work in exactly the same way as the 7, 3 and 8 buttons on the remote control. -
Page 21: Video Cd Pbc Menus
Getting started Video CD PBC menus Some Video CDs have menus from which you can choose what you want to watch. These are called PBC (Playback control) menus. You can play a PBC Video CD without having to navigate the PBC menu by starting playback using a number button to select a track, rather than the 3 (6) button. -
Page 22: Playing Discs
Playing discs Introduction With most of the features described in this chapter, you can make use of on-screen displays. For an explanation of how to navigate these, see Using the on-screen displays on page Many of the functions covered in this chapter apply to DVD discs, Video CDs, CDs and MP3s, although the exact operation of some varies slightly with the kind of disc loaded. -
Page 23: Scanning Discs
Playing discs The screen for an MP3 disc shows the folder names on the left and the track names on the right. Select a folder, or a track within a folder. Disc Navigator Folder 1-17 Track 1-10 001. Gravity deluxe 001. -
Page 24: Frame Advance/Frame Reverse
Playing discs • Video CD only supports forward slow motion playback. • The picture quality during slow motion playback is not as good as during normal playback. • Depending on the disc, normal playback may automatically resume when a new chapter is reached. -
Page 25: Using Repeat Play
Playing discs Press ENTER on ‘B(End Point)’ to set the loop end point. Play Mode A-B Repeat A(Start Point) Repeat B(End Point) Random Program Search Mode After pressing ENTER, playback jumps back to the start point and plays the loop. •... -
Page 26: Using The Front Panel Display
Playing discs For MP3 discs, select Disc Repeat, Folder Repeat or Track Repeat (or Repeat Off). Play Mode A-B Repeat Disc Repeat Repeat Folder Repeat Random Track Repeat Program Repeat Off Search Mode Using the front panel display • During playback, press REPEAT (SHIFT+2) select a repeat play option. -
Page 27: Using The Front Panel Display
Playing discs Select a random play option. For DVD discs, select Random Title or Random Chapter (or Random Off) Play Mode A-B Repeat Random Title Repeat Random Chapter Random Random Off Program Search Mode For CDs, Video CDs and MP3 discs, select On or Off to switch random play of all tracks on the disc (or within an MP3 disc folder) on or off. -
Page 28: Creating Program Lists
Playing discs Creating program lists This feature lets you program the play order of titles/chapters/folders/tracks on a disc. • It’s not possible to use program play when playing a Video CD in PBC mode, or an unfinalized CD-R/RW disc. Using the OSD If you’re playing a DVD disc or a Video CD, you should already be using the OSD to navigate the contents. -
Page 29: Editing Program Lists Using The Osd
Playing discs • To add a chapter, first highlight the title, then press (cursor right) and select a chapter from the list. Program Program Step Title 1-38 Chapter 1-4 01. 01-003 Title 01 Chapter 001 Title 02 Chapter 002 Title 03 Chapter 003 Title 04 Chapter 004... -
Page 30: Other Functions Available From The Osd Program Menu
Playing discs Select ‘Create/Edit’ from the list of program options. To clear a step, highlight the step number and press CLEAR. To insert a step in the middle of the program list, highlight the step where you want the new step to appear, then select a title/chapter/folder/track to add. -
Page 31: Clearing A Track From The Program List
Playing discs Make sure the disc is stopped, then press PROGRAM (SHIFT+1). You’re prompted to enter the first track in the program list. P–OO O OO MP3 discs only: Use the number buttons to select a folder for the current step in the program list then press . -
Page 32: Switching Subtitles
Playing discs Select a search mode. Use the number buttons to enter a title, chapter, folder or track number, or a time. Play Mode A-B Repeat Title Search Repeat Chapter Search Random Time Search Program Search Mode • For a time search, enter the number of minutes and seconds into the currently playing title (DVD) or track (Video CD) you want playback to resume from. -
Page 33: Switching Camera Angles
Playing discs Normal Zoom 2x Zoom 2x Zoom 4x Zoom 4x • Since DVD and Video CD have a fixed resolution, picture quality will deteriorate, especially at 4x zoom. This is not a malfunction. Use the cursor buttons to change the zoomed area. -
Page 34: Using The Front Panel Display
Playing discs • CD and Video CD displays Play Current / Total Elapsed Track 2/16 0.23 Play Elapsed Disc 0.23 • MP3 disc displays Play Current / Total Elapsed Track 1/17 0.18 Track Name Outernational Play Current / Total Folder 2 / 7 Folder Name •... -
Page 35: Listening To The Radio
Listening to the radio Choosing stations The tuner can receive both FM and AM broadcasts, and lets you memorize your favorite stations so you don’t have to manually tune in every time you want to listen. STANDBY/ON L1/L2 DVD/CD FM/AM LINE AUDIO SUBTITLE... -
Page 36: Memorizing Stations
Listening to the radio Memorizing stations You can save up to 30 station presets so that you always have easy access to your favorite stations without having to tune in manually each time. STANDBY/ON DVD/CD FM/AM AUDIO SUBTITLE AUTO SURROUND ROOM SETUP BASS MODE... -
Page 37: An Introduction To Rds
Listening to the radio An introduction to RDS European model only Radio Data System, or RDS as it’s usually known, is a system used by FM radio stations to provide listeners with various kinds of information—the name of the station and the kind of show they’re broadcasting, for example. -
Page 38: Using The Rds Display
Listening to the radio Using the RDS display European model only To display the different types of RDS informa- tion available (RT, PS and PTY as explained on the previous page), press SYSTEM DISP on the remote control to cycle through the types of RDS information. -
Page 39: Setting Up For Surround Sound
Setting up for surround sound Choosing your surround sound settings To get the best possible surround sound from your system, make the settings below. This is particularly important when using Dolby surround. You should only need to make these settings once (unless you change the placement of your speakers, or sometimes, depending on the disc you’re playing). -
Page 40: Front Speaker Distance Setting
Setting up for surround sound Use the (cursor up/down) buttons to adjust the setting. Repeat steps 3 and 4 to make other settings. When you’re done, press SYSTEM SETUP (SHIFT+DVD SETUP) to exit. • The setting display is automatically exited after 20 seconds of inactivity. Front speaker distance setting •... -
Page 41: Dual Mono Setting
Setting up for surround sound Dual mono setting • Default setting: L-CH1 R-CH 2 The dual mono setting can only be used when listening to Dolby Digital discs with dual mono encoding. These discs are not widely used, but are sometimes used to seperate the backing track from the vocals on karaoke discs. - Page 42 Setting up for surround sound • The speaker volume can be adjusted while listening to any sound source you want by pressing CH LEVEL (SHIFT+5) and then using the down) buttons to adjust the channel levels. After you’re finished with one channel, use the buttons to move to the next.
-
Page 43: Playing Sources
Playing sources Using the multi-channel sound modes There are three basic multi-channel sound modes: Auto, Surround and Advanced Surround. The Stereo mode (available in all three modes) bypasses the multi-channel sound modes and downmixes multi-channel sources to your two-front speakers. Auto The AUTO mode automatically decodes Dolby Digital, DTS or Dolby Surround... -
Page 44: Stereo
Playing sources Virtual Surround Back The Virtual Surround Back effect simulates 6.1 surround channel listening, giving the impression that there is a surround back speaker in your system when listening to a 5.1 channel source. Expanded This mode is especially designed to give sound depth to stereo sources. -
Page 45: Listening To A Stereo Source
Playing sources Select the source you want to playback. Press AUTO. For multi-channel sources, Dolby/DTS decoding is selected automatically accord- ing to the source and AUTO shows in the display. Pressing SURROUND repeatedly during playback of a multi-channel source will cycle through the following menu: Auto Stereo... -
Page 46: Using Advanced Surround
Playing sources Using Advanced Surround Use the Advanced Surround modes to add DSP effects to a multi-channel source. STANDBY/ON DVD/CD FM/AM AUDIO SUBTITLE AUTO SURROUND ROOM BASS MODE SETUP VOLUME • Press ADV. SURR repeatedly to choose one of the sound options. Each press changes the display as follows: Advanced Music... -
Page 47: Adjusting The Sound
Adjusting the sound Adjusting the bass and treble • Default setting (U.S. model only): TREBLE: 0db BASS: 0dB • Default setting (all other models): TREBLE: –2dB BASS: 0dB To help you get the sound you want you can increase or reduce the bass and treble. Press SOUND MODE. -
Page 48: Using Midnight And Quiet Listening
Adjusting the sound Using Midnight and Quiet listening • Default setting: OFF The Midnight listening feature allows you to hear effective surround sound of movies at low volume levels. The effect automatically adjusts according to the volume at which you’re listening. The Quiet listening feature reduces excessive bass or treble in a sound source. -
Page 49: Using The Timer
Using the timer Setting the wake-up timer Use the wake-up timer to set the system to switch on at any time and start playing whatever source you want. • The clock must be set to the correct time for the wake-up timer to work properly (see page 15). -
Page 50: Turning The Wake-Up Timer On/Off
Using the timer • You can check the timer settings in standby by pressing TIMER (SHIFT+6). Turning the wake-up timer on/off If the wake-up timer is active, it will switch on everyday at the time you have set. Here’s how to turn it on or off: Press TIMER (SHIFT+6). -
Page 51: The Initial Settings Menu
The Initial Settings menu Using the Initial Settings menu The Initial Setup menu gives you complete control in setting up your system, including video output settings and parental lock settings, among others. If an option is grayed out it means that it cannot be changed at the current time. -
Page 52: S Video Out
The Initial Settings menu S Video Out • Default setting: S2 You only need to make this setting if you connected this system to your TV using an S- Video cord. Initial Settings TV Screen Video Output S-Video Out Language Display Options If you find that the picture is stretched or... -
Page 53: Dvd Menu Language
The Initial Settings menu DVD Menu Language • Default Setting: w/Subtitle Lang. Initial Settings Audio Language w/Subtitle Lang. Video Output Subtitle Language English Language DVD Menu Lang. French Display Subtitle Display German Options Italian Spanish Other Language Some multilingual discs have disc menus in several languages. -
Page 54: Angle Indicator
The Initial Settings menu Angle Indicator • Default setting: On Initial Settings OSD Language Video Output On Screen Display Language Angle Indicator Display Options If you prefer not to see the camera icon on- screen during multi-angle scenes on DVD discs, change this setting to Off. -
Page 55: Changing Your Password
The Initial Settings menu Press ENTER to register the password and return to the Options menu screen. If you forget your password, you can reset the system then register a new one. See page 61 for how to reset the player. Changing your password To change your password, confirm your existing password then enter a new one. -
Page 56: Setting/Changing The Country Code
The Initial Settings menu Press (cursor left) repeatedly to lock more levels (more discs will require the password); press (cursor right) to unlock levels. You can’t lock level 1. Press ENTER to set the new level and return to the Options menu screen. Setting/changing the Country Code You may also want to refer to the Country code list on page 67. -
Page 57: Additional Information
Additional information Switching off the demo • Default setting: DEMO ON This unit has an automatic demo feature that starts when the unit is plugged in for the first time. Here’s how to turn it off: Switch the system into standby. Press SYSTEM SETUP (SHIFT+DVD SETUP). -
Page 58: Child Lock
Additional information Child Lock • Default setting: LOCK OFF This system has a child lock feature that makes the front panel buttons and controls inopera- tive. This is useful when you’ve set the wake-up timer and don’t want the unit switched on before it activates. -
Page 59: Using Discs With This Unit
This unit is designed for use with conventional, fully circular discs only. Use of shaped discs is not recommended for this product. Pioneer disclaims all liability arising in connection with the use of shaped discs. -
Page 60: Proper Installation And Maintenance Of This Unit
The DVD player’s lens should not become dirty in normal use, but if for some reason it should malfunction due to dust or dirt, consult your nearest Pioneer authorized service center. Although lens cleaners for CD players are commercially available, we do not recommend using them since some may damage the lens. -
Page 61: Additional Connections
Additional information Additional connections Connecting external antennas External AM antenna Use 5–6 meters (15–18 feet) of vinyl-insulated wire and set up either indoors or outdoors. Leave the AM loop antenna connected. Outdoor antenna Indoor antenna (vinyl-coated wire) 5–6m (15–18 ft.) External FM antenna Use 75Ω... - Page 62 Additional information • Connect the LINE 1 (IN) jacks on the rear panel to an auxiliary playback compo- nent. These include components such as a VCR or cassette deck. Connect using RCA pin-plug stereo cables. See also Reducing the TV and line signal levels on page 48.
-
Page 63: Troubleshooting
Sometimes the trouble may lie in another component. Investigate the other components and electrical appliances being used. If the trouble cannot be rectified even after exercising the checks listed below, ask your nearest Pioneer authorized service center or your dealer to carry out repair work. -
Page 64: Dvd/Cd/Video Cd Player
Additional information DVD/CD/Video CD player Problem The disc is ejected automatically after loading. Playback is not possible. Picture playback stops and the operation buttons cannot be used. Settings are canceled. No picture/No color. Screen is stretched or aspect does not change. When recorded on a VCR or passed through an AV selector, there is disturbance in the... -
Page 65: Tuner
Additional information Tuner Problem Considerable noise in radio broadcasts. Auto tuning does not pick up some stations. Sound is mono only. Error Messages Message CHILD LOCK CAN’T USE 96K STEREO or 96KHZ STEREO (OSD only) Remedy • Tune into the correct frequency. •... -
Page 66: Screen Sizes And Disc Formats
Additional information Screen sizes and disc formats DVD-Video discs come in several different screen aspects, ranging from TV programs, which are generally 4:3, to CinemaScope widescreen movies, with an aspect ratio of up to about 7:3. Televisions also come in different aspect ratios;... -
Page 67: Language Code List
Additional information Language code list Language (Language code letter), Language code Japanese (ja), 1001 Estonian (et), 0520 English (en), 0514 Basque (eu), 0521 French (fr), 0618 Persian (fa), 0601 German (de), 0405 Finnish (fi), 0609 Italian (it), 0920 Fiji (fj), 0610 Spanish (es), 0519 Faroese (fo), 0615 Dutch (nl), 1412... -
Page 68: Preset Code List
Additional information Preset Code List Manufacturer Corde(s) ACURA ADMIRAL AIWA AKAI 632, 635, 642 AKURA ALBA 607, 639, 641, 644 AMSTRAD 642, 644, 647 ANITECH ASUKA AUDIOGONIC 607, 636 BASIC LINE 641, 644 BAUR 631, 607, 642 BEKO BEON BLAUPUNKT BLUE SKY BLUE STAR BRANDT... - Page 69 WESTINGHOUSE 607 YOKO 607, 642, 646 ZENITH 603, 620 PIONEER 600, 631, 632, 607, 636, 642, 651 • Please note that there are cases where the codes for the manufacturer in the list will not work for the model that you...
-
Page 70: Glossary
Additional information Glossary Analog audio An electrical signal that directly represents sound. Compare this to digital audio which can be an electrical signal, but is an indirect representation of sound. See also Digital audio. Aspect ratio The width of a TV screen relative to its height. Conventional TVs are 4:3 (in other words, the screen is almost square);... - Page 71 Additional information Regions (DVD-Video only) These associate discs and players with particular areas of the world. This unit will only play discs that have compatible region codes. You can find the region code of your unit by looking on the rear panel. Some discs are compatible with more than one region (or all regions).
-
Page 72: Specifications
Additional information Specifications Amplifier section Continuous Power Output (RMS): Front, center, surround ... 75 W per channel (1 kHz, 10 % T.H.D., 6 Ω) Subwoofer ... 75 W (100 Hz, 10 % T.H.D., 6 Ω) Continuous Power Output : Front, center, surround ... 62 W per channel Subwoofer ... -
Page 73: Power Cord Caution
A damaged power cord can cause a fire or give you an electric shock. Check the power cord once in a while. If you find it damaged, ask your nearest Pioneer authorized service center or your dealer for a replacement. - Page 74 Additional information...
- Page 75 Additional information...
- Page 76 253 Alexandra Road, #04-01, Singapore 159936 TEL: 656-472-1111 PIONEER ELECTRONICS AUSTRALIA PTY. LTD. 178-184 Boundary Road, Braeside, Victoria 3195, Australia, TEL: (03) 9586-6300 PIONEER ELECTRONICS DE MEXICO S.A. DE C.V. San Lorenzo 1009 3er Piso Desp. 302 Col. Del Valle Mexico D.F. C.P. 03100 TEL: 55-5688-52-90 <TSWZZ/02H00000>...