Table of Contents
Advertisement
Available languages
Available languages
ATTACH YOUR RECEIPT HERE
Serial Number _______________ Purchase Date ______________
Questions, problems, missing parts? Before returning to your retailer, call our customer
service department at 1-866-994-4148, 8 a.m. - 6 p.m., EST, Monday - Thursday,
8 a.m. - 5 p.m., EST, Friday.
AB1740
TM
READ AND SAVE THESE INSTRUCTIONS
EASY FIT INSTALL
VENTILATION FAN
WITH LED LIGHT
Français p. 13
ITEM #0831383
MODEL #7115-02
Español p. 25
Advertisement
Chapters
Table of Contents

Related Manuals for Utilitech 7115-02


Summary of Contents for Utilitech 7115-02
- Page 1 ITEM #0831383 EASY FIT INSTALL VENTILATION FAN WITH LED LIGHT MODEL #7115-02 Français p. 13 Español p. 25 ATTACH YOUR RECEIPT HERE Serial Number _______________ Purchase Date ______________ Questions, problems, missing parts? Before returning to your retailer, call our customer service department at 1-866-994-4148, 8 a.m.
-
Page 2: Table Of Contents
TABLE OF CONTENTS Product Specifications ........................2 Package Contents ..........................3 Safety Information ..........................3 Preparation ............................4 New Construction Assembly Instructions ...................6 Existing Construction Assembly Instructions ..................8 Care and Maintenance ........................12 Troubleshooting ..........................12 Warranty ............................13 PRODUCT SPECIFICATIONS SPECIFICATIONS SPECIFICATIONS Airflow: 100 CFM Sound output: 1.5 Sones 120 V, 60 Hz Power consumption: 30 W Duct diameter: 4 in. -
Page 3: Package Contents
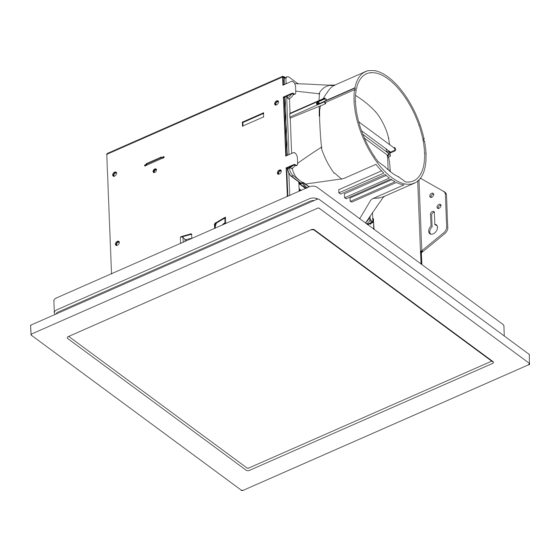
PACKAGE CONTENTS PART DESCRIPTION QUANTITY Fan body Grille Duct connector SAFETY INFORMATION READ AND SAVE THESE INSTRUCTIONS Please read and understand this entire manual before attempting to assemble, operate or install the product. 1. Always disconnect the power supply prior to servicing the fan, motor or junction box. 2. -
Page 4: Preparation
SAFETY INFORMATION WARNING TO REDUCE THE RISK OF FIRE, ELECTRIC SHOCK, OR INJURY TO PERSONS, OBSERVE THE FOLLOWING: 1. Use this unit in the manner intended by the manufacturer. If you have any questions, please call customer service. 2. Before servicing or cleaning unit, switch power off at service panel and lock the service disconnecting means to prevent power from being switched on accidentally. -
Page 5: Wiring Diagram
PREPARATION Note: Installations may vary depending on how the previous bath fan was installed. Supplies necessary for the installation of your bath fan are not all included; however, most are available at your local home improvement or hardware store. DIMENSION REQUIREMENTS Ceiling Ceiling Ceiling... -
Page 6: New Construction Assembly Instructions
NEW CONSTRUCTION ASSEMBLY INSTRUCTIONS BEFORE INSTALLATION – Turn off power source. Review all safety precautions. Attach the duct connector (C) to the fan housing (A). Remove the wiring box cover (2.1) from the fan housing (A). Remove the wiring knockout (2.2) from the wiring box cover (2.1) with a flathead screwdriver (not included). - Page 7 NEW CONSTRUCTION ASSEMBLY INSTRUCTIONS Mount the fan housing (A) to the joist or stud using wood screws (4.1) (not included) where indicated. Joist or wall stud Pull the house wires through the wire box cover hole. Using a quick connector, secure 120 V AC house wiring from the wall switch to the fan as shown in the wiring diagram on page 5.
-
Page 8: Existing Construction Assembly Instructions
NEW CONSTRUCTION ASSEMBLY INSTRUCTIONS For the LED light connection, plug in the connector (7.1) from the grille (B) into the fan housing (A) as shown. Pinch the mounting springs (7.2) on the grille (B) and insert them into the narrow rectangular slots (7.3) inside the fan housing (A). - Page 9 EXISTING CONSTRUCTION ASSEMBLY INSTRUCTIONS Remove the three screws (3.1) that hold the motor assembly (3.2) in place. Remove the fan motor assembly (3.2) from the fan housing (A). Unplug the fan power unit (3.3). Remove the wiring box cover (4.1) from the fan housing (A).
- Page 10 EXISTING CONSTRUCTION ASSEMBLY INSTRUCTIONS Install a circular 4 in. duct (6.1) (not included) and secure it with duct tape or clamps (neither included). Finish ceiling work. The ceiling hole should be aligned with the edge of the fan housing (A). 4 in.
-
Page 11: Care And Maintenance
EXISTING CONSTRUCTION ASSEMBLY INSTRUCTIONS Plug back in the power unit (9.1). Replace motor assembly (9.2) back into fan housing (A) using the three screws (9.3) removed in step 3. 10. For the LED light connection, plug in the connector 10.3 (10.1) from the grille (B) into the fan housing (A) as 10.3 shown. -
Page 12: Troubleshooting
TROUBLESHOOTING PROBLEM POSSIBLE CAUSE CORRECTIVE ACTION Be sure the CFM rating on the fan CFM too great matches the size of your room Check damper to ensure it is opening Damper not working properly or and closing properly. If the damper damaged has become damaged, please call Customer Service... - Page 13 ARTICLE #0831383 VENTILATEUR À INSTALLATION FACILE AVEC LUMINAIRE À DEL MODÈLE #7115-02 JOIGNEZ VOTRE REÇU ICI Numéro de série _____________ Date d’achat ________________ Des questions, des problèmes, des pièces manquantes? Avant de retourner l’article au détaillant, appelez notre service à la clientèle au 1 866 994-4148, entre 8 h et 18 h (HNE) du lundi au jeudi, ou entre 8 h et 17 h (HNE) le vendredi.
-
Page 14: Caractéristiques Du Produit
TABLE DES MATIÈRES Caractéristiques du produit.......................14 Contenu de l’emballage et quincaillerie incluse ................15 Consignes de sécurité ........................16 Préparation ............................16 Instructions pour l’assemblage dans une nouvelle construction ............18 Instructions pour l’assemblage dans une construction existante ............20 Entretien ............................23 Dépannage ............................24 Garantie ............................24 CARACTÉRISTIQUES DU PRODUIT CARACTÉRISTIQUES CARACTÉRISTIQUES... -
Page 15: Contenu De L'emballage Et Quincaillerie Incluse
CONTENU DE L’EMBALLAGE PIÈCE DESCRIPTION QUANTITÉ Boîtier du ventilateur Grille Raccord pour conduit CONSIGNES DE SÉCURITÉ VEUILLEZ LIRE ET CONSERVER CES INSTRUCTIONS. Assurez-vous de lire et de comprendre l’intégralité du présent manuel avant de tenter d’assembler, d’installer ou d’utiliser l’article. 1. -
Page 16: Consignes De Sécurité
CONSIGNES DE SÉCURITÉ AVERTISSEMENT AFIN DE RÉDUIRE LES RISQUES D’INCENDIE, DE CHOC ÉLECTRIQUE ET DE BLESSURE, SUIVEZ LES INSTRUCTIONS SUIVANTES : 1. N’utilisez cet appareil que de la façon prévue par le fabricant. Si vous avez des questions, veuillez communiquer avec le fabricant. 2. - Page 17 PRÉPARATION Avant de commencer l’installation, prévoyez un espace permettant l’accès pour les inspections et entretiens futurs qui ne sera pas gêné par l’installation. Il se peut que vous ayez besoin de l’aide d’une autre personne pour installer le ventilateur : une personne devrait se trouver dans le grenier, et l’autre dans la pièce.
-
Page 18: Instructions Pour L'assemblage Dans Une Nouvelle Construction
INSTRUCTIONS POUR L’ASSEMBLAGE DANS UNE NOUVELLE CONSTRUCTION AVANT L’INSTALLATION : Coupez l’alimentation électrique. Consultez toutes les mesures de sécurité. Fixez le raccord pour conduit (C) au boîtier du ventilateur (A). Retirez le couvercle de la boîte de câblage (2.1) du boîtier du ventilateur (A). Retirez la pastille défon- çable (2.2) du couvercle de la boîte de câblage à... - Page 19 INSTRUCTIONS POUR L’ASSEMBLAGE DANS UNE NOUVELLE CONSTRUCTION Installez le boîtier du ventilateur (A) sur la solive ou le montant à l’aide de vis à bois (4.1) (non incluses) aux endroits indiqués. Solive ou montant Passez les fils de la maison à travers le trou du couvercle de la boîte de fils.
-
Page 20: Instructions Pour L'assemblage Dans Une Construction Existante
INSTRUCTIONS POUR L’ASSEMBLAGE DANS UNE NOUVELLE CONSTRUCTION Pour alimenter le luminaire à DEL, branchez le con- necteur (7.1) de la grille (B) au boîtier du ventilateur (A) tel qu’il est illustré. Pincez les ressorts de fixation (7.2) sur la grille (B) et insérez-les dans les étroites fentes rectangulaires à... - Page 21 INSTRUCTIONS POUR L’ASSEMBLAGE DANS UNE CONSTRUCTION EXISTANTE Retirez les trois vis (3.1) qui retiennent l’ensemble moteur (3.2) du ventilateur en place. Retirez l’ensemble moteur du ventilateur (3.2) du boîtier du ventilateur (A). Débranchez le bloc d’alimentation (3.3) du ventilateur. Retirez le couvercle de la boîte de câblage (4.1) du boîtier du ventilateur (A).
- Page 22 INSTRUCTIONS POUR L’ASSEMBLAGE DANS UNE CONSTRUCTION EXISTANTE Installez un conduit circulaire de 4 po (6.1) (non inclus) et fixez-le à l’aide de ruban à conduits ou d’un collier de serrage (non inclus). Terminez les travaux au plafond. Vous devez aligner le trou du plafond au rebord du boîtier du ventila- teur (A).
-
Page 23: Entretien
INSTRUCTIONS POUR L’ASSEMBLAGE DANS UNE CONSTRUCTION EXISTANTE Rebranchez l’appareil dans le bloc d’alimentation (9.1). Replacez l’ensemble moteur (9.3) dans le boîtier du ventilateur (A) à l’aide des trois vis (9.2) retirées à l’étape 3. 10.3 10. Pour alimenter le luminaire à DEL, branchez le 10.3 connecteur (10.1) de la grille (B) au boîtier du ventilateur (A) tel qu’il est illustré. -
Page 24: Dépannage
DÉPANNAGE PROBLÈME CAUSE POSSIBLE MESURE CORRECTIVE Assurez-vous que le débit en m³/min du Le débit en m³/min est trop élevé. ventilateur est approprié pour la taille de la pièce. Vérifiez que le registre s’ouvre et se ferme Le registre ne fonctionne pas correctement correctement. - Page 25 ARTÍCULO #0831383 VENTILADOR DE INSTALACIÓN FÁCIL CON LUZ LED MODELO #7115-02 ADJUNTE SU RECIBO AQUÍ Número de serie _____________ Fecha de compra ____________ ¿Preguntas, problemas, piezas faltantes? Antes de volver a la tienda, llame a nuestro Departamento de Servicio al Cliente al 1-866-994-4148, de lunes a jueves de 8 a.m. a 6 p.m., y los viernes de 8 a.m.
- Page 26 ÍNDICE Especificaciones del producto ......................26 Contenido del paquete ........................27 Información de seguridad .........................28 Preparación............................29 Instrucciones de ensamblaje para una construcción nueva .............30 Instrucciones de ensamblaje para una construcción existente ............32 Cuidado y mantenimiento .........................35 Solución de problemas ........................35 Garantía............................36 ESPECIFICACIONES DEL PRODUCTO ESPECIFICACIONES ESPECIFICACIONES Flujo de aire: 100 CFM...
-
Page 27: Contenido Del Paquete
CONTENIDO DEL PAQUETE PIEZA DESCRIPCIÓN CANTIDAD Cuerpo del ventilador Rejilla Conector del conducto INFORMACIÓN DE SEGURIDAD LEA Y GUARDE ESTAS INSTRUCCIONES Lea y comprenda completamente este manual antes de intentar ensamblar, usar o instalar el producto. 1. Desconecte siempre el suministro de electricidad antes de realizar tareas de mantenimiento en el ventilador, el motor o la caja de unión. -
Page 28: Preparación
INFORMACIÓN DE SEGURIDAD ADVERTENCIA PARA REDUCIR EL RIESGO DE INCENDIOS, DESCARGAS ELÉCTRICAS O LESIONES PERSO- NALES, SIGA LAS SIGUIENTES INSTRUCCIONES: 1. Use esta unidad solo de la manera prevista por el fabricante. Si tiene preguntas, llame al fabri- cante (el número del servicio al cliente que aparece en la primera página). 2. - Page 29 PREPARACIÓN Antes de instalar, asegúrese de dejar un acceso para revisiones y tareas de mantenimiento futuras en un lugar que no interfiera con el trabajo de instalación. Es posible que necesite la ayuda de otra persona para instalar este ventilador: Una persona del lado del ático y la otra del lado de la habitación.
-
Page 30: Instrucciones De Ensamblaje Para Una Construcción Nueva
INSTRUCCIONES DE ENSAMBLAJE PARA UNA CONSTRUCCIÓN NUEVA ANTES DE LA INSTALACIÓN – Apague la fuente de alimentación eléctrica. Revise todas las precauciones de seguridad. Adjunte el conector de conducto (C) a la carcasa del ventilador (A). Retire la cubierta de la caja del cableado (2.1) de la carcasa del ventilador (A). - Page 31 INSTRUCCIONES DE ENSAMBLAJE PARA UNA CONSTRUCCIÓN NUEVA Monte la carcasa del ventilador (A) en la vigueta o el montante con tornillos para madera (4.1) (no se incluyen) donde están las marcas. Vigueta o techo pared Pase los conductores de la casa a través del orificio de la cubierta de la caja del cable.
-
Page 32: Instrucciones De Ensamblaje Para Una Construcción Existente
INSTRUCCIONES DE ENSAMBLAJE PARA UNA CONSTRUCCIÓN NUEVA Para la conexión de la luz LED, enchufe el conector (7.1) de la rejilla (B) a la carcasa del ventilador (A), como se muestra. Apriete los resortes de montaje (7.2) de la rejilla (B) e insértelos en las ranuras rectangulares estrechas (7.3) dentro de la carcasa del ventilador (A). - Page 33 INSTRUCCIONES DE ENSAMBLAJE PARA UNA CONSTRUCCIÓN EXISTENTE Retire los tres tornillos (3.1) que sostienen el ensamble del motor (3.2) en su lugar. Retire el ensamble del motor del ventilador (3.2) de la carcasa del ventilador (A). Desenchufe la unidad de tomacorriente del ventilador (3.3).
- Page 34 INSTRUCCIONES DE ENSAMBLAJE PARA UNA CONSTRUCCIÓN EXISTENTE Instale un conducto circular de 10,16 cm (6.1) (no incluido) y fíjelo con cinta aislante o abrazaderas (tampoco incluidas). Finalice el trabajo en el techo. El orificio en el techo debe estar alineado con el borde de la carcasa del 7,62 cm conducto ventilador (A).
-
Page 35: Cuidado Y Mantenimiento
INSTRUCCIONES DE ENSAMBLAJE PARA UNA CONSTRUCCIÓN EXISTENTE Enchufe nuevamente en la unidad de tomacorriente (8.1). Vuelva a colocar el ensamble del motor (8.2) utilizando los tres tornillos (8.3) retirados en el paso 3. 10. Para la conexión de la luz LED, enchufe el conector 10.3 (10.1) de la rejilla (B) a la carcasa del ventilador 10.3... -
Page 36: Solución De Problemas
SOLUCIÓN DE PROBLEMAS PROBLEMA CAUSA POSIBLE ACCIÓN CORRECTIVA 1. Los m /min. son demasiados 1. Asegúrese de que la clasificación de /min. en el ventilador coincida con el tamaño de su habitación. 2. El regulador de tiro no funciona de 2.