Panasonic AW-RP50 Quick Start Manual
For ptz camera systems
Hide thumbs
Also See for AW-RP50:
- Manual (3 pages) ,
- Quick start manual (2 pages) ,
- Operating instructions manual (140 pages)
Advertisement
Quick Links
Download this manual
See also:
Manual
Controlling (One) PTZ Camera via AW-RP50
1.
Connect AW-RP50 LAN port and AW-XXXX LAN port using a LAN cable. (AW-XXXX can
automatically recognize whether it is a cross or straight cable.)
* LAN Cable: Category 5 or higher, Up to 100m (Category 5e or higher if connected via a PoE+ compatible hub)
* Connecting AW-RP50 and AW-XXXX via a hub: Straight cable, Category 5 or higher, Up to 100m
2.
Operate AW-RP50 to set up the connection with AW-XXXX.
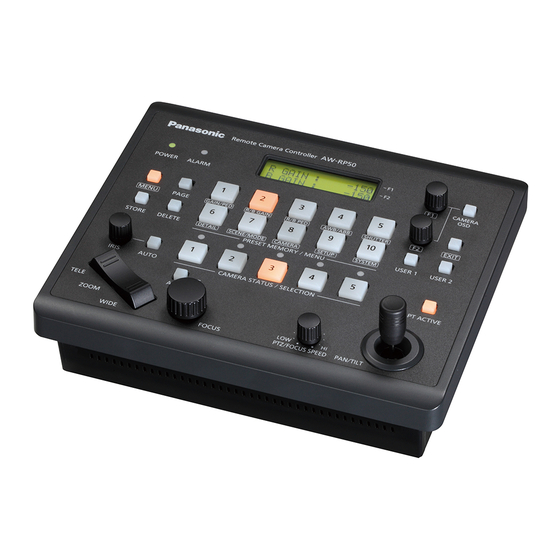
Press MENU button. - (Fig. 1-A)
Press [10] SYSTEM button. - (Fig. 1-B) * "[1] CAMERA CTL" will be displayed on the LCD screen. - (Fig. 2)
* If it is not displayed, turn F1 dial to make "[1] CAMERA CTL" appear.
While "[1] CAMERA CTL" is displayed on the LCD, press F1 dial. – (Fig. 1-C)
("[1] CAM1" will be displayed on the upper half, and the connection method (default: [NoAsign]) on the
lower half of the LCD screen.)
* If it is not displayed, turn F1 dial to make [CAM1] appear.
④ Turn F2 dial to select [Network], then press F2 dial to determine the setting. – (Fig. 1-D)
(A)
After the setting-up is completed, LED button 1 (CAM1) in the picture below (AW-RP50 CAMERA STATUS /
SELECTION Area) lights up according to the camera's power status. If the camera is in STANDBY mode (power
OFF: factory default), it lights up in orange. If in POWER ON mode (power ON), it lights up in green.
* When the camera is in STANBY mode, the Power-ON operation needs to be done. (Please see "3. Turn
AW-XXXX on" below.)
After setting up, this lights up
according to the camera's
power status.
* If it does not light up, please check the following points.
① Check the connection state of LAN cable or whether you are using a cable that meets the specifications.
(Figure 1)
(AW-RP50: CAMERA STATUS/SELECTION Area)
Controller
(Figure 2)
MENU ON ⇒ Select [10]
(C)
[1]CAMERA CTL
(D)
Press F1
(B)
1.CAM1
Turn F2 to select ⇒ Press F2 to determine
Network
Advertisement

Related Manuals for Panasonic AW-RP50


Summary of Contents for Panasonic AW-RP50
- Page 1 * LAN Cable: Category 5 or higher, Up to 100m (Category 5e or higher if connected via a PoE+ compatible hub) * Connecting AW-RP50 and AW-XXXX via a hub: Straight cable, Category 5 or higher, Up to 100m Operate AW-RP50 to set up the connection with AW-XXXX.
-
Page 2: Power Off
* By this operation, AW-XXXX will be switched over to POWER ON mode after its default setting motion. (The status lamp will light up in green and the LED on AW-RP50 will also light up in green.) * When performing the same procedure from POWER ON mode, if [POWER: OFF] is selected, AW-XXXX will be switched over to STANDBY mode. - Page 3 By [1] CAMERA CTL setting, select [No Asign] for a CAMERA No. you want to assign. ★ AW-RP50 will automatically assign IP addresses to the tables with their connection method set to [No Asign] in ascending order of camera’s MAC address.
- Page 4 ④ Currently managed switchers + ③ After setting up, LED buttons 1 – 3 at <CAMERA STATUS / SELECTION> on the AW-RP50 operation panel light up in a few seconds according to the camera’s power status. If a camera is in STANDBY mode (power OFF: factory default), it lights up in orange.
- Page 5 - This is a setting to decide how long the control of network settings is enabled after AW-XXXX starts up via EASY IP Setup Software or AW-RP50. 【Location】 Web Setup Screen > Setup > Network > Easy IP Setup accommodate period [20min]: Enables controlling the camera settings via EASY IP Setup Software, etc.
- Page 6 Controlling AW-XXXX Camera via AW-RM50 Wireless Remote ★ To control AW-XXXX via AW-RM50, the camera needs to be selected according to the IR ID setting (*1) set for it, using the buttons [CAM1] – [CAM4] on the remote controller. (*1) IR ID Setting: Enables controlling up to 4 cameras via AW-RM50. This is a setting to prevent the interference while controlling multiple cameras.
- Page 7 * For the parts and their functions, please see page 43 and after of AW-XXXX Operating Instructions <Basics>. * For the detailed operations, please see “When performing the operations using the wireless remote control” under each setting/adjustment item in AW-XXXX Operating Instructions <Operations and Settings>.
- Page 8 Controlling AW-XXXX Camera via PC * Using the Web screen on a PC connected with AW-XXXX via IP network, IP videos from the camera can be output and its various settings can be set. Connect AW-XXXX LAN port and the PC using a LAN cable. (AW-XXXX can automatically recognize whether it is a cross or straight cable.) * LAN Cable: Category 5 or higher, Up to 100m (Category 5e or higher if connected via a PoE+ compatible hub) Set an IP address for the PC so that it belongs to the same segment as AW-XXXX.
- Page 9 ★ If your PC does not have Plug-In Viewer Software installed, the confirmation message for installation will be shown before Live Screen is displayed. In this case, please follow the instructions of the message to install the software. For the details, please see page 48, “Installing the plug-in viewer software” of AW-XXXX Operating Instructions <Basics>.
-
Page 10: Easy Ip Setup Software
EASY IP Setup Software Network-related settings on AW-XXXX can be set via EASY IP Setup Software (on CD-ROM) that comes with the camera. EASY IP Setup Software also enables displaying the Web screen for AW-XXXX. * For the connection between PC and AW-XXXX, please refer to the Manual 【Controlling AW-XXXX Camera via PC】. ●... - Page 11 ● Display the Web screen for AW-XXXX via EASY IP Setup Software. 1. Start up EASY IP Setup Software and click [Search] button. Connected cameras will be extracted. 2. Click the camera you want to change, and then click [Access Camera] button. Web screen will be displayed. (Web Screen for AW-XXXX) Power Button If AW-XXXX is in STANBY mode (power OFF: factory default), please use [Power ON] button to turn it ON.
- Page 12 * If CAMERA OSD button is held down again while being lit, displayed on-screen menu will disappear. · Use F1 dial on AW-RP50 to change the following camera menu setting. – (Fig. 1-C) 【Location】 System > Others > Others 1/4 > Install Position ⇒ Select [Hanging] (Figure 1) (C)...
- Page 13 (Web Screen for AW-XXXX)
- Page 14 * Power ON/OFF of AW-XXXX can be changed via the controllers below. For operating each controller, please refer to the following Manual) Manuals. (Controller: 【Controlling AW-XXXX Camera via AW-RP50 Controller】 - AW-RP50: 【Controlling AW-XXXX Camera via AW-RM50 Wireless - AW-RM50: Remote】 【Controlling AW-XXXX Camera via PC】...