
Related Manuals for Yamaha MCP1


Summary of Contents for Yamaha MCP1
- Page 1 WALL-MOUNT CONTROLLER MCP1 Installation Manual Installationshandbuch Manuel d’installation Manual de instalación Manual de instalação Manuale all’installazione Руководство по установке 施 工 説 明 書...
- Page 2 “OFF” meets FCC requirements. Modifications not and “ON” , please try to eliminate the problem expressly approved by Yamaha may void your by using one of the following measures: authority, granted by the FCC, to use the prod- uct.
-
Page 3: Precautions
Doing so may result in Water warning malfunction. • Always consult qualified Yamaha service • Do not expose the device to rain, use it personnel if the device installation requires near water or in damp or wet conditions, or... - Page 4 (panel, etc.). If this happens, immediately turn off the Yamaha cannot be held responsible for power of the PoE injector or the PoE damage caused by improper use or network switch, unplug the cable, and have the device inspected by qualified modifications to the device.
-
Page 5: Table Of Contents
• MCP1 installation manual (this document) Firmware update MTX-MRX Editor is used to update the firmware of the MCP1 and to check the version. For details on how to perform these operations, refer to “MTX-MRX Editor User Guide.” The latest firmware can be downloaded from the download page of the following website. -
Page 6: Introduction
After reading this manual, keep it for future reference. The MCP1 lets you set up a home page and six pages, and assign up to 36 parameters. What you’ll need to provide When attaching the MCP1 to a wall, you’ll need to provide several items. -
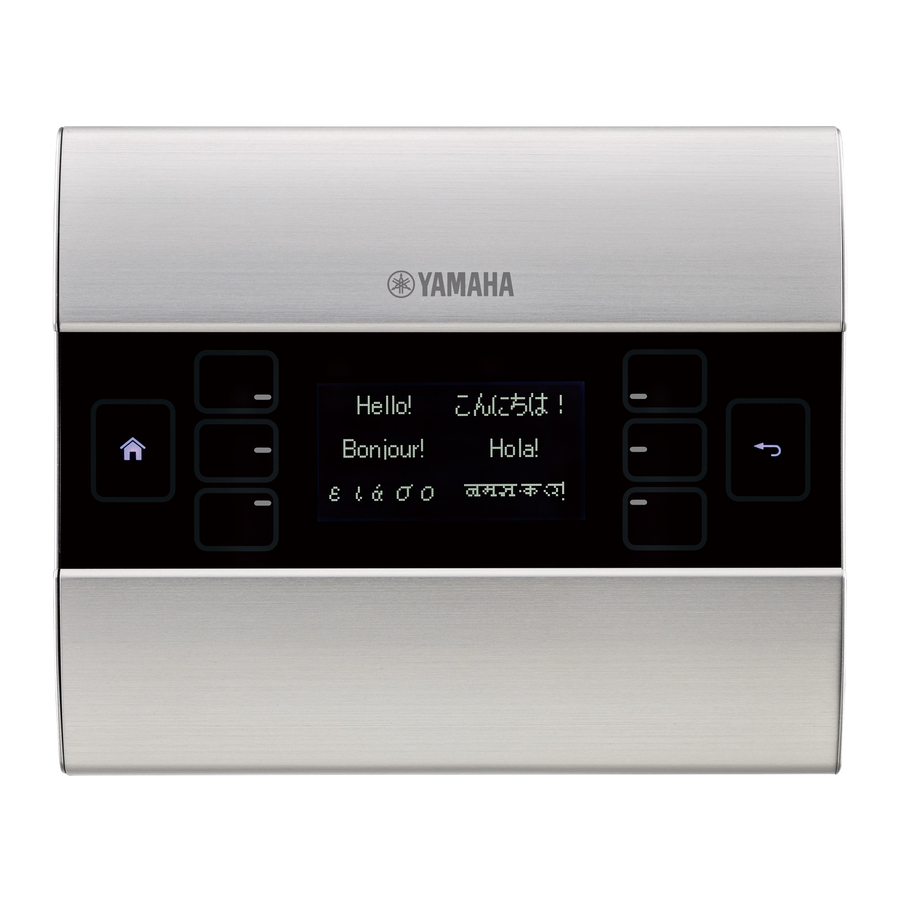
Page 7: Controls And Connectors
This shows parameters and other information. Use MTX-MRX Editor to create the data that will be shown. r Return switch After setting a parameter, touch this switch to confirm and return to the page or to move to a confirmation screen. MCP1 Installation Manual... -
Page 8: Rear Panel
This is an RJ-45 port for connection to the Dante port or [NETWORK] port of the MTX/MRX via the PSE. The maximum cable length that can be used is 100 meters. NOTE Use STP (Shielded Twisted Pair) cable to prevent electromagnetic interference. 8 MCP1 Installation Manual... -
Page 9: Connections With An Mtx/Mrx System
In some cases, the PSE (PoE network switch or PoE injector) might have ports that supply power and ports that do not supply power. Connect the MCP1 to a port that supplies power. For details on how to synchronize each device, refer to “MTX-MRX Editor User Guide.”... -
Page 10: Function Tree
After synchronizing with MTX-MRX Editor, it will be necessary to enter the PIN code. • IP Setting Selects either PC or UNIT ID as the method of specifying the MCP1’s IP address. In the case of PC, use MTX-MRX Editor to specify the IP address. -
Page 11: Installation
Installation The MCP1 can be installed on a wall in either of two ways: in a gang box that is embedded behind the wall, or in the included surface mount box which you attach to the surface of the wall in an exposed position. - Page 12 Installation Connect the cable to the MCP1. To the NETWORK port on the back of the MCP1, connect the cable that extends from the PSE. Fit the tabs of the mounting plate into the square holes of the MCP1. MCP1 While pressing the unit, use the included screws with washers to secure the unit in four locations from the side.
-
Page 13: Setting The Unit Id
Touching an L1/2/3 switch decreases the number; touching an R1/2/3 switch increases the number. When you’ve set the UNIT ID, touch the return switch. A confirmation screen appears; select Yes. The UNIT ID is confirmed, and the MCP1 auto- matically restarts. MCP1 Installation Manual... -
Page 14: Removal
When re-installing the MCP1, portions of the screw holes in the mount plate may be deformed and may not properly fit into the MCP1. If this is the case, use a tool to adjust parts of the screw holes as necessary and re-install the unit. -
Page 15: Alert List
Alert list The following table lists the alerts generated by the MCP1, their meaning, and the appropriate action to take. When a Fault type alert occurs, it will immediately be displayed. Other alert types can be checked by touching [Alert] in the Settings page. A single occurrence is shown when the situa- tion occurs. - Page 16 If you’ve changed any Error Continuing formed do not match the cur- UNIT ID’s, perform synchroniza- rent UNIT ID settings. tion again. For other alerts, refer to “Alert list” in the “MTX-MRX Editor User Guide.” 16 MCP1 Installation Manual...
-
Page 17: Specifications
The contents of this manual apply to the latest specifications as of the publishing date. To obtain the latest manual, access the Yamaha website then download the manual file. The model number, serial number, power requirements, etc., may be found on or near the name plate, which is at the rear of the unit. -
Page 18: Dimensions
Dimensions Without surface mount box (18) (20) Unit: mm 18 MCP1 Installation Manual... - Page 19 Dimensions With surface mount box (18) (28) Surface mount box Unit: mm MCP1 Installation Manual...
- Page 20 Information on Disposal in other Countries outside the European Union: This symbol is only valid in the European Union. If you wish to discard these items, please contact your local authorities or dealer and ask for the correct method of disposal. (weee_eu_en_02) 20 MCP1 Installation Manual...
- Page 21 MCP1 Installation Manual...
- Page 22 Via Tinelli N.67/69 20855 Gerno di Lesmo (MB), Italy CENTRAL & SOUTH AMERICA PT. Yamaha Musik Indonesia (Distributor) Tel: +39-039-9065-1 MEXICO Yamaha Music Center Bldg. Jalan Jend. Gatot SPAIN/PORTUGAL Yamaha de México, S.A. de C.V. Subroto Kav. 4, Jakarta 12930, Indonesia Yamaha Music Europe GmbH Ibérica, Sucursal Av.
- Page 24 Yamaha Pro Audio global website http://www.yamahaproaudio.com/ Yamaha Downloads http://download.yamaha.com/ Manual Development Group © 2017 Yamaha Corporation Published 04/2017 POHD-A0 Printed in China ZW65400...