Table of Contents
Advertisement
Quick Links
PJ-WPD-200
Wireless Presentation Gateway
User Guide
IMPORTANT: Please read this User Guide to obtain important information on installing
and using your product in a safe manner, as well as registering your product for future
service. Warranty information contained in this User Guide will describe your limited
coverage from ViewSonic Corporation, which is also found on our web site at http://
www.viewsonic.com in English, or in specific languages using the Regional selection
box in the upper right corner of our website. "Antes de operar su equipo lea cu
idadosamente las instrucciones en este manual"
Model No. VS15989
Advertisement
Table of Contents

Related Manuals for ViewSonic PJ-WPD-200


Summary of Contents for ViewSonic PJ-WPD-200
-
Page 1: User Guide
Warranty information contained in this User Guide will describe your limited coverage from ViewSonic Corporation, which is also found on our web site at http:// www.viewsonic.com in English, or in specific languages using the Regional selection box in the upper right corner of our website. -
Page 2: Compliance Information
Compliance Information Please read before proceeding • Use only the batteries and power adapter provided by the manufacturer. The use of unauthorized accessories may void your warranty. • Do not store your device in temperatures higher than 50°C (122°F). • The operating temperature for this device is from 0°C (32°F) to 35°C (95°F). FCC Compliance Statement The following statement applies to all products that have received FCC approval. -
Page 3: Ce Conformity For European Countries
FCC SAR Information This equipment complies with FCC radiation exposure limits set forth for an uncontrolled environment. End users must follow the specific operating instructions for satisfying RF exposure compliance. This transmitter must not be co-located or operating in conjunction with any other antenna or transmitter. -
Page 4: Declaration Of Rohs2 Compliance
Declaration of RoHS2 Compliance This product has been designed and manufactured in compliance with Directive 2011/65/EU of the European Parliament and the Council on restriction of the use of certain hazardous substances in electrical and electronic equipment (RoHS2 Directive), and is deemed to comply with the maximum concentration values issued by the European Technical Adaptation Committee (TAC) as shown below: Proposed Maximum Substance... -
Page 5: Table Of Contents
Contents Compliance Information FCC Compliance Statement ...................i CE Conformity for European Countries ..............ii Declaration of RoHS2 Compliance ............... iii Copyright Information Product Registration ....................1 For Your Records ....................1 Introduction Features ........................2 System requirements.....................2 Before you start .....................2 Getting Started Wireless LAN Basics .....................3 IP Address ......................4 Install Driver / Utility ....................5 Wireless Network Configuration ................7... -
Page 6: Copyright Information
® NERGY Disclaimer: ViewSonic Corporation shall not be liable for technical or editorial errors or omissions contained herein; nor for incidental or consequential damages resulting from furnishing this material, or the performance or use of this product. -
Page 7: Introduction
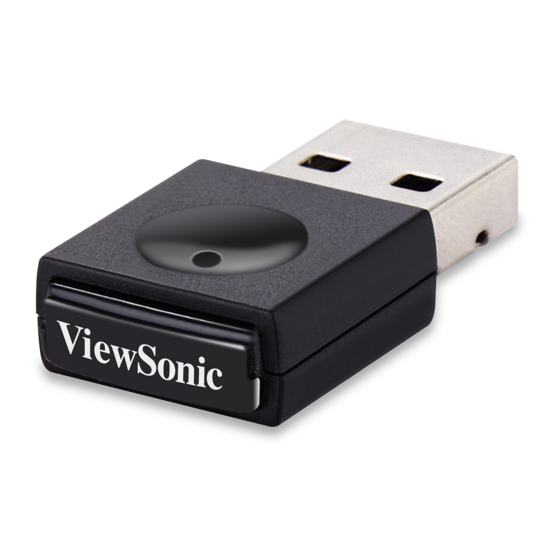
Introduction Thank you for your purchase of the WLAN Adapter. Featuring wireless technology, this wireless networking solution has been designed for both large and small businesses, and it is scalable so that you can easily add more users and new network features depending on your business scale. -
Page 8: Getting Started
Getting Started Wireless LAN Basics Wireless LAN network defined by IEEE 802.11b/g standard committee could be configured as: • Ad Hoc wireless LAN. • Infrastructure wireless LAN. Ad Hoc network is a group of wireless LAN cards, this group is called a BSS (Basic Service Set). -
Page 9: Ip Address
IP Address To use the WLAN 11n USB Client Adapter with a computing device, the WLAN Adapter must be equipped with a proper Interface. All drivers and supporting software for the WLAN Adapter must be installed and configured first. Ask your system administrator for the following information, which you may need to provide during driver installation: •... -
Page 10: Install Driver / Utility
Install Driver / Utility The installation and driver CD will automatically activate the autorun installation program after you insert the disk into your CD drive. Step 1: Insert the installation CD into your CD- ROM. Choose the Setup Language and click Next button. - Page 11 Installing & configuring WLAN utility. Installing Drivers. Step 3: Click Finish to complete installation.
-
Page 12: Wireless Network Configuration
Wireless Network Configuration WLAN 11n USB Client Adapter uses its own management software. All functions controlled by users are provided by this application. When you insert the WLAN Adapter into your personal computer, a icon should appear in the Windows System Tray automatically. - Page 13 General Setting Once device is set, double click on that icon and the configuration window will pop up as shown. It shows the current connected network. The signal strength and link quality are displayed also. The bar graph displays the quality and strength of the link between the node and its Access Point.
- Page 14 Available Netwoek Setting Click Available Network tab and it will show all available networks that radio can reaches. Select proper SSID & BSSID you want to connect. Click Refresh button to force and rescan available networks currently. Select one of SSIDs, and click Add to Profile to create profile that can be configured more wireless parameters.
- Page 15 Status Status page tab, shows all wireless, networking and device driver version in details. Statistics Statistics page tab will show real-time TX/RX relative counters to check or evaluate the wireless performance. Click Reset button to set counter to zero.
- Page 16 Wi-Fi Protected Setup An easy and secure setup solution for Wi-Fi network. You can choose PIN Code or Push Button method to connect to an AP. • Pin method: Step 1: Push the PIN button. Step 2: Select a specific AP.
- Page 17 Step 3: Enter the PIN code into your AP. Step 4: Select AP that you want to configure. Step 5: Wait for configuring your wireless AP to be the security setting.
- Page 18 • PBC method: Step 1: Push the PBC button. Step 2: Push the physical button on your AP or visual button on the WPS config page. • Soft AP: Step 1: Click Access Point to change AP mode.
- Page 19 Step 2: Click Config to set AP. Step 3: Setting SSID and Securtiy. Step 4: Choosing the Ethernet controller and click Apply to bridge your Soft AP.
-
Page 20: Technical Specifications
Technical Specifications Product Name 11n Wi-Fi USB Dongle(2T2R) Standard 802.11b/g/n, 802.3, 802.3u Data Transfer Rate 1,2,5.5,6,11,12,18,22,24,30,36,48,54,60,90,120 and maximum of 150Mbps Modulation Method BPSK/ QPSK/ 16-QAM/ 64-QAM Frequency Band 2.4GHz ISM Band Spread Spectrum IEEE 802.11b: DSSS (Direct Sequence Spread Spectrum) IEEE 802.11g/n:OFDM (Orthogonal Frequency Division Multiplexing) RF Output Power... -
Page 21: Troubleshooting
Troubleshooting Symptom Remedy The LED is off. Make sure the dongle is inserted properly. Otherwise contact your vendor. The LED is always on not Make sure that you have installed the driver from blinking. attached CD. Otherwise contact your vendor. The LED is blinking but the Make sure that you have installed the Utility from icon does not appear in your... -
Page 22: Other Information
Latin America C= http://www.viewsonic.com/ www.viewsonic.com/la/ soporte@viewsonic.com (Mexico) la/soporte/servicio-tecnico Nexus Hightech Solutions, Cincinnati #40 Desp. 1 Col. De los Deportes Mexico D.F. Tel: 55) 6547-6454 55)6547-6484 Other places please refer to http://www.viewsonic.com/la/soporte/servicio-tecnico#mexico Latin America C= http://www.viewsonic.com/ www.viewsonic.com/la/ soporte@viewsonic.com (Peru) la/soporte/servicio-tecnico Macau www.hk.viewsonic.com T= 853 2870 0303 service@hk.viewsonic.com... -
Page 23: Limited Warranty
If a product proves to be defective in material or workmanship during the warranty period, ViewSonic will, at its sole option, repair or replace the product with a like product. Replacement product or parts may include remanufactured or refurbished parts or components. - Page 24 Exclusion of damages: ViewSonic’s liability is limited to the cost of repair or replacement of the product. ViewSonic shall not be liable for: 1. Damage to other property caused by any defects in the product, damages based upon inconvenience, loss of use of the product, loss of time, loss of profits, loss of business opportunity, loss of goodwill, interference with business relationships, or other commercial loss, even if advised of the possibility of such damages.
-
Page 25: Mexico Limited Warranty
Exclusion of damages: ViewSonic’s liability is limited to the cost of repair or replacement of the product. ViewSonic shall not be liable for: Damage to other property caused by any defects in the product, damages based upon inconvenience, loss of use of the product, loss of time, loss of profits, loss of business opportunity, loss of goodwill, interference with business relationships, or other commercial loss, even if advised of the possibility of such damages. - Page 26 Tel: (52) 999-925-1916 Tel: 01(52)95-15-15-22-22 E-Mail: rrrb@sureste.com Fax: 01(52)95-15-13-67-00 E-Mail. gpotai2001@hotmail.com Tijuana: FOR USA SUPPORT: ViewSonic Corporation Av Ferrocarril Sonora #3780 L-C 14035 Pipeline Ave. Chino, CA 91710, USA Col 20 de Noviembre Tel: 800-688-6688 (English); 866-323-8056 (Spanish); Tijuana, Mexico E-Mail: http://www.viewsonic.com...