Gigaset A390 Manual
Hide thumbs
Also See for A390:
- User manual (18 pages) ,
- Instruction manual (27 pages) ,
- Manual (66 pages)
Table of Contents
Advertisement
Quick Links
Gigaset A390/A490/A495
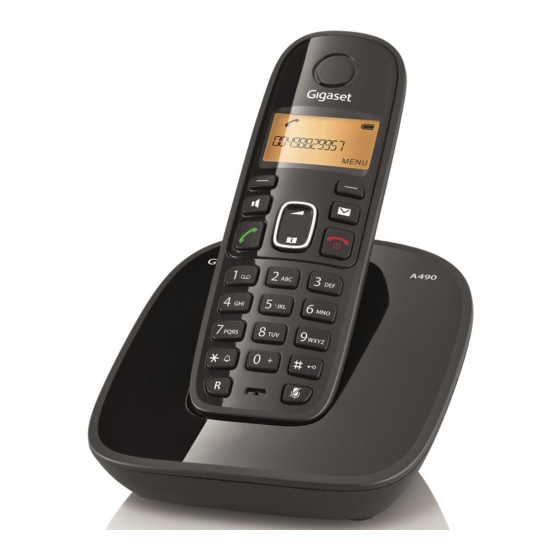
The handset at a glance
1 Charge status of the batteries
2 Answer machine icon (A495 only)
3 Display keys
4 Message key
Flashes: new messages received
t
to activate the menu for setting
5 Use
the volume
h
6 A390:
Directory key
A490/A495:
7 Control key (u)
8 Talk key
r
9
Directory key
(press down on the control key)
10 End call key and
On/Off key
11 Ringer tone on/off
(press and hold in idle status)
12 Keypad lock on/off (press and hold)
13 Recall key
- Consultation call (flash)
- Dialling pause (press and hold)
14 Microphone
15 "Microphone off" key
Please note
Charge the handset for
18 hours before first use.
Display key on handset:
Pressing a key launches the function that appears above that key in the display.
Display
Function when pressed
INT
Call other registered handsets
MENU
Open main/submenu (see Menu tree
"
Go back one menu level.
U
Scroll up/down or adjust volume with u.
T
Move cursor to left/right with u.
˜
Backspace deletes one character at a time.
OK
Confirm menu function or save entry.
n
Handsfree key
1
1
2
11.12.
INT
3
4
5
6
7
8
9
10
11
12
13
14
15
¢
¢
page 14.
page 19).
± U
11:56
MENU
Advertisement
Table of Contents

Related Manuals for Gigaset A390


Summary of Contents for Gigaset A390
- Page 1 Gigaset A390/A490/A495 The handset at a glance 1 Charge status of the batteries 2 Answer machine icon (A495 only) 3 Display keys 4 Message key ± U Flashes: new messages received 11.12. 11:56 to activate the menu for setting 5 Use...
-
Page 2: Reduced Energy Consumption
(press twice). 7 Skip to next message. ECO WDCT You are helping to protect the environment with your Gigaset A390/A490/A495. Reduced energy consumption Your telephone has an energy-saving adapter plug and uses less energy. -
Page 3: Safety Precautions
Never use a dry cloth. This can ard, e.g. paint shops. cause static. ƒ If you give your Gigaset to someone Contact with liquid else, make sure you also give them the user guide. If the handset should come into contact... -
Page 4: First Steps
You can also mount the base station and charging cradle on the wall. Please note: ◆ Never expose the telephone to the influence of heat sources, direct sunlight or other electrical devices. ◆ Protect your Gigaset from moisture, dust, corrosive liquids and vapours. -
Page 5: Setting Up The Handset For Use
Inserting the batteries and closing the battery cover Warning ¢ Use only rechargeable batteries recommended by Gigaset Communications GmbH ( page 16). Never use a conventional (non-rechargeable) battery or other battery types as this could result in significant health risks and personal injury. - Page 6 ¤ Insert the batteries the right way round. The polarity is indicated in/on the battery compartment. ¤ Slide the battery cover from bot- tom up onto the casing until it clicks into place. ¤ If you need to open the bat- tery cover, for instance to replace the batteries, press the ribbing at the top of the...
- Page 7 Initial charging and discharging of the batteries The correct charge level can only be displayed if the batteries are first fully charged and discharged. ¤ Place the handset in the base station or charging cradle for 18 h 18 hours. ¤...
-
Page 8: Activating/Deactivating The Handset
Display in idle status Once the phone is registered and the time set, the idle ± display is shown as in this example. The internal number of the handset is shown in the 11.12. 11:56 upper left corner. MENU If the answer machine is activated (A495), the answer ±... -
Page 9: Making Calls
Directory set the volume. Calling Line Identification To open the directory: press (A390 only). When you get a call, the caller's number will You can save up to 80 phone numbers be displayed on your handset; the caller's (max. -
Page 10: Storing Additional Entries In The Directory
Storing additional entries in the Using shortcut keys directory ¢ ¢ ¢ You can assign directory entries to the keys ¢ ¢ MENU New Entry ¢ ¢ ¢ ¢ enter number) ¢ ¢ ¢ (select entry) MENU enter name) Shortcut (press the key you want to assign the entry to) When storing a number you also have to... -
Page 11: Calls List/Answer Machine (Network Mailbox) List
Calls list/answer machine Using other functions ¢ (network mailbox) list (select entry) MENU The following functions can be selected The message key flashes as soon as a new with entry appears in the calls list/answer Delete Entry Delete current entry. machine list. -
Page 12: Operating The Answer Machine (A495)
Opening the answer machine list Recording your own announcement ¢ ¢ ¢ ¢ ¢ ¢ VoiceMail 01+02 MENU VoiceMail ¢ ¢ ¢ Announcements If you have new messages, playback will ¢ Rec announce Speak after OK start with the first new message, otherwise with the first old message. -
Page 13: Locating A Handset ("Paging")
Setting up the answer Calling the answer machine and playing back messages machine ¢ (Dial your own number) while listening The answer machine has already been pre- to your announcement: press the key and set at the factory. Make individual settings enter the system PIN using the handset. -
Page 14: De-Registering Handsets
Registering handsets Using several handsets You can register up to four handsets on Making internal calls your base station (Gigaset A39H/A49H rec- ommended). Internal calls are free calls to other handsets that are registered to the same base station. Please note To make a call to other handsets, press ¢... -
Page 15: Setting The Alarm Clock
Internal listening in (conference) Changing the display language To listen in to an existing external call, press ¢ ¢ ¢ and hold the key. You can listen in to the ¢ ¢ ¢ ¢ call. All participants hear a signal tone. MENU Settings Handset... -
Page 16: Entering Letters/Characters
Hardware reset Specifications Disconnect the power cord from the base ¢ station. Hold down the registration/paging Recommended batteries key ( page 1) on the base station while Technology: Nickel-metal-hydride reconnecting the power cable to the base (NiMH) station. Release the key after approximately Size: AAA (Micro, HR03) 5 seconds. - Page 17 Questions and answers If you have any queries about the use of your telephone, visit our website at www.gigaset.com/service for 24-hour support. The table below con- tains a list of common problems and possi- ble solutions. Problem Cause Solution Nothing...
-
Page 18: Customer Service & Assistance
Downloads for user manuals and current software updates ◆ E-mail contact to our customer service Please note that if the Gigaset product is not sold by authorized dealers in the national territory the product may not be fully compatible with the national tele- phone network. - Page 19 MENU Alarm Clock Activation Activating/deactivating the alarm clock Wake-up time Input format: HHMM Audio Settings Handset Volume 3 levels available (A390) Handset Volume Earpiece 3 levels available (A490) Speaker 5 levels available (A490) Ringer Volume 5 levels + "Crescendo" available...
- Page 20 Message Length Maximum No limit per call (overall recording time up to 12 minutes ). 1 Minute Limit the recording time to 1 minute per call. 2 Minutes Limit the recording time to 2 minutes per call. 3 Minutes Limit the recording time to 3 minutes per call. Ring Delay Immediately Call is answered immediately.
- Page 21 Issued by Gigaset Communications GmbH Frankenstr. 2a D-46395 Bocholt © Gigaset Communications GmbH 2012 All rights reserved. Subject to availability. Rights of modification reserved. www.gigaset.com A31008-M2200-U501-6-3P19...