Viper 50000398 User Manual
Hide thumbs
Also See for 50000398:
- Quick start manual (263 pages) ,
- Quick start manual (356 pages) ,
- User manual (31 pages)

Related Manuals for Viper 50000398


Summary of Contents for Viper 50000398
-
Page 1: User Manual
AS5160 / AS5160T USER MANUAL Model: 50000398 / 50000403 Company information: VS10008-EU www.vipercleaning.eu Rev 02 info-eu@vipercleaning.com 8 July 2016... -
Page 2: Table Of Contents
USER MANUAL ENGLISH TABLE OF CONTENTS INTRODUCTION ..........................2 GUIDE PURPOSE AND CONTENTS ........................2 HOW TO KEEP THIS GUIDE ........................... 2 DECLARATION OF CONFORMITY ........................2 ACCESSORIES AND MAINTENANCE ........................2 CHANGE AND IMPROVEMENT ..........................2 SCOPE OF APPLICATION............................2 MACHINE IDENTIFICATION DATA ........................ -
Page 3: Introduction
USER MANUAL ENGLISH INTRODUCTION CAUTION! Some general and detailed machine information is not included in this guide. ® ® Please refer to Instruction for Use Manual on supplied CD-ROM reading by Adobe Reader NOTE The numbers in brackets refer to the components shown in Machine Description chapter. GUIDE PURPOSE AND CONTENTS The purpose of this Quick Start Guide is to provide the operator with all basic information to use the machine properly. -
Page 4: Transport And Unpacking
USER MANUAL ENGLISH TRANSPORT AND UNPACKING When the carrier delivers the machine, make sure the packaging and machine are both whole and undamaged. If any damaged, make the carrier know the damage and before accepting the goods, reserve the right in compensation of the damage. -
Page 5: General Safety Instruction
USER MANUAL ENGLISH GENERAL SAFETY INSTRUCTION Specific warnings and cautions to inform about potential damages to people and machine are shown below. DANGER! This machine must be operated by trained and authorized personnel according to guidance of the • manual. Before performing any cleaning, maintenance, repair or replacement procedure, read all the •... - Page 6 USER MANUAL ENGLISH Do not lean liquid containers on the machine, use the relevant can holder. • To avoid damaging the floor, do not allow the brush/pad to operate while the machine is stationary. • In case of fire, use a dry powder fire extinguisher. Do not use liquid fire extinguishers. •...
-
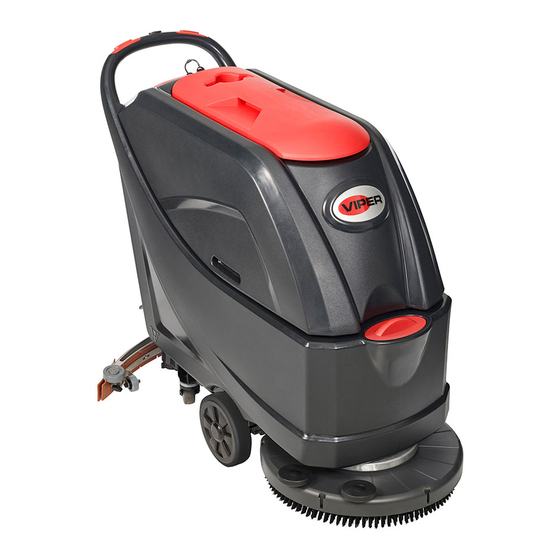
Page 7: Machine Description
USER MANUAL ENGLISH MACHINE DESCRIPTION MACHINE STRUCTURE (as shown in Figure 1) 1. Recovery tank lid 19. Front wheels on fixed axle (A). 2. Can holder Driving wheels (B) 3. Handlebar 20. Brush/pad-holder 4. Control panel 21. Brush/pad-holder deck 5. Serial number plate/technical data 22. -
Page 8: Control Panel
USER MANUAL ENGLISH CONTROL PANEL (as shown in Figure 2) 33. Machine backward switch (B) 49. Charging green LED 34. Safe switch 50. Security cover of charging jack 35. Ignition key (0 - I) 51. Overload protector of brush 36. Discharged battery warning light (red) 52. -
Page 9: Technical Parameters
USER MANUAL ENGLISH NOTE When charging, if the yellow LED (48) of charger is on, it may be caused by: Battery and charger does not match, battery is not connected well, or output is short-circuited. The red LED of charger flashing may be caused by charger internal short circuit. TECHNICAL PARAMETERS MODEL Units... -
Page 10: Wiring Diagram
USER MANUAL ENGLISH WIRING DIAGRAM (MACHINE WITHOUT TRACTION) RD-BK RD-BK BN-BK BU-BK COMPONENTS WIRE ROD 24V BATTERIES RED/6AWG BATTERY CHARGER RED/10AWG CONTROL PANEL BOARD RED/20AWG ELECTROMAGNETIC SWITCH 24V(BRUSH MOTOR) BLACK/6AWG RELAY 24V(VACUUM MOTOR) BLACK/10AWG LOW POWER CIRCUIT FUSE BLACK/12AWG CIRCUIT BREAKER(BRUSH MOTOR) BLACK/20AWG BRUSH RELEASE FUSE BLACK/16AWG... - Page 11 USER MANUAL ENGLISH WIRING DIAGRAM (MACHINE WITH TRACTION) COMPONENTS WIRE ROD 24V BATTERIES RED/6AWG BATTERY CHARGER RED/10AWG CONTROL PANEL BOARD RED/20AWG ELECTRONIC BOARD(TRACTION SYSTEM) BLACK/6AWG ELECTROMAGNETIC SWITCH 24V(BRUSH MOTOR) BLACK/10AWG RELAY 24V(VACUUM MOTOR) BLACK/12AWG RELAY 24V(TRACTION SYSTEM) BLACK/14AWG LOW POWER CIRCUIT FUSE BLACK/20AWG CIRCUIT BREAKER(BRUSH MOTOR) BLACK/16AWG...
-
Page 12: Operating Guide
USER MANUAL ENGLISH OPERATING GUIDE WARNING! On some points of the machine there are some adhesive plates indicating: - - - - DANGER - - - - WARNING - - - - CAUTION - - - - CONSULTATION While reading this Manual, the operator must pay particular attention to the symbols shown on the plates. Do not cover these plates for any reason and immediately replace them if damaged. -
Page 13: Battery Installation And Battery Typesetting (Wet Or Gel/ Agm)
USER MANUAL ENGLISH BATTERY INSTALLATION AND BATTERY TYPESETTING (WET OR GEL/ AGM) According to the type of batteries (WET or GEL/AGM), set the machine and electronic board of the battery charger as follows: WET BATTERIES (NOTE: Turn the DIP switch 1 and 2 both to “OFF”. -
Page 14: Brush/Pad-Holder Installation And Uninstallation
USER MANUAL ENGLISH BRUSH/PAD-HOLDER INSTALLATION AND UNINSTALLATION NOTE Install either the brush (A, Figure 5) or pad-holder (B and C, Figure5) according to the type of floor to be cleaned. CAUTION Before installation or uninstallation of brush or pad-holder, make sure all the switches on ma- chine are in off position and lifting up the squeegee from the floor. -
Page 15: Solution Or Washing Water Tank Filling
USER MANUAL ENGLISH SOLUTION OR WASHING WATER TANK FILLING Open the water inlet cover (B, Figure 7). Filling water or solution suitable for work performance through the water inlet with filter. The solution temperature must not exceed +104F (+40°C). Do not overfill the tank, refer to water level indicator (H) for the water volume. -
Page 16: Machine Operation (Scrubbering And Drying)
USER MANUAL ENGLISH Stopping the machine Stop the machine by using the handlebar (E) (only for machine without traction). Stop the machine by releasing the switches (F) (only for machine with traction). 10. Stop the brushes and the vacuum system by pressing the switch (M). The vacuum system stops after a few seconds. -
Page 17: Tank Emptying
USER MANUAL ENGLISH Battery discharge during operation C B A Until the green warning light (A, Figure 10) stays on, the batteries allow the machine to work normally. When the green warning light (A) turns off, and the yellow warning light (B) turns on, it is advisable to charge the batteries, because the remaining charge will last for a few minutes (depending on battery characteristics and work to be... -
Page 18: After Using The Machine
USER MANUAL ENGLISH CAUTION! When draining the wastewater, the vacuum tube for waste must be folded (A, Figure 12) and lowered to a lower position (B, Figure 12), and then open the lid of the vacuum tube for waste to drain the water. Do not make the outlet of the vacuum tube for waste face up- ward to drain the water vertically. -
Page 19: Maintenance
USER MANUAL ENGLISH MAINTENANCE WARNING! Maintenance procedures must be performed after the machine is turned off and the battery charger cable is disconnected. In addition, carefully read the safety chapters in the manual. All scheduled or extraordinary maintenance procedures must be performed by qualified personnel or an authorized Service Center. -
Page 20: Battery Charging
USER MANUAL ENGLISH BATTERY CHARGING NOTE Charge the batteries when the yellow (F, Figure 14) or red warning light (G) turns on, or when finishing cleaning. CAUTION! Keeping the batteries charged make their life last longer. CAUTION! When the batteries are discharged, charge them as soon as possible, as that condition makes their life shorter. -
Page 21: Brush/Pad Cleaning
USER MANUAL ENGLISH Battery charging with battery charger installed on the machine Connect the battery charger cable (A, Figure 15) to the electrical mains (G) (the electrical mains voltage and frequency must be compatible with the battery charger values shown on the machine serial number plate (F). When the battery charger is connected to the electrical mains, all machine functions are automatically cut off. -
Page 22: Squeegee Cleaning
USER MANUAL ENGLISH SQUEEGEE CLEANING NOTE The squeegee must be clean and its blades must be in good conditions in order to get a good drying. CAUTION! It is advisable to wear protective gloves when cleaning the squeegee because there may be sharp debris. -
Page 23: Squeegee Blade Check And Replacement
USER MANUAL ENGLISH SQUEEGEE BLADE CHECK AND REPLACEMENT Clean the steel or the aluminum squeegee, as shown in the previous paragraph. Check that the edges (E, Figure 20) of the front blade (C) and the edges (F) of the rear blade (D) lay down on the same level, along their length;... -
Page 24: Tank And Vacuum Grid With Float Cleaning, And Cover Gasket Check
USER MANUAL ENGLISH TANK AND VACUUM GRID WITH FLOAT CLEANING, AND COVER GASKET CHECK Drive the machine on a level floor. Ensure that the machine is off and the ignition key (54) has been removed. Turn the recovery tank lid (A, Figure 21) 90 degree position where it can be took off from the tank, and then take down the float ball filter (P) from the tank. -
Page 25: Machine Working Hour Check
USER MANUAL ENGLISH MACHINE WORKING HOUR CHECK Turn the ignition key (A, Figure 22) to "I". Press the switch (B), the hour meter (C) begins to work and it at the same time shows the total number of working hours (scrubbing/drying) performed by the machine. Release the switch (B). -
Page 26: Accessories/Options
USER MANUAL ENGLISH ACCESSORIES/OPTIONS In addition to the standard components, the machine can be equipped with the following accessories/options, according to the machine specific use: For further information concerning the above-mentioned optional accessories, contact an authorized Retailer. ACCESSORIES/OPTIONS See “Parts List” section GEL/AGM batteries Pads of different materials TROUBLESHOOTING... -
Page 27: Ec Declaration Of Conformity
Address: Liang Bian Village, Liao Bu town, Dongguan City, Guangdong Province, China Business name: Viper Cleaning Equipment Co., Ltd Name and address of person/Company authorised to compile the technical file established in the EU Community: herewith declare that the following machinery:... - Page 28 Company information: www.vipercleaning.eu info-eu@vipercleaning.com...