Webasto DBW 2010 Workshop Manual
Hide thumbs
Also See for DBW 2010:
- Operating and servicing manual (88 pages) ,
- Service and repair manual (72 pages) ,
- Operating instructions manual (40 pages)

Related Manuals for Webasto DBW 2010


Summary of Contents for Webasto DBW 2010
-
Page 1: Water Heaters
Visit www.butlertechnik.com for more technical information and downloads. Water Heaters Workshop Manual DBW 2010 DBW 2016 03/2003 www.butlertechnik.com... - Page 2 Only genuine Webasto parts may be used. See also Webasto air and water heaters accessories catalogue. NEVER try to install or repair Webasto heating or cooling systems if you have not completed a Webasto training course, you do not have the necessary technical skills and you do not have the technical documentation, tools and equipment available to ensure that you can complete the installation and repair work properly.
- Page 3 Visit www.butlertechnik.com for more technical information and downloads. www.butlertechnik.com...
-
Page 4: Table Of Contents
Visit www.butlertechnik.com for more technical information and downloads. DBW 2010 / 2016 Table of Contents Table of Contents Introduction ..............101 Contents and purpose . - Page 5 Table of Contents DBW 2010 / 2016 Malfunction symptoms ..............504 5.4.1...
- Page 6 Visit www.butlertechnik.com for more technical information and downloads. DBW 2010 / 2016 Table of Contents Repair ................901 General information.
- Page 7 Automatic switching, DBW 2010 with 1563 control unit, 12 and 24 V ......
-
Page 8: Introduction
1.5.1 General safety precautions Throughout this manual, the signal words WARNING, IMPOR- There are type approvals for the DBW 2010 / 2016 water TANT and NOTE have the following meanings: heaters according to the directives ECE-R 10 (EMC) and ECE- R 122 (heater). -
Page 9: Statutory Regulations Governing Installation
Visit www.butlertechnik.com for more technical information and downloads. 1 Introduction DBW 2010 / 2016 Statutory regulations governing The heater may only be installed in motor vehicles or in inde- pendent heating systems with a minimum coolant quantity of installation 10 litres. - Page 10 Extraction of the combustion air from the vehicle passenger compartment is not permitted. Only caps may be used which comply with the standard DIN 73400. All fuel tanks offered in the Webasto accessories catalogue are suitable for a maximum operating pressure of 0.15 bar. www.butlertechnik.com...
-
Page 11: Suggestions For Improvement And Change
Visit www.butlertechnik.com for more technical information and downloads. 1 Introduction DBW 2010 / 2016 All fuel tanks offered in the Webasto accessories catalogue are individually subjected to a pressure test of at least 0.3 bar gauge pressure at the factory. -
Page 12: General Description
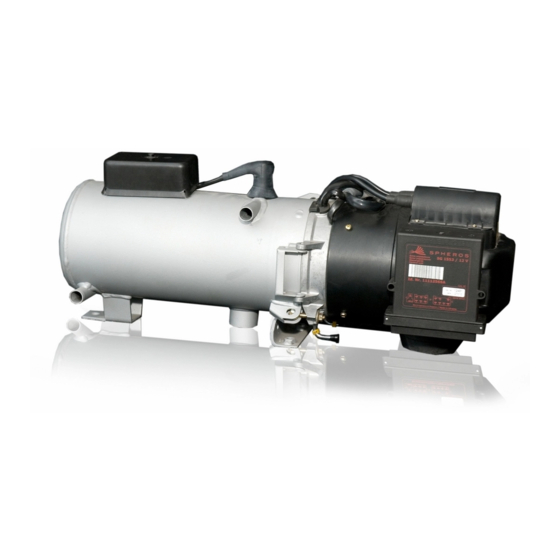
Visit www.butlertechnik.com for more technical information and downloads. DBW 2010 / 2016 2 General Description General Description The Webasto DBW 2010 and DBW 2016 water heaters are The DBW 2010 and DBW 2016 water heaters mainly consist used in conjunction with the original vehicle heating system –... -
Page 13: Fig. 201 Dbw 2010 Heaters
Ignition spark generator 10 Exhaust outlet Coolant, outlet 11 Control unit Control thermostat * Thermal fuse * Control thermostat * * for components installed in accordance with the Temperature limiter * heater variant Fan thermostat * Fig. 201 DBW 2010 heaters www.butlertechnik.com... -
Page 14: Fig. 202 Dbw 2010 Heaters With Sensor Technology
Burner head Exhaust outlet Ignition spark generator Control unit Coolant, outlet Temperature sensor * Thermal fuse * * for components installed in accordance with the Temperature limiter * heater variant Heat exchanger Fig. 202 DBW 2010 heaters with sensor technology www.butlertechnik.com... -
Page 15: Fig. 203 Dbw 2016 Standard / Rail Heaters
Visit www.butlertechnik.com for more technical information and downloads. 2 General Description DBW 2010 / 2016 Burner head Ignition spark generator Coolant, outlet Heat exchanger Exhaust outlet Control unit Fig. 203 DBW 2016 Standard / Rail heaters www.butlertechnik.com... -
Page 16: Fig. 204 Combustion Air Fan
Visit www.butlertechnik.com for more technical information and downloads. DBW 2010 / 2016 2 General Description Combustion air fan Fuel pump The combustion air fan transports the air required for com- The fuel supply is provided with the fuel pump. The pump is bustion out of the combustion air inlet into the combustion driven by the motor of the combustion air fan via a coupling. -
Page 17: Fig. 208 Heat Exchanger
Visit www.butlertechnik.com for more technical information and downloads. 2 General Description DBW 2010 / 2016 Heat exchanger Control unit The heat generated in the heat exchanger by combustion is The control unit is the central component and ensures the transferred to the coolant circuit. -
Page 18: Fig. 212 Flame Monitor Standard Device
Visit www.butlertechnik.com for more technical information and downloads. DBW 2010 / 2016 2 General Description Flame monitor Ignition spark generator with ignition electrodes The flame state is monitored during the entire combustion operation with the flame monitor. The flame monitor is a... -
Page 19: Fig. 216 Temperature Limiter/Thermal Fuse Only For Heaters With 1563/1564 Control Unit
Visit www.butlertechnik.com for more technical information and downloads. 2 General Description DBW 2010 / 2016 2.10 Temperature limiter/thermal fuse 2.11 Control thermostat Temperature limiter Control thermostat on heater The temperature limiter (bi-metal) protects the heater against The control thermostat assumes the control operation after impermissibly high operating temperatures. -
Page 20: Fig. 218 External Control Thermostat
30 °C and 40 °C. The thermostat closes at 40 ± 3 °C and opens at Fig. 221 U 4840, suitable for DBW 2010 and DBW 2016 30 ± 5 °C. Fig. 219 Fan thermostat on heater Fig. -
Page 21: Description Of Operation
(heaters with 1553 control unit) or circulation pump remains in operation in the control break – with temperature sensor (DBW 2010 heaters with sensor and the operating indicator lamp lights up. If the temperature technology with 1563/1564 control unit). -
Page 22: Fig. 301 Operating Sequence (Heaters With 1553 Control Unit)
Visit www.butlertechnik.com for more technical information and downloads. DBW 2010 / 2016 3 Description of Operation Fault switch-off only for heaters with sensor technology with 1563/64 control unit – 12 seconds after start-up due to detection of extraneous light or in case of undervoltage –... -
Page 23: Fig. 302 Operating Sequence (Heaters With 1563/1564 Control Unit)
Visit www.butlertechnik.com for more technical information and downloads. 3 Description of Operation DBW 2010 / 2016 (A) Switch-on indicator (B) Circulation pump (C) Combustion air fan (D) Ignition spark generator Solenoid valve Flame monitor Switch-on Run-up Extraneous light query Pre-ignition... -
Page 24: Technical Data
12 V (DBW 2010) or 24 V (DBW 2010 / Mixing ratio for separate fuel tank DBW 2016) power supply. The components temperature lim-... - Page 25 Visit www.butlertechnik.com for more technical information and downloads. 4 Technical Data DBW 2010 / 2016 Circulation pump U 4840 Volume flow rate [l/h] 1,600 (against 0.1 bar) Rated voltage 12 or 24 Operating voltage range 9 to 15 or 16 to 30...
-
Page 26: Fig. 501 General Error Symptoms
Visit www.butlertechnik.com for more technical information and downloads. DBW 2010 / 2016 5 Troubleshooting Troubleshooting General information This section describes troubleshooting on the DBW 2010/ IMPORTANT 2016/2016 Rail heaters. Error detection is generally limited to the localisation of the defective components. - Page 27 Visit www.butlertechnik.com for more technical information and downloads. 5 Troubleshooting DBW 2010 / 2016 Error symptom Possible cause Malfunction in water system Heater shuts off, as heat exchangers (heater and vehicle) do Flow rate insufficient, as not give off sufficient heat.
-
Page 28: Fig. 502 Troubleshooting - Rapid Diagnosis
Visit www.butlertechnik.com for more technical information and downloads. DBW 2010 / 2016 5 Troubleshooting Troubleshooting – rapid diagnosis Heater types: All heaters Only heaters with sensor technology with 1563/1564 control unit Description of malfunction Check and repair or replace if necessary After switching on –... -
Page 29: Malfunction Symptoms
Visit www.butlertechnik.com for more technical information and downloads. 5 Troubleshooting DBW 2010 / 2016 Malfunction symptoms 5.4.1 Heater does not start up when switched on Is voltage connected Are both fuses F2/ Does the control Does the control ther- Control thermo-... -
Page 30: When Switched On
Visit www.butlertechnik.com for more technical information and downloads. DBW 2010 / 2016 5 Troubleshooting 5.4.2 Heater switches into fault mode repeatedly after approx. 30 s (20 s with 1563/1564 control unit) when switched on Has thermal fuse F1 Is the buzzing of... -
Page 31: Heater Does Not Start Until After Several Starting Attempts
Visit www.butlertechnik.com for more technical information and downloads. 5 Troubleshooting DBW 2010 / 2016 5.4.3 Heater does not start until after several starting attempts Does smoke exit from the Fuel level has dropped Fuel pump defective; exhaust pipe during the while heater was replace. -
Page 32: Heater Emits Black Smoke
Visit www.butlertechnik.com for more technical information and downloads. DBW 2010 / 2016 5 Troubleshooting 5.4.5 Heater emits black smoke Is the combustion-air intake Are the gas paths of Does vacuum or gauge Motor speed (see Sec- pipe or the exhaust connec-... -
Page 33: Heater Emits White Smoke
Visit www.butlertechnik.com for more technical information and downloads. 5 Troubleshooting DBW 2010 / 2016 5.4.6 Heater emits white smoke Does the heater smoke Does the heater emit Does the heater emit for longer than 20 s? smoke during opera- smoke after being... -
Page 34: Fig. 601
500 m above sea level 6.2.1 Adjusting CO content Fig. 601 setting DBW 2010 (nozzle: 0.3 gph) A change in the combustion air quantity set at the factory is permissible and can be achieved by turning the adjustment ring. -
Page 35: Fig. 603
Visit www.butlertechnik.com for more technical information and downloads. 6 Operating Tests DBW 2010 / 2016 NOTE The CO setting is dependent on the fuel (viscosity) and the geodetic altitude (0.1 % per 100 m). If the CO value cannot be properly set, proceed as follows: –... -
Page 36: Fig. 605 Resistance Test Of Temperature Sensor
Visit www.butlertechnik.com for more technical information and downloads. DBW 2010 / 2016 6 Operating Tests Checking individual components 6.3.2 Resistance test of flame monitor NOTE 6.3.1 Resistance test of temperature sensor (only The glass element of the flame monitor and the inspection heaters with 1563/1564 control unit) window of the disc (see illustration) must be cleaned if soiled. -
Page 37: Fig. 607 Checking Flame Monitor With 1563/1564 Control Unit
Visit www.butlertechnik.com for more technical information and downloads. 6 Operating Tests DBW 2010 / 2016 6.3.3 Checking and setting ignition electrodes 6.3.2.2 Checking flame monitor with 1563/1564 control unit NOTE When installed • The insulating elements of the ignition electrodes must –... -
Page 38: Fig. 609 Fuel Pump Pressure
IMPORTANT A tester is required for testing. A tester (display range 0 to Do not charge ignition spark generator without ignition elec- 15 bar) can be purchased from your authorised Webasto trodes with voltage. dealer. Test IMPORTANT The ignition spark generator must be removed. -
Page 39: Checking Burner Motor
Visit www.butlertechnik.com for more technical information and downloads. 6 Operating Tests DBW 2010 / 2016 6.3.6 Checking burner motor 6.3.7 Checking solenoid valve NOTE NOTE The combustion air fan is checked when installed. If the set- A leaky valve seat of the solenoid valve is indicated by longer point states are not reached, then the fan motor must be continued smoking of the heater in run-on. -
Page 40: Circuit Diagrams
DBW 2010 / 2016 7 Circuit Diagrams Circuit Diagrams The wiring diagrams or application examples (Fig. 701 to Fig. 705) show the possible circuits of the DBW 2010, DBW 2016 and DBW 2016 Railheaters. Cable cross-sections Cable colours < 7.5 m 7.5 m–15... - Page 41 Version with temperature limiter and thermal fuse Version with thermal fuse and fan thermostat Version with thermal fuse, temperature limiter and fan thermostat Fig. 701 System wiring diagram for DBW 2010 with 1553 control unit and switch, 12 and 24 V www.butlertechnik.com...
- Page 42 Visit www.butlertechnik.com for more technical information and downloads. DBW 2010 / 2016 7 Circuit Diagrams Version with thermal fuse only Version with temperature limiter and thermal fuse Version with thermal fuse and fan thermostat Version with thermal fuse, temperature limiter and fan thermostat Fig.
-
Page 43: Fig. 703 System Wiring Diagram Dbw 2010 With 1553 Control Unit, 12 And 24 V, Switch, Nozzle Holder
7 Circuit Diagrams DBW 2010 / 2016 Fig. 703 System wiring diagram DBW 2010 with 1553 control unit, 12 and 24 V, switch, nozzle holder pre-heating unit and altitude control Fig. 704 System wiring diagram DBW 2016 with 1553 control unit, 24 V, switch, nozzle holder pre-heating unit and altitude control www.butlertechnik.com... - Page 44 Visit www.butlertechnik.com for more technical information and downloads. DBW 2010 / 2016 7 Circuit Diagrams Legend Fig. 701 to Fig. 704: Item Description Comment Heater Not earthed Control unit SG 1553 Ignition spark generator Thermostat Control thermostat (internal) Thermostat Fan thermostat...
- Page 45 Visit www.butlertechnik.com for more technical information and downloads. 7 Circuit Diagrams DBW 2010 / 2016 Fig. 705 Automatic switching, DBW 2010 with 1563 control unit, 12 and 24 V www.butlertechnik.com...
- Page 46 Visit www.butlertechnik.com for more technical information and downloads. DBW 2010 / 2016 7 Circuit Diagrams Legend Fig. 705: Item Description Comment Heater Not earthed Control unit SG 1563 Flame monitor Ensure proper polarity Temperature sensor Polarity as desired Fan thermostat...
-
Page 47: Work On Vehicle
A temperature of 85 °C must not be exceeded in the vicinity • The heater should be checked by an authorised Webasto of the heater under any circumstances (e.g. during painting dealer at regular intervals, however at the latest at the work on the vehicle). -
Page 48: Fig. 801 Swinging Burner Head Away And In
The cotter pin can be positioned on the other side in accordance with the swinging direction of the burner head. • The burner head of the DBW 2010 / DBW 2016 heat- ers is shown here. Fig. 801 Swinging burner head away and in www.butlertechnik.com... -
Page 49: Visual Inspections And Installation Instructions
DBW 2010 / 2016 Visual inspections and installation If fuel hoses are used, the hoses supplied or offered by Webasto must always be used. If other fuel hoses are used, instructions they must at least comply with DIN 73379. Fuel hoses must not be kinked or twisted and must be secured with clamps at distances of approx. -
Page 50: Fig. 802 Installation Example For Heater In Bus
Visit www.butlertechnik.com for more technical information and downloads. DBW 2010 / 2016 8 Servicing Work Water heating circuit – wall radiator Run-up Return line Wall radiator with fan Heater Circulation pump Motor vehicle engine Driver's seat heating Control element Fig. 802 Installation example for heater in bus... -
Page 51: Fig. 803 Notification Sign
Webasto. 8.6.2.2 Fuel filter 8.6.4 Exhaust pipe A fuel filter supplied or approved by Webasto must be installed. Installation should be vertical if possible, while the IMPORTANT The statutory regulations for the installation must be direction of flow is horizontal. -
Page 52: Removal And Installation
Close water valves if present. – Inside diameter: 5. Loosen the hose clamps on the coolant hoses, pull off the DBW 2010 / 2016 = 38 mm hoses and seal off with blind plugs. – Maximum permissible line length: 5 m 6. -
Page 53: Replacing Thermal Fuse
Visit www.butlertechnik.com for more technical information and downloads. 8 Servicing Work DBW 2010 / 2016 8.7.4 Replacing thermal fuse 8.7.9 Replacing ignition spark generator NOTE NOTE The procedure for replacing the thermal fuse with the heater The procedure for replacing the ignition spark generator with installed or removed is identical. -
Page 54: Start-Up
Visit www.butlertechnik.com for more technical information and downloads. DBW 2010 / 2016 8 Servicing Work Start-up After the heater has been installed, the coolant circuit and the fuel supply system must be carefully bled. The specifica- tions of the vehicle manufacturer must be observed when doing so. -
Page 55: Repair
Visit www.butlertechnik.com for more technical information and downloads. 9 Repair DBW 2010 / 2016 Repair General information This section describes the repair work that can be carried out on the heaters when they are installed. Any further disman- tling will invalidate the warranty. -
Page 56: Fig. 901 Visual Inspection On Combustion-Air Rotor
Visit www.butlertechnik.com for more technical information and downloads. DBW 2010 / 2016 9 Repair 9.1.1 Works on components when dismantled DBW 2010 / 2016 IMPORTANT All sealing elements between the dismantled components must always be removed and replaced. 9.1.1.1 General visual inspection •... -
Page 57: Fig. 902 Installing Nozzle Holder Pre-Heating Unit With 1553 Control Unit
9 Repair DBW 2010 / 2016 9.1.2.1 Installation of nozzle holder pre-heating unit Following retrofitting, the following bags of spare parts are for DBW 2010 / DBW 2016 with 1553 control provided for the heaters specified above: unit • 12 V heaters with 1553 control unit, General information Order No. -
Page 58: Fig. 903 Retrofitting Dbw 2010 / Dbw 2016
NOTE The polarity is irrelevant in the following work step. NOTE On DBW 2010 / DBW 2016 heaters, the washer and the nut 7. Engage tab receptacle for heating cartridge connection in the retrofit kit are not required. in 2-pin socket housing accordingly. -
Page 59: Fig. 904 Electrical Connection
Visit www.butlertechnik.com for more technical information and downloads. 9 Repair DBW 2010 / 2016 Item Description Comment Heater Control unit SG 1553 Plug connector, 6-pin Thermostat for nozzle holder pre-heating unit 10 A fuse Flat fuse SAE J 1284 20 A fuse Flat fuse SAE J 1284 16 A (12 V);... -
Page 60: Fig. 905 Installing Nozzle Holder Pre-Heating Unit With 1563/1564 Control Unit
DBW 2010 / 2016 9 Repair 9.1.2.2 Installation of nozzle holder pre-heating unit Following retrofitting, the following bags of spare parts are for DBW 2010 / DBW 2016 with 1563/1564 provided for the heaters specified above: control unit • 24 V heaters with 1563/1564 control unit, Order No. 968... -
Page 61: Fig. 906 Retrofitting Dbw 2010
7. Engage tab receptacle for heating cartridge connection in 2-pin socket housing accordingly. NOTE On DBW 2010 heaters, the washer and the nut in the retrofit NOTE kit are not required. Route wiring harness (1) behind solenoid valve and guide to outside via a rubber grommet with 2-pin socket housing. -
Page 62: Fig. 907 Electrical Connection
Visit www.butlertechnik.com for more technical information and downloads. DBW 2010 / 2016 9 Repair Item Description Comment Heater Control unit SG 1563/1564 Plug connector, 6-pin Thermostat for nozzle holder pre-heating unit Fuse Flat fuse SAE J 1284 Fuse Flat fuse SAE J 1284 16 A (12 V);... -
Page 63: Replacing Thermal Fuse
Visit www.butlertechnik.com for more technical information and downloads. 9 Repair DBW 2010 / 2016 Dismantling and assembling 2. Tighten temperature sensor (11) to 20 + 5 Nm. 3. Make the electrical connection. 9.2.1 Replacing temperature limiter 9.2.3 Replacing thermal fuse... -
Page 64: Fig. 908 Replacing Temperature Limiter, Temperature Sensor, Thermal Fuse, Fusible Link And Control Thermostat
Visit www.butlertechnik.com for more technical information and downloads. DBW 2010 / 2016 9 Repair DBW 2010 / DBW 2016 DBW 2010 Control thermostat Terminal block Protective cap Angle bracket Screw plug Thermal fusible link Temperature limiter Fan thermostat 10 Heat exchanger... -
Page 65: Replacing Fan Thermostat
Visit www.butlertechnik.com for more technical information and downloads. 9 Repair DBW 2010 / 2016 9.2.5 Replacing fan thermostat 9.2.7.2 Installation 1. Guide 1563/1564 control unit (3, Fig. 909) or 1553 con- 9.2.5.1 Removal trol unit (1) with holding clamp (2) laterally into guide of protective cap (4) and push in up to stop. -
Page 66: Fig. 909 Replacing Control Unit
NOTE • The cotter pin can be positioned on the other side in accordance with the swinging direction of the burner head. • The burner head of the DBW 2010 heaters is shown here. Fig. 910 Replacing burner head www.butlertechnik.com... -
Page 67: Fig. 911 Replacing Motor
Screw (4) 15 Cable tie Ignition spark generator 16 Motor Ignition cable (2) 17 Screw (4) Retaining clip (2) Ignition electrode (2) NOTE The motor of the DBW 2010 / DBW 2016 heaters is shown here. Fig. 911 Replacing motor www.butlertechnik.com... -
Page 68: Replacing High-Pressure Nozzle
Visit www.butlertechnik.com for more technical information and downloads. DBW 2010 / 2016 9 Repair 9.2.10 Replacing high-pressure nozzle 5. Slide ignition cable onto ignition electrode (9) and secure with retaining clips (8). 6. Swing in burner head (see 8.5.1). 9.2.10.1 Removal 1. -
Page 69: Fig. 912 Replacing Nozzle Holder, Nozzle Holder Pre-Heating Unit, High-Pressure Nozzle And Flame Monitor
Visit www.butlertechnik.com for more technical information and downloads. 9 Repair DBW 2010 / 2016 NOTE The parts marked with * are not present with single-line fuel pumps. Solenoid valve 11 High-pressure nozzle 21 Washer (4) Heating cartridge 12 Disc 22 Banjo bolt (2) -
Page 70: Replacing Fuel Pump
Visit www.butlertechnik.com for more technical information and downloads. DBW 2010 / 2016 9 Repair 9.2.15 Replacing fuel pump 9.2.16.2 Installation 1. Place “o” ring (5, Fig. 914) on solenoid valve body (4). 9.2.15.1 Removal 2. Fit spring (7) and pin (6) in bolt (8). -
Page 71: Fig. 913 Replacing Thermostat Of Nozzle Holder Pre-Heating Unit
Visit www.butlertechnik.com for more technical information and downloads. 9 Repair DBW 2010 / 2016 Disc Serrated lock washer Thermostat DBW 2010 / DBW 2016 Screw Nozzle holder plate Fig. 913 Replacing thermostat of nozzle holder pre-heating unit Washer Spring Solenoid valve head... -
Page 72: Fig. 915 Replacing Combustion Chamber And Heat Exchanger
NOTE 2. Remove temperature limiter or thermal fuse (see 9.2.1.1 Work steps 3 to 6 only apply to the devices DBW 2010 / DBW or 9.2.3.1). 2016 without sensor technology. 3. Remove temperature sensor (see 9.2.2.1). -
Page 73: Replacing Nozzle Holder
Visit www.butlertechnik.com for more technical information and downloads. 9 Repair DBW 2010 / 2016 9.2.20 Replacing nozzle holder 9.2.21.2 Installation 1. Only DBW 2010/2016: 9.2.20.1 Removal Check gap at fan impeller (see 9.1.1.4) 2. Move combustion air fan (4, Fig. 916) into assembly posi- 1. -
Page 74: Fig. 916 Replacing Combustion Air Fan
Visit www.butlertechnik.com for more technical information and downloads. DBW 2010 / 2016 9 Repair DBW 2010 / DBW 2016 Screw (3) Combustion air fan Washer (3) Nozzle holder plate Motor carrier Screw (4) Fig. 916 Replacing combustion air fan www.butlertechnik.com... -
Page 75: Packing, Storage And Shipping
Packing, Storage and Shipping 10.1 General information If the heater or its components are sent to Webasto for test- ing or repair, it must be cleaned and packed in such a way that it is protected against damage during handling, trans- port and storage. -
Page 76: Periodic Heater Maintenance
The heater should be checked at regular intervals, however at shortened or extended accordingly. the latest at the start of the heating period (point in time of Please contact your responsible Webasto partner in corre- weather-dependent increased use of heater). sponding cases. - Page 77 Visit www.butlertechnik.com for more technical information and downloads. www.butlertechnik.com...
- Page 78 Visitors’ address: Friedrichshafener Str. 9 82205 Gilching Germany Internet: www.webasto.com Technical Extranet: http://dealers.webasto.com The telephone number of each country can be found in the Webasto service center leaflet or the website of the respective Webasto representative of your country. www.butlertechnik.com...