Table of Contents
Advertisement
Quick Links
How to Install the KDC 9520 AM/FM
Stereo Receiver/Cassette Tape
Player/CD Player
VOL
VOL
PR OG
COMP
ACT
DIGITA
L AUDIO
Welcome!
What you're holding in your hands is no ordinary owner's
manual. We've tried to make the instructions in this book
clear and easy to follow.
For your Jensen stereo to work right, it must be installed
correctly. This manual will show you how to install your new
stereo like a pro. It's a good idea to read all of these
instructions before you begin the installation. Most
installations are straightforward and can be handled by a
do-it-yourselfer with the right tools, patience, and the ability
to follow instructions. But, do-it-yourself installation isn't for
everyone. If you still don't feel confident after reading this
book, consider turning the installation job over to someone
better suited to it.
Warranty Service
If your Jensen stereo should ever require service, you will
need to have the original dated receipt. If you ever need to
return the unit for any reason, always include the receipt
with the product.
Technical Assistance
For technical assistance with the installation of the
KDC 9520, call 1-800-323-0221.
KDC9520 _EIN.p65
1
Installation
®
Contents
Installation ............................. 2
Before You Begin Installation ..... 2
Tools and Supplies Needed ....... 2
Speaker Requirements .............. 2
Installation .................................. 2
Installation .................................. 2
• Connections ........................ 3
• Crimp Connections ............. 3
• Upgrading your System ...... 3
Disconnect Battery ..................... 4
Remove Old Radio .................... 4
Wiring ....................................... 5
• Fuse Adapters .................... 5
Speaker Wire ...................... 5
Wiring with a Wiring Adapter ..... 6
Connect Wires ........................... 6
Wiring Color Codes .................... 6
Attach Wires to Radio ................ 6
Install Wiring Inside the Car ....... 6
Installation .................................. 7
Testing .................................... 8
Reconnect Battery ..................... 8
Test Power Wiring ...................... 8
View/Set the Clock ..................... 8
Test Antenna Connection ........... 8
Test Memory Wiring ................... 8
Test Speaker Connections ......... 9
Final Installation ....................... 10
Troubleshooting ................ 11
Reset Button ............................ 11
and Warranty ...................... 12
3/14/00, 1:27 PM
Advertisement
Table of Contents

Related Manuals for Jensen DC 9520 A


Summary of Contents for Jensen DC 9520 A
-
Page 1: Table Of Contents
Attach Wires to Radio ....6 clear and easy to follow. Install Wiring Inside the Car ..6 For your Jensen stereo to work right, it must be installed Wiring Diagram–Advanced correctly. This manual will show you how to install your new Installation ........ -
Page 2: Installation
KDC 9520. Dashboard Adapters The opening in your dashboard may not match the size of your Jensen radio. Purchase an adapter kit for your car. Antenna Adapter (GM cars) 1990 and newer GM cars have a small antenna connector. -
Page 3: Connections
Stretch electrical system sound better, great or INCREDIBLE! tape tightly over splice. Better Sound Install a Jensen tape deck or CD player like you’re doing now. High power units can make your existing speakers sound better and play louder. -
Page 4: Disconnect Battery
® KDC 9520 Disconnect Battery Before you begin, always disconnect the battery negative terminal. Remove Old Radio 1. Remove trim to expose chassis. 2. Remove the frame from the dashboard. 3. Unscrew screws from the sides. 4. Disconnect wiring harness and remove radio. KDC9520 _EIN.p65 3/14/00, 1:27 PM... -
Page 5: Wiring
No convenient power wire? Install a fuse Some speakers connect to the original adapter having a spade connector. radio with a single wire. Your Jensen radio requires two wires per speaker. You must locate each speaker and run a second wire Fuse from the speaker (–) terminal to the radio. -
Page 6: Wiring With A Wiring Adapter
Attach Wires to Radio Splice, crimp or solder the wires from the 1. After splicing the wiring adapter to the Jensen connector to the wiring adapter. Match Jensen connector, attach the connector to the wires according to the chart (below) and the back of the radio as shown. -
Page 7: Wiring Diagram-Advanced Installation
® KDC 9520 Wiring Diagram–Advanced Installation If you are installing new speakers or amplifiers or replacing an aftermarket installation, use this diagram. Back of Receiver Antenna Jack Amplifier wiring (See amplifier instructions) RCA-to-RCA cables (not supplied) Antenna extender cable (not supplied) Power Antenna Connect to power antenna or... -
Page 8: Testing
® KDC 9520 Testing Before you finish the installation, you should do the following tests to make sure the wiring is correct and everything is operating properly. Reconnect Battery Test Antenna Connection When wiring is complete, reconnect the battery negative terminal. 1. -
Page 9: Test Speaker Connections
® KDC 9520 Test Speaker Connections These tests make sure the speakers are connected right. If speakers don’t play at all, both wires may not be connected. If the wrong speaker plays (you hear front speakers when you expect rear speakers) make sure you connected the wires right. -
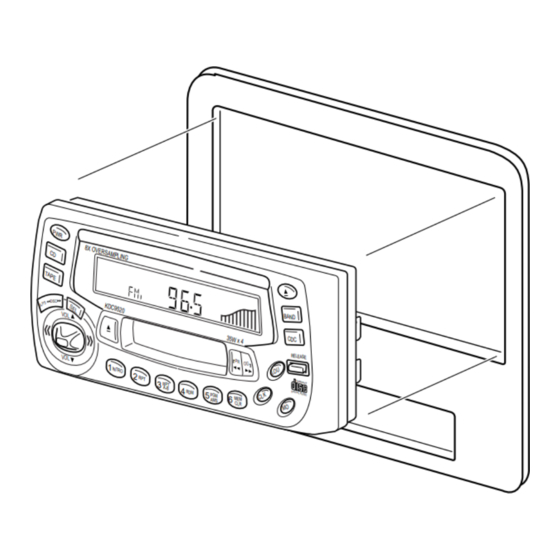
Page 10: Final Installation
® KDC 9520 Final Installation VO L VO L PR OG PACT DIGIT AL AUDI KDC9520 _EIN.p65 3/14/00, 1:28 PM... -
Page 11: Troubleshooting
Insert a disc and try again ER-3 appears on display High temperature Wait until temperature returns to normal Can’t find cause of problem Call Jensen Technical Assistance (1-800-323-0221) Reset Button The RESET button is located on the left side of the faceplate. -
Page 12: Specifications
Jensen will pay the return shipping charges if the product is What is Covered. Except as otherwise specified below, returned to an address inside the USA or Canada.