Table of Contents
Advertisement
Quick Links
Advertisement
Table of Contents

Related Manuals for Plextor H/H DVD Writer


Summary of Contents for Plextor H/H DVD Writer
- Page 1 浦科特 Internal & External H/H DVD Writer User’s Manual...
-
Page 2: Safety Instructions
SAFETY INSTRUCTIONS Please read all instructions carefully and keep this User’s Manual for your reference. Carefully note all Cautions and Warnings. 1. Always install electrical equipment close to an electrical outlet and ensure that the outlet is easily accessible. 2. Place power cords where people will not step or trip on them. Do not place objects over power cords. 3. - Page 3 This device complies with Part 15 of the FCC Rules. Operation is subject to the following two conditions: (1) this device may not cause harmful interference, and (2) this device must accept any interference received, including interference that may cause undesired operation. Plextor DVD Writer User’s Manual...
- Page 4 PRECAUTIONS CAUTION: Do not attempt to open the drive for service. Removing the cover may cause exposure to harmful laser beams and electrical voltage. To obtain service, return the defective drive to the vendor where the drive was purchased. • Use the original package for transporting the drive or sending it back for service.
-
Page 5: Table Of Contents
Installing ATAPI/E-IDE Drives………….…..………..………..…………………………………..……7 Installing Serial ATA Drives……………………..…………...……………………………………..……12 Installing External Drives …………………..…………………………………………………..……13 Drive Overview………………………………………………………………………………………….…13 Front View……………………..……………………………………………………….……………..…13 Rear View………………………..……………………………………………………………..……….…14 Installing the Drives………...……………………………………………………………………….14 Using your Plextor DVD Writers Features of the drive ……..…………………………………………………………………………16 System Requirements …………………………………………………………………………………16 Recording Modes Supported …………………………………….……………………………..17 Format Compatibility …………………...……………………………...………………………………17 Loading and Unloading the Tray ……..………………………………………………………….18... -
Page 6: Quick Installation Guide
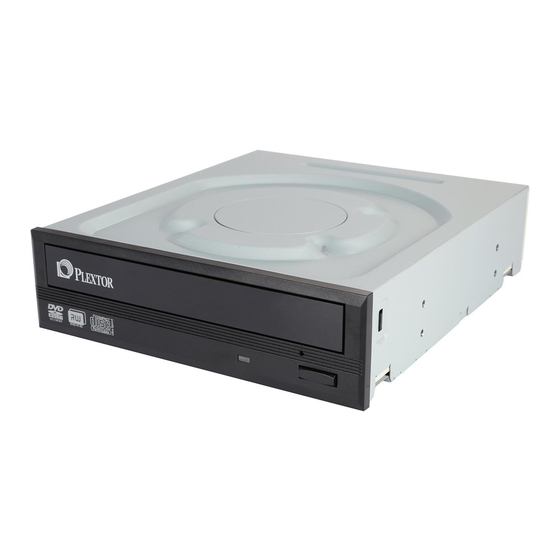
QUICK INSTALLATION GUIDE Thank you for purchasing Plextor products. Please refer to this manual before you install the drive. Installing Internal Drive Drive Overview Front View Figure: Representative front view of the drive (your drive may differ) A Eject / Close Button Push once to eject tray. Push again to insert the tray back into the drive. To prevent wear on the drive, always use the eject button to insert the tray. -
Page 7: Rear View
Sony/Philips digital interface (SPDIF) or Digital-In. Serial ATA Drives: Figure: Rear view of Serial ATA drive Serial ATA Power Connector 15-pin connector for DC power input. Serial ATA Data Connector 7-pin connector for Serial ATA data interface. Plextor DVD Writer User’s Manual... -
Page 8: Installing Atapi/E-Ide Drives
Installation of ATAPI/E-IDE Drives Installing the DVD Drives This chapter explains how to physically install your drive in your computer. The steps you need to perform are as follows: Turn off your computer system and unplug it from the power outlet. Remove the computer cover. -
Page 9: Changing The Jumper
Hard disk connected as Master device on the primary IDE port; nothing connected to the Secondary IDE port. Setting instructions: Set the drive’s jumper to Master and connect the drive to the secondary IDE port. Plextor DVD Writer User’s Manual... - Page 10 Configuration (B) Current configuration: Hard disk connected as Master device and CD-ROM or DVD-ROM connected as Slave on the primary IDE port; nothing connected to the secondary IDE port. Simplest setting instructions (B-1): Set the drive’s jumper to Master and connect the drive to the Secondary IDE port. Recommended setting instructions (B-2) –...
- Page 11 (the other end should already be connected to the motherboard). (B) Power Cable: Connect a power cable from the computer to the power connector of the drive, as shown above. In most computers, you will find free power connectors that are Plextor DVD Writer User’s Manual...
- Page 12 ready for use. If there is no available power connector, purchase a power cable splitter for an internal drive. (C) Audio Cables (Optional): To use a sound card in your system, connect an analog audio cable to the four-pin analog audio output connector on the rear panel of your drive and to your sound card.
-
Page 13: Installing Serial Ata Drives
And the pin definition of Serial ATA power connector should be the same as that in the following figure. Put the PC cover back and connect the power cords. Figure: Rear Panel of Serial ATA Drive Plextor DVD Writer User’s Manual... -
Page 14: Installing External Drives
Installing External Drive Drive Overview Front View Figure: Representative front view of the drive (your drive may differ) A Eject button Push once to eject tray. Push again to insert the tray back into the drive. To prevent wear on the drive, always use the eject button to insert the tray. B Disc/busy indicator Indication of drive's operation status. -
Page 15: Rear View
USB (1.1) port, but this is not recommended because it will significantly lower the drive’s performance. If you are unsure about which ports are available on your PC, check your PC manual or Windows device manager. Plextor DVD Writer User’s Manual... - Page 16 3. Connect the power supply to your drive. Plug the power supply into the back of your drive. 4. Connect the power supply to a wall outlet. Plug the power supply into the outlet or power strip. Then, turn on the power switch. NOTE: Your power plug and outlet may differ from the illustration.
-
Page 17: Using Your Plextor Dvd Writers
USING YOUR PLEXTOR DVD WRITERS Thank you for purchasing this DVD Writer. Please read this manual carefully and keep it handy for easy reference. Use the manual for installation, operation and troubleshooting for this drive. Features of the drive Records data on all CD/DVD format... -
Page 18: Recording Modes Supported
Recording Modes Supported Track at Once Data can be recorded to disc one track at a time. New tracks can be added later. This mode requires the disc to be “closed” (through the software application) before music CDs can be played back in a CD player or CD-ROM drive. -
Page 19: Loading And Unloading The Tray
Loading and Unloading the Tray To load and unload the tray: 1. While the drive is powered up, push the eject button on the front panel. The tray drawer slides out in 3–4 seconds. Figure: Loading the tray Plextor DVD Writer User’s Manual... -
Page 20: Writing To Cd And Dvd Media
2. Lay a CD or DVD disc in the depression in the tray, label side up. 3. Press the eject button again and the tray will slide shut within seconds. NOTE: Always use the eject button to close the tray in a smooth and secure manner. Closing the tray by pressing the front of the drawer using your hand is not recommended and risks damage or premature wearing of the mechanism. -
Page 21: Troubleshooting
Always handle discs with care and keep them clean. Deep scratches, fingerprints, or other contaminants on a disc’s surface can make it unreadable. Disc inserted upside Remove the disc from the tray and reinsert it label side up. down Plextor DVD Writer User’s Manual... -
Page 22: Write Problems
Write Problems Symptom Possible Cause Solution Cannot write to a Authoring software used Use the authoring software provided with the DVD writer. disc does not support your If using other software, contact the software supplier (or check the DVD writer appropriate website) to ensure that it supports your DVD writer. - Page 23 Symptom Possible Cause Solution Defective or damaged Always use high-quality media. disc Always handle discs with care and keep them clean. Deep scratches, fingerprints, or other contaminants on a disc’s surface can make it unreadable. Plextor DVD Writer User’s Manual...