
Related Manuals for Audiovox Jensen Phase Linear PCD160U


Summary of Contents for Audiovox Jensen Phase Linear PCD160U
- Page 1 PCD160U/PMP180U Owner's Manual/Manual del Usario/Manual de L'Utilisateur AM/FM/CD Receiver Receptor AM/FM/CD AM / FM / CD RECEIVER PCD160U AM/FM/CD Ampli-Syntoniseur CD-IN...
-
Page 2: Table Of Contents
Para obtener instrucciones en Espa ñ ol, diríjase a la página 18. PREPARATION Getting Started It’s a good idea to read all of the instructions before beginning the installation. Contents Installation Instructions... 3 Wiring ... 5 Installing the Removable Faceplate ... 6 Operating Instructions ... -
Page 3: Installation Instructions
PCD160U/PMP180U INSTALLATION INSTRUCTIONS Installation Using a Mounting Sleeve Slide the mounting sleeve off the chassis. If it is locked into position, use the removal tools (supplied) to disengage it. Check the dashboard opening size by sliding the mounting sleeve into it. If the opening is too small, carefully cut or file as necessary until the sleeve easily slides into the opening. - Page 4 INSTALLATION INSTRUCTIONS Installation Using a Kit If your vehicle requires the use of an installation kit to mount this radio, follow the instructions included with the installation kit to attach the radio to the mounting plate supplied with the kit. Wire and test the radio as described in step 4 of “Installation Using a Mounting Sleeve”...
-
Page 5: Wiring
PCD160U/PMP180U WIRING Antenna Connector WARNING! Never combine (bridge) outputs for use with 1 speaker. WARNING! Never ground negative speaker leads to chassis ground. CAUTION: Failure to wire exactly as shown may cause electrical damage to the radio. CD Changer Connector (PMP180U Only) RF/AVD LF/AVG... -
Page 6: Installing The Removable Faceplate
INSTALLING THE REMOVABLE FACEPLATE Faceplate Installation To install the faceplate, slip the left edge of the front panel into the radio then gently press the right side into place. Faceplate Detachment To remove the faceplate, press the REL button, and pull gently on the right side of the front panel. -
Page 7: Operating Instructions
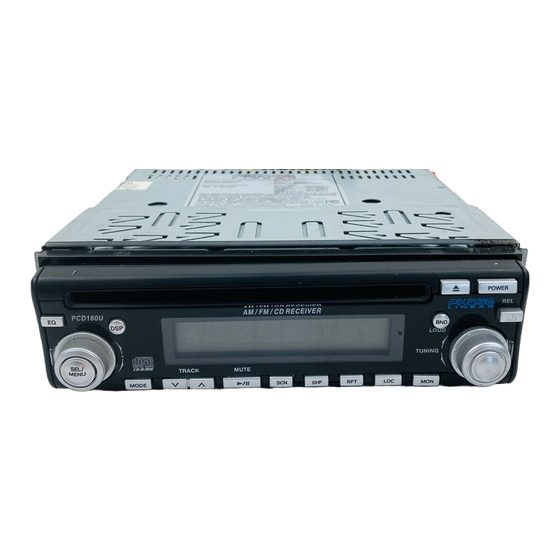
PCD160U/PMP180U OPERATING INSTRUCTIONS Power On/Off Button Press the POWER button (1) to turn the unit on and off when the vehicle ignition switch is on. When the unit is off, the clock is automatically displayed on the Liquid Crystal Display (LCD) panel unless the ignition switch is off. -
Page 8: Treble Control
OPERATING INSTRUCTIONS Bass Control To adjust the bass level, press the SEL/MENU button (4) until “BAS” appears on the display panel. Within five seconds, rotate the MULTI/ JOG control (3) to adjust the bass from “BAS - 6” to “BAS 06”. “BAS 00” represents a flat response. - Page 9 PCD160U/PMP180U OPERATING INSTRUCTIONS Manual Tuning Control Turn the TUNING control (6) clockwise to tune upward in frequency on the band in use, or counter-clockwise to tune downward in frequency. The current frequency will be shown in digital format on the display panel. When tuning in a station, always adjust the control so that the correct broadcast frequency is shown on the display and you are receiving a clear...
-
Page 10: Cd Player Operating Instructions
CD PLAYER OPERATING INSTRUCTIONS Disc Slot With the label surface facing up, fully insert a compact disc into the slot until the mechanism engages and pulls the disc in. The disc symbol “ CD-IN” will appear on the display and play will begin from the first track on the disc, accompanied by the elapsed time of track play. - Page 11 PCD160U/PMP180U CD PLAYER OPERATING INSTRUCTIONS Repeat Play Selector (RPT) During disc play, press the RPT button (15) to repeat the playback of a desired track (“S - RPT” appears on the display panel, followed by the current track number). Play of the selected track will continue to repeat until the Track Repeat function is cancelled by pressing the button again or by activating the Intro-Scan or...
-
Page 12: Mp3 Player Operation (Pmp180U)
MP3 PLAYER OPERATION (PMP180U) This section applies to the PMP180U only. Instructions for Insert/Eject, Play/Pause, Track Selection, Cue/Review, Scan, Repeat, and Random are the same for CD and MP3 operation. Please see the CD Player Operation section for information about these topics. After inserting an MP3 disc, “MP3 T”... -
Page 13: Cd Changer Controls (Pmp180U)
This section applies to the PMP180U only. Built into the PMP180U are controls to operate an optional CD changer. Please check with your Phase Linear/Audiovox car stereo specialist or call 1-800-323-4815 for recommendations of the models that will work with this radio. -
Page 14: Care And Maintenance
CARE AND MAINTENANCE Your new radio/CD player does not require any maintenance. However, proper understanding of its use and handling will help you obtain maximum enjoyment of its capabilities. We recommend that you keep this manual for reference on the many features of this unit as well as how to set the clock. -
Page 15: Specifications
PCD160U/PMP180U SPECIFICATIONS CD-R and CD-RW Capability Depending on media type and method of "recording/burning", some CD-R/RWs may be incompatible with this unit. After "recording/ burning", the session must be closed. Please refer to your software's recommended procedures for closing a disc/session. Review your recording software to familiarize yourself with the correct "recording/burning"... -
Page 16: 90 Day Limited Warranty
This Warranty gives you specific legal rights and you may also have other rights which vary from state to state. U.S.A: Audiovox Corporation, 150 Marcus Blvd., Hauppauge, NY 11788, 1-800-323-4815 CANADA: Call 1-800-323-4815 for location of a warranty station serving your area. - Page 17 PCD160U/PMP180U Manual del Usario...
- Page 18 For instructions in English, refer to page 2. PREPARACIÓN Comenzando Es buena idea leer completamente las instrucciones antes de iniciar la instalación. Contenido Instrucciones de Instalación ... 19 Cableado ... 21 Instalación de la Cubierta Desmontable.. 22 Instrucciones de Operación... 23 Funcionamiento del Lector de CD...
-
Page 19: Instrucciones De Instalación
PCD160U/PMP180U INSTRUCCIONES DE INSTALACIÓN Instalación Utilizando una Manga de Montaje Deslice la manga de montaje fuera del chasis. Si está trabada, utilice la herramienta para quitarla (provista). Verifique el tamaño de apertura del tablero deslizando la manga de montaje adentro del mismo. - Page 20 INSTRUCCIONES DE INSTALACIÓN Equipo de Instalación Si su vehículo requiere el uso de un equipo de instalación par amontar este radio, siga las instrucciones incluidas con el equipo de instalación para adherir el radio al plato de montaje provisto en el equipo. Conecte el cable y verifique el radio como se determina en las instrucciones de Instalación Universal.
-
Page 21: Cableado
PCD160U/PMP180U CABLEADO Conector para la Antena ¡CUIDADO! Nunca combine (hacer puente) las salidas para utilizar sólo 1 altavoz. ¡CUIDADO! Nunca tome a tierra las puntas negativas del altavoz utilizando el piso del chasis. CUIDADO: El no colocar los cables exactamente como se muestra puede causar daños eléctricos al radio. -
Page 22: Instalación De La Cubierta Desmontable
INSTALACIÓN DE LA CUBIERTA DESMONTABLE Instalación de la Cubierta Para instalar la cubierta desmontable, deslice el borde derecho del panel delantero dentro del radio, luego suavemente presione el lado izquierdo hasta trabarlo. Desprendimiento de la Cubierta Para quitar la cubierta, presione el botón para liberarla (REL), y jale suavemente del lado izquierdo del panel. -
Page 23: Instrucciones De Operación
PCD160U/PMP180U INSTRUCCIONES DE OPERACIÓN Botón de Encendido / Apagado Presione el botón POWER (1) para encender o apagar la unidad cuando la ignición del vehículo esté en marcha. Cuando la unidad está apagada, automáticamente aparece el reloj en el Panel de Cristal Líquido (LCD por sus siglas en inglés), a menos que la ignición esté... - Page 24 INSTRUCCIONES DE OPERACIÓN Control de Graves Para ajustar el nivel de graves, presione el botón SEL/MENU (4) hasta que "BAS" aparezca en la pantalla del panel. Dentro de los cinco segundos, MULTI/JOG rote el control de volumen ( , 3) para ajustar los sonidos graves desde "BAS -6"...
- Page 25 PCD160U/PMP180U INSTRUCCIONES DE OPERACIÓN Control de Sintonía Manual Gire el control de sintonía manual (TUNING, 6) en el sentido de las agujas de reloj para sintonizar frecuencias ascendentes en la banda y hacia el lado opuesto para sintonizar frecuencias descendentes en la banda. La frecuencia en la que se sintoniza aparecerá...
-
Page 26: Funcionamiento Del Lector De Cd
FUNCIONAMIENTO DEL LECTOR DE CD Ranura Para Disco Con la faz del sello hacia arriba, inserte completamente un disco compacto dentro de la ranura hasta que el mecanismo lo enganche y jale hacia adentro. El símbolo " CD-IN" aparecerá en pantalla y la reproducción comenzará... - Page 27 PCD160U/PMP180U FUNCIONAMIENTO DEL LECTOR DE CD Selector de Reproducción con Repetición (RPT) Durante la reproducción de un disco, al presionar el botón RPT (15) se seleccionará el modo de ejecución en forma repetida de pistas. Para repetir la ejecución de una pista deseada, presione el botón una vez;...
-
Page 28: Operacion Del Equipo De Mp3
OPERACIÓN DEL EQUIPO DE MP3 (PMP180U) Esta sección tiene aplicación solamente para el PMP180U. Las instrucciones para Insertar/Expulsar, Ejecutar/Detener, Selección de Pista, Avance y Retroceso, Escaneo, Repetición y Reproducción Aleatoria son las mismas para CD y MP3. Por favor, vea la sección Operación de Equipo de CD para obtener información sobre estos temas. -
Page 29: Controls Del Cambiador De Cd
CD opcional. Por favor, verifique con su especialista de estéreo de autos Phase Linear/ Audiovox o llame al 1-800-323-4815 para obtener recomendaciones sobre modelos que funcionen con este radio. Las funciones de ajuste de audio (volumen, tono y balances) y de CD (Pausa/ Reproducción, SCN, SHF, RPT y TRACK),... -
Page 30: Cuidados Y Mantenimiento
CUIDADOS Y MANTENIMIENTO Su nuevo reproductor de radio/CD no requiere mantenimiento. Sin embargo, el entender cómo se lo utiliza y mantiene adecuadamente le ayudará a sacar el máximo provecho de sus capacidades. Recomendamos que conserve este manual para utilizarlo como referencia sobre las funciones de esta unidad así... -
Page 31: Especificaciones
PCD160U/PMP180U ESPECIFICACIONES Dependiendo del tipo de medio y método de grabación, algunos CD-R/RW pueden ser incompatibles con esta unidad. Luego de grabar el CD, se debe cerrar la sesión. Por favor, siga los procedimientos recomendados por su programa de grabación para cerrar un disco. -
Page 32: Garantia Limitade De 3 Meses
La presente Garantía le otorga derechos especiales y usted puede gozar de otros derechos que varían de un estado a otro. U.S.A : Audiovox Corporation, 150 Marcus Blvd., Hauppauge, NY 11788, 1-800-323-4815 CANADA: Llamar a 1-800-323-4815 para la ubicación de la estación que le proporciona servico de garantía. - Page 33 PCD160U/PMP180U Manual de L'Utilisateur...
- Page 34 For instructions in English, refer to page 2. PRÉPARATION Mise en Marche C'est une bonne idée de lire toutes les instructions avant de commencer l'installation. Table des Matières Instructions d’Installation ... 35 Câblage ... 37 Installation de la Dalle Amovible ... 38 Instructions d'Operation ...
-
Page 35: Instructions D'installation
PCD160U/PMP180U INSTRUCTIONS D'INSTALLATION Installation en Utilisant un Manchon de Montage Glissez le manchon de montage du châssis. S'il est verrouillé, utilisez les outils d'enlèvement (fournis) pour le désengager. Vérifiez la taille d'ouverture sur le tableau de bord en glissant dedans le manchon de montage. - Page 36 INSTRUCTIONS D’INSTALLATION Installation de la Trousse Si votre voiture exige l'usage d'une trousse d'installation pour monter la radio, suivez les instructions qui accompagne la trousse pour attacher la radio au plateau de montage fourni avec la trousse. Câblez et testez la radio en suivant les instructions pour l'installation universelle.
-
Page 37: Câblage
PCD160U/PMP180U CÂBLAGE Connecteur de Antenne AVERTISSEMENT ! Ne combinez jamais des sorties (ponts) pour utilisation avec un haut parleur. AVERTISSEMENT ! Ne terrez jamais des fils de sortie négatifs de haut parleur avec la masse. AVERTISSEMENT : Si le câblage n'est pas fait comme montré, vous risquez de faire des dégâts électriques à... -
Page 38: Installation De La Dalle Amovible
INSTALLATION DE LA DALLE AMOVIBLE Installation de la Dalle Pour installer la dalle, glissez le bord à gauche du panneau d'avant dans la radio et puis appuyez doucement le bord à droite en place. Détacher la Dalle Pour détacher la dalle, appuyez sur le bouton REL et tirez doucement le côté... -
Page 39: Instructions D'operation
PCD160U/PMP180U INSTRUCTIONS D'OPERATION Bouton Puissance en Marche/en Arrêt Appuyez sur le bouton POWER (1) pour mettre l'appareil en marche ou en arrêt lorsque le véhicule est allumé. Lorsque l'appareil est en arrêt, l'horloge est automatiquement affiché sur le panneau d'affichage à cristaux liquides, à moins que le clé de contact est en arrêt. - Page 40 INSTRUCTIONS D'OPERATION Contrôle de Basse Pour ajuster le niveau de basse, appuyez sur le bouton SEL/MENU (4) jusqu'à ce que le mot BAS apparaisse sur le panneau d'affichage. Dans 5 secondes, faites tourner le contrôle du volume MULTI/JOG , 3) pour ajuster le basse de BAS 6 à BAS 06.
- Page 41 PCD160U/PMP180U INSTRUCTIONS D'OPERATION Contrôle de Syntonisation à la Main Faites tourner le contrôle de syntonisations (TUNING, 6) à la main dans le sens des aiguilles de l'horloge pour syntoniser vers le haut en fréquence sur la bande en utilisation, contre le sens des aiguilles de l'horloge pour syntoniser vers le bas en fréquence.
-
Page 42: Opération De La Platine Cd
OPÉRATION DE LA PLATINE CD Fente du Disque Avec l'étiquette en haut, insérez un disque compact dans la fente jusqu'à ce que le mécanisme s'engage et tire le disque vers l'intérieur. Le symbole disque CD-IN apparaîtra sur le panneau d'affichage et le disque va se mettre à... - Page 43 PCD160U/PMP180U OPÉRATION DE LA PLATINE CD Sélectionneur de Jeu Répété (RPT) Appuyant sur le bouton RPT (15), alors qu'un disque est en train de jouer va sélectionner la mode de répétion du jeu de piste. Pour répéter la reproduction d'une piste désirée, appuyez sur ce bouton une fois ;...
-
Page 44: Operation De Platine Mp3 (Pmp180U)
OPERATION DE PLATINE MP3 (PMP180U) Cette section ne s'applique qu'au seul PMP180U. Des instructions pour Insérer/Ejecter, Jouer/ Faire pause, Sélection de piste, Repère/Revue, Balayage, Répétition, Jeu au hasard sont les mêmes pour opération CD et MP3. Veuillez voir la section sur l'opération platine CD pour des informations sur ces sujets. -
Page 45: Des Controles Changeur Cd (Pmp180U)45
180 U. Des contrôles sont encastrés dans le PMP180U pour opérer un changeur CD facultatif. Veuillez consulter avec votre spécialiste stéréo radio Phase Linear/Audiovox ou appeler 1-800-323-4815 pour des recommandations sur les modèles qui sont compatibles avec cette radio. Ajustements des fonctions audio (volume, tonalité, équilibreur et égaliseur) et des... -
Page 46: Soin Et Entretien
SOIN ET ENTRETIEN Votre nouvelle platine CD/radio n'a pas besoin d'être entretenu. Cependant, une compréhension correcte de son utilisation et manipulation vous aidera à obtenir une jouissance maximum de ses capacités. Nous recommandons que vous gardez ce guide comme référence pour les fonctions multiples de cet appareil, aussi bien que pour régler l'horloge. -
Page 47: Specifications
PCD160U/PMP180U SPECIFICATIONS Capacité CD-R et CD-RW Dépendant du type de média et des méthodes d'enregistrement quelques CD-R/RW peuvent être incompatible avec cet appareil. La séance doit être close après l'enregistrement. Référez-vous aux procédures recommandées de votre logiciel pour clore un disque/séance. Revoyez votre logiciel d'enregistrement afin de vous familiariser avec les procédures d'enregistrement correctes. -
Page 48: Garantie Limitée De 3 Mois
également jouir d’autres droits, suivant l’Etat dans lequel vous vivez. U.S.A : Audiovox Corporation, 150 Marcus Blvd., Hauppauge, NY 11788, 1-800-323-4815 CANADA: Composez le 1-800-323-4815 connaitre l’adresse du poste de garantie de votre région.