Table of Contents
Advertisement
Quick Links
Advertisement
Table of Contents

Related Manuals for Toshiba RemotEye III


Summary of Contents for Toshiba RemotEye III
- Page 1 ®...
-
Page 2: User Manual
RemotEye User Manual Document Number: 62330-005 August 2015 8/15/15 RemotEye III User Manual – 62330-005... -
Page 3: About This Manual
About This Manual This manual was written by the TOSHIBA Engineering and Marketing Groups. These groups are tasked with providing technical documentation for the RemotEye III system. Every effort has been made to provide accurate and concise information to you, our customer. -
Page 4: Contacting Toshiba's Customer Support Center
Contacting TOSHIBA’s Customer Support Center TOSHIBA’s Customer Support Center can be contacted to obtain help in resolving any RemotEye III system problem that you may experience or to provide application information. The Support Center can be reached at 877-867-8773 (toll free) or 713-466-0277. The center is open from 8 a.m. to 6 p.m. -
Page 5: Important Notice
TOSHIBA International Corporation's UPS Division. The warranty contained in the contract between the parties is the sole warranty of the TOSHIBA International Corporation's UPS Division, and any statements contained herein do not create new warranties or modify the existing warranty. -
Page 6: General Safety Instructions
CAUTION / ATTENTION The word CAUTION in capital letters without the safety alert symbol indicates a potentially hazardous situation exists which, if not avoided, may result in equipment and property damage. RemotEye III User Manual – 62330-005... -
Page 7: Special Symbols
WARNING Misuse of this equipment could result in injury and equipment damage. In no event will Toshiba Corporation be responsible or liable for either indirect or consequential damage or injury that may result from the misuse of this equipment. -
Page 8: Installation Precautions
Do not install the unit in areas near sources of electrical noise. Do not install the unit in areas that would allow fluids or any foreign object to get inside the unit. For further information on workplace safety visit www.osha.gov. RemotEye III User Manual – 62330-005... -
Page 9: Table Of Contents
Configuring via Terminal ..........................21 RemotEye III Configuration Menu Navigation ....................23 Configuring the RemotEye III via Telnet .......................36 Connecting to the RemotEye III via Telnet ....................37 RemotEye III Telnet Menu Navigation ......................37 Configuring the RemotEye III via HTTP .......................38 Connecting to the RemotEye III via HTTP ....................40 RemotEye III Web Menu Navigation ......................41... - Page 10 Appendix B – Modbus Registers ..................132 Modbus Input Register for 1600XP: MONITORING ...................132 Modbus Input Coil for 1600XP: ALARMS and STATUS ................143 Modbus Input Register for 4200FA/4300: MONITORING ................151 Modbus Input Coil for 4200FA/4300: ALARMS and STATUS ..............161 RemotEye III User Manual – 62330-005...
-
Page 11: Introduction
This user manual describes the configuration and operation of the RemotEye III. The RemotEye III is a circuit board that is inserted into the option slot of the UPS. The circuit board is connected to the UPS via the RemotEye III card edge connector. -
Page 12: Features
The RemotEye III has several support options for managing your Toshiba UPS. HTTP Web Access Allow access data from RemotEye III publicly or privately using a web browser. Web access includes Secure Sockets Layer (SSL) Configurations (See Figure 2: HTTP Web Access Example). - Page 13 Figure 4: Serial Communication Example Telnet, Terminal Access Allow access to RemotEye III configuration settings through Telnet which includes Secure Shell (SSH) protocol. This can be done using a Terminal Emulator Software such us HyperTerminal or Tera Term (See Figure 5: Telnet Access Example).
- Page 14 The RemotEye III can automatically retrieve its network identity, IP address, from a network server using the Boot Protocol (BOOTP) or Dynamic Host Configuration Protocol (DHCP). Real-Time Clock (RTC) The RemotEye III contains its own RTC which is used for time-stamping data logs and for executing any scheduled events. UPS Event Notification The RemotEye III can send out notification of UPS events via Email or SNMP Traps.
- Page 15 Toshiba UPS. Additional Software Applicaitons: Network Firmware Upgrade Tool RemotEye III Firmware Upgrade Utility is an easy to use network upgrade utility tool that allows user to upgrade to a newer firmware version when available. Auto Save Log Tool RemotEye III Save (Auto) Log Application Program is an easy to configure utility tool that allows administrators to automatically save history logs from one to multiple RemotEye IIIs at the same time to a computer’s hard drive.
-
Page 16: Installation
(See Figure 9: RemotRadar Example). It also has the ability to send SMS and Email notifications when an event occurs to one of the Toshiba UPS. Please contact Toshiba directly or a Toshiba vendor for more information. Figure 9: RemotRadar Example Installation RemotEye III User Manual –... -
Page 17: System Compatibility
Slide the RemotEye III printed circuit board into the extension option slot of the UPS. Secure the printed circuit board using the UPS supplied screws.(See Figure 10: RemotEye III Location in 1600XP UPS, Figure 12: RemotEye III in 4300 UPS) Figure 10: RemotEye III Location in 1600XP UPS RemotEye III User Manual –... - Page 18 RemotEye III Located on Inside Left Door of 50kVA model RemotEye III Located on Deadfront of 15-30kVA model Figure 11 RemotEye III Location in 4200FA Figure 12: RemotEye III in 4300 UPS RemotEye III User Manual – 62330-005...
-
Page 19: Making The Network Connection
DHCP/BOOTP server will allocate (lease) an IP address to the RemotEye III. This setting has to be disabled if using static IP address by going to “RemotEye III Management” “RemotEye III Control” on its web interface. -
Page 20: Configuration
Figure 14: RemotEye III MAC Address Label For each RemotEye III, the MAC address is created using the following format: 00 E0 D8 LL MM NN. The first half of this code, 00 E0 D8, identifies the manufacturer of the Ethernet board. Since every RemotEye III is produced by the same manufacturer, these 3 hexadecimal bytes remain constant. -
Page 21: Default Gateway
This places RemotEye III on a Class B network. Default Gateway The RemotEye III is initially configured with a Gateway address of 0.0.0.0. This value indicates RemotEye III will not attempt to use a gateway. RemotEye III User Manual – 62330-005... -
Page 22: Configuring Via Terminal
Hardware Setup Direct configuration is accomplished through the provided RJ45 to DB9 female connector PC cable. Follow these steps to setup the hardware for direct RemotEye III configuration (See Figure 15: Serial Communication Physical Connection Example): Connect the DB9 female end of the PC cable to the terminal or workstation COM port. NOTE: if no COM port is available, use a USB-to-Serial (RS-232) converter. - Page 23 Press [Enter] and the RemotEye III version and Password field will be displayed (See Figure 16). RemotEye III retains the password of the UPS it is connected to. If the RemotEye is brand new right out of the box the default password is “ADMIN.”...
-
Page 24: Remoteye Iii Configuration Menu Navigation
The main menu of the RemotEye III provides access to configuration parameters. The table below provides an overview of the entire menu structure (See Table 1: Menu Map for RemotEye III Console). When navigating through these menus, all alpha-numeric characters are acceptable and are case-sensitive. - Page 25 (0) Return to Previous Menu (5) Reset Configuration to Default Reset Configuration (y/n)? (6) Save and Exit (7) Save and Restart RemotEye III Restart Agent (y/n)? Table 1: Menu Map for RemotEye III Console RemotEye III User Manual – 62330-005...
- Page 26 Main Menu Description The Main Menu of the RemotEye III consists of the following options (See Figure 17: Console Main Menu Description): Toshiba RemotEye III Configuration SNMP Communities SNMPv3 USM Table Trap Receiver Table Reset Configuration to Default Save and Exit.
- Page 27 TIC RemotEye III Configuration Main Menu → (1) Toshiba RemotEye III Configuration (See Figure 18: Console Configuration Menu Description). The Toshiba RemotEye III Configuration option provides access to the following system settings: System Group Control Group Parameter Group Email Group...
- Page 28 Network Mask — The network mask for the RemotEye III network. Date and Time — The RemotEye III date and time format is MM/DD/YYYY, and HH:MM:SS respectively. RemotEye III supports the Network Time Protocol (NTP) and NTP. These two features enable the UPS to synchronize its date and time with a NTP server.
-
Page 29: Control Group
HTTP(s) Authentication — This parameter allows the administrators to select what type of authentication is required to gain access to the RemotEye III web content. There are three options Local User, Radius, or both. If “Local User” is selected, the user will be authenticated when accessing the RemotEye III web content. - Page 30 System Contact — The RemotEye III system administrator. This string can be changed by administrator as desired. System Name — The alias of the RemotEye III. This string serves as the RemotEye III Client Identifier (CID) in DHCP systems. System Location — The RemotEye III physical location. This string can be changed by administrator as desired.
- Page 31 Server (If hostname is used in the setting 1). Otherwise, this field can be 0.0.0.0. Daily Status Report — This parameter is used to set the time to send RemotEye III daily status report that are listed in the “Mail Receivers” setting (7).
- Page 32 Device Status — The Device Status allows the administrator to allow RemotEye III to auto-detect EMD or to disable. “Auto” will enable the RemotEye III to auto detect the EMD that is connected to its COM port.
- Page 33 COMMANDS - 1. Modify - Modify an entry of table 2. Reset - Reset an entry to default from table 0. Return to previous menu Please Enter Your Choice => Figure 25: SNMP Communities Description RemotEye III User Manual – 62330-005...
- Page 34 1. Modify - Modify an entry of table 2. Reset - Reset an entry to default from table 0. Return to previous menu Please Enter Your Choice => Figure 26: SNMPv3 USM Menu Description RemotEye III User Manual – 62330-005...
-
Page 35: Trap Receiver Table
1. Modify - Modify an entry of table 2. Reset - Reset an entry to default from table 0. Return to previous menu Please Enter Your Choice => Figure 27: Console Trap Receiver Table Description RemotEye III User Manual – 62330-005... - Page 36 From the Main Menu, press 5 to access the Reset Configuration to the Original Setting screen. Save and Exit Main Menu → (6) Save and Exit. When executed, the system saves the RemotEye III configuration and exits the program. The new configuration takes effect immediately. Save and Restart RemotEye III Main Menu →...
-
Page 37: Configuring The Remoteye Iii Via Telnet
The RemotEye III can be configured by establishing a telnet session with the device. Hardware Setup Telnet configuration is accomplished through a network link. Follow these steps to setup the RemotEye III for a telnet session: Verify network cable connection to NETWORK port of RemotEye III. -
Page 38: Connecting To The Remoteye Iii Via Telnet
Routing to the RemotEye III If the workstation is not on the same network as the RemotEye III, the system may require the addition of a network route. This is typically only necessary when RemotEye III is using its default address. -
Page 39: Configuring The Remoteye Iii Via Http
System Setup To access the RemotEye III via the web, enter the IP address of the RemotEye III in the URL field of the browser and press Enter (See Figure 29: RemotEye III with Internet Explorer Example). If unable to access the RemotEye III due to a firewall, contact the network administrator for information on bypassing the firewall of the LAN. - Page 40 If the HTTP Security Control setting is Disabled, the user is granted read-only access. If the HTTP Security Control is Enabled, any attempt to access RemotEye III pages will be met with a request to enter a password (See Figure 30: HTTP Security Control Window).
-
Page 41: Connecting To The Remoteye Iii Via Http
Launch the web browser (e.g. Internet Explorer). Enter the URL for RemotEye III in the browser’s address field. For example, http://172.18.1.63. The home page of the RemotEye III will be displayed once a connection is established (See Figure 31: RemotEye III HTTP Page). -
Page 42: Remoteye Iii Web Menu Navigation
RemotEye III Management • History Data and Logs. The six primary menus provide access to UPS and RemotEye III monitoring and control functions, and each is discussed in detail in the following sections. UPS Monitoring This menu allows the user to view the collected data from the UPS measurements. The UPS measured parameters are... - Page 43 Comprehensive View This web page lists the UPS parameters. This page will refresh automatically at a user-defined rate. To change or view the refresh rate setting, select “RemotEye III Management” → “HTTP Page Refresh Rates” in the RemotEye III web interface.
- Page 44 UPS Manufacture UPS manufacturer. This field shows the typeform of UPS Typeform the UPS to which RemotEye III is presently attached. This field shows the model description of the UPS to which UPS Description ...
- Page 45 UPS Data Display This page shows the UPS Display Information. This page will refresh automatically at a user-defined rate. To change or view the refresh rate setting, select “RemotEye III Management” → “HTTP Page Refresh Rates” in the RemotEye III web interface.
- Page 46 UPS Data – Other This page shows the UPS states. This page will refresh automatically at a user-defined rate. To change or view the current refresh setting, select “RemotEye III Management” → “HTTP Page Refresh Rates” in the RemotEye III web interface.
- Page 47 This page shows the UPS line voltage input readings. This page will refresh automatically at a user-defined rate. To change or view the current refresh rate setting, select “RemotEye III Management” → “HTTP Page Refresh Rates” in the RemotEye III web interface.
- Page 48 This page shows the UPS output voltage source and readings. This page will refresh automatically at a user-defined rate. To change or view the current refresh setting, select “RemotEye III Management” → “HTTP Page Refresh Rates” in the RemotEye III web interface.
- Page 49 output under voltage range. This field shows the maximum limit of the output voltage before the Output Over Voltage Detection Level (V) UPS detect enters the Output over voltage state. RemotEye III User Manual – 62330-005...
- Page 50 Bypass Parameters This page shows the UPS bypass values. This page will refresh automatically at a user-defined rate. To change or view the current refresh setting, select “RemotEye III Management” → “HTTP Page Refresh Rates” in the RemotEye III web interface.
- Page 51 This page shows the UPS DC Bus values. This page will refresh automatically at a user-defined rate. To change or view the current refresh setting, select “RemotEye III Management” → “HTTP Page Refresh Rates” in the RemotEye III web interface.
- Page 52 This page provides the battery status and battery run-time information. This page will refresh automatically at a user- defined rate. To change or view the refresh rate setting, select “RemotEye III Management” → “HTTP Page Refresh Rates” in the RemotEye III web interface.
- Page 53 This field shows the float Float Charge Voltage (Vdc) charge voltage in Vdc. This field shows the Battery Low Detection Level (Vdc) minimum battery voltage in Vdc. RemotEye III User Manual – 62330-005...
-
Page 54: Alarm Table
This page provides past and active UPS alarm activity and descriptions. This page will refresh automatically at a user-defined rate (See Figure 33: RemotEye III Alarm Table Example). To change or view the refresh rate setting, select “RemotEye III Management” → “HTTP Page Refresh Rates” in the RemotEye III web interface. - Page 55 Fault upsTrapDCOverVoltageClear upsAlarmDCBusImbalance upsTrapDCBusImbalance Fault upsTrapDCBusImbalanceClear upsTrapOutputUnderVoltageCle upsAlarmOutputUnderVoltage upsTrapOutputUnderVoltage Fault upsAlarmOutputOverVoltage upsTrapOutputOverVoltage Fault upsTrapOutputOverVoltageClear upsAlarmHeatSinkOverheat upsTrapHeatSinkOverheat Fault upsTrapHeatSinkOverheatClear upsAlarmBypassOverload upsTrapBypassOverload Fault upsTrapBypassOverloadClear upsAlarmChargerOverVoltage upsTrapChargerOverVoltage upsTrapChargerOverVoltage Fault Fault Fault FaultClear upsAlarmOutputOverCurrent upsTrapOutputOverCurrent Fault upsTrapOutputOverCurrentClear RemotEye III User Manual – 62330-005...
- Page 56 Warning upsTrapSystemOverheatClear upsTrapOutputOverloadWarning upsAlarmOutputOverload Warning upsTrapOutputOverloadWarning Warning Clear upsAlarmCurrentLimitWarning upsTrapCurrentLimitWarning Warning upsTrapCurrentLimitWarningClear upsAlarmAsyncOperation upsTrapAsyncOperation Warning upsTrapAsyncOperationClear upsAlarmServiceUPS upsTrapServiceUPS Warning upsTrapServiceUPSClear upsTrapBatteryNearExpiration upsAlarmBatteryNear Expiration upsTrapBatteryNearExpiration Warning Clear upsAlarmBatteryExpired upsTrapBatteryExpired Warning upsTrapBatteryExpiredClear upsAlarmDisplayCableError upsTrapDisplayCableError Warning upsTrapDisplayCableErrorClear RemotEye III User Manual – 62330-005...
- Page 57 Info WarningPoint WarningPoint WarningPointClear upsAlarmEMDTemperatureAtLow upsTrapEMDTemperatureAtLow upsTrapEMDTemperatureAtLow Info CiriticalPoint CriticalPoint CriticalPointClear upsAlarmEMDTemperatureAtHigh upsTrapEMDTemperatureAtHigh upsTrapEMDTemperatureAtHigh Info CiriticalPoint CriticalPoint CriticalPointClear upsAlarmEMDTemperatureAtLow upsTrapEMDTemperatureAtLow upsTrapEMDTemperatureAtLow Info WarningPoint WarningPoint WarningPointClear upsAlarmEMDTemperatureAtHigh upsTrapEMDTemperatureAtHigh upsTrapEMDTemperatureAtHigh Info WarningPoint WarningPoint WarningPointClear RemotEye III User Manual – 62330-005...
- Page 58 1600XP Alarm/Trap Table Alarm Occur Message SNMP Trap Add Level SNMP Trap Remove upsAlarmLogInError upsTrapLogInError Info upsTrapLogInErrorClear RemotEye III User Manual – 62330-005...
- Page 59 Warning upsTrapInputUnderVoltageClear upsAlarmBatteryTestFailed upsTrapBatteryTestFailed Warning upsTrapBatteryTestFailedClear upsAlarmSystemTestFailed upsTrapSystemTestFailed Warning upsTrapSystemTestFailedClear upsTrapBatteryLow upsAlarmBatteryLow upsTrapBatteryLow Warning Clear upsTrapBatteryAtShutdownlevelClea upsAlarmBatteryAtShutdownlevel upsTrapBatteryAtShutdownlevel Warning upsTrapBatteryVoltageNotGoodClea upsAlarmBatteryVoltageNotGood upsTrapBatteryVoltageNotGood Warning upsTrapBatteryMCCBOff upsAlarmBatteryMCCBOff upsTrapBatteryMCCBOff Warning Clear upsAlarmBypass upsTrapBypass Warning upsTrapBypassClear RemotEye III User Manual – 62330-005...
- Page 60 Warning upsTrapMCCBTripClear upsTrapEEUpdateError upsAlarmEEUpdateError upsTrapEEUpdateError Warning Clear upsAlarmOnBypass upsTrapOnBypass Info upsTrapOnBypassClear upsTrapPowerFailure upsAlarmPowerFailure upsTrapPowerFailure Info Clear upsAlarmEPOTripped upsTrapEPOTripped Info upsTrapEPOTrippedClear upsAlarmTimedShutdown upsTrapTimedShutdown Info upsTrapTimedShutdownClear upsAlarmLANShutdown upsTrapLANShutdown Info upsTrapLANShutdownClear upsAlarmRemoteShutdown upsTrapRemoteShutdown Info upsTrapRemoteShutdownClear RemotEye III User Manual – 62330-005...
- Page 61 Info upsTrapRemoteRunClear upsAlarmFirmwareUpdate upsTrapFirmwareUpdate Info upsTrapFirmwareUpdateClear upsAlarmBypassEnable upsTrapBypassEnable Info upsTrapBypassEnableClear upsAlarmBatteryTestDisabled upsTrapBatteryTestDisabled Info upsTrapBatteryTestDisabledClear upsAlarmDefaultCalibration upsTrapDefaultCalibration Info upsTrapDefaultCalibrationClear upsAlarmShutdownPending upsTrapShutdownPending Info upsTrapShutdownPendingClear upsAlarmOutputOffAsRequested upsTrapOutputOffAsRequested Info upsTrapOutputOffAsRequestedClear upsAlarmOutputOff upsTrapOutputOff Info upsTrapOutputOffClear upsAlarmBatteryOn upsTrapBatteryOn Info upsTrapBatteryOnClear RemotEye III User Manual – 62330-005...
-
Page 62: Ups Management
Connected Client Table This page lists the protected registered clients of the RemotEye III that are running during the execution of the RemotEye III Shutdown application (See Figure 34: RemotEye III Client Table Web Page). Go to section “Toshiba RemotEye Client Software” on page 103 for more details on the software application. This page will refresh automatically at a user-defined rate. - Page 63 This menu contains the control parameters of the UPS system connected to the RemotEye III. UPS Configuration General This section shows the identification, installed date, input and output electrical parameters of the UPS. This page also allows the administrator to select which Alarm E-Mail notifications/SNMP Traps to receive.
- Page 64 This section allows the administrator to select which faults, warnings, and informational notifications to receive via E-mail or SNMP Traps. If a checkbox is not filled, RemotEye III will not send that particular alarm. By default, all of the alarms are turned ON (See Figure 35: RemotEye III Selectable E-mail/SNMP Traps Notifications).
- Page 65 UPS Enable RMTI-3 To Control Mode This field shows the present mode of the control that the RemotEye III has on the UPS. This allows the RemotEye to enable or disable control the UPS Bypass and On-Line mode. It is set by the administrator.UPS Mode Change Delay (secs) 0 –...
- Page 66 Remote Contact Shutdown Mode Selection This field shows the mode of the remote contact shutdown. It is set by the administrator. 0 – Bypass 1 – Shutdown while contact closed Default Value = Bypass RemotEye III User Manual – 62330-005...
- Page 67 Dry Contact Low Battery Delay Timer (secs) This field shows the time delay between actual event occurrence and dry contact closure. It is set by the administrator. Range – 0 to 800 seconds Default Value = 0 RemotEye III User Manual – 62330-005...
- Page 68 Battery Start Equalize Charge This field shows the present mode of the UPS Battery Start Equalize Charge function. It can be enabled or disabled. It is set by the administrator. 0 - Disable 1 - Enable RemotEye III User Manual – 62330-005...
- Page 69 Quick Test (10 sec) - Quick test for 10 seconds. Cancel Test - Cancel the current battery test. Clear Test Result - Clear the last battery test result recorded by RemotEye III. UPS Startup Batt Test Enable This field allows the RemotEye to force a battery test when UPS starts following a shutdown. It is enabled by the administrator.
- Page 70 Toshiba RemotEye Client Software for more information). To avoid improper shutdown of the clients, the “UPS output shutdown delay” time setting in the RemotEye III should always be greater than the Toshiba RemotEye Client Shutdown Software Service program's shutdown delay setting.
- Page 71 This field allows the administrator to configure the restart time of the UPS or to view the current setting. This value is displayed in the hh:mm 24-hour format (i.e. 8:30 p.m. is 20:30). Note: to turn off this feature for a particular date type 99:99 in the time fields. RemotEye III User Manual – 62330-005...
-
Page 72: Email Notification
This field allows the administrator to set the IP Address or Hostname of a Simple Mail Transfer Protocol (SMTP) mail server that will be used to send email messages from RemotEye III. If entering a Hostname, the Domain Name Server (DNS) IP address is required in the DNS field. - Page 73 Events – Current events will be sent to recipients. NOTE: System will label each event email with the system Name and Location, in the format: systemName@SystemLocation (“systemName” and “SystemLoaction” can be set in the RemotEye III Configuration menu, see “RemotEye III Configuration” on page 78) •...
-
Page 74: Emd (Environmental Monitoring Device)
Ethernet cable. One end, of the Ethernet cable, is connected to the RJ45 port of the EMD and the other end to the “COM” port of the RemotEye III. Note: The EMD module is separate device which can be purchased from a Toshiba UPS distributor. - Page 75 GREEN: “normal” status Figure 37: EMD Green Web Status (Normal) • YELLOW: “warning” status Figure 38: EMD Yellow Web Status (Warning) • RED: “critical” status Figure 39: EMD Red Web Status (Critical) • GREY: “unknown” value RemotEye III User Manual – 62330-005...
- Page 76 EMD Configuration” in page 75). • “Unknown” – Whenever the EMD is not connected to the RemotEye III. EMD Temperature (°C) - This field displays the temperature in Celsius degrees. EMD Humidity (%) - This field displays the humidity in %.
- Page 77 EMD feature. The EMD type will be auto detected by the RemotEye III if configured as “Auto” and if the EMD is plugged into the COM port. RemotEye III User Manual – 62330-005...
-
Page 78: Remoteye Iii Management
Date On RemotEye III (mm/dd/yyyy) This field show the current date stored in the RemotEye III. Please see the following sections that explain how to change RemotEye III’s date. The date value is displayed in the MM/DD/YYYY format (i.e., Aug 18, 2012 is 08/18/2012). - Page 79 This field shows the RemotEye III MAC address. MAC address format is 00 E0 D8 XX XX XX. RemotEye III IP Address This field allows the administrator to set the IP address of the RemotEye III or to view the current setting (i.e., 192.168.1.20).
- Page 80 This field allows the administrator to set the value in System installation place (System Location) that is defined in MIB file or to view the current setting. NOTE: System will label each event email with the system Name and Location, in the format: systemName@SystemLocation RemotEye III User Manual – 62330-005...
- Page 81 This field allows the administrator to Enable/Disable the Trivial File Transfer Protocol (TFTP) upgrade control or to view the current setting. The Windows firmware upgrade utility, Tugrade (See “Network Firmware Upgrade Tool” on page 14), is used to upgrade the RemotEye III to the latest firmware when enabled. SNMP Version This field allows the administrator to enable and disable the Simple Network Management Protocol security level.
-
Page 82: Radius Configuration
The RemotEye III has the ability to communicate with a RADIUS server which will determine if the user has access to RemotEye III services. Here are the parameters required to enable the Radius feature: RADIUS UDP Port This field shows the default UDP port for RADIUS Authentication. - Page 83 This field shows the administrator description string (text). SNMP Communities /HTTP Access Control This page displays a list of the Network Management Stations (NMS) that have RemotEye III read or write access. Index This field shows the index numbers for the table entries (8 Max).
-
Page 84: History Data & Logs
History Data & Logs This menu allows the user to view UPS & RemotEye III log messages, such as the UPS History Summaries. The log messages are displayed in chronological order and are used to help detect and diagnose UPS problems with the RemotEye III. - Page 85 This page lists the fundamental UPS parameters. Consolidation intervals may be changed by the administrator by modifying the variable General Records Log Frequency from the RemotEye III Configuration page (See “RemotEye III General Records Logs Frequency (secs)” on page 78). The existing values are overwritten when the maximum number of entries has been reached.
- Page 86 Log Date – This field shows the date of the recording. • Log Time - This field shows the time that the values were recorded. Time is displayed in the hh:mm:ss 24- hour format (i.e., 8:30 p.m. is 20:30:00). RemotEye III User Manual – 62330-005...
- Page 87 INVOLRSTNOK Inverter overload occurred and it is NOT resettable UPS Overheat DCUB DC Imbalance UPS Overlaod PHIRER Phase Error PHBRER Bypass Phase Error Emergency Power Off Table 2: UPS Fault Codes Operation Mode Records RemotEye III User Manual – 62330-005...
- Page 88 Battery Voltage low Battery voltage reached shutdown level Power Failure DC Bus low List of Battery voltage out of spec • Status: List of possible conditions: Input Frequency Detection Input Phase Rotation Error Input Frequency Error RemotEye III User Manual – 62330-005...
- Page 89 Output Voltage (%) • Output Load (%) • DC Input Voltage (%) • Battery Voltage (%) • Slot Location • Warning Following is a table of the possible UPS warning codes and their meanings. RemotEye III User Manual – 62330-005...
- Page 90 Battery voltage has reached shutdown level BATRPL Battery replace event occurred CHRGOV Charger overvoltege occurred BTSTFAIL Battery test failed BATDEPL Battery depleted BATOH Battery overheat occurred SYSOH System overheat occurred OL110 Overload occurred Table 3: UPS Warning Codes RemotEye III User Manual – 62330-005...
- Page 91 Clear & Save Log Data This allows the administrator to save the RemotEye III log data to a file. The saved files are given a .csv extension, which allows it to be opened using Microsoft© Excel. Specific log data may be cleared by the administrator or the entire log data record may be cleared after saving the .csv file.
- Page 92 These are the available logs for the 4200FA/4300 UPS: General Records Backup Records Fault records Operation Mode Records RemotEye III Events Log Figure 41: 4200FA/4300 Clear and Save Log Data RemotEye III User Manual – 62330-005...
- Page 93 These are the available logs available for the 1600XP UPS: General Records Test Records Backup Records Fault records Operation Mode Records Warning Records System Setting Change Record RemotEye III Events Log Figure 42: 1600XP Clear and Save Log Data RemotEye III User Manual – 62330-005...
- Page 94 History — Displays the UPS history log graphically. Monitor Clicking the Monitor button at the top-left side of the RemotEye III home page will open the UPS Monitor screen in a separate window (See Figure 43: RemotEye III Web Interface Buttons).
- Page 95 History Clicking the History button at the top-left side of the RemotEye III home page (See Figure 43: RemotEye III Web Interface Buttons), Figure 45: HTTP History Data Screen on page 94 will open in a separate window. This screen displays the UPS history log as a line graph.
-
Page 96: Configuring The Remoteye Iii Via Snmp
IP Address, the Gateway Address, and the MIB System Group. The IP Address of RemotEye III must place it on the same network as the NMS. If the two elements are not located on the same network, a gateway between the RemotEye III and the NMS must exist. - Page 97 Click “Close” to close the SNMP Manager Database. Specifying Trap Receivers To send traps to an NMS, the NMS must be designated as a trap receiver of the RemotEye III. See Trap Receiver Table section on page 34 for instruction on defining a trap receiver.
- Page 98 1. Open RemotEye III on internet browser and go to RemotEye III Management -> RemotEye III Control to check SNMP version Figure 46: SNMP Version Menu 2. Go to RemotEye III Management -> SNMP TRAP Receivers and Become Administrator Figure 47: SNMP Trap Receivers Menu...
- Page 99 3. Enter trap receiver IP address and select Trap Type as Toshiba or JEMA or IETF then set value. Figure 48: SNMP Trap Type Menu RemotEye III User Manual – 62330-005...
- Page 100 Following shows an example of a trap trigger by Battery Test Command as “Quick Test (10 Sec)”. Note: Battery Test feature not available for 4200FA/4300 Series UPS. Figure 49: RemotEye III Trap Example User will receive battery test in progress trap Figure 50: SNMP Trap Example Note: If SNMP version is SNMPv1, SNMP tool must be SNMPv1 compatible.
-
Page 101: Connecting To The Remoteye Iii Via Snmp
Successful SNMP gets and sets from an NMS depend upon RemotEye III settings. The RemotEye III acts as a shield, refusing access to machines that do not meet its setup criteria. If the RemotEye III provides an NMS with Read access, SNMP gets are allowed, if RemotEye III provides NMS with Write access, both SNMP gets and SNMP sets are allowed. - Page 102 The MIB is a set of objects that are processed via a network protocol. These objects determine what UPS parameters may be monitored and controlled using SNMP requests. The RemotEye III communication implements standard MIB III and the following MIBs for TOSHIBA UPS: 1) Toshiba Enterprise RMTI-3 1600XP MIB File...
-
Page 103: Connecting To The Remoteye Iii Via Modbus
Connecting to the RemotEye III via MODBUS Executing SNMP Gets and Sets Log into the RemotEye III using the HTTP interface. Verify the Modbus configuration as follows: On the RemotEye III Main Screen, open RemotEye Management. Click on Modbus TCP Configuration. The Modbus configuration window will open. See Fig. 50. -
Page 104: Toshiba Remoteye Application Programs
The Toshiba RemotEye Client Software runs on servers/PCs and connects to a designated RemotEye III. When the servers/PCs start up the RemotEye III scans for the UPS status. When UPS power events are detected, the RemotEye III broadcasts a Shutdown command to the workstation. The Toshiba RemotEye Client Software will broadcast warning messages (on the screen of the servers/PCs) and then shut down the server/PCs gracefully. - Page 105 This section allows the administrator to check the boxes on which conditions should the client system to be shutdown. When setting this make sure that these are also enabled in the RemotEye III “UPS Shutdown Events” (UPS Management UPS Shutdown Events, see page 69) section. These are the following conditions: •...
- Page 106 Figure 54: HTTP Connected Client Table Figure 54: HTTP Connected Client Table Note: The client local shutdown delay must not be greater than the UPS shutdown delay configured in RemotEye III. RemotEye III User Manual – 62330-005...
- Page 107 The clients will post a dialog box to notify the user that the system will be shutting down. Only checked events in the RemotEye III Client Configuration - Shutdown Events box will trigger a pop-up message and shutdown the Client.
- Page 108 “local machine is about to shutdown” state and select the cancel shutdown option. Uninstalling Toshiba Remoteye III Client Software To uninstall the Toshiba RemotEye Client Software, the following procedure should be followed. Right mouse click the “battery” icon in the taskbar and select "Exit” to stop the shutdown service.
- Page 109 After installation, users can execute the program immediately or during the next system reboot. Supported Operating System Red Hat Advance Server release 2.1 AS Sun Solaris 8 (x86) Sun Solaris 8 (SPARC) HP-UX (PA-RISC) RemotEye III User Manual – 62330-005...
- Page 110 Do you have other run levels that need input?[y/n] If “n” is selected, Please input run level directory: Install to folder /etc[y/n] If “n” is selected, Input install folder: Do you want to start the daemon now?[y/n] RemotEye III User Manual – 62330-005...
- Page 111 Shut down script is loaded?[y/n] If “n” is selected, Input shut down script: Force shut down delay time is 120 seconds?[y/n] If “n” is selected, Input force shut down delay time: Shut Down Enable?[y/n] RemotEye III User Manual – 62330-005...
- Page 112 Also, RemotEye III can be used to coordinate automatic system shutdowns during weekends or holidays. This section highlights the manners in which RemotEye III can be used in conjunction with a UPS to manage power to UPS loads.
- Page 113 Shutdown & Restart day & time: Monday 22:20:00 ----- 99:99:99 Shutdown & Restart day & time: Tuesday 99:99:99 ----- 09:00:00 Note: 99:99:99 indicates the RemotEye III will ignore the Restart Time on Monday, and the Shutdown time on Tuesday. Monday Tuesday...
-
Page 114: Auto Save-Log Software
Toshiba website at www.toshiba.com/ind and clicking on the following path: RemotEye III Download RemotEye Files Save Log. Download the software from the CD or the internet and run the program Savelog_install.exe and follow the setup installation instructions. - Page 115 Unit must be selected then Save Log Settings, Acquire, Browse, Delete, Edit and Open File become available. Figure 58: RemotEye Save Log Utility - RemotEye – Selecting Device List Display the number of devices in the list. Figure 59: RemotEye Save Log Utility – Device List RemotEye III User Manual – 62330-005...
- Page 116 When the unit has been selected and clicked Save Log Settings button becomes available. Figure 61: RemotEye Save Log Utility – Settings Once the Save Log Setting is clicked, the save items will appear. The history logs displayed depends on UPS model selected. RemotEye III User Manual – 62330-005...
- Page 117 Figure 62: RemotEye Save Log Utility – Set Page RemotEye III User Manual – 62330-005...
-
Page 118: Tupgrade Firmware Tool
To perform a firmware upgrade, the RemotEye III must be connected to the same network as the workstation from which the upgrade file is to be sent. In the RemotEye III make sure the Network Upgrade Control is enabled, under RemotEye III Control, and that users have the Admin login and Password string information. - Page 119 Upgrading RemotEye III Firmware from UNIX The RemotEye III firmware may be upgraded from a Unix platform by performing the procedure below. To upgrade the firmware using a UNIX operating system, the tftp command must be installed on the system.
-
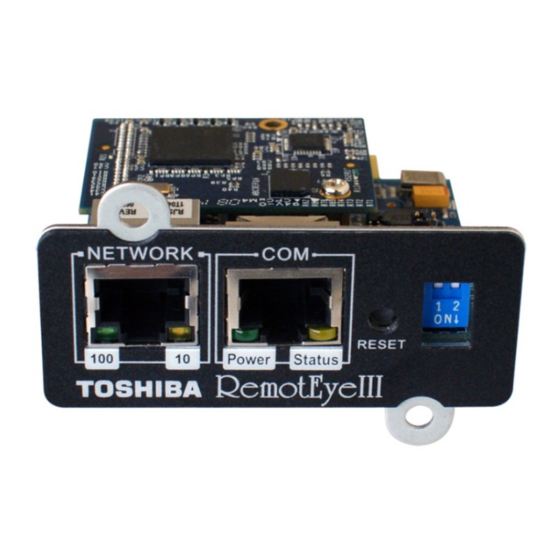
Page 120: Remoteye Iii Specifications
DIP Switch Two bits for operating mode configure. Power x1 (Green) Status x1 (Yellow) LAN 10 Link/Activity x 1 (Yellow) LAN 100 Link/Activity x 1 (Green) Reset Button One Push Button Real time clock RemotEye III User Manual – 62330-005... -
Page 121: System Specifications
Firmware Specifications SNMP over UDP/IP, HTTP over TCP/IP Network Protocols ARP, RARP, DHCP, DNS, BOOTP, SMTP, SNTP, TFTP, SSL, SSH, PPP, ICMP, RADIUS SNMP RFC 1628, JEMA MIB, TOSHIBA MIB TOSHIBA UPS protocol UPS Protocol RemotEye III User Manual – 62330-005... -
Page 122: Led Key
LED Key Front → Figure 64: RemotEye III/Internal Top View Figure 65: Front View – LED location (1) Status LED (Yellow) (3) LAN 10 Link/Activity LED (Yellow) (2) Power LED (Green) (4) LAN 100 Link/Activity LED (Green) Table 3. LED define list... -
Page 123: Jumper Setting
1: Jumper short ; 0 : Jumper open Table 4. J4 Jumper Setting Table ※ Example: Setup Serial Upgrade Z-modem Mode (S1 DIP Switch must Setup: S1-1 on, S1-2 off) Pin1/2: Jumper open. Pin3/4: Jumper short. RemotEye III User Manual – 62330-005... -
Page 124: Dip Switch Setting
OUTPUT + TX- / TDN OUTPUT - RX+ / RDP INPUT + NO CONNECT NO CONNECT RX- / RXN INPUT - NO CONNECT NO CONNECT Table 6. RJ45 LAN connector pin descriptions Console connector (J3) RemotEye III User Manual – 62330-005... -
Page 125: Gold Finger Gf1
Table 7. RJ45 Console connector pin descriptions Gold Finger GF1 PIN Num. Signals Note UPSVCC 8~15Vdc TXDUPS(to UPS) – RS-232 level RXDUPS(from UPS) – RS-232 level Detect+ Detect- Table 8. Gold finger GF1 pin descriptions RemotEye III User Manual – 62330-005... -
Page 126: Appendix A: Install Remoteye Client Shutdown Software On Vmware Esxi 5
Software Needed Toshiba Provided: • RemotEye II Firmware v4.10 or higher. • RemotEye III Firmware v1.05 or higher • RemotEye ESXi Client Shutdown Daemon (TAR file) Customer Provided: • ESXi 5 OS (Operating System) – Full or Evaluation Version (not the Free version) •... -
Page 127: Setup Procedure For Remoteye Esxi Client Shutdown Daemon
Enable SSH in vMA (if not Enabled). 9.1. On the command line prompt type: “vi /etc/hosts.allow” and press Enter. Type “l” and press Enter. (edits file) 9.2. 9.3. Type “sshd: ALL: ALLOW” and press Enter. 9.4. Press the ESC key. RemotEye III User Manual – 62330-005... - Page 128 (See Figure 0-5) Figure 0-5 WinSCP Login Screen 10.1. Locate SD_ESXi_TSB_V100.tar file (left side), then select the directory where you want it stored on the vMA (right side) and press the F5 key. (See Figure 0-6) RemotEye III User Manual – 62330-005...
- Page 129 13. Go to the newly created folder SD_ESXi_TSB: Type “cd SD_ESXi_TSB” and press Enter. 14. Install the software: Type “sh install.sh” in the command prompt and press Enter. Follow the instruction prompts. (See Figure 0-7) RemotEye III User Manual – 62330-005...
- Page 130 "Connected Client Table" web page. Open the Connected Client Table web page. (See Figure 0-8) Figure 0-8 Connected Client Table in RemotEye III 16. Go back to VMware vSphere Client program and select the ESXi server IP address -> Configuration ->...
- Page 131 18.1.1. In the UPS Shutdown Events table, select the action (Disable, Client Warning, or Client Shutdown) and Shutdown Delay (if applicable), for each event listed in the UPS Event column. (See and Error! Reference source not found. and Figure 0-10) 18.1.2. Click the Set Values button when completed. RemotEye III User Manual – 62330-005...
- Page 132 Figure 0-10 RemotEye III UPS Shutdown Events Table 19. Test it. (See Figure 0-11) NOTE: Testing the SHUT DOWN function will shut down all affected servers. Figure 0-11 RemotEye III Main Display with Shutdown Test Buttons RemotEye III User Manual – 62330-005...
-
Page 133: Appendix B - Modbus Registers
Unsigned Integer 16-Bit Date on RemotEye III Day Format: DD 30020 Unsigned Integer 16-Bit Date on RemotEye III Year Year Format: YYYY 30021 Unsigned Integer 16-Bit Time on RemotEye III Hour Hour Format: HH RemotEye III User Manual – 62330-005... - Page 134 UPS Serial Number (seventh and 30039 ASCII String 16-Bit Characters None Serial # Example: 2012101234567891 eighth characters) UPS Serial Number (ninth and tenth 30040 ASCII String 16-Bit Characters None Serial # Example: 2012101234567891 characters) RemotEye III User Manual – 62330-005...
- Page 135 RemotEye Converts °C to °F 30058 Unsigned Integer 16-Bit Input Numbers of Phases Phase 30059 Unsigned Integer 16-Bit Input Voltage Volts 30060 30061 30062 30063 30064 30065 Unsigned Integer 16-Bit Input Voltage Percent 30066 RemotEye III User Manual – 62330-005...
- Page 136 Input Apparent Power (Part 2 of 2) 30084 30085 Unsigned Integer 16-Bit Input Power Factor 30086 Unsigned Integer 16-Bit Output Number of Phases Phase 30087 Unsigned Integer 16-Bit Output Voltage Volts 30088 30089 30090 30091 30092 30093 RemotEye III User Manual – 62330-005...
- Page 137 Output Active Power (Part 1 of 2) Watts Use this formula: (Register (30117) * 0x10000) + Register (30118) 30118 Unsigned Integer 16-Bit Output Active Power (Part 2 of 2) Watts 30119 30120 Unsigned Integer 16-Bit Output Rated Active Power KWatts RemotEye III User Manual – 62330-005...
- Page 138 Unsigned Integer 16-Bit Bypass Current Amps X 0.1 30142 Unsigned Integer 16-Bit Bypass Frequency X 0.1 30143 30144 30145 Unsigned Integer 16-Bit Bypass Apparent Power (Part 1 of 2) Use this formula: (Register (30145) * RemotEye III User Manual – 62330-005...
- Page 139 16-Bit Rated Battery Ampere Hour 30170 Unsigned Integer 16-Bit Batteries in Series Batteries 30171 Unsigned Integer 16-Bit Batteries in Parallel (Strings) Strings 30172 Unsigned Integer 16-Bit External Battery Installation Date Month Month Format: MM RemotEye III User Manual – 62330-005...
- Page 140 30186 Unsigned Integer 16-Bit Battery Cabinet 1 Charger Current Amps X 0.01 30187 Unsigned Integer 16-Bit Battery cabinet 1 Charger Voltage Volts x 0.1 Battery Cabinet 1 Ambient 30188 Signed Integer 16-Bit °C Temperature RemotEye III User Manual – 62330-005...
- Page 141 Signed Integer 16-Bit Temperature in Celsius °C connected Note: "-1" means disabled or not 30202 Signed Integer 16-Bit Temperature Fahrenheit °F connected Note: "-1" means disabled or not 30203 Signed Integer 16-Bit Humidity connected RemotEye III User Manual – 62330-005...
- Page 142 °C Temperature UPS History Highest Battery 30222 Signed Integer 16-Bit °F Temperature UPS History Total Number Input 30223 Unsigned Integer 16-Bit Times Under Voltage UPS History Total Number 30224 Unsigned Integer 16-Bit Times Overloads RemotEye III User Manual – 62330-005...
- Page 143 Operation Mode Change UPS History Total Number 30229 Unsigned Integer 16-Bit Times Warnings UPS History Total Number System 30230 Unsigned Integer 16-Bit Times Settings Changed 30231 Unsigned Integer 16-Bit UPS History Total Number Resets Times RemotEye III User Manual – 62330-005...
-
Page 144: Modbus Input Coil For 1600Xp: Alarms And Status
1-Bit UPS Battery Status Low True/False (1/0) 10012 Discrete 1-Bit UPS Battery Status Depleted True/False (1/0) 10013 Discrete 1-Bit UPS Battery Status Discharging True/False (1/0) 10014 Discrete 1-Bit UPS Battery Status Failure True/False (1/0) RemotEye III User Manual – 62330-005... - Page 145 1 = Passed; 0 = Failed (If no test has been performed it should 10023 Discrete 1-Bit Last Battery Test Result True/False (1/0) be blank) 10024 Discrete 1-Bit External Battery Install Status True/False (1/0) 1 = Installed; 0 = Uninstalled RemotEye III User Manual – 62330-005...
- Page 146 1-Bit True/False (1/0) up Fault DC Bus Under Voltage During 10038 Discrete 1-Bit True/False (1/0) Charging Fault 10039 Discrete 1-Bit Charger Overvoltage Fault True/False (1/0) 10040 Discrete 1-Bit Output Under voltage Fault True/False (1/0) RemotEye III User Manual – 62330-005...
- Page 147 10063 Discrete 1-Bit True/False (1/0) Warning 10064 Discrete 1-Bit Replace Battery Warning True/False (1/0) 10065 Discrete 1-Bit Battery Overheat Warning True/False (1/0) Battery Near Expiration Warning 10066 Discrete 1-Bit True/False (1/0) (Replace batteries soon) RemotEye III User Manual – 62330-005...
- Page 148 UPS and Service Port Communication 10081 Discrete 1-Bit True/False (1/0) Error Warning 10082 10083 10084 10085 Discrete 1-Bit EMD Sensor 1 Alarm Triggered True/False (1/0) 10086 Discrete 1-Bit EMD Sensor 2 Alarm Triggered True/False (1/0) RemotEye III User Manual – 62330-005...
- Page 149 EMD Temperature at High Warning 10094 Discrete 1-Bit True/False (1/0) Point 10095 Discrete 1-Bit Input Power Failure True/False (1/0) 10096 10097 10098 10099 10100 10101 10102 10103 10104 10105 10106 10107 10108 10109 10110 10111 RemotEye III User Manual – 62330-005...
- Page 150 Battery Cabinet 2 String 3 10129 Discrete 1-Bit True/False (1/0) Disconnected Battery Cabinet 2 String 1 Loose HCT 10130 Discrete 1-Bit True/False (1/0) Connection 10131 Discrete 1-Bit Battery Cabinet 2 String 2 Loose HCT True/False (1/0) RemotEye III User Manual – 62330-005...
- Page 151 Battery Cabinet 2 Charger Over 10135 Discrete 1-Bit True/False (1/0) Voltage Fault Battery Cabinet 2 Charger Over 10136 Discrete 1-Bit True/False (1/0) Current Fault 10137 Discrete 1-Bit Battery Cabinet 2 Lost Communication True/False (1/0) RemotEye III User Manual – 62330-005...
-
Page 152: Modbus Input Register For 4200Fa/4300: Monitoring
Unsigned Integer 16-Bit Time on RemotEye III Hour Hour Format: HH 30022 Unsigned Integer 16-Bit Time on RemotEye III Minute Minute Format: MM 30023 Unsigned Integer 16-Bit Time on RemotEye III Seconds Seconds Format: SS RemotEye III User Manual – 62330-005... - Page 153 UPS Serial Number (ninth and tenth 30040 ASCII String 16-Bit Characters None Serial # Example: 2012101234567891 characters) UPS Serial Number (eleventh and 30041 ASCII String 16-Bit Characters None Serial # Example: 2012101234567891 twelve characters) RemotEye III User Manual – 62330-005...
- Page 154 Input Voltage Phase AB (L-N) Volts 30063 Unsigned Integer 16-Bit Input Voltage Phase BC (L-N) Volts 30064 Unsigned Integer 16-Bit Input Voltage Phase CA (L-N) Volts 30065 Unsigned Integer 16-Bit Input Voltage Percent Phase A RemotEye III User Manual – 62330-005...
- Page 155 Output Voltage Phase B (L-L) Volts 30089 Unsigned Integer 16-Bit Output Voltage Phase C (L-L) Volts 30090 Unsigned Integer 16-Bit Output Rated Voltage (L-L) Volts 30091 Unsigned Integer 16-Bit Output Voltage Phase AB (L-N) Volts RemotEye III User Manual – 62330-005...
- Page 156 X 0.1 30113 Unsigned Integer 16-Bit Output Frequency Phase B X 0.1 30114 Unsigned Integer 16-Bit Output Frequency Phase C X 0.1 30115 30116 30117 30118 Unsigned Integer 16-Bit Output Total Active Power KWatts RemotEye III User Manual – 62330-005...
- Page 157 30139 30140 30141 30142 Unsigned Integer 16-Bit Bypass Frequency Phase 1 X 0.1 30143 Unsigned Integer 16-Bit Bypass Frequency Phase 2 X 0.1 30144 Unsigned Integer 16-Bit Bypass Frequency Phase 3 X 0.1 30145 RemotEye III User Manual – 62330-005...
- Page 158 Unsigned Integer 16-Bit Equalize Charge Time Hours 30165 30166 30167 30168 30169 Unsigned Integer 16-Bit Battery Rated Ampere Hour 30170 Unsigned Integer 16-Bit Batteries in Series Batteries 30171 Unsigned Integer 16-Bit Batteries in Parallel Batteries RemotEye III User Manual – 62330-005...
- Page 159 Data Type Size Description Units Multiplier Comments 30172 30173 30174 30175 30176 30177 30178 30179 30180 30181 30182 30183 30184 30185 30186 30187 30188 30189 30190 30191 30192 30193 30194 30195 30196 30197 30198 RemotEye III User Manual – 62330-005...
- Page 160 Unsigned Integer 16-Bit UPS History Inverter Operation Time Hours 30209 Unsigned Integer 16-Bit UPS History Inverter Operation Time Mins 30210 30211 30212 30213 30214 30215 30216 30217 30218 30219 30220 30221 30222 30223 30224 30225 RemotEye III User Manual – 62330-005...
- Page 161 UPS History Total Number of 30226 Unsigned Integer 16-Bit Times Backups 30227 Unsigned Integer 16-Bit UPS History Total Number of Faults Times UPS History Total Number Operation 30228 Unsigned Integer 16-Bit Times Mode Change 30229 30230 30231 RemotEye III User Manual – 62330-005...
-
Page 162: Modbus Input Coil For 4200Fa/4300: Alarms And Status
UPS Battery Status Discharging True/False (1/0) 10014 Discrete 1-Bit UPS Battery Status Test Failure True/False (1/0) 10015 Discrete 1-Bit Protective Charging Set True/False (1/0) 10016 Discrete 1-Bit Equalized Charging Set True/False (1/0) 10017 10018 10019 RemotEye III User Manual – 62330-005... - Page 163 Discrete 1-Bit Output Under Voltage Fault True/False (1/0) 10041 Discrete 1-Bit Output Overvoltage Fault True/False (1/0) 10042 Discrete 1-Bit Heatsink Overheat Fault True/False (1/0) 10043 Discrete 1-Bit UPS Overload Fault True/False (1/0) 10044 10045 RemotEye III User Manual – 62330-005...
- Page 164 True/False (1/0) 10073 Discrete 1-Bit System Overheat Warning True/False (1/0) 10076 10078 UPS and RemotEye Communication 10079 Discrete 1-Bit True/False (1/0) Error Warning 10087 Discrete 1-Bit EMD Humidity is at Low Critical True/False (1/0) RemotEye III User Manual – 62330-005...
- Page 165 Local Run Command Issued True/False (1/0) 10107 Discrete 1-Bit Remote Run Command Issued True/False (1/0) 10108 Discrete 1-Bit Firmware has been Updated True/False (1/0) 10113 10114 Discrete 1-Bit UPS Output is Off True/False (1/0) RemotEye III User Manual – 62330-005...
- Page 167 INDUSTRIAL DIVISION 13131 West Little York Rd., Houston, TX 77041 Tel: 713/466-0277 Fax 713/466-8773 US 877/867-8773 Canada 800/872-2192 Mexico 01/800/527-1204 www.toshiba.com/ind...