Table of Contents
Advertisement
Advertisement
Table of Contents

Related Manuals for Avaya WAP9112


Summary of Contents for Avaya WAP9112
- Page 1 WAP9112 Quick Start Guide Release 7.5 NN47252-308 Issue 01.02 December 2015...
-
Page 2: Table Of Contents
Chapter 1: Introduction...................... 3 Chapter 2: Required Software Components................ 4 Chapter 3: Installing or Upgrading Wireless LAN Orchestration System...... 5 Chapter 4: Setup Wireless LAN Orchestration System for WAP9112......... 6 ................ 6 Connect to WOS Web Client via a browser .............. 6 Creating an AOS-Lite Profile for AP Configuration ................ -
Page 3: Chapter 1: Introduction
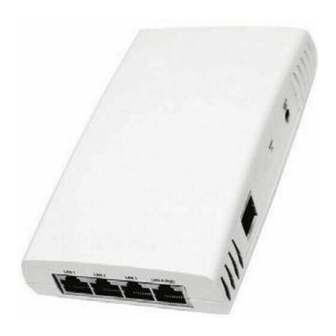
Chapter 1: Introduction This Quick Start Guide is intended to enable a user to configure the Avaya WLAN 9100 WAP9112 Access Point to provide basic Wireless LAN Services for Staff and Guests. WAP9112 is a high performance Gigabit Wi-Fi wall access point with an integrated wired Gigabit switch. -
Page 4: Chapter 2: Required Software Components
Chapter 2: Required Software Components WAP9112 Access Point Operating System (AOS-Lite) The AP Operating System for WAP9112 Access Points is called AOS-Lite and is a separate image file then the AOS image file used for other Access Points in the WLAN 9100 Portfolio. -
Page 5: Chapter 3: Installing Or Upgrading Wireless Lan Orchestration System
.xau file (example: Wos-vm-upgrade-7.5.1-6873.xau). For upgrade instructions, see Performing Server Upgrades in the WOS User Guide or at the online help at http:// docs.wifi.avaya.com/wos/prod/7.5/wwhelp/wwhimpl/js/html/wwhelp.htm#href=XSI.html. December 2015 WAP9112 Quick Start Guide Comments on this document? infodev@avaya.com... -
Page 6: Chapter 4: Setup Wireless Lan Orchestration System For Wap9112
When the WOS splash window appears, log in with your User name and Password. The default login is admin/admin For new appliance installations, click on Cancel for the Setup Wizard and continue. Related links Setup Wireless LAN Orchestration System for WAP9112 on page 6 Creating an AOS-Lite Profile for AP Configuration About this task A profile allows you to define a common access point configuration to a set of Access Points and manage them as a group. - Page 7 Creating an AOS-Lite Profile for AP Configuration If there is a mixture of WAP9112 Access Points and WAP9122, 9123, 9132, 9133, 9172, 9173 or WAO9122 Access Points, you should create one or more AOS and AOS-Lite profiles and set a default profile for each type.
-
Page 8: Configuring The Ap Switch Port Configuration
6 Configuring the AP Switch Port Configuration The WAP9112 has 4 switch ports to connect wired devices to the network. By default the switch ports forward untagged traffic from the devices over to the up-link PoE switch. The Profile Configuration ->... -
Page 9: Configuring The Wireless Networks
Configuring the Wireless Networks Related links Setup Wireless LAN Orchestration System for WAP9112 on page 6 Configuring the Wireless Networks The Profile Configuration enables you to configure your Wireless Networks and apply it to a group of APs that share the common network and access control policies. -
Page 10: Creating Wireless User Vlans
Setup Wireless LAN Orchestration System for WAP9112 Related links Setup Wireless LAN Orchestration System for WAP9112 on page 6 Creating Wireless User VLANs on page 10 Creating SSIDs on page 11 Enable Radios on page 13 Saving the Configuration on page 14... -
Page 11: Creating Ssids
6. Next use the drop down menu selection Currently selected SSID to select the newly created SSID. The drop-down list shows all currently defined SSIDs. 7. Click the SSID in the list to select it. December 2015 WAP9112 Quick Start Guide Comments on this document? infodev@avaya.com... - Page 12 Setup Wireless LAN Orchestration System for WAP9112 8. Check the box for Enabled to activate the selected SSID or uncheck the box to deactivate it. 9. Check the box for Broadcast to make the selected SSID visible to all clients on the network.
-
Page 13: Enable Radios
Configuring the Wireless Networks b. For Guest SSID using a Captive Portal select None / Open. WAP9112 does not have Internal Captive Portal and can be used with any external Captive Portal systems including Avaya IDE Access Portal. Related links... -
Page 14: Saving The Configuration
Setup Wireless LAN Orchestration System for WAP9112 Related links Configuring the Wireless Networks on page 9 Saving the Configuration Procedure Click the Apply Config button at the top of the configuration window to apply these changes to the Access Point. -
Page 15: Chapter 5: Discovering The Access Points
Plug the Uplink-PoE and Pass-through cables into their respective sockets. Note: When the correct power is supplied the POWER LED on the side of the unit turns on and the WAP 9112 boots up. December 2015 WAP9112 Quick Start Guide Comments on this document? infodev@avaya.com... -
Page 16: Discovering The Access Points In Wos
15 Discovering the Access Points in WOS WAP 9112 Access Points do not support auto discovery using the Avaya-WOS DNS entry like the other AOS software Access Points. The Discovery has to be initiated from WOS. There are two methods for discovering the Access Points. -
Page 17: Discover The Ap In Wos Using A Network Address
Running a discovery on the entire subnet is a time consuming task taking up to 30 minutes for a /24 subnet and should only be used if the AP IP addresses cannot be determined from the DHCP Server. December 2015 WAP9112 Quick Start Guide Comments on this document? infodev@avaya.com... - Page 18 The newly entered network will be displayed in the list of networks for discovery. Note: After you click the Discover button WOS will attempt to discover an Avaya Access Point or managed power supply at all of the IP addresses in the specified subnetworks. It will display the results for each network, listing whether discovery is in Progress, Completed, Disabled, or Failed.
-
Page 19: Chapter 6: Upgrade Access Point Operating System
1. Download the latest AOS-Lite software from Avaya support portal. 2. Click the CONFIGURE tab and 3. Under Access Point Upgrade select Perform or Schedule Upgrade. 4. Select the WAP9112 Access Points to be upgraded and click Next. December 2015 WAP9112 Quick Start Guide... - Page 20 Upgrade Access Point Operating System 5. Select WOS Server as the upgrade source and click Next. 6. Click on Browse button… next to the system software and import the WAP9112 software image downloaded from the support portal. December 2015 WAP9112 Quick Start Guide...
- Page 21 7. Select the imported software and click Next once the import is complete. 8. Click Upgrade to start the AP image upgrade and wait for the upgrade process to complete. December 2015 WAP9112 Quick Start Guide Comments on this document? infodev@avaya.com...
- Page 22 Upgrade Access Point Operating System December 2015 WAP9112 Quick Start Guide Comments on this document? infodev@avaya.com...
-
Page 23: Chapter 7: Assigning An Ap To A Profile
Access Point may not be a member of more than one profile, the selected Access Points will be removed from any other profiles to which they belong. 6. In the drop-down menu select the Profile name you wish to assign the AP to. December 2015 WAP9112 Quick Start Guide Comments on this document? infodev@avaya.com... - Page 24 7. Click OK. 8. Navigate to the profile and monitor the Job Status for the configuration to complete. The time for job completion is dependent on the number of APs. December 2015 WAP9112 Quick Start Guide Comments on this document? infodev@avaya.com...
-
Page 25: Chapter 8: Ap Configuration
4. Select the Radios tab in the menu on the left-hand side. 5. Select Radio Settings. 6. Select the desired radio’s check box on the left and click the Edit button. The Edit Radio dialog appears. December 2015 WAP9112 Quick Start Guide Comments on this document? infodev@avaya.com... - Page 26 8. Click the Apply Config button at the top of the configuration window to apply these changes to the Access Point. Important: To make the changes permanent check Save to flash before clicking the Apply Config button. December 2015 WAP9112 Quick Start Guide Comments on this document? infodev@avaya.com...
-
Page 27: Chapter 9: Rf Optimization
3. Click on Optimize Channels in the drop down menu. 4. Check Full Scan and click OK when done. 5. Wait until the Message column shows Done Performing auto channel to signify completion. December 2015 WAP9112 Quick Start Guide Comments on this document? infodev@avaya.com... -
Page 28: Chapter 10: Validate Configuration
Chapter 10: Validate Configuration Connect Clients to the Staff and Guest SSID to validate the configuration. December 2015 WAP9112 Quick Start Guide Comments on this document? infodev@avaya.com...