
Related Manuals for KitchenAid 5KHB2569


Summary of Contents for KitchenAid 5KHB2569
- Page 1 Hand Blender 5KHB2569 I N S T R U C T I O N S Mixer KEB25 I N S T R U Ç Õ E S 후드믹서...
- Page 2 Welcome to the world of KitchenAid. We’re committed to helping you create a lifetime of delicious meals for family and friends. To help ensure the longevity and performance of your appliance, keep this guide handy. It will empower you with the best way to use and care for your product.
-
Page 3: Table Of Contents
Table of Contents HAND BLENDER SAFETY Important Safeguards....................4 Electrical Requirements.....................5 Electrical Requirements for Brazil Only ..............6 PARTS AND FEATURES Hand Blender Parts ....................7 Hand Bender Features ....................8 OPERATING YOUR HAND BLENDER Assembling Hand Bender ..................9 Twist-Lock Blending Arm ..................10 Whisk Attachment....................11 Chopper Attachment ..................12 Operating Tips.....................13 Attachment Guide ....................14... -
Page 4: Hand Blender Safety
Hand Blender Safety IMPORTANT SAFEGUARDS When using electrical appliances, basic safety precautions should always be followed, including the following: 1. Read all instructions. 2. To protect against risk of electrical shock do not put motor body, cord, or electrical plug of this Hand Blender in water or other liquid. 3. -
Page 5: Electrical Requirements
Hand Blender Safety IMPORTANT SAFEGUARDS 15. Blades are sharp. Handle carefully. 16. This product is designed for household use only. 17. To disconnect, turn any control to “OFF,” then remove plug from wall outlet. 18. This appliance is intended to be used in household and similar applications such as: -staff kitchen areas in shops, offices, and other working environments -farm houses -by clients in hotels, motels, and other residential type environments... -
Page 6: Electrical Requirements For Brazil Only
If not, it is your responsibility to have one installed • If the cord of this appliance is by a qualified electrician. damaged, it must be replaced. Contact your nearest authorized KitchenAid Customer Care Center. -
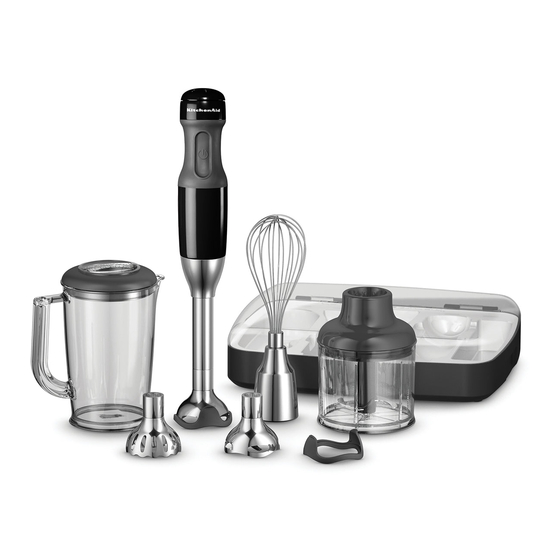
Page 7: Parts And Features
Parts and Features Guide Hand Blender Parts Bell Blades Speed Control Dial One-Touch Power Button S-Blade Motor Body 1.5 m (5 ft.) Multi-Purpose Power Cord Blade Whisk Attachment 20 cm (8") Stainless Steel Blending Arm Frother/Beater * Shown with S-Blade attached 4 C u p 3 1 /2 C Pan Guard... -
Page 8: Hand Bender Features
Long enough to take the Hand Blender chopping cooked meats, and frothing milk, to the cooktop or work area, the Power the KitchenAid Hand Blender has you Cord is rounded with no grooves for easy covered. clean up. A silicone cord strap is included for convenient cord storage. -
Page 9: Operating Your Hand Blender
Operating Your Hand Blender Assembling Hand Blender Before using the KitchenAid™ Hand Blender for the first time, wipe the motor body and attachment adapters with a clean, damp cloth to remove any dirt or dust. Mild dish soap may be used, but do not use abrasive cleansers. -
Page 10: Twist-Lock Blending Arm
Operating Your Hand Blender Twist-Lock Blending Arm Use the Blending Arm attachment for Insert Hand Blender with Blending Arm attached into the Blending Pitcher smoothies, milk shakes, soup, cooked containing ingredients at an angle. Use vegetables, frosting, or baby food. your free hand to cover the top of the 1. -
Page 11: Whisk Attachment
Operating Your Hand Blender Whisk Attachment Use the Whisk to whip cream, beat egg The stainless steel Whisk may scratch or whites, mix instant puddings, vinaigrettes, mar non-stick coatings; avoid using the mousse, or for making mayonnaise. Whisk in non-stick cookware. NOTE: Hand Blender should only be immersed in liquids the length of the attachment. -
Page 12: Chopper Attachment
Operating Your Hand Blender Chopper Attachment 2. Add small pieces of foods to the bowl. 3. Insert the Chopper attachment into the Chopper bowl. 4. Align the Chopper bowl with the motor body and press together. 5. Hold the motor body with one hand and the Chopper bowl with the other while processing. -
Page 13: Operating Tips
Operating Your Hand Blender Chopper Attachment (cont.) Chopper Processing Guide Food Quantity Preparation Speed Time Meats 200 g / 7 oz Cut into 2 cm / " Cubes 15 Seconds Almonds/Nuts 200 g / 7 oz Place in Whole Nuts 25 Seconds Garlic 10–12 Cloves... -
Page 14: Attachment Guide
Operating Your Hand Blender Attachment Guide Attachment Best used for S-Blade Blend, Crush, Puree Smoothies, Milk Shakes, Cooked Veggies, Soups, Sauces, Ice, Baby Food, Frosting, Crushed Ice Multi-Purpose Shred Cooked Meats, Beef Gravy, Liquidize Fruits, Minces, Crushed Ice Frother/Beater Froth and Mix Milk Latte, Frappes, Cappuccino, Cake Batter, Pancake Batter, Muffin Mix, Milk, Muffin Batter... -
Page 15: Care And Cleaning
Care and Cleaning Hand Blender Hand Blender Accessories and Attachments 1. Unplug Hand Blender before cleaning. Wash Blending Attachment, Pitcher and 2. Remove the Adapters and Attachments Lid, Whisk, Chopper Bowl, Blade, and by twisting (see “Operating Your Hand non-skid Base in hot, soapy water, or Blender”... - Page 16 W10508885B 08/12 © 2012. All rights reserved.