ooma Hub User Manual
Voip phone device
Hide thumbs
Also See for ooma Hub:
- User manual (58 pages) ,
- Quick start manual (21 pages) ,
- Quick start manual (22 pages)
Table of Contents
Advertisement
Advertisement
Table of Contents

Related Manuals for ooma ooma Hub


Summary of Contents for ooma ooma Hub
- Page 1 User Guide...
-
Page 3: Table Of Contents
Getting Started ...2 Using the ooma System with a Landline ... 2 Landline Provisioning ... 2 Basic Calling ...4 Verify ooma Service is Working ... 4 Placing Calls ... 4 Answering Calls ... 5 Ending Calls ... 5 Emergency 911 Calls ... - Page 4 Package Contents ... 25 Installing the ooma Hub™ ...28 Connecting the ooma Hub to the Network ... 28 Connecting the ooma Hub to Your Phone System ... 31 Finishing Installation of the ooma Hub ... 34 Installing the ooma Scout™ ...36 Installing the Rest of your Phones ...
-
Page 6: Getting Started
With your ooma™ system, you can use your phones to call anyone in the U.S. – with no monthly fees! It can also provide the Instant Second Line™ feature, allowing you to make or receive two calls at the same time without the hassle or expense of installing a second physical phone line. -
Page 8: Basic Calling
If you see your ooma Tab is blinking red, or if you do not hear the ooma dialtone, your ooma service is not available. You will not be able to make or receive calls until the problem is resolved (i.e. the Internet or power outage is over). -
Page 9: Answering Calls
Lounge or call ooma customer service. If you are using your ooma system with a landline and you place a 911 call, the call will be placed over your landline phone service to ensure that your location is quickly identified. 911 calls will continue to work even if your Internet connection is down or there is a power outage in your house. -
Page 10: Service Disruptions
During an Internet outage, you will not hear any dialtone. When using the ooma system without a landline, you will not be able to dial 911 unless your power and Internet connection are both working. -
Page 11: Other Calling Features
Call Return The ooma system allows you to return the last incoming call. Simply pick up your phone and dial *69. If the caller-ID for the last incoming call is not available or is blocked, the call cannot be returned. - Page 13 basic calling...
-
Page 14: The Instant Second Line
It is especially convenient when you are not near the ooma device, such as when you are using a cordless phone. If your phone does not have a flash button, you may quickly press and release the phone’s hook switch instead. -
Page 15: Placing Calls On Hold
Conferencing With the ooma system you can create a three-way conference call. Creating a Three-Way Conference Call With active calls on both lines, simply press both line buttons simultaneously. -
Page 16: Using The Instant Second Line With Cordless Phones
Using the Instant Second Line with Cordless Phones If your ooma Hub or ooma Scout device is attached to a cordless phone, you may not be near the ooma interface to use the line buttons. Still, you can easily access most of the functions of the Instant Second Line feature directly from your cordless phone. -
Page 18: The Broadband Answering Machine
Unless you have set your system to Do Not Disturb or have disabled message screening in the ooma Lounge, each message is screened (played aloud) over the ooma Hub and ooma Scout speakers as it is recorded. While the caller is recording a message, you can pick up the phone at any time to talk to the caller. -
Page 19: Advanced Features
The next message will automatically begin to play. If you mistakenly delete a message you wish to keep, you can use the ooma Lounge to recover the message from the trash and move it back into your inbox. Messages in the trash for more than two weeks will be permanently removed. - Page 20 Changing Voicemail Settings Pick up a home phone and dial your home phone number (or press the play button on the associated ooma Hub or ooma Scout). From the main menu, select option 2: “Change Your Settings.” From here, you will be...
-
Page 22: The Ooma Lounge
You can listen to all of your voicemail online by logging into the ooma Lounge: http://www.ooma.com/lounge Here, you can login and enter the ooma Lounge, a secure, easy, and friendly Web portal where you can manage your messages, explore and add new ooma services, and get help from ooma Customer Care. - Page 23 quick reference guide...
-
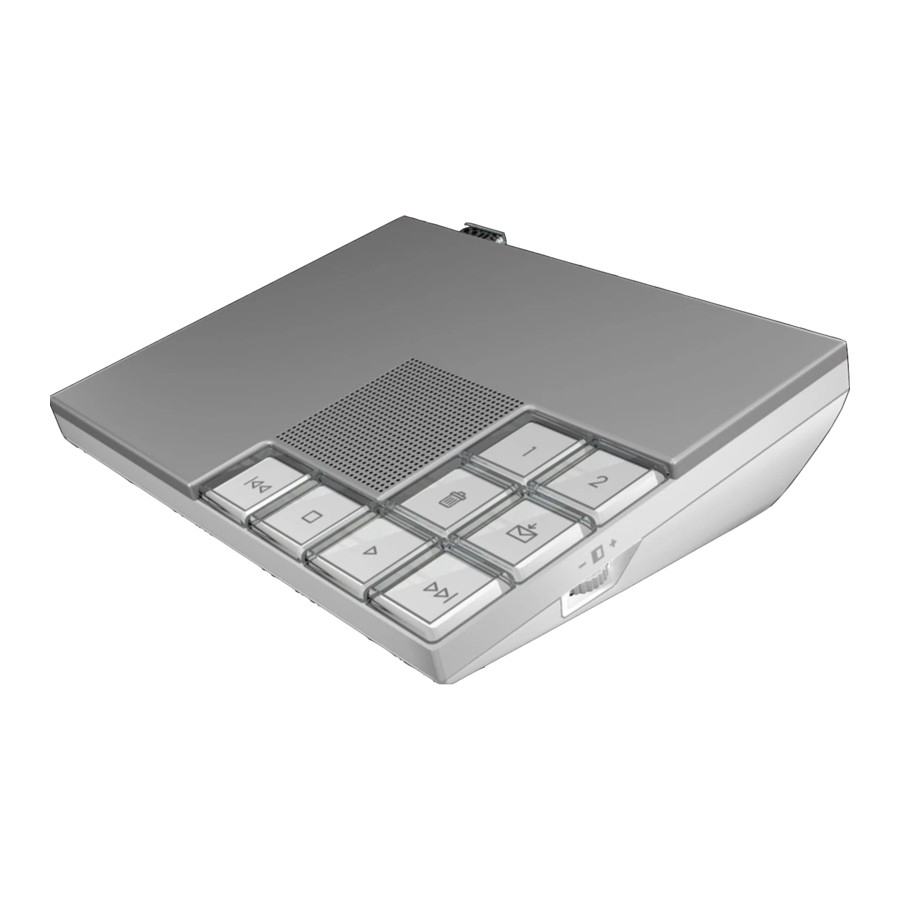
Page 24: Quick Reference Guide
Line 1 and Line 2 traSh Send-to-VoicemaiL reVerSe pLay Stop Forward ooma Hub device VoLUme adJUStment BriGhtneSS adJUStment left side view right side view... -
Page 25: The Ooma Scout
Line 1 and Line 2 traSh Send-to-VoicemaiL pLay reVerSe Forward Stop ooma Scout device VoLUme adJUStment BriGhtneSS adJUStment left side view right side view... -
Page 26: Button Layout
If you are using the ooma system with a landline, you will hear the regular dialtone, not the ooma dial tone. Your Internet or phone connection may be down. -
Page 28: Installation
Hub through your home phone wiring, and drawing upon its power and functionality. The ooma Hub supports up to four ooma Scout devices. If you have a phone which cannot be connected to an ooma Hub or ooma Scout, it must be disconnected and set aside. Additional ooma Scout devices can be... -
Page 29: Package Contents
An Ethernet cable A short phone cable A long phone cable An ooma telephone splitter An AC adaptor Ports on the ooma Hub device Here is a closer look at the ports you will be using during the installation process. - Page 30 Each ooma Scout package contains: The ooma Scout™ device A short phone cable An AC adaptor Ports on the ooma Scout device Here is a closer look at the ports you will be using during the installation process.
-
Page 32: Installing The Ooma Hub
The Internet, ideally next to your modem A power outlet If you plan on using the ooma system with a landline, or want to install ooma Scout devices in other locations in the house, the ooma Hub must also have access to a phone jack. - Page 33 Your initial setup looks like one of these: Internet Modem To connect the ooma Hub to your network: Unplug the existing Ethernet cable from your modem. This is the cable that connects your modem to your computer or router. Plug the existing Ethernet cable into the port labeled Use the Ethernet cable provided and connect the port labeled Ethernet port of the modem.
- Page 34 Integrated Router Installation These instructions assume your modem has a built-in router or that you want to install the ooma Hub behind a router. Your initial setup looks like one of these: Internet Integrated Router To connect the ooma Hub to your network: (optional) Unplug an existing Ethernet cable from your router.
-
Page 35: Connecting The Ooma Hub To Your Phone System
Connecting the ooma Hub to Your Phone System If you plan on using the ooma Hub with an existing landline or you plan on installing one or more ooma Scouts, follow the directions below to connect your ooma Hub to your phone system. Otherwise, you may:... - Page 36 Jack Modem Plug the ooma splitter directly into the phone jack in the wall. UNPlUg any existing DSL filters or splitters from the wall. Connect your DSL modem to one port of the ooma splitter using the original DSL phone cable (leaving any existing DSL filters or splitters connected to the DSL modem).
- Page 37 Use the long phone cable provided and connect the port labeled jack in the wall (not your DSL jack). Now your setup should look like this: DSL Jack Modem Phone Jack MODEM HOME WALL Phone Jack WALL on the ooma Hub to the phone...
-
Page 38: Finishing Installation Of The Ooma Hub
Plug one end of the AC adaptor into the port labeled power outlet. The clear ooma Tab, at the top left corner of the ooma Hub device, should light up red as it boots up. Power on your network devices (modem, switch, router). Wait a few minutes for everything to boot up. -
Page 40: Installing The Ooma Scout
Now that you’ve installed your ooma Hub device, all that’s left to do is install your ooma Scout devices. Each additional phone you want to use with the ooma system must be connected to an ooma Scout. Your initial setup will look like:... -
Page 41: Installing The Rest Of Your Phones
Make sure each phone or cordless telephone base station is connected to an ooma device. Any phone that is not connected to an ooma device should be disconnected. Additional ooma Scout devices can be purchased online on the ooma website. -
Page 42: How Phone Devices Work With The Ooma System
If a phone shares a wall jack with one of these devices, use a standard duplex splitter and connect one jack to the device, and the other jack to the ooma Hub or ooma Scout. Do not use any “pass-through” telephone jacks that the device may have to allow it to connect in-line with a telephone. -
Page 44: Troubleshooting
When using the ooma system with a landline, the ooma Hub is unable to detect if a phone line is plugged in. Confirm that the ooma Hub is connected to a working phone jack. - Page 45 Hub and go to http://setup.ooma.com. This will bring up a simple interface to configure port forwarding and assign a static IP address to the ooma Hub. port of an You have a cable or DSL modem that connects to the computer via USB Modems with only a USB connection are not supported.
-
Page 46: Contacting Ooma Support
Read Frequently Asked Questions Submit an issue or chat with a customer support representative If you are unable to resolve your problem online, you can call ooma, seven days a week at 1-888-711-6662. funds into your pre-paid account. This can be done online in the ooma Lounge. -
Page 48: Appendix A: Identifying Your Equipment
To install the ooma system, you must be able to identify and locate the following network devices and services: your high-speed Internet connection, your modem, your router, and your phone system. The Internet Connection Your high-speed Internet connection is most likely provided by a Digital Subscriber Line (DSL), cable, or a fiber-optic connection. - Page 49 (the line which you registered your ooma system). If you have more than one line, you will have either two-line splitters or dual-jack wall plates that allow you to connect to different phone numbers.
- Page 50 If you have a two-line splitter, make sure you install the ooma Hub or ooma Scout device between the phone and the splitter jack, instead of between the phone and wall plate. Be sure that your ooma Hub and ooma Scout devices are all plugged into the same line (with the same phone number).
-
Page 52: Appendix B: Limited Warranty
What this Warranty Covers. ooma agrees to provide a limited warranty to the holder of a valid proof of purchase (“Consumer” or “you”) that the ooma Hub device contained in this package (“Product”) is free from material defects in material and workmanship, subject to the exclusions noted below. - Page 53 If such is the case, to the extent permitted by applicable law, ooma limits the duration of any implied warranties to the duration of this express Limited Warranty.
-
Page 56: Appendix C: Regulatory Information
appendix c: regulatory information The FCC Wants You to know This equipment complies with Part 68 of the FCC rules and the requirements adopted by the ACTA. On the bottom of this equipment is a label that contains, among other information, a product identifier in the format US:AAAEQ##TXXXX. - Page 57 DO NOT DISASSEMBLE THIS EQUIPMENT. It does not contain any user serviceable components. Changes or modifications to this product not expressly approved by ooma, or operation of this product in any way other than as detailed by the owner’s manual, could void your authority to operate this product.
- Page 59 Appendix D: Technical Specifications...
-
Page 60: Appendix D: Technical Specifications
High-speed Internet connection (cable, DSL or fiber-optic) 256 Kbps upstream network speed (384 Kbps recommended) Landline phone service (only if using the ooma system with a landline) Environmental Requirements Operating temperature: 5C to 40C Operating humidity: 5% - 85% RH non-condensing... -
Page 61: Important Safety Information
Inc. All other product, service or brand names are the property of their respective owners. ooma reserves the right to revise this publication and to make changes in content from time to time without obligation on the part of ooma to provide notification of such revision or change.