ooma Hub User Manual
Tivo inc. hub user guide
Hide thumbs
Also See for Ooma Hub:
- User manual (61 pages) ,
- Quick start manual (21 pages) ,
- Quick start manual (22 pages)
Table of Contents
Advertisement
Advertisement
Table of Contents

Related Manuals for ooma Ooma Hub


Summary of Contents for ooma Ooma Hub
- Page 1 User Guide...
-
Page 3: Table Of Contents
Getting Started ...2 Landline vs. Non-landline ... 2 Provisioning (Landline version only) ... 2 Basic Calling ...4 Verify ooma Service is Working ... 4 Placing Calls ... 4 Answering Calls ... 5 Ending Calls ... 5 Emergency 911 Calls ... 5 Service Disruptions ... - Page 4 Package Contents ... 25 Installing the ooma Hub™ ...28 Connecting the ooma Hub to the Network ... 28 Connecting the ooma Hub to Your Phone System ... 31 Finishing Installation of the ooma Hub ... 34 Installing the ooma Scout™ ...36 Installing the Rest of your Phones ...
-
Page 6: Getting Started
getting started Using the ooma™ system means you can use your phones to call anyone in the US - with no monthly fees! With the Instant Second Line™ feature, your household can make or receive two calls at the same time without the hassle or expense of having a second line and number. -
Page 8: Basic Calling
Both of these indicators tell you that your ooma service is enabled. Placing Calls To place a call, pick up any phone connected to an ooma Hub or ooma Scout device. An available line will automatically be selected for you and the Line handset, you will hear the signature ooma dialtone. -
Page 9: Answering Calls
Answering Calls To answer an incoming call, simply pickup any ringing phone in the house and you will be connected to the caller. When a line is ringing, you will see the line button blink rapidly. To use Caller ID on your phones, the landline phone service plugged into the ooma system must also have the Caller ID feature enabled. -
Page 10: Service Disruptions
Service Disruptions Internet Interruptions ooma service depends on your Internet connection. If the Internet connection stops working, the ooma Tab blinks red, indicating that your ooma service is temporarily unavailable. When this happens, the ooma system will work differently depending on whether you are using the landline or non-landline version. Please see the appropriate notes below. -
Page 11: Other Calling Features
Other Calling Features The ooma system supports traditional calling features that you may already be familiar with on your existing landline phone service. Blocking Caller ID To block Caller ID when placing an outgoing call, dial *67 on the telephone before dialing the destination phone number. - Page 13 basic calling...
-
Page 14: The Instant Second Line
the instant second line The Instant Second Line™ feature adds another phone line to every phone in your home without the hassle or cost of physically installing a new one through the phone company. Not only that, the Instant Second Line uses the same phone number you already have and makes it easy to create 3-way conference calls! To fully utilize your Instant Second Line, you will need to purchase and install at least one ooma Scout device. -
Page 15: Placing Calls On Hold
the instant second line Placing Calls on Hold With the Instant Second Line, you can place a call on hold. Placing a Call on Hold When you are talking on either Line or Line , that particular line’s button will display a solid light. To place your line on hold, simply press the line button with the solid light. -
Page 16: Using The Instant Second Line With Cordless Phones
Using the Instant Second Line with Cordless Phones If your ooma Hub or ooma Scout device is attached to a cordless phone, you may not be near the ooma interface to use the line buttons. Still, you can easily access most of the functions of the Instant Second Line feature directly from your cordless phone. -
Page 18: The Broadband Answering Machine
Unless you have set your system to Do Not Disturb, each message is screened (played aloud) over the ooma Hub and ooma Scout speakers as it is recorded. While the caller is recording their message, you can pick up the phone at anytime to talk to the caller. -
Page 19: Advanced Features
Repeating a Message During message playback, press the Rewind Button already at the beginning of a message, Rewind skips back to the previous message. While a message plays, press and hold to Playing the Next Message – Skipping Messages During message playback, press the Fast-Forward Button While a message plays, press and hold If you start to play a message that is not for you, press to still be marked as new, and the Play Button... - Page 20 Checking Messages Remotely When you are away from home and want to check your messages, call your home phone number. When you hear your outgoing greeting play, press the * key on the phone and the system will ask for your PIN, and will then guide you through message retrieval.
-
Page 22: The Ooma Lounge
If you are online, you can access all your voice messages by connecting to: http://www.ooma.com/lounge Here, you can login and enter the ooma Lounge, a secure, easy, and friendly Web portal where you can manage your messages, explore and add new ooma services, and get help from ooma Customer Care. In the ooma Lounge you can: Listen to and manage all of your messages (listen, save, categorize, or delete) Review your call history (calls received, placed, and missed) - Page 23 quick reference guide...
-
Page 24: Quick Reference Guide
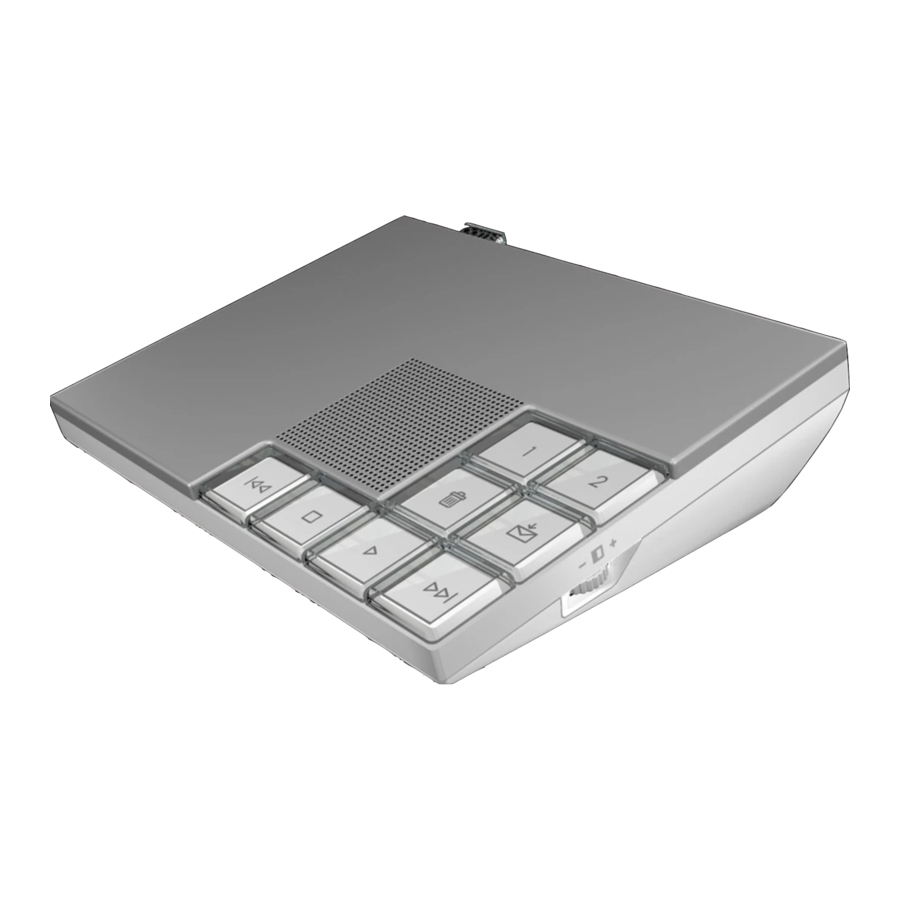
Line 1 and Line 2 traSh Send-to-VoicemaiL reVerSe pLay Stop Forward ooma Hub device VoLUme adJUStment BriGhtneSS adJUStment left side view right side view... -
Page 25: The Ooma Scout
quick reference guide ooma taB Line 1 and Line 2 traSh Send-to-VoicemaiL pLay reVerSe Forward Stop ooma Scout device VoLUme adJUStment BriGhtneSS adJUStment left side view right side view... -
Page 26: Button Layout
Line 1 & Line 2 Buttons A solid light shows the line your call is on. Pick up a phone and press the blinking line button to join a call in progress. Press both buttons at the same time to create a 3-way conference call. -
Page 28: Installation
Hub through your home phone wiring, and drawing upon its power and functionality. The ooma Hub supports up to four ooma Scout devices. If you have a phone which cannot be connected to an ooma Hub or ooma Scout, it must be disconnected and set aside. Additional ooma Scout devices can be purchased on our website. -
Page 29: Package Contents
The ooma Hub™ device An Ethernet cable A short phone cable A long phone cable An ooma telephone splitter AC adaptor Ports on the ooma Hub device Here is a closer look at the ports you will be using during the installation process. - Page 30 Each ooma Scout package contains: The ooma Scout™ device A short phone cable AC adaptor Ports on the ooma Scout device Here is a closer look at the ports you will be using during the installation process.
-
Page 32: Installing The Ooma Hub
The ooma Hub is smart enough to function effectively anywhere in your network. There are certain locations, however, where it works best. If you can connect the ooma Hub in your network between the cable or DSL modem and all the computers in the house, the ooma Hub can intelligently prioritize your phone calls over computer data transfers (like large file downloads or uploads) and maintain the best possible voice quality. - Page 33 Your initial setup looks like one of these: Internet Modem To connect the ooma Hub to your network: Unplug the existing Ethernet cable from your modem. This is the cable that connects your modem to your computer or router. Plug the existing Ethernet cable into the port labeled Use the Ethernet cable provided and connect the port labeled Ethernet port of the modem.
- Page 34 Integrated Router Installation These instructions assume your modem has a built-in router or that you want to install the ooma Hub behind a router. Your initial setup looks like one of these: Internet Integrated Router To connect the ooma Hub to your network: (optional) Unplug an existing Ethernet cable from your router.
-
Page 35: Connecting The Ooma Hub To Your Phone System
Connecting the ooma Hub to Your Phone System LANDLINE If you are installing the landline version, the next step is to connect your ooma Hub to your phone system. Choose one set of instructions based on how your high-speed Internet is provided in your home. - Page 36 Use the long phone cable provided and connect the port labeled port of the ooma splitter. Now your setup should look like this: Phone / DSL ooma Splitter Jack Modem SkIP TO FINISHING INSTALLATION OF THE OOMA HUB MODEM HOME on the ooma Hub to the other WALL WALL...
- Page 37 Use the long phone cable provided and connect the port labeled jack in the wall (not your DSL jack). Now your setup should look like this: DSL Jack Modem Phone Jack MODEM HOME WALL Phone Jack WALL on the ooma Hub to the phone...
-
Page 38: Finishing Installation Of The Ooma Hub
Plug one end of the AC adaptor into the port labeled power outlet. The clear ooma Tab, at the top left corner of the ooma Hub device, should light up red as it boots up. Power on your network devices (modem, switch, router). Wait a few minutes for everything to boot up. -
Page 40: Installing The Ooma Scout
With your ooma Hub device installed, all that’s left to do is connect each of your other phones to an ooma Scout™ device. Each additional phone on the same phone line (or that will share the same phone number) as the ooma Hub must be connected to an ooma Scout. -
Page 41: Installing The Rest Of Your Phones
Installing the Rest of Your Phones Locate other phones that share the same phone line or phone number as the ooma Hub. Repeat steps 1-4 for each phone. If you do not have enough ooma Scout devices for each phone, you must DISCONNECT those phones or your ooma service will be disrupted. -
Page 42: How Phone Devices Work With The Ooma System
If a phone shares a wall jack with one of these devices, use a standard duplex splitter and connect one jack to the device, and the other jack to the ooma Hub or ooma Scout. Do not use any “pass-through” telephone jacks that the device may have to allow it to connect in-line with a telephone. -
Page 44: Troubleshooting
APPENDIx A: IDENTIFYING YOUR The ooma Hub is unable to register to the ooma network. Check your Internet connection to see if it is working and that you can successfully browse http://ww.ooma.com. - Page 45 The ooma Tab cycles between blue and red every few seconds Swap the phone cables going into the ports of the ooma Hub or ooma Scout. PHONE They may be plugged in wrong. You hear a regular dialtone instead of the ooma dialtone Check that your ooma system is powered.
-
Page 46: Contacting Ooma Support
My phones don’t ring when I receive a call Check that your phones are connected to the port of an ooma Hub or ooma Scout. If PHONE the phone needs power, confirm that it is plugged in correctly. -
Page 48: Appendix A: Identifying Your Equipment
To install the ooma system, you must be able to identify and locate the following network services: your high- Internet connection, your modem, your router, and your phone system. The Internet Connection Your high-speed Internet connection is most likely provided by a Digital Subscriber Line (DSL), cable, or fiber- optic connection. -
Page 49: The Router
Hub and ooma Scout devices on the same line (the line on which you registered your system on). If you have more than one line, you will have either two-line splitters or dual-jack wall plates that allow you to con- nect to different phone numbers. - Page 50 (duplex) or two-line splitters just like external splitters. If you have a dual-jack plate with two lines, make sure you install your ooma device on the right phone jack. All ooma Hub and ooma Scout devices need to be...
-
Page 52: Appendix B: Limited Warranty
What this Warranty Covers. ooma agrees to provide a limited warranty to the holder of a valid proof of purchase (“Consumer” or “you”) that the ooma Hub device contained in this package (“Product”) is free from material defects in material and workmanship, subject to the exclusions noted below. This limited warranty extends only to the Consumer for Products purchased and used in the United States of America. - Page 53 appendix b: limited warranty How State or Country Law Applies. This limited warranty gives you specific legal rights. You may also have other rights which vary from state to state and/or country to country. Limitation on Liability. This warranty is the complete and exclusive warranty agreement for the Product between you and ooma.
-
Page 56: Appendix C: Regulatory Information
appendix c: regulatory information The FCC Wants You to know This equipment complies with Part 68 of the FCC rules and the requirements adopted by the ACTA. On the bottom of this equipment is a label that contains, among other information, a product identifier in the format US:AAAEQ##TXXXX. - Page 57 appendix c: regulatory information If your home has specially wired alarm equipment connected to the telephone line, ensure the installation of this ooma system does not disable your alarm equipment. If you have questions about what will disable alarm equipment, consult your telephone company or a qualified installed. This equipment is hearing aid compatible.
-
Page 58: Important Safety Information
© 2007 ooma, Inc. All rights reserved. Reproduction in whole or in part without written permission is prohibited. ooma, the ooma logo, ooma Hub, ooma Scout, Instant Second Line, Broadband Answering Machine, the sound of the ooma dialtone, and all other ooma company, product and service names and slogans are trademarks of ooma, Inc.