
Related Manuals for Omron IntelliSense HEM-705CP


Summary of Contents for Omron IntelliSense HEM-705CP
- Page 1 INSTRUCTION MANUAL Automatic Blood Pressure Monitor and Print-Out IntelliSense™ with HEM-705CP Model...
-
Page 3: Table Of Contents
TABLE OF CONTENTS Introduction...4 Notes on Safety...5 Know Your Unit ...6 Quick Reference Guide ...7 Initial Set-Up ...8 Battery Installation/Replacement...8 How to Set Time and Date ...9 How to Connect Printer-Unit...10 How to Load Printer Paper ...11 How to Use the Optional AC adapter...12 Correct Usage ...13 How to Apply Arm Cuff ...13, 14 How to Take a Reading ...15, 16... -
Page 4: Introduction
INTRODUCTION TITLE Thank you for purchasing the Omron Automatic Blood Pressure Monitor and Print-Out with IntelliSense ™ , HEM-705CP. Although your blood pressure fluctuates throughout the day, no self-adjustment is necessary as the monitor intelligently adjusts to your changing conditions. The ™... -
Page 5: Notes On Safety
Improper operation may result. Do not disassemble, repair, or remodel the main unit or the arm cuff of the blood pressure monitor. The battery liquid may leak and damage the main unit. Please observe the following points. • When you are not going to use the unit for a long period of time (approximately three months or more), take out the batteries. -
Page 6: Know Your Unit
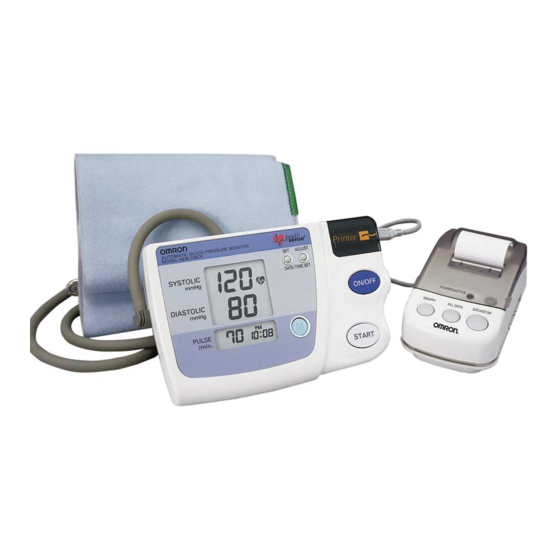
KNOW YOUR UNIT Main Unit: Systolic Blood Pressure Cuff Jack Diastolic Blood Pressure Pulse Rate Printer-Unit: Power/Operation Light Print Graph Accessories: Arm Cuff (Applicable arm cuff for Adults 9 to 13 in.) Air Tube TITLE Heart Symbol Set Date/Time Date/Time Display Printer Cover Print Current Data/Stop Printing Print All Data... -
Page 7: Quick Reference Guide
QUICK REFERENCE GUIDE 1. Avoid eating, smoking, and exercising for at least 30 minutes before taking a measurement. 2. Remove tight-fitting clothing from your upper arm. 3. Sit in a chair with your feet flat on the floor and place your arm on a table so that the cuff is at the same level as your heart. -
Page 8: Initial Set-Up
BATTERY INSTALLATION/REPLACEMENT 1. Slide the battery cover off in the direction of the arrow. 2. Install or replace 4 "AA" size batteries so the + (positive) and – (negative) polarities match the polarities of the battery compartment as indicated. 3. Replace the battery cover. Notes: If the Low Battery Indicator ) appears on the display,... -
Page 9: How To Set Time And Date
HOW TO SET TIME AND DATE 1. When the batteries are installed, the display will show 12:00a.m. 2. Press and hold the “SET” button. The year digits (2001) will flash. 3. Press the “ADJUST” button to advance the digit(s) one at a time. If you hold down the “ADJUST”... -
Page 10: How To Connect Printer-Unit
HOW TO CONNECT PRINTER UNIT 1. Remove printer cable plug from around printer unit. 2. Connect printer cable plug cord to the main unit. Arrow ( ) on printer cable plug should face down to main unit. -
Page 11: How To Load Printer Paper
Use only thermal paper of similar size (width approx. 38mm) and roll diameter (not to exceed approx. 26mm). These rolls of paper (model number 90TRP) can be ordered from OMRON HEALTHCARE, INC., 300 Lakeview Parkway, Vernon Hills, IL 60061 (1-800-634-4350). -
Page 12: How To Use The Optional Ac Adapter
HOW TO USE THE OPTIONAL AC ADAPTER To avoid potential damage to the monitor, use only the exclusive AC adapter (Model HEM-ADPT1). To connect the AC adapter 1. Insert the AC adapter plug into the AC Adapter jack on the back of the main unit. -
Page 13: Correct Usage
HOW TO APPLY THE ARM CUFF 1. If the cuff is assembled correctly, the hook material will be on the outside of the cuff loop and the metal D-ring will not touch your skin. 2. If the cuff is not assembled, pass the end of the cuff furthest from the tubing through the metal D-ring to form a loop. - Page 14 HOW TO APPLY THE ARM CUFF 5. Pull the cuff so that the top and bottom edges are tightened evenly around your arm. 6. When the cuff is positioned correctly, press the sewn hook material FIRMLY against the pile side of the cuff. 7.
-
Page 15: How To Take A Reading
HOW TO TAKE A READING 1. Press the ON/OFF button. a) All display symbols appear for approximately one second. b) When the monitor becomes ready to measure, the Heart Symbol appears on the display. 2. Press the START button and remain still. As the cuff begins to inflate, the monitor automatically determines your ideal inflation level. - Page 16 HOW TO TAKE A READING • If your systolic pressure is known to be more than 220 mmHg, push and hold the START button until the monitor inflates 30 to 40 mmHg higher than your suspected systolic pressure. • If you want to stop the measurement, push the ON/OFF button.
-
Page 17: How To Use The Memory Function
HOW TO USE THE MEMORY FUNCTION This monitor has a memory capable of storing twenty-eight (28) sets of readings. Every time you complete the measurement, the monitor automatically stores blood pressure and pulse rate. • Push the Symbol ( ) is displayed. •... -
Page 18: How To Use The Printer-Unit
HOW TO USE THE PRINTER-UNIT The HEM-705CP has the ability to print all the readings stored in memory. NOTE: • Make sure printer-unit is connected to main unit (see How to Connect Printer-Unit) • Do not use printer-unit without loading printer paper (see How to Load Printer Paper). - Page 19 HOW TO USE THE PRINTER-UNIT The numerical print-out will list all stored readings (maximum of 28 readings) starting with the most recent reading to last stored reading: Systolic Reading Column Month(s) Date Time/Hour • Month(s) The month or months will be printed. Example: If the blood pressure reading was stored between months March-June, then the printout will indicate “3-6”.
- Page 20 HOW TO USE THE PRINTER-UNIT 3. Press “GRAPH” button to print a graph of all stored readings (stores a maximum of 28 readings). Month(s) If reading is lower than 50 mmHg or higher than 200 mmHg, ( ) will appear. Diastolic Reading Average diastolic reading of stored...
-
Page 21: Troubleshooting
TROUBLESHOOTING Main Unit: If you continue to have difficulty obtaining a reading, call Please tell the representative you have an OMRON Model HEM-705CP. TITLE Cuff under-inflated. Movement during measurement. Cuff over-inflated (more than 300 mmHg). Battery voltage is excessively low. Problem caused by abnormal memory function. - Page 22 TROUBLESHOOTING Printer Unit: Nothing is printed Power/Operation light is blinking, stopped printing No printer paper comes out If you continue to have difficulty obtaining a reading, call Please tell the representative you have an OMRON Model HEM-705CP. TITLE Printer cable plug is not connected properly or damaged Batteries are worn...
-
Page 23: Caution
Changes or modifications not expressly approved by Omron Healthcare, Inc. could void the user’s warranty. POTENTIAL FOR RADIO/TELEVISION INTERFERENCE (for U.S.A. only) This product has been tested and found to comply with the limits for a Class B digital device, pursuant to part 15 of the FCC rules. These limits are designed to provide reasonable protection against harmful interference in a residential installation. -
Page 24: Care And Maintenance
CARE AND MAINTENANCE To protect your monitor from damage, please AVOID the following: • Subjecting your monitor and cuff to extreme temperatures, humidity, moisture, and direct sunlight. • Folding the cuff and tubing tightly. • Inflating the monitor over 280 mmHg. •... -
Page 25: Warranty
10 days from the date of purchase. By phone toll free By using the feedback form at WARRANTY Omron Healthcare, Inc. Attn: Repair Department 300 Lakeview Parkway Vernon Hills, IL 60061 1-800-634-4350... -
Page 26: Specifications
SPECIFICATIONS MAIN UNIT: Model: Display: Measurement Range: Accuracy/Calibration: Inflation: Deflation: Rapid Pressure Release: Pressure Detection: Measurement Method: Pulse Wave Detection: Power Source: Battery Life: Operating Temperatures/Humidity: Storage Temperatures/Humidity: Main Unit Weight: Main Unit Dimensions: Cuff Dimensions: Cuff Circumference: Accessories: LCD Digital Display Pressure: 0 to 299 mmHg Pulse: 40 to 180/minute Pressure: ±4 mmHg... - Page 27 PRINTER UNIT: Power Source: Battery Life: Paper Usage: (Printer) Weight: (Printer) Dimensions: These specifications are subject to change without notice. *Optional accessories: large cuff (fits arms 13" to 17" in circumference) and small cuff (fits arms 7” to 9” in circumference) are sold separately. SPECIFICATIONS 4 “AA”...
- Page 28 For Customer Service Call Toll Free 1-800-634-4350 Manufactured by OMRON Distributed by: 300 Lakeview Parkway Vernon Hills, Illinois 60061 www.omronhealthcare.com Copyright © 2001 OMRON HEALTHCARE, INC. 705CPINST Rev A...