Olympus DM 620 Detailed Instructions
Olympus microcassette recorder user manual
Hide thumbs
Also See for DM 620:
- Instrucciones detalladas (113 pages) ,
- Mode d'emploi (113 pages) ,
- Instruções de uso (113 pages)
Table of Contents
Advertisement
DIGITAL VOICE
RECORDER
DETAILED
INSTRUCTIONS
Thank you for purchasing an Olympus
Digital Voice Recorder.
Please read these instructions for information
about using the product correctly and safely.
Keep the instructions handy for future reference.
To ensure successful recordings, we recommend that
you test the record function and volume before use.
Register your product on www.olympus-consumer.com/register
EN
and get additional benefits from Olympus!
Advertisement
Table of Contents

Related Manuals for Olympus DM 620


Summary of Contents for Olympus DM 620
- Page 1 DIGITAL VOICE RECORDER DETAILED INSTRUCTIONS Thank you for purchasing an Olympus Digital Voice Recorder. Please read these instructions for information about using the product correctly and safely. Keep the instructions handy for future reference. To ensure successful recordings, we recommend that you test the record function and volume before use.
- Page 2 • Any liability for passive damages or damage of any kind occurred due to data loss incurred by a defect of the product, repair performed by the third party other than Olympus or an Olympus authorized service station, or any other reason is excluded.
-
Page 3: Table Of Contents
Formatting the recorder [Format] ...77 5 Using the recorder on your PC Operating environment ...80 Using Olympus Sonority ...82 Functions available in the Olympus Sonority ...82 Installing software ...83 Uninstalling software ...85 Copying voice guide data ...86 Upgrade function ...87 Using online help ...89... -
Page 4: Safety Precautions
Safety precautions Before using your new recorder, read this manual carefully to ensure that you know how to operate it safely and correctly. Keep this manual in an easily accessible location for future reference. • The warning symbols indicate important safety related information. - Page 5 Olympus or an Olympus authorized service station, or any other reasons is excluded from the Olympus’s liability.
- Page 6 • If you notice anything unusual when using this product such as abnormal noise, heat, smoke, or a burning odor: 1 remove the battery immediately while being careful not to burn yourself, and; 2 call your dealer or local Olympus representative for service.
- Page 7 f Caution: • Please recycle batteries to help save our planet’s resources. When you throw away dead batteries, be sure to cover their terminals and always observe local laws and regulations. • Always charge a rechargeable battery when using it for the first time, or if it has not been used for a long period.
-
Page 8: Getting Started
Main features s Built-in 3-microphone system (high- sensitivity stereo microphones and center microphone). With a combination of the high- sensitivity stereo microphones and center microphone, balanced, wideband recordings from the high to low frequencies are enabled. s Utilizes a high sensitivity, low noise stereo microphone capable of faithfully capturing the original sound. - Page 9 PC, you can easily playback, organize, and edit the files. • You can perform waveform editing, file joining, and file splitting. s The “Olympus Sonority” can be upgraded to a “Olympus Sonority Plus”, which is equipped with a enhanced functionality (Optional) (☞...
-
Page 10: Checking The Contents Of The Box
• Contents may vary depending on purchase location. • Warranty differs depending on purchase location. Warranty card may not be included. 4 Attaching the strap: USB cable • Ni-MH Rechargeable batteries (2) • Olympus Sonority CD-ROM • INSTRUCTIONS • Warranty card Earphone Strap... -
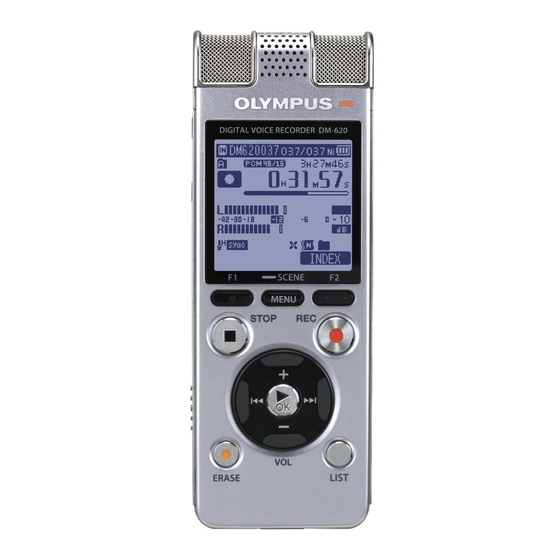
Page 11: Identification Of Parts
Identification of parts & 1 Built-in stereo microphone (L/R) 2 Built-in center microphone 3 LED indicator light (LED) 4 Display (LCD panel) 5 F1 button MENU/SCENE button F2 button 6 STOP (4) button 7 + button 8 0 button 9 ERASE button 0 –... -
Page 12: Display (Lcd Panel)
Display (LCD panel) 4 [Recorder] mode display: Folder list display 1 Recording media indicator [l]: Built-in flash memory [m]: microSD card 2 Current folder name 3 Battery indicator 4 Folder name 5 Function guide indicator File list display 1 Recording media indicator 2 Current folder name 3 Battery indicator 4 File name... - Page 13 4 [Music], [Podcast], [Audible], mode display: List display 1 When there are files and folders in the folder 1 Recording media indicator [l]: Built-in flash memory [m]: microSD card 2 Current folder name 3 Battery indicator 4 Folder name, File name 5 Function guide indicator List display 2 When there are only files in...
- Page 14 [«]: Timer [A]: Alarm [?]: Microphone Sensitivity [û]: VCVA [Æ]: Voice sync [†]: Rec Level [0]: Low Cut Filter • Remove the screen protector on the display. Identification of parts Icon display (For all modes) [≤]: Zoom Mic [%]: Noise Cancel [$]: Voice Filter [Ü] [á] [ [∞] EUPHONY...
-
Page 15: Power Supply
Power supply Inserting batteries This recorder can be used with either Ni-MH Rechargeable Batteries or AAA Alkaline Batteries. • When charging with the recorder, be sure to use the supplied Ni-MH rechargeable batteries (BR404). • The supplied rechargeable batteries are not fully charged. Before using the recorder or after long periods of disuse, it is recommended that you... -
Page 16: Battery Settings
(☞ P.15). Press the + or − button to change the setting. Battery type [Ni-MH] (õ): Select when using the Olympus Ni- MH rechargeable batteries (BR404). [Alkaline] (ú): Select when using alkaline batteries. Press the `OK button to complete the setting. -
Page 17: Charging By Connecting To A Computer Via Usb
Note • When playing a voice/music file, the recorder may be reset due to the reduction of the voltage output of the batteries depending on the volume level even if [º] is displayed in the battery indicator. In this case, lower the volume of the recorder. -
Page 18: Connect To The Usb Connecting Ac Adapter (Optional) To Charge
will be changed depending on the remaining amount and the state of batteries. Connect to the USB connecting AC adapter (optional) to charge It can be charged by connecting to the USB connecting AC adapter (A514) (optional). • Before connecting the AC adapter, switch the USB connection setting to [AC Adapter] (☞... - Page 19 • Do not charge the recorder with the USB hub connected. • Insert the supplied rechargeable battery and set [Battery] to [Ni-MH]. If [Battery] is set to [Alkaline], you cannot recharge (☞ P.16, P.64). • You cannot charge when [ ø ]*1 or [ √ ]*2 blinks.
-
Page 20: Turning On/Off The Power
• When disposing rechargeable batteries, always observe the local laws and regulations. Contact your local recycling center for proper disposal methods. • If Ni-MH rechargeable batteries are not fully discharged, protect against short- circuiting (e.g. by taping the contacts) before disposing. Turning on/off the power When the recorder is not being used, turn the power off to reduce battery... -
Page 21: Hold
HOLD If you set the recorder to HOLD mode, the running conditions will be preserved, and all buttons will be disabled. This feature is useful when the recorder has to be carried in a bag or pocket. This mode can also prevent you from accidentally stopping recording. Set the recorder to HOLD mode Slide the POWER/HOLD switch to the [HOLD] position. -
Page 22: Setting Time And Date [Time & Date]
Setting time and date [Time & Date] If you set the time and date beforehand, the information when the file is recorded is automatically stored for each file. Setting the time and date beforehand enables easier file management. When you use the recorder for the first time after purchasing it, or when the batteries have been inserted without the device having... -
Page 23: Changing The Time And Date
Notes • If you press the ` OK button during the setup operation, the recorder will save the items that were set to that point. • After setup, a message will sound saying that If the guidance is not required, select [Off], and the screen goes into [Voice Guide] (☞... -
Page 24: Inserting And Ejecting A Microsd Card
Inserting and ejecting a microSD card The “microSD” indicated in the instruction manual refers to both microSD and microSDHC. With this recorder, besides the built-in memory, you can store the data in the commercially available microSD card. Inserting a microSD card While the recorder is during stop mode, open the card cover. -
Page 25: Ejecting A Microsd Card
• Releasing your finger quickly after pushing the microSD card inward may cause it to eject forcefully out of the slot. • Check the Olympus website regarding microSD cards which are confirmed operation with this recorder. • This recorder may not recognize correctly on some microSD cards which are not compatible with this recorder. -
Page 26: [Home] Display Operations
[Home] display operations You can use this recorder as a digital voice recorder, as well as a digital music player. Press the LIST button repeatedly to set the [Home] display. • [Home] will appear on the display. • When [Home] is displayed in the Function Guide display section, press the F1 button to return to the home screen. -
Page 27: Notes On The Folders
Notes on the folders The built-in memory or the microSD card can be used for the recording media. Regardless of the recording media, voice files, music files, and contents files are separated and saved respectively into the [Recorder], [Music], [Podcast] and [Audible] folders organized in a branching tree-style. -
Page 28: About The Folder For Music Playback
About the folder for music playback When transferring music files to the device using Windows Media Player, a folder is automatically created within the music playback folder which has a layered structure as shown in the diagram below. Music files that are in the same folder can be rearranged in preferential order and replayed (☞... -
Page 29: About The Folder For Podcast Contents
A [Podcast] folder to store podcasts is prepared in advance. Programs (files) transmitted from the “Olympus Sonority” can be played. With the recorder stopped, open the [Podcast] folder at the [Home] menu to display a list of files and folders stored in the folder. -
Page 30: Selecting The Folders And Files
Selecting the folders and files Change folders while the operation is stopped or during play. For information on the layered structure of the folders, see the section entitled “Notes on the folders” (☞ P.27). [Home] display Folder list display (First layer) When [Music] folder is selected. -
Page 31: About Recording
About recording Recording Before starting recording, select a folder among [&] to [*]. These five folders can be selectively used to distinguish the kind of recording; for example, Folder [&] might be used to store private information, while Folder ['] might be dedicated to holding business information. - Page 32 • When remaining recording time is less than 60 seconds, the LED indicator light starts flashing. When the recording time is decreasing to 30 or 10 seconds, the light flashes faster. • [Folder Full] will appear when the recording cannot be made any further. Select other folder or delete any unnecessary files before recording (☞...
- Page 33 Settings relating to Recording Select whether or not the [Mic Select] built-in center microphone is (☞ P.53) to be turned On or Off. [Mic Sense] Sets the recording sensitivity. (☞ P.53) [Rec Mode] Sets the recording rate for (☞ P.54) each recording format.
-
Page 34: Changing The Recording Scene [Rec Scene]
Listening while audio is recorded If you start recording after inserting the earphone into the EAR jack on the recorder, you can hear the sound being recorded. The recording monitor volume can be adjusted by pressing the + or − button. Connect the earphone to the EAR jack on the recorder. -
Page 35: Recommended Settings By Recording Condition
Recommended settings by recording condition The recorder is initially set to [WMA 128 kbps] mode so that you can make high quality stereo recordings immediately after purchasing it. The various functions relating to recording can be configured in detail to suit the recording conditions. The following table shows the recommended settings for some example recording conditions. -
Page 36: Recording From External Microphone Or Other Devices
Recording from external microphone or other devices The external microphone and other devices can be connected and the sound can be recorded. Connect as follows according to a device to be used. • Do not plug and unplug devices into the recorder’s jack while it is recording. - Page 37 Recording the sound of other devices with this recorder: The sound can be recorded when connecting to the audio output terminal (earphone jack) of the other device and the MIC jack of the recorder with the connecting cord KA333 (optional) for dubbing. To audio output To MIC jack terminal of other...
-
Page 38: About Playback
Playback The recorder can play WAV, MP3 and WMA format files. To playback a file recorded with other machines, you need to transfer (copy) it from a computer. Select the file to be played back from the folder which contains it (☞... - Page 39 Settings relating to playback If recorded audio is difficult to understand because of [Noise Cancel] noisy surroundings, adjust (☞ P.60) the Noise Cancel setting level. The EUPHONY setting can [EUPHONY] be set to one of the 4 levels (☞ P.60) according to your preference.
- Page 40 Forwarding While the recorder is during stop mode in the file display, press and hold the 9 button. • [ß] will appear on the display. • If you release the 9 button, it will stop. Press the `OK button to start playback from where it was stopped.
- Page 41 Locating the beginning of a file While the recorder is during stop mode or playback mode, press the 9 button. • The recorder skips to the beginning of the next file. While the recorder is during playback mode, press the 0 button.
-
Page 42: Playback Position Mode
Playback Position mode The recorder has a playback position mode to automatically bookmark the latest position where you previously stopped playback for files transferred to the [Podcast] and [Music] (Audible) folders. Even if the recorder is stopped while a file is being played back, the last stop position is recalled from the file, and the file can be played back from that position next time. - Page 43 Rewinding While the recorder is during stop mode, press and hold the 0 button. ➥ When you release the button, the recorder stops. The Playback position is updated. If the `OK button is pressed, playback starts from this position. While the recorder is during playback mode, press and hold the 0 button.
-
Page 44: Changing The Playback Speed
Changing the playback speed Change the speed according to need such as listening to meeting content at a fast speed or reviewing spots that you couldn’t catch in a language lesson at a slow speed. The tone will be automatically adjusted digitally without changing the voice so it sounds natural. -
Page 45: Setting An Index Mark Or A Temp Mark
Index marks can only be placed on files created by Olympus voice recorders, but temp marks can be placed instead to temporarily remember desired locations. -
Page 46: How To Begin Segment Repeat Playback
How to begin segment repeat playback This function enables repeated playback of part of the file being played. Select a file that has a segment you would like to play back repeatedly, and start playback. Press the F1 (A-B) button at the point you want to start segment repeat playback. -
Page 47: Changing The Playback Scene [Play Scene]
Canceling the segment repeat playback function Pressing any of the following buttons will release the segment repeat playback. a Press the F1 (CANCEL) button Pressing the F1 (CANCEL) button will release segment repeat playback, and it will return to normal playback mode. b Press the STOP (4) button Pressing the STOP (4) button will release segment repeat playback, and... -
Page 48: Erasing
Erasing Erasing files A selected file can be erased from a folder. Also, all files in a folder can be erased simultaneously. Select the file you want to erase (☞ P.30). While the recorder is during stop mode in the file display, press the ERASE button. -
Page 49: Partially Erasing A File
Press the + button to select [Start]. Press the `OK button. • The display changes to [Erase!] and erasing will start. • [Erase Done] is displayed when the folder is erased. Partially erasing a file An unwanted part of a file can be erased. Only a PCM file recorded in the recorder can be partially erased. - Page 50 Press the ERASE button. • The display will switch to [Partial erasing !] and start the partial erase. The deletion is completed when [Partial erase completed.] is displayed. • Playback will stop at the end location of the partial erase. •...
-
Page 51: Menu Setting
Menu setting method Items in menus are categorized by tabs, so select a tab first and move to a desired item to quickly set it. You can set each menu item as follows. MENU/SCENE button F2 button + − button `OK button While the recorder is during stop mode, press the MENU/SCENE... - Page 52 Press the `OK button to complete the setting. • You will be informed that the settings have been established via the screen. • Pressing the 0 button without pressing the `OK button will cancel the settings and return you to the previous screen.
-
Page 53: File Menu
+ File Menu File Lock Locking a file keeps important data from being accidentally erased. Locked files are not erased when you select to erase all files from a folder (☞ P.48). [On]: Locks the file and prevents it from being erased. - Page 54 Rec Mode The recorder can record in the linear PCM format. High resolution recording at a high sampling rate and high bit rate equivalent or superior to that of a music CD is possible. Moreover, it also supports the MP3 and WMA formats. Select the recording format.
- Page 55 • Inputting a very loud sound may produce noise even when the recording level is set to [Auto]. • The level can be adjusted from [01] to [16]. The higher the number, the higher the level and the larger the indicator position on the level meter.
- Page 56 [Off]: Disables this function. Will resume recording in normal mode. When [Standby] is selected: [On]: With this setting, the recording monitor (earphone output) is disabled during VCVA standby (☞ P.34), which allows you to confirm VCVA actuation status by the earphone output.
- Page 57 Sets the detection time. [1 second] [2 seconds] [3 seconds] [4 seconds] [5 seconds] [10 seconds]: If the input (recording level) is equal to or below the specified level for longer than the specified detection time, the recorder will return to the standby mode.
- Page 58 Rec Scene A recording setting can be selected from among the [Conference], [Lecture], [Meeting], [Dictation] or [DNS] templates to suit the recording scene or situation. You can also save a recording setting of your choice. Select [Scene Select] or [Scene Save]. [Scene Select]: Select a recording scene from the templates which will suit the recording scene and conditions.
- Page 59 [Meeting]: [Mic Select] [Central Mic ON] [Mic Sense] [Middle] [Rec Mode] [MP3]: [128 kbps] [Rec Level] [Auto] [Zoom Mic] [Off] [Low Cut Filter] [On] [On/Off]: [Off] [VCVA] [Standby]: [Off] [V-Sync. Rec] [Off] [Dictation]: [Mic Select] [Central Mic ON] [Mic Sense] [Low] [Rec Mode] [MP3]: [mono]...
-
Page 60: Play Menu
- Play Menu Noise Cancel If recorded audio is difficult to understand because of noisy surroundings, adjust the Noise Cancel setting level. [High] [Low]: Enables the Noise Cancel function. Noise will be reduced in the file when it’s played back for better sound quality. - Page 61 Play Mode You can select the playback mode that fits your preference. Select the desired playback range: Select [Play Area]. Select [File], [Folder] or [All]. [File]: Selects the current file. [Folder] Selects the current folder. [All]: Selects all files in the current memory.
- Page 62 Play Scene Voice files recorded in the recorder and music files downloaded from the PC can be saved in the playback settings of your choice to suit the different sound qualities and playback methods. Select [Scene Select] or [Scene Save]. [Scene Select]: Select a playback scene customized to your preferences.
-
Page 63: Lcd/Sound Menu
. LCD/Sound Menu Backlight The display will remain lit for about 10 (Initial setting) seconds when a button on the recorder is pressed. Select [Lighting Time] or [Brightness]. Select the setting. When [Lighting Time] is selected: [Off]: Disables this function. [5seconds] [10seconds] [30seconds] [1minute]: Enables the Backlight function. -
Page 64: Device Menu
Battery Select to match the battery you are using. [Ni-MH] (õ): Select when using the Olympus Ni-MH rechargeable batteries (BR404). [Alkaline] (ú): Select when using alkaline batteries. Folder Name You can change the folder names of Folder &... - Page 65 - Play Menu: [Noise Cancel] [Off] [EUPHONY] [Off] [Voice Filter] [Off] [Play Mode] [Play Area] [File] [Repeat] [Off] [Random] [Off] [Skip Space] [Forward Skip] [File Skip] [Reverse Skip] [File Skip] [Alarm] [Off] [Play Scene] [Off] [Reverb] [Off] . LCD/Sound Menu: [Backlight] [Lighting Time] [10Seconds]...
-
Page 66: Rearranging Files [Replace]
Rearranging files [Replace] You can move a file in a folder to change the order of playback. First select the folder (file) for which you want to change the playback order. Select the folder for which you would like to rearrange the file order (☞... -
Page 67: Moving/Copying Files [File Move/Copy]
Moving/Copying files [File Move/Copy] Files saved in the built-in memory or the microSD card can be moved or copied within the memory. Files can also be moved or copied between memory. F2 button + − button `OK button Select the folder where the file you want to move or copy is saved (☞... - Page 68 When you select [1file]: 1 Press the + or − button to select the file you want to move or copy. 2 Press the `OK button to select the file. When you select [Selected files]: 1 Press the + or − button to select the file you want to move or copy.
-
Page 69: Dividing Files [File Divide]
Dividing files [File Divide] Files with large capacities and long recording times can be divided so that they are easier to manage and edit. F2 button + − button `OK button Only MP3 files and PCM files recorded on this recorder can be divided. -
Page 70: Timer Recording [Timer Rec]
• If a file has an extremely short recording time, it may not be divided even if it is a MP3 file or PCM file. • Do not remove the battery while dividing a file. This may damage the data. Timer recording [Timer Rec] Timer recording is the function to execute a recording at a set time. - Page 71 [Time] setting: 1 Press the 9 or 0 button to select "Hour" and "Minute" in the [Start Time] and "Hour" and "Minute" in the [Stop Time]. 2 Press the + or – button to set. 3 Press the `OK button to exit [Time] selection.
-
Page 72: Alarm Playback Function [Alarm]
• If the batteries run out while recording based on the timer setting, the recorder will stop recording. Check the battery power before starting the timer recording. • If the [Time & Date] is not correct, timer recording cannot be set at the specified time, so make sure the [Time &... - Page 73 Press the + or − button to select the item to set. • Select items you want to set from among [On/Off] [Day] [Start Time] [Volume] [Alarm Sound] [Playback File]. Press the `OK button to move to the respective setting. [On/Off] setting: 1 Press the + or –...
- Page 74 When the data has been erased by accident, connect to PC and copy the alarm sound data to the recorder by using the supplied "Olympus Sonority" (☞ P.86). Menu setting method...
-
Page 75: Guidance [Voice Guide]
PC and copy the guide data to the recorder by using supplied “Olympus Sonority” (☞ P.86). • Set the volume of the starting tune/ closing tune at the guidance [Volume] setting. -
Page 76: Changing The Usb Class [Usb Settings]
Changing the USB class [USB Settings] Besides setting to [PC] (Connect to PC to transfer files) or [AC Adapter] (Connect to AC adapter to recharge the battery), you can switch the USB class according to your usage. Select [USB Settings] from the menu on the [Device Menu]. -
Page 77: Formatting The Recorder [Format]
Press the ` OK button to complete the setting. Press the F2 (EXIT) button to close the menu screen. Notes • When you first connect the recorder to your PC as an external storage device, the driver for the recorder will be automatically installed in your PC. - Page 78 Press the + button to select [Start]. Press the `OK button. • After [Data will be cleared] message is on for two seconds, [Start] and [Cancel] will turn on. Press the + button again to select [Start]. Menu setting method Press the `OK button.
- Page 79 • If you format the recorder (☞ P.77), voice guide data will be erased as well. If you want to recover the voice guide data, connect to a PC and copy the guide data to the recorder by using supplied “Olympus Sonority” (☞ P.86). Menu setting method...
-
Page 80: Using The Recorder On Your Pc
• Voice files recorded on the recorder can be played and managed on the PC using the “Olympus Sonority”. If an upgrade (Optional) to the “Olympus Sonority Plus” is executed or a Music Editing Plug-in is added (Optional), various additional functions can be utilized (☞ P.87). - Page 81 Windows and Finder in Macintosh are different from the folder names that can be set with the recorder or the “Olympus Sonority”. • If folders or files stored on the recorder are moved or renamed by using a file management tool in Windows or Macintosh, the order of files may be changed or files may become unrecognizable.
-
Page 82: Using Olympus Sonority
Using Olympus Sonority Functions available in the Olympus Sonority Various functions such as file management and editing are installed in the “Olympus Sonority”. For information on operating procedures and detailed settings, please refer to the respective items on online help (☞ P.89). -
Page 83: Installing Software
Installing software Before you connect the recorder to your PC and use it, you must first install the “Olympus Sonority” software from the included Software CD. Be sure to confirm the following before installation: • Exit all running applications. • You need to log on as an Administrator. - Page 84 [Start Installation] • When the installation is completed, the completed [Installer] display will be displayed. • After starting up the “Olympus Sonority”, the serial number entry dialog box will appear. Enter the serial number which is listed on the separate sheet. After entering, click [OK] and the “Olympus Sonority”...
-
Page 85: Uninstalling Software
Uninstalling software To uninstall any of the software component of the “Olympus Sonority” software installed on your PC, follow the steps below. Windows Exit “Olympus Sonority”. Select [Control Panel] from [Start] menu. Click [Add/Remove programs] in the control panel window. -
Page 86: Copying Voice Guide Data
Copying voice guide data If you format the recorder and erase data by mistake, you can copy the voice guide data from "Olympus Sonority" to the recorder. Make sure that the recorder’s voice guide is set to [On]. • If the recorder’s voice guide is set to [Off] the voice guide data cannot be copied. -
Page 87: Upgrade Function
The "Olympus Sonority" can be upgraded to the Plus Version (Optional) to expand and improve its functions. In addition, in the "Olympus Sonority Plus", you can purchase a Music Editing Plug-in to enjoy high-quality effect editing. To add a Music Editing Plug-in, you will need to upgrade the "Olympus Sonority Plus". - Page 88 Functions available with the music editing plug-in: By purchasing a music editing plug-in, you can add high-quality functions to expand the music editing range in the “Olympus Sonority Plus”. For detailed purchasing method and operating procedures, please refer to the Online Help (☞ P.89).
-
Page 89: Using Online Help
Using online help To open Online Help: • While “Olympus Sonority” is running, select [Contents] from the [Olympus Sonority Help] menu. 4 Search by contents: Once the Online Help display appears, click the Contents tab. Double-click the icon of the desired topic heading. -
Page 90: Connecting To Your Pc
Connecting to your PC Before you connect the recorder to your PC and use it, you must first install the “Olympus Sonority” software from the included Software CD (☞ P.83). Boot the PC. Connect the USB cable to the USB port of the PC. -
Page 91: Disconnecting From Your Pc
Disconnecting from your PC Windows Click [ ] on the task bar located at the lower-right corner of the screen. Click [Safely remove USB Mass Storage Device]. • The drive letter will differ depending on the PC being used. • When the window indicating that it is safe to remove hardware window appears, close the window. -
Page 92: Transfer The Voice Files To Your Pc
Transfer the voice files to your PC The 5 voice folders of this recorder are named as [Folder A], [Folder B], [Folder C], [Folder D] and [Folder E], and the recorded voice files are saved in these folders. Windows Connect the recorder to your PC (☞... -
Page 93: Using As External Memory Of The Pc
Using as external memory of the PC In addition to its uses as a voice recorder and a music player, this recorder can also be used as external memory for a computer by storing data from a computer and reading it back out. With the recorder connected to your PC, you can download data from the memory to your PC and upload data stored on your PC to the memory. -
Page 94: Using Audible Content
Start up the downloaded executable file. • The AudibleManager Setup screen will be displayed. Select the name of the device in use (OLYMPUS DM-620) and click the [Install] button. When the [Audible Manager License Agreement] is displayed, click the [I Accept] button. - Page 95 4 Adding device to AudibleManager: If AudibleManager has already been installed, add a device in order to handle the recorder in the AudibleManager. Follow the procedure described below. Select [Add New Device] in the [Devices] menu. When the dialog box is displayed, verify the internet connection and click the [Yes] button.
-
Page 96: Transferring Audible Content
Transferring Audible content Audible content can be transferred into the [Audible] folder on the recorder by following the procedure described below. Windows Connect the recorder to a computer. Select [Library] in the [Audible Folders] tree listing. • A list of content stored in the [Library] is displayed on the right side. -
Page 97: Enjoy Audible Content With The Recorder
Enjoy Audible content with the recorder Audible content that has been transferred into the [Audible] folder on the recorder from a computer can be enjoyed with an exclusive mode optimally suited for the operation of Audible content. 4 Audible mode: When you select the [Audible] folder in the [Music] folder, the recorder automatically switches to the Audible mode.The Audible mode is an exclusive mode for enjoying Audible content (Mode 3 and Mode 4 formats*) transferred from a computer. - Page 98 4 Playback position and section: In the Audible mode, the starting position can be moved easily by referring to the [Playback Position] which is the positional information stored from previous stops for each file, and by referring to "Section" where the content distributor has preset the position. Playback position: The Playback Position (positional information) is stored in the [.pos] file, which is created automatically by the recorder for each Audible content file ([.aa] file).
- Page 99 4 Operating the Recorder in Audible mode: The operating method of the recorder is different in the Audible mode when the [Audible] folder or Audible file is selected, then while in the Normal mode. Forwarding Press and hold the 9 button while the recorder is stopped. ➥...
- Page 100 File skip and section skip Press the 9 button while the recorder is stopped. ➥ The recorder skips to a playback position or the starting position of a section, whichever is closer in the file, and stops. After a stop position, if there is no playback position or a starting position of a section, the recorder will skip to a playback position in the next file then stop.
-
Page 101: Other Information
(☞ P.48). This is a malfunction, so go to the store where you purchased the Error in the memory. recorder or an Olympus service station for repair (☞ P.112). Remove the microSD microSD card is not card, and put it again recognized correctly. - Page 102 Message Meaning [Can’t make the system file. Connect to PC and delete unnecessary file] File which cannot be [Cannot play this file] played. [Please Select The File] [Same folder. Can't be moved(copied).] [Some files. Can't be moved(copied).] [This file can’t be divided] Explanation The file for management...
-
Page 103: Troubleshooting
Troubleshooting Symptom Probable cause The batteries are not loaded properly. Nothing appears on Battery power is getting low. the display The power is off. Battery power is getting low. Won’t start The power is off. The recorder is in HOLD mode. Low remaining memory. - Page 104 Symptom Cannot find the recorded Voice File Noise heard during playback Unable to hear any sound from the earphone through the recording monitor Unable to erase the file Unable to erase the folders Noise is audible through the recording monitor Unable to set index marks, temp marks Probable cause...
- Page 105 Symptom Probable cause [Battery] is set to [Alkaline]. Cannot recharge You have not pressed the `OK button. [USB Class] is set to [Composite]. The PC is unable [USB Connect] is set to to recognize the [AC Adapter]. recorder Troubleshooting Action When using the supplied rechargeable batteries, set the battery setting to [Ni-MH].
-
Page 106: Accessories (Optional)
Accessories (optional) Accessories exclusive to the Olympus voice recorder can be purchased directly from Online Shop on our company’s website. Sales of accessories are different according to the country. s Stereo microphone: ME51S The built-in large-diameter microphone enables sensitive stereo recording. -
Page 107: Specifications
ø 3.5 mm mini-jack, impedance 8 Ω or more 4 Input power requirement: Batteries: AAA battery (LR03) or Olympus Ni-MH rechargeable battery External power supply: USB connecting AC adapter(A514) 5 V 4 External dimensions: 110.8 mm × 39.8 mm × 15.4 mm... - Page 108 Frequency response: 4 During recording mode (Microphone jack): Linear PCM format 48 kHz 16 bit 44.1 kHz 16 bit MP3 format 320 kbps 256 kbps 128 kbps mono WMA format 128 kbps 64 kbps 32 kbps mono 4 During recording mode (Built-in microphone): 20 Hz to 20 kHz ([Central Mic ON]) 70 Hz to 20 kHz ([Central Mic OFF])
- Page 109 MP3 format 320 kbps 128 kbps WMA format mono Note • Battery life is measured by Olympus. It varies greatly according to the type of batteries used and the conditions of use. Specifications Built-in stereo microphone Earphone playback (During recording mode) (During playback mode) 39h.
- Page 110 Guide to recording times The following values are strictly references. 4 Linear PCM format: Recording mode 48 kHz 16 bit 44.1 kHz 16 bit 4 MP3 format: Recording mode 320 kbps 256 kbps 128 kbps mono 4 WMA format: Recording mode 128 kbps 64 kbps...
- Page 111 Maximum recording time per file • The maximum capacity for a single file is limited to approx. 4 GB for WMA and MP3. • Regardless of the memory remaining amount, the longest sound recording time per file is restricted to the following value.
-
Page 112: Technical Assistance And Support
Technical assistance and support The following are contact information for technical support for Olympus recorders and software only. s Technical Hotline Number in the U.S. and Canada 1-888-553-4448 s User Support E-mail address in the U.S. and Canada distec@olympus.com s Technical Hotline Number in Europe... - Page 113 OLYMPUS IMAGING CORP. Shinjuku Monolith, 3-1 Nishi-Shinjuku 2-chome, Shinjuku-ku, Tokyo 163-0914, Japan. Tel. +81 (0)3-3340-2111 http://www.olympus.com OLYMPUS IMAGING AMERICA INC. 3500 Corporate Parkway, P.O. Box 610, Center Valley, PA 18034-0610, U.S.A. Tel. 1-888-553-4448 http://www.olympusamerica.com EN-BD3011-01 AP1012...