Riello RX 700 S/PV Installation, Use And Maintenance Instructions
Premixed gas burners
Hide thumbs
Also See for RX 700 S/PV:
- Installation, use and maintenance instructions (84 pages) ,
- Installation, use and maintenance instructions (80 pages) ,
- Installation, use and maintenance instructions (80 pages)
Table of Contents

Related Manuals for Riello RX 700 S/PV


Summary of Contents for Riello RX 700 S/PV
- Page 1 Installation, use and maintenance instructions Premixed gas burners Progressive two-stage or modulating operation CODE MODEL TYPE 20074586 RX 700 S/PV 854T3 20074219 RX 850 S/PV 926T1 20050087 RX 1000 S/PV 891T3 20079424 (2) - 10/2013...
- Page 2 Translation of the original instructions...
-
Page 3: Table Of Contents
Contents Declarations....................................3 Information and general warnings............................4 Information about the instruction manual........................4 2.1.1 Introduction ..................................4 2.1.2 General dangers ................................4 2.1.3 Other symbols................................. 4 2.1.4 Delivery of the system and the instruction manual ......................5 Guarantee and responsibility ............................5 Safety and prevention................................ - Page 4 Contents Maintenance ....................................33 Notes on safety for the maintenance..........................33 Maintenance programme ..............................33 7.2.1 Maintenance frequency ..............................33 7.2.2 Checking and cleaning ..............................33 Opening and closing the burner ............................34 Recommended preventive maintenance schedule .......................35 Opening and closing the burner ............................35 Operation, indication, diagnostics ............................36 Control sequence in the event of fault ...........................36 Fault status messages, display of errors........................36 8.2.1 Display of errors (faults) with lockout ..........................36...
-
Page 5: Declarations
Controlling organisation: TÜV Industrie Service GmbH TÜV SÜD Gruppe Ridlerstrase, 65 80339 München DEUTSCHLAND Manufacturer’s Declaration RIELLO S.p.A. declares that the following products comply with the NOx emission limits specified by German standard “1. BImSchV release 26.01.2010”. Product Type Model Power... -
Page 6: Information And General Warnings
Information and general warnings Information and general warnings Information about the instruction manual 2.1.1 Introduction WARNING: MOVING PARTS The instruction manual supplied with the burner: This symbol indicates that you must keep limbs is an integral and essential part of the product and must not away from moving mechanical parts;... -
Page 7: Delivery Of The System And The Instruction Manual
Information and general warnings The system supplier must carefully inform the user about: 2.1.4 Delivery of the system and the instruction – the use of the system; manual – any further tests that may be required before activating the When the system is delivered, it is important that: system;... -
Page 8: Safety And Prevention
Safety and prevention Safety and prevention Introduction The burners have been designed and built in compliance with the type and pressure of the fuel, the voltage and frequency of the current regulations and directives, applying the known technical electrical power supply, the minimum and maximum deliveries for rules of safety and envisaging all the potential danger situations. -
Page 9: Technical Description Of The Burner
Technical description of the burner Technical description of the burner Models available Designation Voltage Code RX 700 S/PV 230V - 50-60 Hz 20074586 RX 850 S/PV 230V - 50-60 Hz 20074219 RX 1000 S/PV 3N - 400V - 50-60 Hz... -
Page 10: Maximum Dimensions
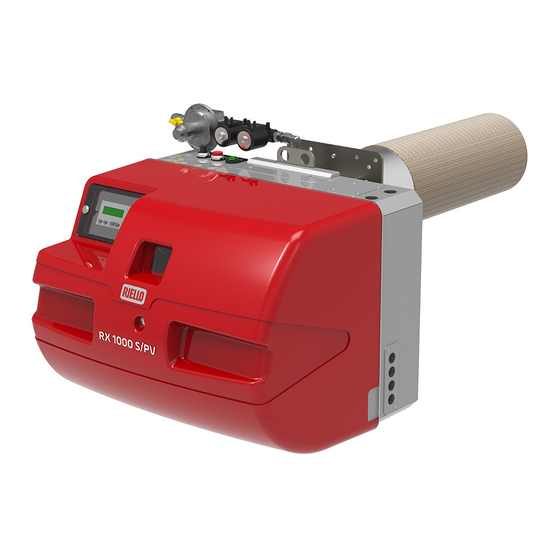
The maximum dimensions of the burner are given in Fig. 1. Bear in mind that, in order to inspect the combustion head, the burner must be pulled back. 20075691 Fig. 1 RX 700 S/PV RX 850 S/PV RX 1000 S/PV Tab. C 20079424... -
Page 11: Burner Description
Technical description of the burner Burner description 20075698 Fig. 2 Combustion head 16 Transformer Ignition electrode 17 Plate with 4 holes, useful for passing electrical cables Flame sensor probe 18 Fuses Gas valve 19 Programming board Air/gas mixer in the suction line circuit 20 ON-OFF selector Gas pressure test point 21 Light signalling of mains live state... -
Page 12: Firing Rates
The Ignition output should be selected from within area A for the the diagram (Fig. 3 - Fig. 4 - Fig. 5). gas G20 - G25. RX 700 S/PV = 700 kW The firing rate (Fig. 3 - Fig. 4 - Fig. 5) was ob- RX 850 S/PV = 880 kW tained with an ambient temperature of 20 °C, at a... -
Page 13: Test Boiler
Technical description of the burner RX 1000 S/PV 20075304 Thermal power – kW Fig. 5 4.8.1 Test boiler 4.8.2 Commercial boilers The firing rates were set in relation to special test boilers, accord- The burner-boiler combination does not pose any problems if the ing to EN 676 regulations. -
Page 14: Burner Controls (Lme71
WARNING The LME71... are safety devices! Do not open, in- terfere with or modify the unit. Riello S.p.A. does not assume responsibility for damage resulting from unauthorized interference! Additional safety notes contained in other chap- ters of this document must be observed as well! Only qualified personnel are allowed to install and operate the equipment. - Page 15 Technical description of the burner Installation notes Description of display and buttons Always run the high-voltage ignition cable separate from the unit and other cables while observing the greatest possible distance. Do not mix up live and neutral conductors. ...
- Page 16 Technical description of the burner Technical data LME71... burner Mains voltage AC 230 V Mains frequency 50 / 60 Hz +- 6% controls Power consumption <10 W, typical External primary fuse Max. 6.3 A (slow) Safety class I with parts according to II and III to DIN EN 60730-1 Terminal rating Under voltage UMains 230 V...
- Page 17 Technical description of the burner Program sequence Standby Startup Operation Shutdown Valve proving if parameter P241 =1 (ON) Can be parameterized t11 t10 t12 t3 t3n t11 t8 td4 td1 td3 td2 Phase number oP: xx (actual load in %) 242 243 244 245 Operating unit parameter number LED permanent...
- Page 18 Technical description of the burner Key Fig. 9: Times Alarm device Safety time Waiting time Auxiliary output Prepurge time Wire link Preignition time Lockout reset button (info button) Postignition time (P257 +0.3 seconds) (EK1) Interval: end of safety time ñ fuel valve 1 ON /reset (dependent on Interval: end of safety time ñ...
-
Page 19: Indication Of Diagnostics Mode
Technical description of the burner Key to Phases (Fig. 9): 4.9.1 Indication of diagnostics mode Phase The lockout reset button (info button) is the key Function number operating element for resetting the burner control and for activating/deactivating the diagnostics Lockout shutdown phase functions. -
Page 20: Installation
Installation Installation Notes on safety for the installation After carefully cleaning all around the area where the burner will The installation of the burner must be carried out be installed, and arranging the correct lighting of the environ- by qualified personnel, as indicated in this manual ment, proceed with the installation operations. -
Page 21: Operating Position
Pierce the closing plate of the combustion chamber, as in Fig. 12. The position of the threaded holes can be marked using the ther- mal insulation screen supplied with the burner. RX 700 S/PV RX 850 S/PV 325 ÷ 275 RX 1000 S/PV Tab. -
Page 22: Securing The Burner To The Boiler
Installation Securing the burner to the boiler Provide an adequate lifting system. The burners are supplied with the combustion head already assembled. The seal between burner and boiler must be airtight. 20075323 WARNING Make sure the probe and electrodes are correctly Fig. -
Page 23: Fuel Supply
Installation Fuel supply A signal reporting pressure detected in the air circuit is carried to Explosion danger due to fuel leaks in the pres- the pneumatic gas valve, which delivers an amount of gas in pro- ence of a flammable source. portion to the airflow produced by the fan. -
Page 24: Electrical Wiring
Installation Electrical wiring Notes on safety for the electrical wiring The electrical wiring must be carried out with the electrical supply disconnected. Electrical wiring must be made in accordance with the regulations currently in force in the country of destination and by qualified personnel. -
Page 25: Supply Cables And External Connections Passage
Installation 5.8.1 Supply cables and external connections passage All the cables to be connected to the burner must be threaded through cable grommets. The use of the cable grommets can take various forms by way of example we indicate the following mode. -
Page 26: Opening Sequence Of The Fuse-Holder
Installation 5.8.2 Opening sequence of the fuse-holder In case of failure or control of the fuse-holder, follow these steps Close the component side (Fig. 23). to remove or replace the fuse: Disconnect the electrical supply from the burner by means of the main system switch. DANGER Unhook as indicated in Fig. -
Page 27: Start-Up, Calibration And Operation Of The Burner
Start-up, calibration and operation of the burner Start-up, calibration and operation of the burner Notes on safety for the first start-up The first start-up of the burner must be carried out Check the correct working of the adjustment, com- by qualified personnel, as indicated in this manual mand and safety devices. -
Page 28: Fan Adjustment
Start-up, calibration and operation of the burner Fan adjustment Modulation is based on variable-speed technology. Hence the output delivered is adjusted by varying the motor’s speed of rotation. The speed of the motor can be adjusted setting Combustion air delivery can be adjusted by varying the motor’s the control box. - Page 29 Start-up, calibration and operation of the burner Proceed as follows (Fig. 27): – By pressing the speed can be changed in step sizes of 10 rpm within the limits predefined by the OEM (P0max, P0min). NOTE: the setting value of P0 must be greater than the setting value of P1.
-
Page 30: Gas Valve Adjustment
Start-up, calibration and operation of the burner Run appears during download (backup process) of the program sequence. Display shows alternately End and bAC. Alternately Display shows the end of data exchange. Display appears for 2 minutes or can be finished by pressing /reset When the backup process is completed, the display shows OFF. -
Page 31: Optimum Calibration Values
Start-up, calibration and operation of the burner To correct these values act on the gas valve in the following way: to increase the gas delivery and the CO : turn the screw V2 clockwise (tighten); to reduce the gas delivery and the CO : turn the screw V2 anticlockwise (unscrew). -
Page 32: Operator Panel With Lcd Display
Start-up, calibration and operation of the burner Operator panel with LCD display Description of the symbols Lock-out lamp Lockout Flame presence Valve powered Ignition transformer powered Fan motor powered Pre-heater active only for burners of fuel oil Fig. 29 D8268 Heat request Key to units of measurement cubic metre... - Page 33 Start-up, calibration and operation of the burner Technical data Display and operating unit General unit data Operating voltage DC 5V Power consumption <50 mW (typically) Degree of protection - AZL21… IP40 to IEC529 Safety class II to DIN EN 60730-1 Housing - Material PC and PC / ABS...
-
Page 34: Combustion Head
Start-up, calibration and operation of the burner 6.9.1 Combustion head The combustion head comprises a highly heat resistant cylinder whose surface features numerous holes, encased in a metal “mesh”. The air-gas mixture is pushed inside the cylinder and out of the head through the holes in the perimeter. -
Page 35: Maintenance
Maintenance Maintenance Notes on safety for the maintenance The periodic maintenance is essential for the good operation, safety, yield and duration of the burner. Disconnect the electrical supply from the burner It allows you to reduce consumption and polluting emissions and by means of the main system switch. -
Page 36: Opening And Closing The Burner
Maintenance Display of flame current ION or QRA... Press for display of the flame signal amplifier. Signal lamp blinks green. Display shows FL.1 Press (1…3 seconds), the flame signal current is displayed. Signal lamp blinks green. 1..3s Example: 11 When pressing (>3 seconds), the point after the number begins to blink. -
Page 37: Recommended Preventive Maintenance Schedule
Maintenance Recommended preventive maintenance schedule Operation and maintenance instructions are intended for general applications. For specific operating and maintenance instruc- tions, consult the equipment manufacturer. Test/Inspection Frequency Check components, monitors, and indicators DAILY Check instrument and equipment settings DAILY Check burner flame DAILY Check igniter WEEKLY... -
Page 38: Operation, Indication, Diagnostics
Operation, indication, diagnostics Operation, indication, diagnostics Control sequence in the event of fault If lockout occurs, the outputs for the fuel valves, the burner motor and the ignition equipment are immediately deactivated (<1 sec- ond). Cause Response Mains voltage failure Restart Voltage below undervoltage threshold Safety shutdown... -
Page 39: Error Code List With Operation Via Internal Led
Operation, indication, diagnostics Error code list with operation via internal LED Error Clear text Possible cause code bAC Er3 Fault of compatibility program module to basic unit during Program sequence of program module does not match the backup process basic unit Err PrC Fault of program module –... -
Page 40: Resetting The Burner Control
Operation, indication, diagnostics Resetting the burner control When lockout occurs, the burner control can immediately be reset. For reset the unit, press for 1...3 seconds. When the button is released, OFF is displayed. > 1s The basic unit is reset. The LME71…... - Page 41 Operation, indication, diagnostics Press for >3 seconds to display alternately LoA and 41. The relative value 41 of the current position or current speed is displayed. Current speed 0 rpm = 0% display Alternately Current speed corresponds to the rated load speed = 100% display. >...
-
Page 42: Diagnostics Of Cause Of Fault
Operation, indication, diagnostics 8.5.2 Diagnostics of cause of fault If, by accident, interface diagnostics has been activated, in which case the slightly red light of the signal lamp flickers, it can be de- After lockout, the red fault signal lamp remains steady on. In that activated by pressing again the lockout reset button (info button) condition, visual diagnostics of cause of fault according to the er- for >... -
Page 43: First Startup With A New Program Module Or In Case Of Replacement Of Program Module
Operation, indication, diagnostics 8.5.3 First startup with a new program module or in case of replacement of program module Display shows alternately rSt and PrC. Display shows the replacement of the program module. Alternately Signal lamp blinks red once and yellow twice alternately. Press for >3 seconds to start data download from the program module. -
Page 44: Manual Restore
Operation, indication, diagnostics Manual restore Press simultaneously simultaneously for >1 second (Escape) for starting the manual re- store process. Parameter PrC appears. Display: PrC > 1s Press for parameter rSt. Display: rSt 1...3s run appears during download (restore process) of program sequence. After the restore process, the unit is automatically in the lockout position (LOC 138) and must Alternately be reset for operation! -
Page 45: Errors During The Restore Process
Operation, indication, diagnostics 8.6.1 Errors during the restore process Alternately with Display shows alternately rSt and Er1, Er2 or Er3. For meaning of a possible cause, see chapter “Error code list with operation via internal LED” on page 37. Tab. Z NOTE: During the restore process, all settings and parameters are writ- ten from the program module to the basic unit’s onboard memory. -
Page 46: Appendix - Accessories
3010214 Software diagnostics kit Burner Code RX 700 S/PV RX 850 S/PV in progress RX 1000 S/PV A special kit is available that, by an optical link to a PC, shows the burner life together with operating hours, type and number of lock- outs, number of motor rpm's and safety parameters. -
Page 47: Appendix - Electrical Panel Layout
Appendix - Electrical panel layout Appendix - Electrical panel layout Index of layouts Indication of references Functional diagram Functional diagram Functional diagram Functional diagram Electrical wiring that the installer is responsible for Electrical wiring that the installer is responsible for Electrical wiring that the installer is responsible for Indication of references / 1 . - Page 48 20079424...
- Page 49 20079424...
- Page 50 20079424...
- Page 51 20079424...
- Page 52 20079424...
- Page 53 20079424...
- Page 54 20079424...
- Page 55 20079424...
- Page 56 20079424...
- Page 57 20079424...
- Page 58 WIRING LAYOUT KEY Control box LME7... Display and operating unit Suppressor Input under current 4...20 mA DC Input under current 4...20 mA DC to modify the setpoint Pressure probe Pressure probe Remote setpoint voltage divider Thermocouple probe Probe Pt100 with 2 wires Probe Pt100 with 3 wires Probe Pt100 with 3 wires BTEXT...
- Page 60 RIELLO S.p.A. I-37045 Legnago (VR) Tel.: +39.0442.630111 http:// www.riello.it http:// www.rielloburners.com Subject to modifications...