
Related Manuals for New Balance 5K


Summary of Contents for New Balance 5K
- Page 1 _ OWNER'S MANUAL FOR MAXIMUM EFFECTIVENESS AND SAFETY, PLEASE READ THIS OWNER'S MANUAL BEFORE USING YOUR NEW BALANCE 5K 6 I00 RECUMBENT BIKE 12/_5/05...
-
Page 2: Table Of Contents
NB _- logo are registered trademarks Fitness Quest Inc. is the exclusive licensee 5-11 15-17 Bike ... 25 26-27 Made In China. Of Fitness Quest Inc. of New Balance Alhletic Shoe Inc, of New Balance A_hle_ic Shoe Inc, 12/15/05... - Page 3 Read all instructions before using this equipment Exemise of a strenuous should not be undertaken No specific health 1) Before starting this or any other exercise program, consult your physician, who can assist you in determining the target heart rate zone appropriate for your age and physical Certain...
- Page 4 Important: See below for placement of the foltowlng w_rnlng labels on your equipment. WARNING LABEL t WARNING LABEL 2 WARNING LABEl 3...
- Page 5 New Balance Fitness Equipment SK 6100 Recumbent Bike Customer Service Department 1400 Raft Road...
- Page 6 Occasionally our products contain components at the factory. We recommend that you protect flooring, or anything else the parts may contact, with newspaper computerlube boatfoollube wlthrollers _¢omputeT marfloat l ubo wlthendcaps ©© book holder water baffle with holder L& Rfootpedals &_Iraps Tools Required: (included) Multi Hex Tool with...
- Page 7 _ STEP I - Front Foot Tube Assembly Remove [2) Carriage Bo_,[2) Washers (2) Acorn Nuts from the Front Foot Tube. Position Front Foot Tube [with rollers) in front of Main Fame and align bolt holes, see Figure 1. ¢) Attach Front Foot Tube with (2) Carriage Bolts, (2) Washers...
- Page 8 _'STEP 3 - Seat Carriage Assembly Remove (1) Alien Bolt and (1) Washer from underside Position Seat Carriage in front of Carriage Raise Locking Arm, slide Carriage down to hold Carriage Tube In place. Remove (3) Alien Bolts and (3] Washers from Main Frame. Plug Pulse Wire from Main Frame Info Long Extension and remove...
- Page 9 _ STEP4 - Seat Cushion and Backrest Installation Position Seat Cushion over lower Seat Carriage with narrow side pointing forward and align bolt holes. Secure wilh (4) Phillips Bolts and (4) Washers from fastener pack and tighten, see Figure 4a, Place Backrest upside...
- Page 10 :_,STEP6 - Computer Tube Assembly Remove (4) Allen Bolts and (4] Washers from Main Frame. Connect Main Frame wires to wires in Computer Tube (remove twist ties] and carefully tuck wires into Main Frame while sliding Computer Tube onto Main Frame, see Figure 6, Be careful not to pinch the wires.
- Page 11 M8 _c:_hers --_ M8 n_on nuts _-_- allen boffs front handebar eornputer tube Figure 8 - Instofl Front Handlebar STEP 9 - Computer Installation Remove batlery door from back of Computer, insert [4) "C" batteries and replace the battery door, Note: DO NOT use reehargeable batteries, doing...
- Page 12 STEP 10 - Water Battle Holder Installation a) Remove (2) Phillips Screws from Computer Tube Align holes and affach Water Be/file Holder to Computer Tube with phillips screws removed In Step A Place water bottle In holder receptacle AC adapter Figure 1 1 - AC Adaptor Once...
- Page 13 ITEM PARTS NAME NBC6100-2 Retail Unit NBC6100-01 M8 x 65ram Carriage Bolt (01) NBC6100-02 Front Foot Tube (02) NBC6100-O4 M8 Washer (04) NBC6100_]5 M8 Acorn Nut (05) NBC6100-07 End Cap (07) NBC61D0-08 Rear Foot Tube (08) NBC6100-09 Suppod Tube (09) NBC6100-10 Right Rear Cover (10) NBC6100-11...
-
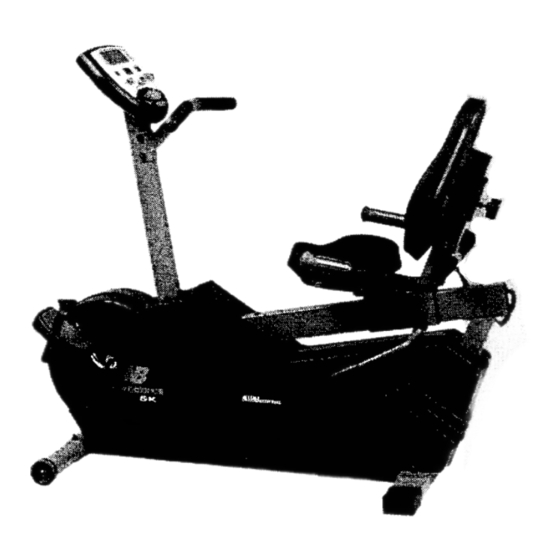
Page 15: Bike
RISK OF ELECTRICALSHOCK,THIS UNiTIS TO BE USED Your recumbent bike provides a completely hips, knees and ankles while providing frame and transport wheels make the unit mobile IMPORTANT: • This bike is not recommended • Always make sure that you feel balanced •... - Page 16 WARNING The batteries must be installed as instructed on page 10, Do not carry batteries loosely, such as _na purse ar pocke_.The batteries may explode or leak and cause injury If installed improperly, misused, disposed of in a fire or recharged. DO not plug AC Adapter into wall until WARNING...
- Page 17 Buttons and Definitions ENTER: This button allows users to set the Program and Time on Programs 1-!0 and Time and Age on Programs 11-12. START: This button allows the user to STOP or START exercising, (By holding this button for two seconds the user can reset all values to "0").
- Page 18 LCD Workout Graphics PROGRAM 1 _OGRAM5 MANUAL FAT B_STER INCLINE _nmmm_mmm _NiU_N_i_ _mmmmmm_ ii_uininii PROGRAM2 PROGRAM6 ROLLING HIL_ SUPER SLOW INCLINE _nmn_nni_ _n_nnnN mmmnmmmimm PROGRAM 3 PROGRAM7 SHAPE UP VALLEY RANDOM ENERGY fill lib E] IE3 IZ3_Z] llllm lib mE BIUEl ]E72_7__C_] lib lllm mM mmmd llm _21m ml llm...
-
Page 19: Computer Tips And Trouble Shooting
If you have any problems with your Computer: First check this manual to be sure you have followed the assembly instructions correctly. Computer Installation: Follow Step 9 on page Computer Tube Assembly: Follow Step 6 on page (Make sure all wire connectors ore firmly attached If the Computer is powered by batteries and: The Computer... -
Page 20: Knowing The Basics
Please review this section before you begin exercising. IMPORTANT: If you over 35 and have been inactive for several years, you should consult your physician, or may recommend a graded exerolse test, If you just beginning your exercise program, your larget heart rate... -
Page 21: Aerobic Exercise: How Much? How Often
described previously. Each workout should with a warm up and end with a cool down.As general rule, space your workouts throughout the week and ovoid consecutive days of hard exercise. Here are the amounts of activity necessary average healthy person to maintain a minimum level of overall... -
Page 22: Clothing
Individual would need tokeep their heart rate at or above 126 beats per minute to get a cardiovascular effect. Note: Although used in this example, the heart rate range to achieve results falls belween 60% and 85% of your maximum heart rate. -
Page 23: Heart Rate Target Zone Chart
HEART CARDIOVASCULAR TABLE I 200 _. Heart Rate "_ (Beats/ Min) 140 _j_ TABLE 2 Exercise Warm Up THR% Week Period Minutes 1 & 2 5 rain 60-65% -8 3 & 4 5 rain 65-70% -10 5 & 6 5 rain 70-75% -15 7 &... -
Page 24: Warm Up & Cool Down Stretches
Stretches can help Improve flexibilih/and that results from repetitive spod movements of motion. 10 to 12 minutes of daily stretching be done when warming up or cooling stretches, your movements should be slew and smooth, or jerking. Move into the stretch until you feel a slight tension, the muscle and hold the stretch for 20 to 30 seconds. - Page 25 °24 4. Back Stretch Stand with your legs shoulder width slightly bent, Bend forward from your waist with your arms extending loosely In front of your body. Gently the waist flexing your body as far forward Hold for 20 to 30 seconds, Straighten Standing Hamstrlngs...
-
Page 26: Bike
Coring For Your Bike Your Recumbent Bike has been carefully designed to require minimum maintenance. However, we recommend the following keep your bike operating smoothly. • Unplog the bike, • Use your bike Indoors only, • Wipe alI perspiration from your bike with a soft, clean cloth after each use to prevent... - Page 27 Use the charts below and on the following keep track of your progress over time. Before writing on them, make as many copies as you think you'll need,We suggest you keep these in a notebook.You will find it both Informative and motivational back at what...
- Page 28 D',iI _,ig!i Iw.,, w.i.h, • wa_'t ...I ,bd°_',l "'P' T "_g" _' _': .._.""g.ot.
- Page 29 Update once a week Week # Of Week # Of _to/ Workouts Wo_outflme (Date) (Oa_) Workou_ WorkoutF1me _ 28...
- Page 30 Fitne sO_ est" Dedication to Quality We warrant this producl to be tree from all defects In material and workmanship when used according to the manufacturer's instructions. See Limited Warranty Card for details. Save your sales receipt. (You may wish to staple it into this manual.) 12/15!05...