
Related Manuals for Samsung RR35H61657F


Summary of Contents for Samsung RR35H61657F
-
Page 1: User Manual
Refrigerator user manual imagine the possibilities Thank you for purchasing this Samsung product. Free Standing Appliance DA68-03008C (EN)-05.indd 1 2016. 3. 24. 11:01... - Page 2 Contents SAFETY INFORMATION ……………………………………………………………… 2 SETTING UP YOUR REFRIGERATOR ……………………………………………… 12 OPERATING YOUR REFRIGERATOR ……………………………………………… 17 TROUBLESHOOTING ………………………………………………………………… 23 INSTALLATION PART ………………………………………………………………… 24 Safety information SAFETY INFORMATION responsible for their safety. • This appliance can be • Before operating the used by children aged appliance, please read this from 8 years and above manual thoroughly and retain and persons with reduced it for your reference. physical, sensory or • Use this appliance only for mental capabilities or its intended purpose as lack of experience and described in this instruction knowledge if they have...
- Page 3 • Because these following Do NOT attempt. operating instructions Do NOT disassemble. cover various models, the Do NOT touch. characteristics of your Follow directions refrigerator may differ slightly carefully. from those described in this Unplug the power manual. plug from the wall • It is hazardous for anyone socket. other than an Authorised Make sure the Service Person to service machine is grounded this appliance. In Queensland to prevent electric – the authorized Service shock. Person MUST hold a Gas Call the contact Work Authorisation or center for help. Licence for hydrocarbon Note. refrigerants, to carry out Servicing or repairs which involve the removal of These warning signs are covers. (For Australia only) here to prevent injury to you and others.
- Page 4 SEVERE WARNING prevents overloading house wiring circuits, which could WARNING SIGNS FOR cause a fire hazard from INSTALLATION overheated wires. • Do not install the • If the wall socket is loose, do refrigerator in a damp not insert the power plug. place or place where it - There is a risk of electric may come in contact shock of fire. with water. • Do not use a cord that - Deteriorated insulation of shows cracks or abrasion electrical parts may cause an damage along its length or at electric shock or fire. either end. • Do not place this refrigerator • Do not bend the power cord in direct sunlight or expose to excessively or place heavy the heat from stoves, room articles on it. heaters or other appliance. • Never use gas pipes, • This refrigerator must be telephone lines or other properly installed and potential lightening rods as located in accordance ground.
- Page 5 damaged by the back of the CAUTION SIGNS FOR refrigerator. CAUTION INSTALLATION • Keep the packing materials • Keep ventilation out of reach of children. opening in the - There is a risk of death from appliance enclosure or suffocation if children put mounting structure clear them on their head. of obstruction. • The appliance must be • Allow the appliance to stand positioned so that the plug is for 2 hours after installation. accessible after installation. • The refrigerator must be grounded. SEVERE WARNING - You must ground the refrigerator to prevent any SIGNS FOR USING WARNING power leakages or electric • Do not insert the power shocks caused by current plug with wet hands. leakage from the refrigerator. • Do not store articles on the top of the appliance.
- Page 6 There is a risk of children • Do not damage the entrapment. refrigerant circuit. • Never put fingers or other • Do not disassemble or objects into the dispenser repair the refrigerator by hole. yourself. - It may cause personal injury - You run risk of causing a fire, or material damage. malfunction and/or personal • Do not store volatile or injury. flammable substances in the refrigerator. • Children should be - The storage of benzene, supervised to ensure thinner, alcohol, ether, LP that they do not play gas and other such products with the appliance. may cause explosions. • Bottles should be stored • Do not store pharmaceuticals tightly together so that they products, scientific materials do not fall out. or temperature sensitive • This product is intended only products in the refrigerator. for the storage of food in a - Products that require domestic environment.
- Page 7 • Do not apply strong shock Electronics service or excessive force onto the center. surface of glass. • If you experience difficulty - Broken glass may result when changing the light, in a personal injury and/or contact service agents. property damage. • If the products equipped with • If the refrigerator is LED Lamp, damaged by water, pull do not disassemble Lamp out the power plug and Cover and LED Lamp by contact your Samsung yourself. Electronics service - Please contact your service center. agents. CAUTION SIGNS FOR CAUTION SIGNS FOR CAUTION CLEANING CAUTION USING • Do not directly spray • To get Best water inside or outside performance of product, the refrigerator.
- Page 8 • Remove any foreign packaging material for this matter or dust from the product in an environmentally power plug pins. friendly manner. But do not use a wet • Leave the shelves in place so or damp cloth when that children may not easily cleaning the plug, climb inside. remove any foreign Ensure that none of the material or dust from pipes on the back of the the power plug pins. appliance are damaged prior - Otherwise there is a risk of to disposal. fire or electric shock. • R-600a or R-134a is used as a refrigerant. • Unplug the refrigerator Check the compressor label before cleaning and on the rear of the appliance making repairs. or the rating label inside the refrigerator to see which refrigerant is used for your refrigerator. When this product contains SEVERE WARNING flammable gas (Refrigerant WARNING SIGNS FOR R-600a), contact your local DISPOSAL authority in regard to safe...
- Page 9 appliances are damaged of refrigerant used. prior to disposal. Never start up an The pipes shall be broke in appliance showing any the open space. signs of damage. If in doubt, consult your • If the appliance contains iso- dealer. butane refrigerant (R-600a), The room must be 1 m³ a natural gas with high in size for every 8 g environmental compatibility of R-600a refrigerant that is, however, also inside the appliance. combustible. The amount of When transporting and refrigerant in your installing the appliance, particular appliance care should be taken to is shown on the ensure that no parts of identification plate inside the refrigerating circuit are the appliance. damaged. • Refrigerant squirting out of the pipes could ignite or cause an eye injury. If a leak is detected, avoid any naked flames or potential sources of ignition and air the room in which the appliance is standing for several minutes.
- Page 10 ADDITIONAL TIPS bananas, melons. FOR PROPER USAGE • Your appliance is frost free, which means there is no • In the event of a power need to manually defrost failure, call the local office of your appliance, as this will be your Electricity Company and carried out automatically. ask how long it is going to • The temperature of two last. star section (sections) - Most power failures that are or compartment corrected in an hour or two (compartments) which have will not affect your refrigerator two star symbol temperatures. ( ) is slightly higher than However, you should other freezer compartment minimize the number of door (compartments). openings while the power is The two star section off. (sections) or compartment • If the key is provided with (compartments) is (are) refrigerator, the keys should based on the instruction and/ be kept out of the reach of or the condition as delivered.
- Page 11 down before placing it in the of energy, please keep the appliance. all inner fittings such as baskets, drawers, shelves - Put frozen food in the on the position supplied by refrigerator to thaw. manufacturer. You can then use the low temperatures of the frozen products to cool food in the refrigerator. This appliance is intended - Do not keep the door of to be used in household and the appliance open for too similar applications such as long when putting food in or taking food out. - staff kitchen areas in shops, The shorter time for which offices and other working the door is open, the less ice environments; will form in the freezer. - farm houses and by - Clean the rear of the clients in hotels, motels...
-
Page 12: Setting Up Your Refrigerator
Setting up your refrigerator GETTING READY TO INSTALL 595 mm THE REFRIGERATOR 568 mm Congratulations on your purchase of this Samsung at least Refrigerator. 50 mm We hope you enjoy the state-of-art features and efficiencies that this new appliance offers. 1183 mm • This refrigerator must be properly installed and 121° located in accordance with the manual before it is used. 912.5 mm • Use this appliance only for its intended purpose as described in this instruction manual. • We strongly recommend that any servicing be • H eight of the product may be different performed by a qualified individual. depending on the models. • Allow clearance to the right, left, back and top • Please dispose of the packaging material for when installing. - Page 13 REVERSING THE REFRIGERATOR 2. Remove the plastic cover and make sure to disconnect the wire connected to it. DOOR After removing the plastic cover, check the parts for reversing the door. Samsung recommends that reversing of the door opening is only completed by WARNING Samsung approved Service providers. This will be on a chargeable basis and at the customers expense. Any damage caused while attempting to reverse the door opening is not covered under the appliance manufactures warranty. B e careful not to damage the electrical Any repairs requested due to this wires when removing the plastic cover. CAUTION circumstance will be completed on a chargeable basis at the customers expense. 3. Disconnect the wires and then remove 3 bolts. Required Tools (Not provided) Make sure your refrigerator is unplugged 10 mm Socket Phillips Head Flat Head Driver Wrench before handling electrical wires. WARNING...
- Page 14 5. Separate the front leg cover after removing 9. Remove the screws on the bottom left and right 2 screws. side of the refrigerator door. Switch the side of the door stopper from right to the left. Hinge riser should be switched as well. Screw Hinge riser Hinge riser 6. Unscrew 3 bolts tightening the hinge and also unscrew 3 bolts on the bottom left side by the front leg where removed hinge will be attached. 10. R emove the wire cover on top of the refrigerator door to switch the side of the wires. 10 mm 10 mm 7. Separate the hinge shaft by using hex wrench first. Unscrew the bolt to remove the hinge riser and switch the side of the hinge shaft and the hinge riser. 11. R emove the hinge and the grommet from the Hinge shaft refrigerator door. Detach the right side hinge cover and pull the wires out of the hinge cover. Hinge riser 8 mm Bolt Hinge cover 8. Attach the hinge on the bottom left side of Grommet...
- Page 15 12. U se wrench to separate the hinge shaft and 15. T ake off the handle cover and remove the then flip the hinge and reattach the hinge shaft. screws, make sure to detach the caps and the And remove the shim at the top and attach it to handle from the left to right side of the door. the other side. (Make sure to cover the left side with detached caps.) Handles may not have cover depending on the models. 16. S witch the hinge cap and attach the front leg cover. 13. R eassemble the hinge on the refrigerator door Carefully put the refrigerator door back on. by reversing the step 11. Make sure to use left side hinge cover (which can be found underneath the removed plastic cover from step 2) and remove the grommet. After reassembling the hinge, wire and the hinge cover, switch the side from right to the left. Hinge cap 17. T ighten the 3 bolts and then connect the wires back together. Grommet 14. A fter switching the hinge, close it with the wire cover on the top of refrigerator door.
- Page 16 18. C onnect the wire on the plastic cover and put LEVELLING THE REFRIGERATOR the cover back to its original position. If the front of the appliance is slightly higher than the rear, the door can be opened and closed more easily. Turn the adjusting legs clockwise to raise and counter- clockwise to lower the height. 19. T ighten 4 screws back to its place. Case 1) The appliance tilts down to the left. • Turn the left adjusting leg in the direction of the arrow until the appliance is level. Case 2) The appliance tilts 20. D etach the Fridge and the Freezer door gaskets down to the right. and then attach them after rotating them 180˚. • Turn the right adjusting leg in the direction of the arrow until the appliance is level. After reversing the doors, make sure the Fridge and Freezer door gaskets are < Case1 > WARNING properly arranged. If not, there might be a noise or dew formed which affects performance of the refrigerator.
-
Page 17: Operating Your Refrigerator
Operating your refrigerator CHECKING THE CONTROL ( 2 ) Power Cool PANEL Press the Power Cool button to activate the Power Cool function. Power Cool indicator will light up and the refrigerator will speed up the time to needed to cool products in the refrigerator. Power Cool function will operate for 2 hours and 30 minutes to quickly cool the refrigerator. To deactivate the Power Cool function, press the Power Cool button again. ( 1 ) Power Cool function cannot be used ( 2 ) together with Vacation function. ( 3 ) Selecting Vacation function will automatically deactivate the Power Cool ( 4 ) function. Each time you press the button, a short beep will sound. ( 3 ) Door Alarm 1. Alarm Press the Door Alarm button to activate the Alarm function. USING THE CONTROL PANEL Alarm indicator will light up and the refrigerator will alert you with alarm sound if the refrigerator door is kept open for... - Page 18 ( 4 ) Vacation Control Lock (3 sec) Press the Vacation button to activate the Vacation function. ( 8 ) Vacation indicator will light up and the refrigerator will set the temperature to ( 7 ) 15 °C to minimize the power consumption while you are away (on vacation or ( 1 ) business trip etc). Keep the refrigerator free from bacteria ( 2 ) and odor. ( 3 ) Press the Vacation button for 3 seconds to activate the child Lock function. Child lock indicator will light up and all the buttons on the control panel will be ( 4 ) locked. To deactivate the Child Lock function, ( 6 ) ( 5 ) press the Vacation button again for 3 seconds. • Vacation function will be automatically deactivated If you select Power Cool function or adjust temperature while • Some of the features such as water tank Vacation function is on. and the beverage station can be different • Make sure to remove foods before using and may not be available depending on Vacation function.
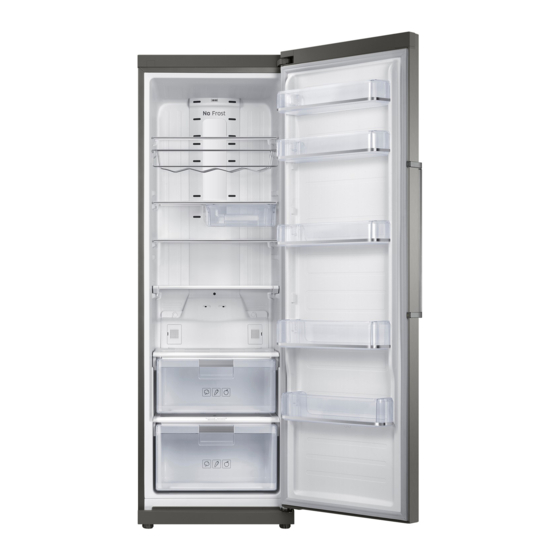
- Page 19 ( 1 ) Glass shelves ( 7 ) Water tank Shelves made out of glass are easy to clean and You can obtain chilled water in a water tank easy to see what is stored in the refrigerator. and get water from the water dispenser without These shelves are designed to be crack- opening the refrigerator. resistance and they can be used to store all types of food and drinks. ( 8 ) Egg tray Best place to keep eggs. ( 2 ) Movable deli bin Place the Egg tray on the shelf to keep the eggs A deli bin designed to be horizontally adjustable. safely and access easily. You can move the bin left and right depends on the contents underneath. You can store beverages, dairy products or foods • I f you plan to go away for a significant that need to be cooked soon. time, empty the refrigerator and turn it CAUTION off. Wipe the excess moisture from the inside of the appliance and leave the door open. This helps keep odor and mold from ( 3 ) Foldable shelf developing.
-
Page 20: Using The Foldable Shelf
USING THE FOLDABLE SHELF USING THE WATER DISPENSER You can tuck in the foldable shelf if you need to Filling the water accommodate taller containers or products on the You can fill the water with the water tank sitting shelf underneath. inside of the refrigerator or you can remove the water tank to fill the water. 1. Slightly lift up the shelf and slide it inward. 2. You can simply pull the tucked in shelf to use the fully extended shelf. Method 1 Fill the water through the hole on the top of the water tank. If you pour the water too fast, water may overflow. Method 2 USING THE MOISTURE CONTROL BIG BOX 1. Release the lock on the both side of the water tank to remove the lid on the water tank. You can use the moisture control big box to control 2. Fill the water in the water tank. - Page 21 Getting water from the dispenser Drawers Place a glass underneath the water outlet and Pull the drawers out fully then slightly lift it up to push it gently against the water dispenser lever remove the drawers. with your glass. (Plastic drawer/Moisture control big box) • M ake sure the glass is in line with the dispenser to prevent the water from Door guards splashing out. • Water dispenser may not be available Firmly grab the door guards with both hands and depending on the model. lift it up gently to remove the door guards. REMOVING THE INTERIOR PARTS Moveable deli bin Pull the deli bin out fully then slightly lift it up to remove it. Water tank Firmly grab the water tank with both hands and lift it up towards you gently to remove the water tanks. Shelves Gently lift up the shelves with both hands and pull it toward you.
-
Page 22: Cleaning The Refrigerator
CLEANING THE REFRIGERATOR Do not use Benzene, Thinner or Clorox™ for cleaning. WARNING They may damage the surface of the appliance and can create a risk of fire. D o not spray the refrigerator with water while it is plugged in, as it may cause an CAUTION electric shock. Do not clean the refrigerator with benzene, thinner or car detergent for risk of fire. REPLACING THE INTERIOR LIGHT For LED lamp, please contact service engineer to replace it. English - 22 DA68-03008C (EN)-05.indd 22 2016. 3. 24. 11:01... -
Page 23: Troubleshooting
Troubleshooting PROBLEM SOLUTION The appliance is not • Check if the power plug is correctly connected. • Is the temperature control on the front panel correctly set? operating at all or the • Does sun shine on the appliance or are there any heat sources nearby? temperature is too • Is the back of the appliance too close to the wall? high. There are unusual • Check if the appliance is installed on a stable and even floor. • Is the back of the appliance too close to the wall? noises. • Have any foreign objects fallen behind or under the appliance? • Is the noise coming from the compressor in the appliance? • A ticking sound may be heard inside the appliance; this is normal. This sound occurs when the various accessories contract or expand. The front corners and • Heat-proof pipes are installed in the front corners of the appliance to prevent condensation from forming. -
Page 24: Installation Part
Installation Part Installing the products together How to install the product Side by Side combination possible with Samsung Models Make sure to turn off the power for both of the products. starting with RZ**, RR**. Please ask the shop for detail such as Color and Design. 1. Keep the distance between the refrigerator and the For Side by Side arrangement, please make sure freezer about 5~7 mm. followings. 2. Remove the front leg cover on both refrigerator and - Recommend to place the Fridge on the Right for best the freezer by removing the screws. performance. - For perfect finish, allow the following clearance and install SPACERS in installation Kit provided. (Only available on some models) - Make the height of the refrigerator and the freezer same with referring the 16 page. 3. Remove the screw from the each of the product and attach them back after putting the bottom fixer. Install Direction Fixer Joining Strip Bottom Fixer A 4. Insert the joining strip in between the refrigerator and... - Page 25 Memo DA68-03008C (EN)-05.indd 25 2016. 3. 24. 11:01...
- Page 26 Memo DA68-03008C (EN)-05.indd 26 2016. 3. 24. 11:01...
- Page 27 Memo DA68-03008C (EN)-05.indd 27 2016. 3. 24. 11:01...
- Page 28 Business users should contact their supplier and check the terms and conditions of the purchase contract. This product and its electronic accessories should not be mixed with other commercial wastes for disposal. Contact SAMSUNG WORLD WIDE If you have any questions or comments relating to Samsung products, please contact the SAMSUNG customer care center. COUNTRY...