Motorola MPx200 Owner's Manual
Motorola cell phone owner's manual
Hide thumbs
Also See for MPx200:
- User manual (152 pages) ,
- Manual (144 pages) ,
- Service manual (52 pages)
Table of Contents
Advertisement
Quick Links
Welcome
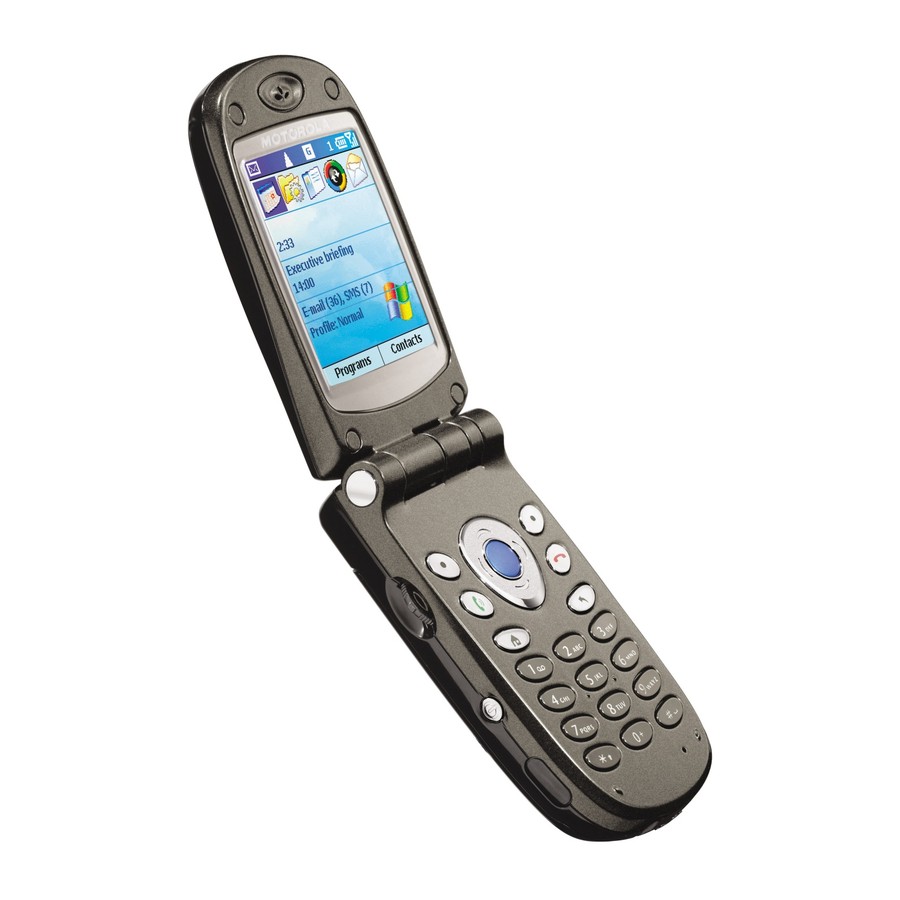
Welcome to the world of Motorola digital wireless communications! We are pleased that
you have chosen the MPx200.
Memory card slot
Headset socket
Earpiece
Soft key
Talk button
Jog dial
Home button
Power button
Infrared port
External display
Speaker
Sync/charger socket
Handstrap hole
Memory card slot
Main display
Direction key
Soft key
Action button
End button
Back button
Keypad
Microphone
Welcome - 1
Advertisement
Table of Contents

Related Manuals for Motorola MPx200


Summary of Contents for Motorola MPx200
-
Page 1: Welcome
Welcome Welcome to the world of Motorola digital wireless communications! We are pleased that you have chosen the MPx200. Memory card slot Headset socket Earpiece Soft key Talk button Jog dial Home button Power button Infrared port External display Speaker... -
Page 2: Software Copyright Notice
Furthermore, the purchase of the Motorola products shall not be deemed to grant either directly or by implication, estoppel, or otherwise, any licence under the copyrights, patents, or patent... -
Page 3: Menu Map
Menu Map • mMode • OfficeOnline • Calendar • Internet Explorer • MSN Messenger • Inbox • Settings • Telephony • Sounds • Profiles • Home Screen • About • Accessibility • Data Connections • Date and Time • Owner Information •... -
Page 4: Table Of Contents
Table of Contents Welcome ...1 Menu Map ...3 Safety and General Information ...7 Getting Started ...13 Package Contents ...13 Optional Features ...13 Optional Accessories ...13 Setting up your Smartphone ...14 Getting to know your Smartphone ...19 Synchronising with ActiveSync ...25 Where to find information ...26 The Basics ...27 Navigation methods ...27... - Page 5 Receiving e-mail and SMS messages ...67 Viewing your message folders ...70 Managing Inbox ...71 Message notifications ...74 SMS messages ...74 Communicating with MSN Messenger ...75 Contacts, Calendar and Tasks ...79 Using Contacts ...79 Using Calendar ...85 Using Tasks ...90 Synchronising Information ...95 Using ActiveSync ...95 Synchronising information ...100 Synchronising using an infrared connection ...102...
- Page 6 Specific Absorption Rate Data ...157 Index ...159 6 - Table of Contents...
-
Page 7: Safety And General Information
RF energy. When you communicate with your phone, the system handling your call controls the power level at which your phone transmits. Your Motorola phone is designed to comply with local regulatory requirements in your country concerning exposure of human beings to RF energy. -
Page 8: Data Operation
Motorola may exceed RF energy exposure guidelines. If you do not use one of the body-worn accessories approved or supplied by Motorola, and are not using the phone held in the normal use position, ensure the phone and its antenna are at least 1 inch (2.5 centimeters) from your body when transmitting. -
Page 9: Medical Devices
Medical Devices Pacemakers Pacemaker manufacturers recommend that a minimum separation of 6inches (15 centimeters) be maintained between a handheld wireless phone and a pacemaker. • ALWAYS keep the phone more than 6 inches (15 centimeters) from your pacemaker when the phone is turned ON. •... -
Page 10: Operational Warnings
• Pull off the road and park before making or answering a call if driving conditions so require. Responsible driving best practices may be found in the “Wireless Phone Safety Tips” at the end of this manual and at the Motorola website: www.Motorola.com/callsmart. Operational Warnings For Vehicles With an Air Bag Do not place a phone in the area over an air bag or in the air bag deployment area. - Page 11 (short circuit) and become quite hot. Exercise care in handling any charged battery, particularly when placing it inside a pocket, purse, or other container with metal objects. Use only Motorola original bat- teries and chargers.
-
Page 12: Repetitive Motion Injuries
If you have experienced seizures or blackouts, or if you have a family history of such occurrences, please consult with your doctor before playing video games on your phone or enabling a blinking-lights feature on your phone. (The blinking-light feature is not available on all products.) Parents should monitor their children's use of video game or other features that incor- porate blinking lights on the phones. -
Page 13: Getting Started
Contact your service provider for more information. Optional Accessories This label identifies a feature that requires an optional Motorola Original accessory. Quantity Getting Started - 13... -
Page 14: Setting Up Your Smartphone
Setting up your Smartphone Installing the SIM card The SIM (Subscriber Identification Module) card is a small plastic card with metal contact on it. You get this card after you subscribe to your operator.Your personal subscriber information is stored in this card and you need to use it in the phone to make/receive calls and access services provided by your operator. - Page 15 The bevelled corner SIM card socket SIM card retainer • Insert the SIM card into the socket with the metal contact on the card facing down and the bevelled corner in the direction shown. • Push the SIM card fully into the socket. Slide the SIM card retainer in the direction shown and make sure the retainer goes on top of the SIM card to...
-
Page 16: Installing And Charging The Battery
Installing and charging the battery Installing the battery Your phone is designed for use only with Motorola Original batteries and accessories. We recommend that you store batteries in their protective cases when not in use. 16 - Getting Started Place the battery onto the back of... - Page 17 Place the battery cover back on the phone. Align the tabs on the cover to the groove on the phone. Slide the battery cover in the direction shown until it locks into place. Getting Started - 17...
- Page 18 Charging the battery Open the sync/charger socket cover. Notes: • Charge the new battery before first time use. When the battery is being charged, the bars of the charging status icon on phone external display scrolls. When charging is completed, the bars will stop scrolling. You can use the phone during the charging process.
-
Page 19: Getting To Know Your Smartphone
• When battery power is low, a low battery message will pop up on the display. Charge the battery immediately. • If battery power is completely drained, the phone will be turned off automatically. • When charging a completely drained battery, it will take longer for the charging status icon to appear on phone external display. - Page 20 • Dials a phone number you entered using the keypad. • Dials a phone number you selected from the Call History list. • Answers an incoming call. Talk button • Places a call on hold to answer a second incoming call (call waiting).
- Page 21 Pound key (#) Pressing and holding the Pound key displays a list of symbols. Display External display Battery level Current date The following table lists the icons that are displayed on the external display and their meanings. Icon Meaning Signal strength Call in progress Data call active No signal...
- Page 22 Your current service provider Number of unread messages Your current profile The display shown may be different based on the specific external LCD Style chosen. See "Phone Settings" on page 62. Main display • The screen on the Smartphone that displays information. •...
- Page 23 Status indicators Status indicators are displayed at the top of the Smartphone's display. The following table lists common status indicators and their meanings. Indicator Meaning New e-mail New voice mail New instant message Voice call active Data call active Call forwarding Call on hold Missed call Line 1...
- Page 24 Earpiece & Speaker The audio components of the Smartphone.You can hear the voice during a call by the earpiece, and the ringtone and the windows media files will be played by the speaker. You can also toggle between the earpiece and speaker during a call. See "Miscellaneous call tasks"...
-
Page 25: Synchronising With Activesync
Memory card slot An MMC memory card can be inserted into this slot to further expand data storage capability of your phone. Memory card slot Handstrap hole You can install a handstrap using this hole. Synchronising with ActiveSync You can use Microsoft ActiveSync technology to synchronise information on your desktop computer and/or a Microsoft Exchange Server with the information on the Smartphone. -
Page 26: Where To Find Information
After the first synchronisation, take a look at Calendar, Contacts, and Tasks on the Smartphone. You will notice that your information has been copied to the Smartphone. Disconnect the Smartphone from the desktop computer and you are ready to go! For more information about ActiveSync, see "Beaming information"... -
Page 27: The Basics
The Basics This chapter explains basic information about using the Smartphone, such as navigating around the Smartphone, entering text and numbers on the Smartphone, and securing the Smartphone. Navigation methods The following information describes the different methods for navigating around the Smartphone so you can accomplish tasks quickly and easily. -
Page 28: Using The Action Button
Using the Action button The Action button confirms your selection. You can think of the Action button as the "Do It" button. In some cases, confirming your selection will take you to a program or set- ting. Using the Home button The Home button takes you to the Home screen. - Page 29 Note: The display shown may be different based on the specific Home screen configuration chosen. Your current service provider Number of unread messages Your current profile To access the Home screen • Press the Home button. To change Home screen settings •...
-
Page 30: Using The Back Button
• Press the Contacts soft key to display the Contacts list, select a contact, and then press the Action button. Using the Back button Pressing the Back button navigates to the previous screen, or moves the cursor back to delete one or more characters in a text field, similar to pressing "Backspace" on a key- board. - Page 31 option will either perform the command or take you to another part of the user interface where you can perform the command. To access menu options 1. Press the Menu soft key on any screen where it is displayed. 2. Select a menu option and press the Action button. Note: Pressing Up moves the selection focus to the bottom of the menu.
-
Page 32: Entering Text And Numbers On Your Smartphone
Using numbers You can also use numbers to navigate quickly to programs and settings on the Smart- phone. Just press the number on the keypad that corresponds to the number shown next to the program or setting you want. For example, in Programs, press 3 on the keypad to open Calendar. Note: You can also use numbers to select menu options by pressing the number that corresponds to the menu option in top-down order. -
Page 33: Entering Text In Multipress Mode
The following table shows the complete list of input mode status indicators. Indicator Multipress text input mode, lower case Multipress text input mode, upper case Multipress text input mode, caps lock T9 text input mode, lower case T9 text input mode, upper case T9 text input mode, caps lock Numeric input mode Entering text in Multipress mode... -
Page 34: Entering Text In T9 Mode
To change the Multipress time out 1. On the Home screen, press the Accessibility. 2. Under Multipress time out, select the time interval you want for the pause between keypresses, and press the To enter punctuation in Multipress mode • Press 1 repetitively to scroll through common punctuation. Entering text in T9 mode When you are in T9 mode, just press the number keys that contain the letters you want to form a word. -
Page 35: Entering Numbers In Numeric Mode
To enter punctuation in T9 mode • Press 1, then 0 to scroll through common punctuation. Entering numbers in Numeric mode When you are in Numeric mode, just press the number(s) you want to enter on the keypad. If a field permits a numerical entry only, such as the Work phone field in Contacts, the input mode will automatically default to Numeric mode. -
Page 36: Securing Your Smartphone
To delete characters 1. Press the Back button to backspace over a single character. 2. Press and hold the Back button to backspace and delete an entire text field. To enter the plus (+) sign for international calls • Press and hold 0. Securing your Smartphone You can customise the level of security you want to have on the Smartphone by locking the keypad, the entire Smartphone, or the SIM card. - Page 37 Note: You can still receive calls and make emergency calls when the Smartphone is locked. To lock the Smartphone 1. Press the Power button to display the Quick List, select soft key. 2. Under Lock phone after, select a desired time period the Smartphone is inactive before the Smartphone automatically locks.
- Page 38 To lock the SIM card 1. On the Home screen, press the select More, select Security, select key. 2. Enter your PIN1 password, and press the To unlock the SIM card 1. On the Home screen, press Programs, select More, select Settings, select More, select Security, select 2.
-
Page 39: Phone Calls
Phone Calls This chapter explains how to make and receive phone calls, view Call History, and create shortcuts to help you manage calls more efficiently. Making a call There are several ways to make a call. The easiest way is to simply dial a phone number from the Home screen. -
Page 40: Making A Call From Contacts
to find a matching name and/or number. When you see the name of the person to call listed, select it, and press the Talk button. AutoFilter matches number to a contact AutoFilter matches number from Call History Making a call from Contacts To call someone from the Contacts list, just select the person's name, and press the Talk button. -
Page 41: Making A Call From The Call History List
To change the default number for a contact 1. On the Home screen, press the the Action button. 2. Select the contact, and press Left or Right to change the default number. 3. For example: If you change "w" to "m," the default number changes from Work phone (w) to Mobile phone (m). -
Page 42: Receiving A Call
To make a call from the Call History list 1. On the Home screen, press the Programs soft key, select Call History, and then press the Action button. 2. Select the number or entry for the person to call, and press the Talk button. Making a call from a hyperlink When you see an underlined phone number presented as a hyperlink in an e-mail message, just select the hyperlink phone number, and press the Action button to make... - Page 43 To answer an incoming call • When phone flip is closed, simply open the flip to answer the call. To use this function, you have to activate the flip answer function first(see "Phone Settings" on page 62). • When phone flip is open, press the Talk button or the call.
-
Page 44: In-Call Options
To answer a second call using Call Waiting • If you are already talking on the Smartphone when you receive a call, press the Accept soft key or the Talk button to place the first call on hold, and answer the sec- ond call. - Page 45 Breaks one call out of a conference and makes this call active while Private the rest of the conference is on hold. Mutes the microphone for the active call. The other party will not hear Mute anything you say, but you can still hear the other party. Unmute Turns the microphone back on for the active call.
-
Page 46: Reviewing Your Calls
To change between the earpiece and the speaker • During an incoming call, you can toggle between the earpiece and speakerphone by holding down the Talk button. Reviewing your calls Using Call History and Call Timers, you can view information about phone calls you have made and received, such as who has called you recently and how much time you have spent on the Smartphone. -
Page 47: Call Timers
To create a new contact from a number in Call History • Select the entry, press the ton. Make sure <New Item> is highlighted and then press information. To remove an item from Call History • Select the item, press the button. -
Page 48: Shortcuts
To reset Call Timers • On the Home screen, press the Menu soft key, select View • Press Menu and press Action button to reset all timers. Note: The Lifttime timers can not be reset. Shortcuts You can create speed dials and voice tags as shortcuts to dial frequently-dialled phone numbers quickly. -
Page 49: Voice Tags
To make a call using a speed dial • On the Home screen, press and hold the number on the keypad that you have assigned as a speed dial for a number. If the keypad assignment is two digits, press the first digit and press and hold the second digit. -
Page 50: Advanced Dialling Options
2. Say the word you have assigned as a voice tag for the phone number you want to call. The Smartphone will play back the voice tag and then perform the specified action. 3. If the Smartphone misinterprets the word, press the End button and start over. To view voice tags you have created •... - Page 51 To insert an international country code • Press and hold 0 until a plus sign (+) appears. Note: You can insert a plus sign (+) into a contact's number or dial it directly from the keypad. Some international calls require a three-second pause in the dialling sequence for the call to process successfully.
- Page 52 4. Press the Menu soft key, select letter "w" will appear in the number to show where the pause will occur in the dialling sequence. 5. Press the Done soft key. Note: When you make a call using Insert Wait, press the Talk button to continue the dialling sequence.
-
Page 53: Settings
Settings This chapter introduces viewing and changing the settings on the Smartphone and resetting the Smartphone to its original settings. Viewing and changing settings You can easily view and change settings to personalise the Smartphone for the way you work. For example, you can change the sounds or use your own sounds for ring tones, notifications, and reminders, use your own image for the Home screen background, set up Call Diverting and Call Waiting to manage your calls more efficiently, and more. - Page 54 Telephony Telephony settings are primarily used to set options for calls you receive, such as Call Diverting, Call Waiting, and Caller ID. To view Telephony settings • On the Home screen, press the select Telephony, and then press the Action button. The following table lists the telephony settings and their functions.
- Page 55 To display Sounds settings • On the Home screen, press the select Sounds, and then press the Action button. To use your own sound 1. Go to where the sound file is stored on your desktop computer and copy the file. The file format must be .wav or .mid(MIDI type 0).
- Page 56 To view Profiles settings • On the Home screen, press the select Profiles, and then press the Action button. Note: You can also get to Profiles settings by selecting Profile [Type] from the Home screen. Preset profiles The following table shows the list of profiles and their attributes that initially come with the Smartphone.
-
Page 57: Home Screen
Loud Ring Automatic Toggles between Normal and Meeting, based on your calendar. Headset Ring Ring Speaker- Ring phone To use profiles 1. On the Home screen, press Down to select button. 2. Select the profile, press the Action button to set the profile, and then press the soft key. - Page 58 To view Home screen settings • On the Home screen, press the select Home Screen, and then press the Action button. To customise the Home screen with your own image 1. Go to where your image file is stored on your desktop computer, and copy the image file.
-
Page 59: Data Connections
Accessibility Accessibility settings are used to configure the system font size, multipress time out, confirmation time-out, and in-call alert volume. To view Accessibility settings • On the Home screen, press the select Accessibility, and then press the Action button. Data Connections Data Connections settings enable you to set up Dial-up, Virtual Private Network (VPN), Proxy, and General Packet Radio Service (GPRS) connections so you can connect to the Internet or your corporate network. - Page 60 5. Under Description, enter a name for the connection. 6. Under Connects to, press Left or Right to select 7. Enter the appropriate information for the remaining fields, and press the Done soft key. To create a dial-up connection to your corporate network 1.
-
Page 61: Date And Time
Date and Time Date and Time settings enable you to change the local time zone and the current date and time, and to set the alarm. To view Date and Time settings • On the Home screen, press the select Date and Time, and then press the Action button. -
Page 62: Remove Programs
To view Regional Settings • On the Home screen, press the select More, select Regional Remove Programs Remove Programs settings enable you to remove programs installed on the Smartphone, with the exception of core programs that came with the Smartphone, such as Contacts, Calendar, and Internet Explorer. - Page 63 Note: When you are on a data/GPRS call or talking using a headset, the Flip answer function will be deactivated automatically. To end calls under these situations, press the End button. Settings - 63...
-
Page 64: Messaging Features
Messaging Features This chapter introduces basic messaging features, such as sending and receiving e- mail and Short Message Service (SMS) messages, viewing and managing your mes- sage folders, customising message notifications, and using MSN Messenger to com- municate with others. Sending e-mail and SMS messages There are several ways to send e-mail and SMS messages with your Smartphone. - Page 65 To compose an e-mail or SMS message from Inbox 1. On the Home screen, press the Action button. 2. Press the soft key, enter an e-mail address or SMS number in the select a name from Contacts by pressing the tact, and then press the Action button.
-
Page 66: Inserting Predefined Text Into Messages
To request a delivery receipt for an SMS message you are composing 1. Before you send the SMS message, press the Options, and then press the Action button. 2. Select the Request SMS text message delivery notification press the Done soft key. Sending messages from a contact card You can send a message quickly to a contact if you have an e-mail address or SMS number included in the contact card. -
Page 67: Receiving E-Mail And Sms Messages
To edit your predefined text messages 1. On the Home screen, press the press the Action button. 2. Press the Menu soft key, select Options, select Action button. 3. Select and modify the text you want to change, and press the Inserting voice recordings into messages Inserting a voice recording into a message is easy. -
Page 68: Opening Messages
sage is downloaded by default. Only small attachments are downloaded and the origi- nal messages remain on the e-mail server or your desktop computer. SMS messages that are sent to you instantly appear in Inbox, and are not synchronised. Note: For more information about synchronising Inbox, see "Beaming information" on page 93. -
Page 69: Receiving Message Attachments
Receiving complete messages You can specify messages to receive in full, instead of receiving only the first 0.5 KB set by default. To receive a complete message 1. On the Home screen, press the press the Action button. 2. Select the message to receive in full, press the Download, and then press the Action button. -
Page 70: Viewing Your Message Folders
The attachment will be downloaded when you synchronise or request to send and receive e-mail. To view a downloaded attachment • In an open message containing a downloaded attachment, select the attachment and press the Action button. Note: You can view attachments only for file types that are supported by your Smart- phone. -
Page 71: Managing Inbox
Managing Inbox All e-mail and SMS messages are stored in Inbox. By default, the most recently received messages are displayed at the top of the Inbox list. Using the menu options, you can quickly compose, delete, forward, and reply to messages.You can also cus- tomise Inbox settings to control the way you send, receive, and view messages. - Page 72 The following table lists Inbox menu options and their functions. Inbox menu option New Message Reply Forward Delete Mark for Download Mark as Read Mark as Unread Options Send/Receive E-mail Show Folders Customising Inbox options You can optimise Inbox for the way you work. For example, you can change the way your messages are displayed, specify how you want your messages to be sorted, spec- ify the volume and limit the size of messages you want to automatically download, change your synchronisation schedule, and more.
- Page 73 2. Press the Menu soft key, select Options, and then press the Action button. 3. Select the option to customise, and press the Action button. 4. Modify the settings to change, and press the The following table lists the Inbox options and their functions. Inbox option Display Sending...
-
Page 74: Message Notifications
Message notifications Your Smartphone makes a sound to alert you when new messages arrive. The number of unopened messages is displayed on the Home screen, depending on your Home screen settings, and an envelope icon is shown on the top of the display. You are noti- fied in different ways for the types of messages you receive. -
Page 75: Communicating With Msn Messenger
The advantages of SMS messages include the following: • SMS messages are sent instantly. • SMS messages can be sent or received during a voice or data call. • Most mobile phones support SMS, so most recipients can read SMS messages you send. - Page 76 Getting started with MSN Messenger To use MSN Messenger, you need a Microsoft.NET Passport account unless you already have a Hotmail account. To set up a Microsoft.NET Passport account, go to: http://www.passport.com. Once you have this account, you will need: •...
- Page 77 For information about text input, see "Entering text and numbers on your Smartphone" on page 32. To invite a contact to an ongoing chat • Press the Menu soft key, select Invite, and then select a contact. To see who is already chatting, or to change between chats •...
- Page 78 To block or unblock a contact from seeing your status and sending you mes- sages • In the Messenger contacts list, select the contact's name, press the and then select Block or Unblock. To change your status 1. In the Messenger contacts list, select your name, and press the Action button. 2.
-
Page 79: Contacts, Calendar And Tasks
Contacts, Calendar and Tasks This chapter introduces features on your Smartphone that help you manage and keep track of contacts, appointments, and schedule, and maintain a "things to do" list. This chapter also explains how to send and receive contact and appointment information between your Smartphone and another mobile device or a desktop computer (beaming data) by using infrared. - Page 80 Note: You can also access Contacts by pressing the Contacts soft key on the Home screen, if it is displayed. The following table shows possible abbreviations that might be displayed in the Con- tacts list and their meanings. Contact list abbreviation 80 - Contacts, Calendar and Tasks Meaning Work phone...
- Page 81 To call a contact using the default number 1. On the Home screen, press the the Action button. 2. Select the contact to call, and press the Talk button. Note: If you have a long list of contacts and you don't see the contact you want to call on the first screen, enter the first few letters of the contact's name.
-
Page 82: Contact Cards
2. Press the Menu soft key, select Filter, and then press the Action button. 3. Select a filter (Business, Miscellaneous, or Personal), and press the Action button. To create a new contact 1. On the Home screen, press the the Action button. 2. - Page 83 2. Select the contact to view, and press the Action button. Number in bold denotes default number To call a contact from a contact card 1. On the Home screen, press the the Action button. 2. Select the contact, and press the Action button to open the contact card. 3.
- Page 84 To edit a contact 1. On the Home screen, press the the Action button. 2. Select the contact to edit, and press the Action button to open the contact card. 3. Press the Menu soft key, select Edit, and then press the Action button. 4.
-
Page 85: Using Calendar
Set As Default Beam Contact Delete Edit * For information about creating speed dials and voice tags, see "Speed dials" on page Using Calendar Calendar is the scheduling program on your Smartphone, where you can create and view appointments, and view your calendar by day, week, or month. To access Calendar •... - Page 86 To view an appointment 1. On the Home screen, press the the Action button. 2. Select the appointment to open, and press the Action button. To edit an appointment 1. On the Home screen, press the the Action button. 2. Select the appointment to edit, press the Action button, and then press the key.
-
Page 87: Viewing Your Schedule
To delete an appointment 1. On the Home screen, press the the Action button. 2. Select the appointment to delete, press the press the Action button. Viewing your schedule You can view your schedule using three different views: Agenda, Week, and Month. Agenda view The Agenda view in Calendar is the default view for calendar information. - Page 88 3.Enter the date you want to view, and press the Done soft key. Week view The Week view shows your schedule for the specified week. This view allows you to get a quick indication of your free and busy time, and allows you to create an appointment at a selected time easily.
- Page 89 Note: To change settings for Week View, press the Menu soft key, select Options, and then press the Action button. Month view The Month view provides an overview of your monthly schedule with arrow indicators for morning and afternoon appointments. The arrows pointing upward represent morn- ing appointments, and the arrows pointing downward represent afternoon appoint- ments.
-
Page 90: Using Tasks
2. Press the Menu soft key, select Month View, and then press the Action button. Importing calendar information You can import calendar information from another calendar program if it uses the iCal or vCal format. The calendar information can be imported from attachments in e-mail mes- sages, SMS messages, links in Microsoft Pocket Internet Explorer, or by infrared. - Page 91 Note: If you synchronise tasks with your desktop computer, completed tasks are removed from your Smartphone after synchronisation. They are then displayed in gray with a strikethrough on your desktop computer. Using the Tasks list To create a new task 1.
-
Page 92: Creating Voice Notes
To mark a task as complete 1. On the Home screen, press the then press the Action button. 2. Select the task, and press the To mark a completed task as incomplete 1. On the Home screen, press the then press the Action button. 2. -
Page 93: Beaming Information
2. Press the Menu soft key, select Rename, and then press the Action button. 3. Under Name, enter a new name for the recording, and press the Done soft key. Beaming information You can use the infrared port on your Smartphone to send and receive (beam) calendar appointments and contact cards between your Smartphone and Synchronising Informa- tion with another mobile device or a desktop computer that has an infrared port and supports VCards and VCal. - Page 94 Status information will then be displayed, indicating the name of the device your Smart- phone is beaming to, and whether the beaming process is pending, done, or has failed. To receive beamed information 1. On the Home screen, press the ries, and then press the Action button.
-
Page 95: Synchronising Information
Synchronising Information This chapter introduces basic concepts and features of Microsoft ActiveSync, and explains how to set up Server ActiveSync, synchronise remotely, and create a synchronisation schedule. This chapter also gives an overview of the different types of Microsoft Outlook information you can synchronise. For more information about ActiveSync, see ActiveSync Help on your desktop computer. -
Page 96: Creating A Partnership
Installing ActiveSync Before you begin synchronisation, install ActiveSync 3.6 or above on your desktop computer (You can download ActiveSync to your desktop computer for free from the website of Microsoft). ActiveSync is already installed on your Smartphone. Creating a Partnership After the installation is complete, the New Partnership Wizard helps you set up a part- nership between your Smartphone and your desktop computer and/or a server so that you can start synchronising information and customising your synchronisation settings. -
Page 97: Setting Up Server Activesync
To start and stop synchronisation You have to connect your Smartphone and your desktop computer using infrared port on your Smartphone or cable before you can begin to synchronise information. 1. On the Home screen, press the press the Action button. 2. - Page 98 9.Press the Done soft key twice. 10.To begin synchronising with the server, press the Note: You can also set up a connection to synchronise remotely with a server when you first create a partnership between your Smartphone and desktop computer. To stop synchronising with a server You can stop synchronising an information type with a server on your Smartphone.
- Page 99 Synchronising Remotely You can synchronise remotely with your desktop computer, or with a server, if you have set up Server ActiveSync. To synchronise remotely with a desktop computer 1. On the Home screen, press the press the Action button. 2. Press the Menu soft key, select Options, and then press the Action button.
-
Page 100: Synchronising Information
To create a schedule to synchronise with a server when your Smartphone is con- nected to a desktop computer 1. On the Home screen, press the press the Action button. 2. Press the Menu soft key, select Options, select Schedule, and then press the Action button. -
Page 101: Synchronising Inbox
Synchronising Inbox When you select Inbox for synchronisation in ActiveSync, e-mail messages are syn- chronised as part of the general synchronisation process. During synchronisation, the following events occur: • Messages are copied from the Outlook Inbox folder on your desktop computer, or from a Microsoft Exchange Server, to the Inbox folder on your Smartphone. -
Page 102: Synchronising Using An Infrared Connection
Synchronising Contacts Contacts stored on your Smartphone can be synchronised with contacts stored on your desktop computer or on a Microsoft Exchange Server. By default, all of your contacts will be synchronised. Contacts created on your Smartphone are copied to your desktop computer and/or server during synchronisation, and vice versa. -
Page 103: Activesync Errors
ActiveSync errors Whenever ActiveSync cannot successfully synchronise your information, it displays an error on your Smartphone. To view more information about an ActiveSync error • Press the Action button when the error text is displayed. ActiveSync will then display more information about the error that occurred. Note: Some types of errors can interfere with automatic synchronisation. -
Page 104: Internet, Entertainment, And More
Internet, Entertainment, and More This chapter explains how to browse the Web using Microsoft Pocket Internet Explorer, play audio and video files using Microsoft Windows Media Player, set up a modem link, play Solitaire, and use Calculator. Using Internet Explorer Using Pocket Internet Explorer, you can browse the Web on your Smartphone. - Page 105 To view a favorite 1. On the Home screen, press the then press the Action button. 2. Select a favorite to view, and press the To activate a link • Select a link, and press the Action button. Note: Scroll vertically or horizontally to see all available links. To access Smartphone How-To information in Favorites 1.
-
Page 106: Using The Favorites List
To visit a Web page on the History list 1. On the Home screen, press the then press the Action button. 2. Press the Menu soft key, select 3. Select View History, and press the 4. Select the URL for a Web page, and press the Note: While you are connected to the Internet, you can change between Pocket Inter- net Explorer and other programs on your Smartphone by pressing the Home button. - Page 107 5. Enter a name for the Web site as you want it to appear on your Favorites list, and press the soft key. Enter name of link To create a new folder in Favorites 1. On the Home screen, press the then press the Action button.
-
Page 108: Pocket Internet Explorer Options
already stored on your Smartphone, you will see the stored version when you select the page. Choose Refresh from the menu to see the latest Web content for that page. To refresh a Web page you have recently visited 1. On the Home screen, press the then press the Action button. -
Page 109: Using Media Player
Enables you to clear temporary Internet files, cookies, and your Memory Web history. Using Media Player Using Windows Media Player 7.0 or later, you can play Windows Media audio and video files and MP3 audio files on your Smartphone. You can also copy digital music and video directly from your desktop computer to your Smartphone by using Media Player or ActiveSync. - Page 110 To play or stop a file • On the Local Content screen, press the Note: To access the Local Content screen, press the Select soft key. To skip to the beginning of the current file • Press Left. To skip to the beginning of the previous file •...
-
Page 111: Menu Options When Playing A File
To play files repeatedly 1. On the Local Content screen, press the press the Action button. 2. Select the Repeat check box, and press the To stop playback while using another program 1. On the Local Content screen, press the press the Action button. - Page 112 The following table lists the menu options and their functions that are available when you play a file. Menu options when playing a file Play/Stop Next Previous Open URL Properties Settings Add to Favorites Local Content screen menu options By using the menu options from the Local Content screen, you can start and stop play- back, add files to your Favorites playlist, display information about a file, configure vol- ume and playback settings, or delete a file.
-
Page 113: Using Media Player Favorites
The following table lists the Local Content screen menu options and their functions. Local Content menu option Play/Stop Local Content Favorites Open URL Properties Settings Delete Using Media Player Favorites You can connect to your favorite streaming media file and add it to Favorites. The next time you want to listen to the streaming media file, just select it from Favorites. -
Page 114: Supported File Formats
To play a favorite 1. On the Local Content screen, press the press the Action button. 2. Select an item, and press the To delete a favorite 1. On the Local Content screen, press the press the Action button. 2. Select an item, press the button. -
Page 115: Modem Link
Moving Picture Experts Group (MPEG) Supported Audio and Video Codecs Media Player can play files that have been compressed by using any of the following audio and video codecs. Audio codecs • Microsoft Windows Media Audio codec version 2.0, 7.0, and 8.0 •... - Page 116 5. Connect your Smartphone to the device with which you want to use your Smart- phone as a modem. To set up a serial port modem connection 1. Make sure that your Smartphone is not connected to another device. 2. On the Home screen, press the ries, and then press the Action button.
-
Page 117: File Management
File Management Using File Management, you can view the files stored in your Smartphone (and storage card if inserted) and deal with them. To use File Management • On the Home screen, press the then press the Action button. To navigate in File Management •... -
Page 118: Sim Manager
SIM Manager Using SIM manager, you can manage and maintain the SIM phonebook easily. To use SIM manager • On the Home screen, press the Action button. Select SIM Manager To add a new phonebook entry to SIM card • Press the soft key, enter the name and phone number, press ished. - Page 119 • When editing, press the dial the phone number. Select Select Cancel and press the Action button to discard and exit this function. To delete an entry • Select an entry and press the ton to delete this entry. To make a phone call •...
-
Page 120: Using Ia Album
To use the SMS Manager • Press the Menu soft key, select To add a SMS on SIM card • Press the soft key, enter the phone number of recipient and the content. Press Save to store the SMS and press To edit a SMS •... -
Page 121: Camera Mode
you install IA Album to your phone’s memory. After installing, you will find two ways to start IA Album from your Smartphone’s Programs menu. If you have a built-in or attached camera, select Camera Photos to start Photos mode. Camera Mode When in Camera mode, use Burst Capture submode to auto-capture multiple images in quick succession;... - Page 122 Video Capture submode To start the video recording process, press the Left soft key or the Action button. These acts an On/Off toggle; that is, to stop recording, press either of them again to stop the recording process. By default, audio is recorded along with your video. To turn this off, select Options>Video from the menu or press 6 on your keypad to toggle audio On...
- Page 123 displayed after Capture was finished). Press the Right or Left button to select.To dis- card, use the Right soft key. Composition Capture submode In Composition Capture submode, you can use Select Template on the menu to select a “digital picture frame“ into which your captured image will be placed. In the Select Template screen, press the Left or Right buttons to view the available templates, then press the Left soft key (“OK“) to select the current template.
- Page 124 ments\Frames folder of your Smartphone’s local storage in order for IA Album to be able to find them. Photos Mode Select Photos from Programs to browse, manipulate, and view/play image and video files. You can capture new images and videos using IA Album’s Camera mode, or get images and video files from received E-mail, a Storage Card, infrared beaming, or syn- chronised from a PC.
- Page 125 Note: The total number of image/video files found in the current folder is displayed in the Title Bar, and the current folder is shown directly under the Title Bar. Large thumbnails with infor Pane Detailed view Detailed view mode utilises the whole screen to display still images or to play back and animated GIF files.
- Page 126 most figure below, only one second of the video has played thus far.) Video files can also be converted into animated GIF files for greater portability. Zoom submode of Detailed View If you have IA Caller ID, you can select invoke the IA Caller ID application and assign the selected photo to one of your Pocket Contacts.
- Page 127 At any time during the Slide Show playback, press 6 to toggle the Full Screen display on or off. (Or, select Full Screen from the menu to switch it on/off.) When Full Screen is “On“, the Title Bar and Softkey labels will not be displayed on the screen during the Slide Show.
-
Page 128: Using Ia File Manger
Product support:supportE@iastyle.com ® ® Microsoft and Windows ration in the United States and/or other countries. IA Album , IA Capture ™ ™ The names of other actual companies, products and brand names mentioned herein may be trade names, service marks, trademarks, or registered trademarks of their respective owners. - Page 129 that you install IA File Manager to the main unit (Smartphone's local "Phone" storage). After installing, select File Manager from your Smartphone's Programs menu to start it. Key Features: • Send the selected files via E-mail or Infrared beaming, and receive files via infrared beaming •...
-
Page 130: Jmms
pressing the Action button will also switch to List View. If the selected folder in Tree View does contain subfolders, pressing Action button expands or collapses the tree for that folder. For most functions, you must first select the file or folder you wish to operate on, the select the desired command from the menus, or press the shortcut key on your Smartphone keypad, if a shortcut exists. - Page 131 jMMS also facilitates the exchange of multimedia messages with the existing MMS Cli- ent. Features Receiving MMS messages jMMS supports the receipt of multimedia notification for incoming messages, over SMS. The incoming message notification is stored in the Inbox folder . Sending MMS messages Using the jMMS, multimedia messages can be sent as MMS SMIL content.
- Page 132 System requirements Hardware Smart-Phone 2002 with ARM processor Minimum memory of 1 MB Software Microsoft powered Smartphone 2002 For more information All your queries can be addressed to: helpdesk@jataayusoft.com Getting to know jMMS The Integrated inbox will be invoked from the “Programs” options. The dpad direction buttons can be used for navigation, and the dpad action button can be used for selection.
- Page 133 Clicking on soft key will display the blank screen with the Menu to add the con- tents, which is shown in the second slide. The Send soft key helps the user to send the Insert The Insert option helps you to insert the Pictures,Text, and Audio to your MM. Internet, Entertainment, and More - 133...
- Page 134 Picture To insert picture to your MM select Menu->Insert->Picture. The screen with the images is displayed. You can choose the image by clicking on the Select soft key. The Menu option helps you to perform various operations on the images displayed. Cancel This option helps you to cancel the image selection and return to the compose screen.
- Page 135 More This option is enabled only if you have more than 9 images. Delete Delete option helps you to delete the selected image. An Alert message is displayed before deleting the image. Clicking on soft key will delete the selected image. Clicking on will cancel the deletion operation.
- Page 136 Properties This option helps the user to view the property of the selected image. On inserting the image to your MM click on Send soft key to send the MM. Send MMS You get the Send MMS screen. Enter the valid mobile number in theTo text box.You can send this message to multiple recipients by adding their mobile numbers in CC and BCC fields.
- Page 137 To select an address from the phone book, press Phone Book. This displays the phone book from which the user can select the required address. The Address Book contains the Name, Email or Mobile numbers of the contact. Note: Phone Book cannot be edited. To add an address to the phone book, click Con- tacts from the main screen of the device, click...
- Page 138 Text To insert the text to your MM go to Menu-> Insert-> Text option. You get a page where you can type your message. Click on to cancel the message. You can send the message by clicking on text then you get a notification asking if you want the message to be sent as SMS. Click to send as SMS.
- Page 139 Audio To insert the audio to your MM go to Menu->Insert->Audio option. The list of audio files is displayed. Click on Select soft key to select the audio file. On selecting the audio file an audio icon is displayed in your MM page. Click on Send soft key to send the MM.
- Page 140 Remove To remove the picture from the MM this option is used. Menu->Remove->Picture. To remove the inserted text go to Menu->Remove->Text. To remove the audio from the MM this option is used. Menu->Remove->Audio. 140 - Internet, Entertainment, and More...
- Page 141 Preview This option helps you to view the composed MMs. Internet, Entertainment, and More - 141...
- Page 142 Slide This option helps you to Insert and Delete slides with options for navigating between different slides. This option helps you to add a new slide to the message. 142 - Internet, Entertainment, and More...
- Page 143 Delete To delete a slide you can use this option. Next and previous To navigate between slides you can either use Next Previous option. Internet, Entertainment, and More - 143...
- Page 144 Background This option helps you change the background colour of your message. On selecting this option you will get a set of colours from which you can choose. The following screen shows the changed Background colour of the message. Camera Camera Option allows capturing image using the camera attached to the Device.
- Page 145 Send message This option helps you to send the message. Cancel message To cancel the composed message you can select Cancel message. Internet, Entertainment, and More - 145...
-
Page 146: Network Configuration
Network Configuration Jataayu MMS Client Connection Profiles jMMS supports multiple connection profiles. Select any of the given profiles and edit the content to suit the available network setup. • WAP 1.0 Gateway (Over WAP 1.x compliant gateway) • WAP 2.0 Gateway (Over WAP 2.x compliant gateway) •... - Page 147 8. Select Address and enter the address. To configure WAP 2.0 Gateway In the Edit Profile screen: 1. Select Profile, and enter a name 2. Select Gateway. 3. The Gateway Select screen is displayed. Select 4. Select MMS, and enter the URL. 5.
-
Page 148: Solitaire
Solitaire The object of Solitaire is to use all the cards in the deck to build up the four suit stacks in ascending order, beginning with the aces.You win the game when all cards are on the suit stacks. To start a game of Solitaire •... -
Page 149: Calculator
Note: Pressing Up will move a card to one of the four card stacks on the upper right corner of the screen if it belongs there. For example, if you have an ace displayed in one of the seven stacks, press the number above the ace, and then press Up. To play Solitaire 1. - Page 150 To clear the last digit entered in a multiple-digit entry • Press the Back button. 150 - Internet, Entertainment, and More...
-
Page 151: Care And Maintenance
Care and Maintenance It is recommended that you observe the cautions below to prevent possible damage to your phone and to keep your phone in good condition. When using your phone • Avoid using your phone in dusty, extremely high or low temperature environments. •... - Page 152 • Remove the battery from phone if it is not going to be used for a long period of time. Keep the phone and battery in a cool and dry place. When using the accessories • Use only approved batteries and accessories. Use of non-approved accessories can cause damage to your phone or yourself.
-
Page 153: Troubleshooting
Troubleshooting If problems occur when you use your phone, please refer to the table below to find out possible solutions. If your problem is not in the table, or the problem still persists after you try these solutions, please seek your original dealer for help. When you encounter these problems... - Page 154 Unable to make calls. Unable to receive calls. Your voice can not be heard. Can not use certain call functions. 154 - Troubleshooting • Is the reception of network signal in good condition? Move to an open space, or a place closer to window.
- Page 155 There are noises during a phone call. Can not connect to the Internet The screen shows "Insert SIM". The battery can not be charged. Avoid using the phone near a microwave oven, speaker or TV. Their interference has adverse effect to call quality. •...
- Page 156 The standby and talk time is apparently shorter than ever. Can not deactivate call barring or call divert functions. 156 - Troubleshooting • Your phone consumes more power when signal reception is poor. Try to move to a better location when you use the phone.
-
Page 157: Specific Absorption Rate Data
Specific Absorption Rate Data The model phone meets the government’s requirements for exposure to radio waves. Your mobile phone is a radio transmitter and receiver. It is designed and manufactured not to exceed limits for exposure to radio frequency (RF) energy. These limits are part of comprehensive guidelines and establish permitted levels of RF energy for the gen- eral population. - Page 158 • Additional related information includes the Motorola testing protocol, assessment procedure, and measurement uncertainty range for this product. 158 - Specific Absorption Rate Data...
- Page 159 Index Accessibility 59 Accessories 13 Accessories list 13 ActiveSync 95 Installing 96 Audio 131 Audio codecs 115 Battery 16 Charging 18 Installing 16 Burst Capture 122 Buttons 19 Action button 28 Back button 30 Function Buttons 19 Home button 28 Calculator 149 Calendar 85 Schedule 87...
- Page 160 Handstrap hole 25 Headset socket 24 Home Screen Customising 58 Viewing 58 Home screen 22, 28 IA Album 120 IA File Manger 128 Image Capture 121 Inbox 71, 131 Infrared port 24 Input modes 32 Multipress mode 33 Numeric mode 35 T9 mode 34 Internet Explorer 104 Jog dial 24...
- Page 161 Quick List 32 Security 62 Shortcuts 48 Deleting 50 Viewing 50 SIM card 14 Installing 14 Locking 37 Unlocking 38 Slide show view 126 SMS messages 74 soft keys 30 Sounds 54 Customizing 55 Displaying 55 Speaker 24 Speed dials 48 System Requirements Hardware 132 Tasks 90...