Advertisement
Table of Contents
- 1 Table of Contents
- 2 Specifications
- 3 Model Overview
- 4 Important Safety Instructions
- 5 Grounding Instructions
- 6 Assembly Instructions
- 7 Operating Instructions
- 8 Using the Accessories
- 9 Working with Detergents
- 10 TAKING a BREAK ..Five Minutes or more
- 11 Shutting down & Clean-Up
- 12 Winterizing and Long-Term Storage
- 13 Care and Maintenance Instructions
- 14 Cleaning Tips
- 15 Optional Cleaning Accessories
- 16 Troubleshooting
- Download this manual
See also:
Operator's Manual
Advertisement
Table of Contents

Related Manuals for Kärcher K 5.540


Summary of Contents for Kärcher K 5.540
- Page 1 K 5.540 K 5.740 HIGH PRESSURE WASHER - OPERATOR MANUAL NETTOYEUR HAUTE PRESSION - MANUEL D'UTILISATION MANUAL DE USUARIO DEL LIMPIADOR DE ALTA PRESIÓN English Français Español 59642390 (03/11)
-
Page 2: Table Of Contents
In the U.S. or Canada, please call WARNING 1-800-537-4129 for warranty issues indicates “a potentially hazardous situ- and visit www.karcher-help.com for ation which, if not avoided, could result technical support and product assis- in death or injury.” tance. -
Page 3: Model Overview
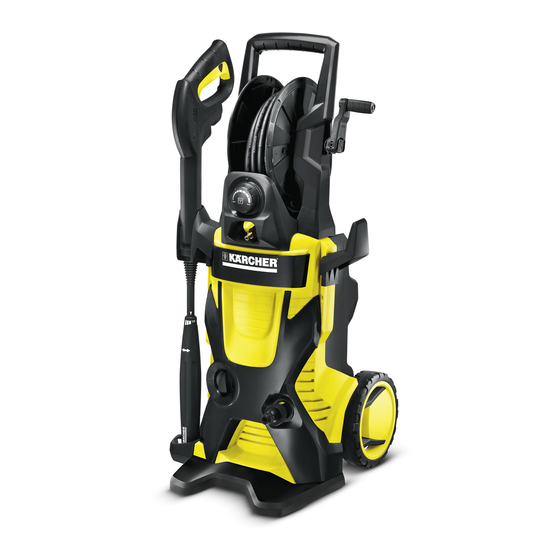
MODEL OVERVIEW 1 Garden hose connector (female) 14 Detergent tank 2 Water inlet with connector 15 Accessory storage 3 ON/OFF switch 16 Storage hook for mains connection cable 4 High pressure hose 17 Power cord with Ground Fault Cir- 5 Dosage regulator for detergent cuit Interrupter (GFCI) 6 Storage for trigger gun 18 Wheels... -
Page 4: Important Safety Instructions
IMPORTANT SAFETY INSTRUCTIONS WARNING WARNING When using this product basic precau- Risk Of Explosion – Do not spray tions should always be followed, in- flammable liquids. cluding the following: Do not use acids, alkaline, solvents, or any flammable material in this product. -
Page 5: Grounding Instructions
the skin. do not point the gun at anyone additional protection from the risk of or any part of the body. In case of pen- electric shock. Should replacement of etration seek medical aid immediately. the plug or cord become necessary, This system is capable of producing use only identical replacement parts 13800 kPa /2000 PSI to avoid rupture... -
Page 6: Assembly Instructions
ASSEMBLY INSTRUCTIONS For more detailed information on Install the storage for hand-spray gun how to assemble this pressure STEP 2: washer, please visit Place the bottom holder into the re- www.karcherresidential.com/as- cesses and push forward until it au- sembly dibly locks in. - Page 7 Install the high pressure hose drum STEP 6: Slide the free end of the coiled high pressure hose through the recess- es on the dosage regulator. Insert the hose drum into the in- takes on the transport handle. Insert the axle of the hand crank into the guides.
- Page 8 Install high pressure hose to hose drum STEP 7: Slide the retention clip on the reel (as indicated by “1” below) then completely push the high pressure hose in (as indicated by “2” below) until you hear a click. Tug on the hose before proceeding to make sure it is securely installed.
-
Page 9: Operating Instructions
OPERATING INSTRUCTIONS This pressure washer has been tested nector and make sure you hear it by Kärcher's quality assurance team. A click into place before proceeding. small amount of water may be present in the water inlet or outlet. This is nor- mal and will not affect the performance of the pressure washer. - Page 10 WARNING Do not use if above test fails. STEP 6: Unlock the trigger gun safety lock. Trigger the gun to eliminate trapped air, wait for a steady flow of water to emerge from the spray nozzle. STEP 7: Turn on the high pressure washer (I/ON).
-
Page 11: Using The Accessories
WORKING WITH DETERGENTS Detergents can only be applied at STEP 2: low pressure setting (Mix). Fill the detergent tank with Karcher STEP 1: detergent and position the tank into Install the Vario Power Spray its storage area. Insert the suction Wand. -
Page 12: Taking A Break ..Five Minutes Or More
STEP 3: siphon tube when done to flush any remaining detergents from the in- Adjust the suction volume of the de- jection system. tergent solution by means of the dosage regulator for detergents. For best results see Cleaning Tips for specific information on how to clean different surfaces. -
Page 13: Shutting Down & Clean-Up
SHUTTING DOWN & CLEAN-UP STEP 1: water may leak from the connec- tions after operation. Turn the switch to OFF (0) position and unplug cord from outlet. STEP 2: Turn off the water source. STEP 3: Press trigger to release water pres- sure. -
Page 14: Winterizing And Long-Term Storage
WINTERIZING AND LONG-TERM STORAGE 1: Disconnect all water connec- of heat as it may dry out the pump tions. seals. 2: Turn on the machine for a few CAUTION seconds, until the water which had Failure to follow the above directions remained in the pump exits, turn off will result in damage to the pump as- immediately. -
Page 15: Cleaning Tips
CLEANING TIPS House Siding CAUTION Before cleaning any surface an in- (with or without detergent). Pre-rinse conspicuous area should be cleaning surface with fresh water. If us- cleaned to test spray pattern and ing detergent, apply to surface at low distance for maximum cleaning re- pressure (for best results, limit your sults. - Page 16 Brush Attachment (not included) to re- Cars, Boats & Motorcycles move stubborn dirt. Rinse at high pres- (with or without detergent). Pre-rinse sure in a sweeping motion keeping the vehicle with fresh water. If using deter- spray nozzle approximately 3-6 inches gent, apply to surface at low pressure.
-
Page 17: Optional Cleaning Accessories
OPTIONAL CLEANING ACCESSORIES Optional accessories are available to causes the inner brushes to gently further enhance your cleaning capabil- spin, making your cleaning job much ities. These accessories are accurate easier. The angle of brush head is ad- as of the printing date of this manual. justable to help you reach difficult ar- Please check our website for pricing eas. - Page 18 material and attack the rust and paint with our eco-friendly alternative. Fits most Kärcher pressure washers up to ® 2300 PSI. (bayonet) Part No. 2.638-792.0 Detergent Foamer Attachment Ideal for applications which require a thick foam. Simply fill the resevoir cup with liquid pressure washer detergent to generate a foam spray.
-
Page 19: Troubleshooting
TROUBLESHOOTING Disconnect the machine from the pow- CAUTION er source before making any repair. Symptom Cause Solution Motor will not start On/Off switch is in the “OFF” Turn switch to the “ON” (I) posi- (0) position. tion Power cord is not plugged in. Plug in power cord. Electrical outlet does not Try a different outlet. - Page 20 Water seals are damaged or Call Customer Support drops per minute is worn. permissible). Oil Drip. Oil seals are damaged or Call Customer Support worn. If you encounter any additional difficulties not listed, please visit our website. USA / Canada: www.karcher-help.com México: www.karcher.com.mx English...