Table of Contents
Advertisement
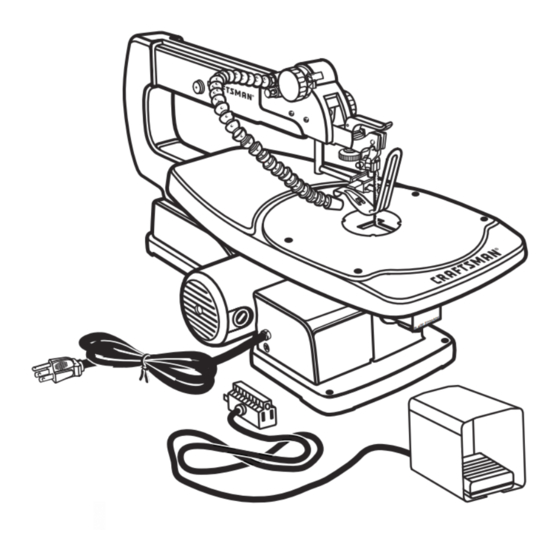
OPERATOR'S MANUAL
18 in. SCROLL SAW
VARIABLE SPEED
Model No.
315.216090
WARNING
: To reduce the risk of injury,
the user must read and understand the
operator's manual before using this product.
Customer Help Line: 1-800-932-3188
Sears, Roebuck and Co., 3333 Beverly Rd., Hoffman Estates, IL 60179 USA
Visit the Craftsman web page: www.sears.com/craftsman
983000-769
09-05
Save this manual for future reference
Advertisement
Table of Contents

Related Manuals for Craftsman 315.216090


Summary of Contents for Craftsman 315.216090
- Page 1 Customer Help Line: 1-800-932-3188 Sears, Roebuck and Co., 3333 Beverly Rd., Hoffman Estates, IL 60179 USA Visit the Craftsman web page: www.sears.com/craftsman Save this manual for future reference 983000-769 09-05...
-
Page 2: Table Of Contents
ONE YEAR FULL WARRANTY ON CRAFTSMAN TOOL If this Craftsman tool fails due to a defect in material or workmanship within one year from the date of purchase, CON- TACT THE NEAREST SEARS PARTS & REPAIR CENTER at 1-800-4-MY-HOME ® and Sears will repair it, free of charge. -
Page 3: General Safety Rules
GENERAL SAFETY RULES n SECURE WORK. Use clamps or a vise to hold work WARNING: Read and understand all instruc- when practical, it is safer than using your hand and tions. Failure to follow all instructions listed below frees both hands to operate the tool. may result in electric shock, fire, and/or serious n DO NOT OVERREACH. - Page 4 GENERAL SAFETY RULES n NEVER USE IN AN EXPLOSIVE ATMOSPHERE. n USE ONLY CORRECT BLADES. Use the right blade Normal sparking of the motor could ignite fumes. size, style, and cutting speed for the material and the type of cut. Blade teeth should point down toward the n INSPECT TOOL CORDS PERIODICALLY.
-
Page 5: Specific Safety Rules
SPECIFIC SAFETY RULES n FIRMLY CLAMP OR BOLT the tool to a workbench or n IF ANY PART OF THIS SAW IS MISSING or should table at approximately hip height. break, bend, or fail in any way, or should any electrical component fail to perform properly, shut off the power n KEEP HANDS AWAY FROM CUTTING AREA. -
Page 6: Symbols
SYMBOLS Some of the following symbols may be used on this tool. Please study them and learn their meaning. Proper interpretation of these symbols will allow you to operate the tool better and safer. SYMBOL NAME DESIGNATION/EXPLANATION Volts Voltage Amperes Current Hertz Frequency (cycles per second) -
Page 7: Save These Instructions
SYMBOLS The following signal words and meanings are intended to explain the levels of risk associated with this product. SYMBOL SIGNAL MEANING Indicates an imminently hazardous situation, which, if not avoided, will DANGER: result in death or serious injury. Indicates a potentially hazardous situation, which, if not avoided, could WARNING: result in death or serious injury. -
Page 8: Electrical
ELECTRICAL EXTENSION CORDS SPEED AND WIRING Use only 3-wire extension cords that have 3-prong The no-load speed of this tool is approximately 1,600 grounding plugs and 3-pole receptacles that accept the spm. This speed is not constant and decreases under tool’s plug. -
Page 9: Glossary Of Terms
GLOSSARY OF TERMS Anti-Kickback Pawls (radial arm and table saws) Non-Through Cuts Any cutting operation where the blade does not extend A device which, when properly installed and maintained, is designed to stop the workpiece from being kicked back completely through the thickness of the workpiece. toward the front of the saw during a ripping operation. -
Page 10: Features
FEATURES PRODUCT SPECIFICATIONS Throat ....................................18 in. Blade Size ..............................5 in. plain or pin No Load Speed ............................. 500 - 1,600/min. Input ............................ 120 V, 60 Hz, AC Only, 1.2 Amps Net Weight..................................28 lbs. LIGHT SWITCH DROP FOOT BLADE CLAMP LOCK KNOB SCREWS... - Page 11 FEATURES KNOW YOUR SCROLL SAW WARNING: For your own safety, always push See Figures 2 - 3. the knob OFF when machine is not in use. Also, in Before attempting to use this product, familiarize yourself the event of a power failure, push knob OFF. Lock with all operating features and safety rules.
-
Page 12: Tools Needed
TOOLS NEEDED The following tools (not included) are needed for making adjustments: HEX KEY ADJUSTABLE WRENCH PHILLIPS SCREWDRIVER FLAT HEAD SCREWDRIVER SMALL COMBINATION SQUARE Fig. 4 LOOSE PARTS The following items are included with the tool: n Plain Blades (3) n Pin Blades (2) n Operator’s Manual (Not Shown) PIN BLADE... -
Page 13: Assembly
ASSEMBLY UNPACKING NOTE: All bolts should be inserted from the top. Install the washers and nuts from the underside of the bench. This product has been shipped completely assembled. n Carefully lift the saw from the carton and place it on a The supporting surface where the scroll saw is mounted level work surface. - Page 14 ASSEMBLY If lag bolts are being used, make sure they are long should not be relied upon for precision. Make practice enough to go through holes in the saw base and the ma- cuts on scrap material to determine if your angle set- terial to which the saw is being mounted.
-
Page 15: Operation
ASSEMBLY down out of the way, and the table can be angled up to HEX BOLT 12˚ to the left. NOTE: Make sure the zero degree stop is rotated all the way down or it will contact the blade storage drawer as you angle to the left. - Page 16 OPERATION n Never use another person as a substitute for a table n Properly support round materials such as dowel rods extension or as additional support for a workpiece that or tubing because they have a tendency to roll during is longer or wider than the basic saw table.
- Page 17 OPERATION CHOICE OF BLADE AND SPEED n Pull up on the tension release. n Turn blade tension knob clockwise to decrease (or The scroll saw accepts a wide variety of blade widths and loosen) blade tension. thicknesses for cutting wood and other fibrous materials. It uses 5 in.
- Page 18 OPERATION n Pull up on the blade and press the upper arm down to TURNING THE SCROLL SAW ON AND OFF position the upper end of the blade in the upper blade See Figures 13 - 14. holder. n Plug the foot switch into the power source. n Securely tighten the upper blade clamp screw.
- Page 19 OPERATION STACK CUTTING This motor has an electronic control that regulates the speed and provides overload protection to the motor. If See Figure 16. the motor fails to start after about two seconds, push the After becoming well acquainted with the saw through knob OFF and disconnect the saw from the power source.
-
Page 20: Adjustments
ADJUSTMENTS WARNING : Before performing any adjustment, make sure the tool is unplugged from the power supply and the switch is in the OFF ( O ) position. Failure to heed this warning could result in serious personal injury. BLADE TENSION KNOB ADJUSTING DROP FOOT n Loosen the drop foot lock knob. - Page 21 MAINTENANCE ARM BEARINGS MOTOR BRUSHES See Figure 18. See Figure 19. Lubricate the arm bearings after the first 10 hours of use. The saw has externally accessible motor brush assem- Oil after every 50 hours of use or whenever there is a blies that should be checked periodically for wear.
-
Page 22: Troubleshooting
TROUBLESHOOTING PROBLEM CAUSE SOLUTION Motor will not run. Problem with ON / OFF switch, power Have worn parts replaced before us- cord, foot switch, or outlet ing scroll saw again. Have the proper outlet installed by a qualified electri- cian. Motor defective Do not attempt any repair. -
Page 23: Notes
NOTES... - Page 28 Get it fixed, at your home or ours! Your Home For repair – in your home – of all major brand appliances, lawn and garden equipment, or heating and cooling systems, no matter who made it, no matter who sold it! For the replacement parts, accessories and owner’s manuals that you need to do-it-yourself.