Table of Contents
Advertisement
Quick Links
Download this manual
See also:
User Manual
Terminal Server
P O W E R
Administration Guide
CUSTOMER
SUPPORT
INFORMATION
7 2 4 -7
4 6 -5
5 0 3
User and
To order or for technical support see inside back cover.
Technical support and fax orders 24 hours a day, 7 days a week.
Phone orders from 7 a.m. Monday to midnight Friday; Saturday 8 a.m. to 4 p.m. (Eastern)
Mail order: Black Box Corporation, 1000 Park Drive, Lawrence, PA 15055-1018
Web site: http://www.blackbox.com • E-mail: info@blackbox.com
PRODUCT CODES
Desktop Terminal Server 16 - 37687
Desktop Terminal Server 8 - 37688
Rack Terminal Server 16 - 40870
Rack Terminal Server 8 - 40871
102 Terminal Server - 41872
104 Terminal Server - 41874
5
T x
4
3
2
1
R x
July 2001
8
7
6
i
Advertisement
Table of Contents

Related Manuals for Black Box 37687


Summary of Contents for Black Box 37687
- Page 1 Technical support and fax orders 24 hours a day, 7 days a week. SUPPORT Phone orders from 7 a.m. Monday to midnight Friday; Saturday 8 a.m. to 4 p.m. (Eastern) INFORMATION Mail order: Black Box Corporation, 1000 Park Drive, Lawrence, PA 15055-1018 Web site: http://www.blackbox.com • E-mail: info@blackbox.com...
- Page 2 Terminal Server - User and Administration Guide 5500059-10...
- Page 3 Normas Oficiales Mexicanas (NOM) Contents Electrical Safety Statement Instrucciones 1. Todas las instrucciones de seguridad y operación de Seguridad deberán ser leídas antes de que el aparato eléctrico sea operado. 2. Las instrucciones de seguridad y operación deberán ser guardadas para referencia futura. 3.
- Page 4 Terminal Server - User and Administration Guide 11. El aparato eléctrico deberá ser connectado a una fuente de poder sólo del tipo descrito en el instructivo de operación, o como se indique en el aparato. 12. Precaución debe ser tomada de tal manera que la tierra fisica y la polarización del equipo no sea eliminada.
-
Page 5: Table Of Contents
Contents Contents Introduction About this Guide On-line Documentation Getting Support Terminal Server Packing List Installation Connecting to your Network Switching on the Terminal Server Communicating via ARP Communicating via a Terminal or PC The Menu System Tips Terminals on Multi-user Systems Terminal Port Configuration Host Table Setup Making a Connection... - Page 6 Terminal Server - User and Administration Guide Remote Access Systems Remote Site Devices Tips Printing Using ioland Using LPD Using RCP Other Devices Setup Reverse Telnet Port Configuration ioland Utility Tips The Menu Interface Menu Commands Connections Menu Port Setup Menu Administration Menu Access Menu Change Password Options...
- Page 7 Contents Quality Customer Service Figures Terminal Server features and applications Hardware description - Desktop Terminal Server. Hardware description - Rack Terminal Server Hardware description - 102/104 Terminal Server. Packing list - Desktop Terminal Server. Packing list - Rack Terminal Server Packing list - 102/104 Terminal Server.
- Page 8 Terminal Server - User and Administration Guide Administration - Gateway Menu. Administration - Host Address Menu. Administration Menu - LInes pop-up menu. Lines - Access Menu. Lines - Flow Control Menu. Lines - Hardware Menu. Lines - Network Connection Menu. Lines - Options Menu.
-
Page 9: Introduction 1
• Retail point-of-sale equipment (bar coding, registers, etc.) The performance and flexibility of the BLACK BOX ® Terminal Server allows you to use a wide range of high speed devices in complex application environments. These operating systems include: •... -
Page 10: Terminal Server Features And Applications
Terminal Server - User and Administration Guide This configuration diagram shows many of the features available on the Terminal Servers: Router Rack Terminal Server Internet POW ER Local PC Cash 102/104 Register Terminal Server Local PC Local PC SCO Unix Remote PC Printer Server... -
Page 11: About This Guide
Guide included with your package. Consult other sections in this guide as required. Release notes are also available with this unit (enclosed, or available from our web sites). ® ® Note: The BLACK BOX Terminal Server supports Windows ® ® systems including Windows NT... - Page 12 Terminal Server - User and Administration Guide Other Devices Setup The Menu Interface Command Line Interface (CLI) Troubleshooting & Maintenance Cabling Guide Technical Specification Notation The following notations are used to describe commands: Conventions Used Description Meaning mandatory parameter <parameter description> optional parameter [parameter description] option separator...
-
Page 13: On-Line Documentation
1.3 Getting If you encounter problems during setup or general Support ® maintenance, contact BLACK BOX for support. Here is the standard support route for the quickest answers: For technical support, 1. Have your serial number and problem overview ready then…... - Page 14 Terminal Server - User and Administration Guide The Terminal Server hardware features: • 2, 4, 8 or 16 serial lines, fully configurable with port speeds of up to 115.2 kbps. • RJ45 on Rack and 102/104 Terminal Servers or DB25 RS-232 connectors on Desktop version. •...
- Page 15 Introduction • ARP or BOOTP for network based setup. • Dynamic statistics displays and line status reporting for fast problem diagnosis. • Multiscreens on terminals. • Full support of SNMP MIBs, allowing remote configuration via SNMP as well as statistics gathering. •...
-
Page 16: Hardware Description - Desktop Terminal Server
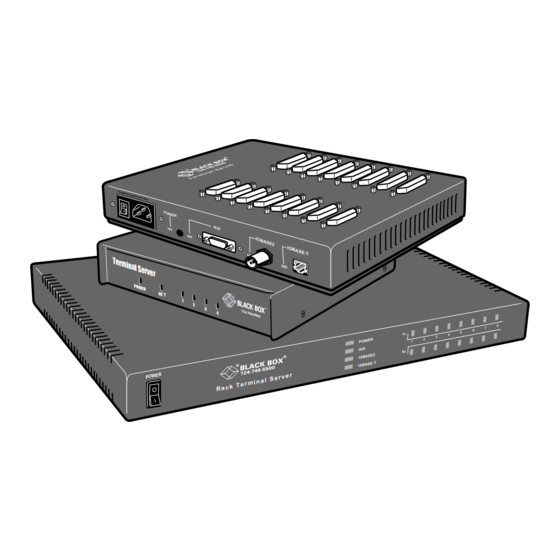
Terminal Server - User and Administration Guide Serial Ports 90-200V AC 50-60Hz 2amp fuse POWER IOBASE2 IOBASE-T 3 4 5 Figure 2: Hardware description - Desktop Terminal Server. Main power switch Power input socket Power indicator Reset switch cover AUI indicator AUI connector 10BASE2 indicator 10BASE2 connector (universal) -
Page 17: Hardware Description - 102/104 Terminal Server
Introduction Terminal Server 724-746-5503 POWER Serial Ports Figure 4: Hardware description - 102/104 Terminal Server Power Indicator Network indicator Reset switch cover Port activity indicators 10BASE-T socket Power input socket RS-232/RS422 Functionally, the difference between RS-232 and RS-422 versions is the absence of support for hardware flow control lines (RTS and CTS) and modem control lines (DSR, DTR and DCD) in the RS-422 version. -
Page 18: Packing List
Terminal Server - User and Administration Guide The Terminal Server uses TFTP for downloading new firmware. tftpd is included with Unix systems such as SCO, AIX and HP-UX but disabled by default. Consult your Unix manual on this subject. On Windows ®... -
Page 19: Packing List - Desktop Terminal Server
Introduction Figure 5: Packing list - Desktop Terminal Server Rack Terminal Terminal Server Server Electrical Safety Booklet This handbook Suppport Software Disk and Quick Start Guide 2 rack mount brackets Power cable PO W ER Figure 6: Packing list - Rack Terminal Server... -
Page 20: Packing List - 102/104 Terminal Server
Terminal Server - User and Administration Guide 102/104 Terminal 102/104 Terminal Server Server This handbook Support software disk and Quick Start Guide Electrical Safety Booklet Power supply unit Power cable 7 2 4 -7 4 6 -5 5 0 3 Figure 7: Packing list - 102/104 Terminal Server. -
Page 21: Installation 2
After you connect your LAN interface, you can power up the unit. The green power indicator at the side (or front for Rack and 102/104 units) should be lit. If the unit fails to power up with the green power indicator lit, disconnect the unit and contact Black Box. -
Page 22: Communicating Via Arp
Terminal Server - User and Administration Guide The green Ethernet indicators show the active connections. It remains lit and will blink when LAN traffic is active. Note: To change your Ethernet media, you will need to reboot the unit to activate the connector. You are now ready to begin communicating with your Terminal Server. -
Page 23: Communicating Via A Terminal Or Pc
Installing your IOLAN+ Here is the sequence to use: arp -s 192.168.209.8 00:80:D4:00:33:4e telnet 192.168.209.8 password> local> At the password prompt, just hit since this is not set yet. The IP address still needs to be configured on the unit (ARP has only allowed you to connect to the unit so far). -
Page 24: The Menu System
Terminal Server - User and Administration Guide The next prompt displayed is local>, which is the Command Line Interface (CLI) prompt. Note: If there are any problems, check the cable you are using (this is the most common error). Port 1 is configured to provide error messages should any problems occur. -
Page 25: Connections Menu
Installing your IOLAN+ CONNECTIONS MENU REMOTE-ADMIN Connection Host *** FREE *** *** FREE *** *** FREE *** *** FREE *** ________________________________________________________________________________ v4.02 a CDi TERMINAL SERVER Figure 8: Connections Menu. The firmware version of the Terminal Server is located on the lower left hand portion (in this example, version 4.02). -
Page 26: Commands Pop-Up Menu
Terminal Server - User and Administration Guide Connection Host *** FREE ** === Commands === *** FREE ** | Telnet *** FREE ** | Rlogin *** FREE ** | Port | Admin mode ^A| | CLI | Lock | Logout ================ ________________________________________________________________________________ This option allows you to configure parameters affecting... -
Page 27: Administration Menu (Password Level)
Installing your IOLAN+ Select the Password field and press the key. Use the factory default password here: this is iolan (no caps). Note: This password level will time-out in four minutes if there is no activity. This is for security reasons and will take you back to Administration Menu (view level). -
Page 28: Server Configuration Menu
Terminal Server - User and Administration Guide ** Administrator ** SERVER CONFIGURATION REMOTE-ADMIN Name [TSERVER Debug mode IP address [204.17.209.8 Subnet mask Ethernet address [00:80:d4:00:9e:a1] Ethernet interface [AUTO Language [English ] Identification Lock [Disabled] Password limit CR to initiate [Yes ] SNAP encoding [Disabled] Boot host... -
Page 29: Commands Pop-Up Menu (Server Confign)
Installing your IOLAN+ Subnet mask Ethernet address [00:80:d4:00:9e: == Commands ===ernet interface [AUTO Language [English ] | Save & Exit | Identification | Quit & Exit | Lock [Disabled] | Values Password limit | Cancel CR to initiate [Yes ] =============== SNAP encoding [Disabled]... -
Page 30: Port Setup Menu Screen
Terminal Server - User and Administration Guide All of the procedures are based around the Port Setup Menu . This is accessed through the Administration Menu (password level). Remember, that if you are not in the password level, you can only view the information, not change it. Here is the Port Setup Menu : ** Administrator ** PORT SETUP MENU... -
Page 31: Tips
Installing your IOLAN+ IP Addresses: Deals with remote access via PPP/SLIP sessions. Options: Deals mainly with the telnet options. This section is the least used. Keys: Defines the various accelerator keys that the server responds to and can be used for convenience. - Page 32 Terminal Server - User and Administration Guide The request is received by all hosts on the network and is checked against a file to find a match. This data base file will normally be /etc/bootptab and will be of the following format: # bootptab description :ht=ethernet:ha=0080d400024e:\ :hd=tftp:\...
- Page 33 Installing your IOLAN+ This can be achieved by uploading the configuration of the unit to a host on the network. To do this, enter the Communications Server Menu from the Administration Menu. Select the Init file entry of this menu. Set this to the full pathname of the file in which you wish to store the configuration.
- Page 34 Terminal Server - User and Administration Guide Domain Name The Terminal Server can be configured to take advantage of Server (DNS) your network’s Domain Name Server (DNS). This is done from the Administration Menu by keying in the IP address of your DNS in the name server field.
-
Page 35: Terminals On Multi-User Systems 3
Terminals on Multi-user Systems 3 Terminals on Multi-user Systems The Terminal Server is used extensively for connecting terminals, printers and modems on multi-user Unix systems, especially in retail applications. These Unix systems include SCO Unix, IBM AIX, HP-UX, Data General’s DG/UX, etc. This section deals with terminals and/or PCs using emulation packages (such as Hyperterm). -
Page 36: Port Setup Menu Screen
Terminal Server - User and Administration Guide ** Administrator ** PORT SETUP MENU REMOTE-ADMIN Hardware Flow ctrl Keys Speed [9600 ] Flow ctrl [XON/XOFF] [^]] Intr [^C] Parity [None] Input Flow [Enabled ] Quit [^@] Kill [^U] Output Flow [Enabled ] [^@] Sess [^@] Stop... -
Page 37: Host Table Setup
Terminals on Multi-user Systems Monitor DSR: You can set this field to Yes if you wire the terminal’s DTR signal pin 20 (DB25) to the Terminal Server's DSR signal pin 3 on the RJ45 conector ( see Cabling Guide for DB25 pin assignments). -
Page 38: Making A Connection
Terminal Server - User and Administration Guide 3.3 Making a If you are using initiated connections, you will not see the Connection Terminal Server menus. Instead, you see the login prompt of the host you assigned in the host field of the Port Setup Menu . -
Page 39: Tips
Terminals on Multi-user Systems Note: At this point, check the host table again for correct entries, then check the network connection and host machine you’re connecting to. While in session to the host machine, you can return to the terminal server by using a hot key. This is user-defined, but defaults to ^]. - Page 40 Terminal Server - User and Administration Guide The TERM field The TERM field in the Port Setup Menu can be used to pass the terminal type information to the host. The terminal type field is local to the Terminal Server but will be passed to the host.
-
Page 41: Setting Up Dial-In Modem Ports 4
Setting up Dial-in Modem Ports 4 Setting up Dial-in Modem Ports This section will review the configuration necessary to create dial-in connections. It will start with the most simple connection such as a dial-in Unix connection. The section then moves into setting up PPP ports which is how Windows ®... - Page 42 Terminal Server - User and Administration Guide The following fields are important: Monitor DCD: With this flag set to Yes , the Terminal Server will monitor Data Carrier Detect (DCD) - pin 8 - from the modem. As soon as your modem answers a call and establishes a carrier signal, the modem raises DCD.
-
Page 43: The Host
Setting up Dial-in Modem Ports Access: Set this field to Dynamic . This sets the port of the terminal server to listen for data on both the RS-232 side and the network side. If only used for dial-in, set to Local and it will only listen on the RS-232 side. -
Page 44: Client Login
Terminal Server - User and Administration Guide ** Administrator ** REMOTE SITE DEVICES SCREEN REMOTE-ADMIN Type [port3 IP Addresses Src Addr Dst Addr Modem Config [ate0s0=1&w Dial Comm Hang Up PPP Configuration Dialer Configuration Restart timer [1 ] Dial Timeout [40] Max Retries [5 ] Dial Retries [2 ]... -
Page 45: Tips
Setting up Dial-in Modem Ports My IP Address is : 192.168.209.7 Your IP Address is : 192.168.209.210 The Subnet Mask is : 255.255.255.0 With this example, the Terminal Service is now in CSLIP mode, so put your PC into CSLIP mode as well. Your dialer script will have to parse out the My/Your addresses from the above message. - Page 46 Terminal Server - User and Administration Guide MOTD A Message of the Day (MOTD) can be displayed before login. This is setup from the Server Configuration menu using MOTD and Boot host fields. Gateway notes If you have a router on your local network, make sure you enter this into the Terminal Server Gateway Menu .
-
Page 47: Modem Authentication & Logging 5
Modem Authentication & Logging 5 Modem Authentication & Logging The Terminal Server provides authentication support to validate users connecting to the serial port, and can update a host log file on connection states. Authentication and logging is achieved by using a designated authentication host to validate users and keep connection information. -
Page 48: User Authentication/Logging
Terminal Server - User and Administration Guide 5.1 User To improve access security, the Terminal Server has a Authentication/ mechanism for authenticating users before allowing them Logging access. This is accomplished by prompting the user for a Login ID and a password. The Terminal Server will then attempt to login to a specified host using that ID and password. - Page 49 Modem Authentication & Logging Authentication Port: The TCP service to be used for authenticating users. Normally this is set to 23 for Telnet. Login Prompt: The string used by the Terminal Server to know when to send the login ID. Set this field to ogin:.
-
Page 50: The Host
Terminal Server - User and Administration Guide Log Username: The User ID the Terminal Server will use to log in to the authentication host and log messages. This user needs to be at a shell prompt to ‘cat’ messages to the log file. - Page 51 FTP site for the latest information. You then need to create a user database file. This is a sample file (for a full file description see the Black Box support FTP site). # Example of a PPP user with static address...
-
Page 52: Logging
Terminal Server - User and Administration Guide # Example of a telnet user mark Password User-Service-Type = Login-User Login-Host = 208.24.183.1 Login-Service = Telnet # Everybody else gets PPP with a dynamic address DEFAULT Password Framed-Protocol = PPP Note: When using advanced authentication, make sure the Success Indication String in the Host Authentication And Logging menu is set to userdefined . -
Page 53: Tips
Modem Authentication & Logging If the host authentication succeeds, but logger fails to log events, then the port connection is dropped. Tue Jan 17 12:03:22 GMT 1997: server earth logger started Tue Jan 17 12:03:22 GMT 1997: server earth is alive Tue Jan 17 12:08:22 GMT 1997: server earth is alive Tue Jan 17 12:09:28 GMT 1997: server earth user us1 logged into port 1 Tue Jan 17 12:12:22 GMT 1997: server earth user us1 logged out port 1... - Page 54 Terminal Server - User and Administration Guide...
-
Page 55: Dial-Out Modem Ports Setup
Setting up Dial-Out Modem Ports 6 Dial-out Modem Ports Setup Dial-out ports can be just a simple Unix outbound cu call or the Terminal Server can act as a dial-out router to facilitate Internet PPP requests. As a dial-out router the Terminal Server automatically establishes a SLIP/CSLIP/PPP link to that site. -
Page 56: The Host
Terminal Server - User and Administration Guide The following fields are important: Access: Set the Access field to Dynamic (dial-in or out) or Remote (dial-out only). Monitor DCD: With this flag set to Yes , the terminal server will monitor the modem signal Data Carrier Detect (DCD) - pin 8. -
Page 57: Routing
Dial-out Modem Ports Setup For dial-out Check our FTP sites for the latest information on dial-out connections on connections (under the Windows ® support directory). Windows ® systems 6.3 Routing For dial-out routing, you must have the proper routing entry on all hosts in your local network that will communicate with the remote site. -
Page 58: Remote Access Systems Screen Menu
Terminal Server - User and Administration Guide 6.4 Remote This screen is used to define a remote system (up to 16 Access entries per Terminal Server), a phone number, login script, Systems etc. There are a lot of similarities between this screen and the UUCP systems file under Unix. - Page 59 Dial-out Modem Ports Setup Service type: This specifies which protocol will be used when the link is established to the remote site. Choices are PPP. SLIP and CSLIP. Inactivity: The period (in minutes) of inactivity on the SLIP/ PPP link before the port drops the call automatically.
-
Page 60: Remote Site Devices Screen
Terminal Server - User and Administration Guide phone# (sends the telephone number field). send the modem’s dial command escapes to ‘\’. send a break. Dial-out PAP If a dial-out script is not used but a username and password Authentication are defined, the Terminal Server will send a PAP packet after establishing a PPP link and use the username and password defined for the remote site. - Page 61 Dial-out Modem Ports Setup The following fields are important: Type: The name of the modem assigned to a specific port. It is referenced from the Remote Access Systems Screen in the Device type field. Dst Address: The address of the remote system the Terminal Server is calling into.
- Page 62 Terminal Server - User and Administration Guide...
-
Page 63: Ioland Printing - Port Setup Menu Screen
Printing 7 Printing There are three methods of printing from your Terminal Server: ioland, LPD, or RCP. LPD is the recommended method, however it depends on your application and operating system. 1. ioland provides a pseudo TTY interface to Unix print spoolers (not available for Windows ®... - Page 64 Terminal Server - User and Administration Guide The following fields are important: Flow ctrl: Set your Terminal Server port flow control to Hardware . Then set your printer to use ‘DTR Pacing’ or ‘Hardware’ or ‘Ready/Busy’ flow control. Use the RS-232 printer cable pinout shown in the Cabling Guide (Appendix C).
-
Page 65: Lpd Printing - Port Setup Menu Screen
Printing Tips Hunt groups: The Terminal Server supports humt groups for printing. To use this, use the same number in the Port Setup local port field ( i.e. 1006). 7.2 Using LPD The Terminal Server can be setup for receiving print jobs via LPD and this is a very simple method. - Page 66 Terminal Server - User and Administration Guide Name: The LPD client, as a reference to the printer, will use what you assign here. This is the printer queue name on the Terminal Server. Set this field to Remote . This sets the port of the Access: terminal server to listen for connections coming from the network.
- Page 67 Printing The name of the terminal server followed by a port number. For example if the queue name is server_name9 (or server_name09) then serial port 9 will receive the print job. Please note that in this example, the Name field in the Port Setup Menu need not be set. 3.
- Page 68 Terminal Server - User and Administration Guide Under Windows ® the printer will be available from within other applications via the File option of the Windows ® menu bar. The actual printer will be referenced by the Name of the terminal server serial port or, by the terminal server and port number in the same way that Unix uses the Name.
- Page 69 Printing To overcome this the local host must perform all of the necessary changes and then send these to the terminal server. Defining a printer queue as in the previous examples can do this. If filtering or formatting is required then a local linking print queue needs to be created.
-
Page 70: Using Rcp
Terminal Server - User and Administration Guide If the lpsystem command is not performed, the lpadmin command will return an error indicating that the system named in the -s parameter does not exist even though the system is listed in the /etc/hosts file. Note: Although it is possible to create a printer spool on the Terminal Server, UNIX lpd queues only print one job at a time. -
Page 71: Rcp Printing - Port Setup Menu Screen
Printing Configuration ** Administrator ** PORT SETUP MENU REMOTE-ADMIN Hardware Flow ctrl Keys Speed [9600 ] Flow ctrl [Both [^]] Intr [^C] Parity [None] Input Flow [Enabled ] Quit [^@] Kill [^U] Output Flow [Enabled ] [^@] Sess [^@] Stop [1 ] Echo [^@] Break... - Page 72 Terminal Server - User and Administration Guide Local port: The INETD process running on the terminal server for this port is listening for TCP/IP connections on TCP port 514 (this is the RCP service number). The Host On systems where LPD or a binary for ioland is not available, or is found to be unreliable due to limitations in the OS, RCP provides a useful, if limited, alternative method for printing.
- Page 73 Printing c. Find the interface shell script for this printer and copy it to a file with the suffix ‘.orig’. using the example: cp hpjet hpjet.orig d. Copy the Server RCP shell script from the TSSD support disk to the interface script, e.g: cp /etc/bbox/src/bbox.rcp hpjet Having created the hpjet file set the permissions to allow execution of the script, e.g:...
- Page 74 Terminal Server - User and Administration Guide RCP printing on a Currently, the RCP printing utility will not work if the of filter spooler system is used in conjunction with any other filter. based on BSD a. Log in as root and create a print queue for the Unix.
- Page 75 Printing Then the line: rcp $TMP <server name>:tty<port number> becomes: rcp $TMP iceland:tty8 Some Unix systems may require the full pathname of the ‘RCP’ command. For example, SunOS Unix and may require the line to become: /usr/ucb/rcp $TMP iceland:tty8 Activate the printer for use. That is: lpc start TSERVER8 lpc enable TSERVER8 g.
- Page 76 Terminal Server - User and Administration Guide...
-
Page 77: Other Devices Setup
Other Devices Setup 8 Other Devices Setup The Terminal Server is a very versatile product and can handle a lot of creative applications. This section deals with setting up printers and data acquisition type equipment, including retail point-of-sale equipment. Many types of RS-232 equipment can be attached including: •... -
Page 78: Reverse Telnet - Port Setup Menu Screen
Terminal Server - User and Administration Guide ** Administrator ** PORT SETUP MENU REMOTE-ADMIN Hardware Flow ctrl Keys Speed [9600 ] Flow ctrl [Hardware] [^@] Intr [^@] Parity [None] Input Flow [Enabled ] Quit [^@] Kill [^@] Output Flow [Enabled ] [^@] Sess [^@] Stop... - Page 79 Other Devices Setup This will start the ioland process in permanent mode and create a device in /dev. If you are not familiar with the ioland program, read the following section. If you are using Windows ® check the web page for the latest information on dial-out connectivity.
- Page 80 Terminal Server - User and Administration Guide There are three mandatory arguments the daemon requires to mediate between the client and server port: Server: The host name of the Terminal Server that has the attached printer or terminal. Port: The TCP port on which the server port is listening for connection requests.
- Page 81 Other Devices Setup Hangs up the pseudo-tty if the TCP connection is lost. This mimics the situation in which a real serial port loses a signal such as DCD. In the same manner as the serial port, a SIGHUP signal will be sent to all processes that have the slave pseudo-tty as their controlling tty.
- Page 82 Terminal Server - User and Administration Guide Used with the -p option. This option prevents the slave pseudo-tty from closing so as to prevent any flushing of data that may occur. With this option set, the daemon will not close the TCP connection so its use is not advised for modems, as line hang-ups may not be initiated.
- Page 83 Other Devices Setup Lets the world know we’re alive — but nothing else. Reports startup options. Reports connection and disconnection events. Reports numbers of characters being sent/received. Displays data written to the client process. Displays data written to the Terminal Server. Reports telnet negotiations.
-
Page 84: Tips
Terminal Server - User and Administration Guide The first is a simple printer configuration, the second is a complex modem configuration while the third is a configuration more suited to a daemon with a terminal attached and a getty running as the client process. Normally, the debug level is set to a minimal level such as three. -
Page 85: Commands - Exit Pop-Up Menu
The Menu Interface 9 The Menu Interface This section describes the menu system and the fields within them. Bounce around the menu system to get your bearings. All of the menus are covered and referenced in this section. 9.1 Menu You move around the menus with the arrow keys or by using Commands the first letter of the associated command. -
Page 86: Connections Menu
Terminal Server - User and Administration Guide Pressing cancels the Command Options window (works the same as Cancel ). Other than mastering the difference between the key and , there are several other special fields and keys. Toggle fields Some data fields have a set of acceptable values. An example of this is the bps rate setting. -
Page 87: Connections Menu - Commands Pop-Up Menu
The Menu Interface Connection Host *** FREE ** === Commands === *** FREE ** | Telnet *** FREE ** | Rlogin *** FREE ** | Port | Admin mode ^A| | CLI | Lock | Logout ================ ________________________________________________________________________________ This option allows you to configure parameters affecting the Server box, eg hosts table, other terminals. - Page 88 Terminal Server - User and Administration Guide This option only appears if there is a current Resume connection open. It allows you to carry on Connection working on a host. This option also appears only if the current Close connection is open and will close the session on Connection a host machine.
-
Page 89: Port Setup Menu
The Menu Interface 9.3 Port Setup This menu allows the user to set up all of the parameters Menu associated with a port. The administrator can alter the set-up of any port on the Terminal Server while a user can only alter the set-up for their own port. - Page 90 Terminal Server - User and Administration Guide This field sets the parity of the port to even, odd Parity or none. The default parity is None . This sets the number of data bits that are used by the port from 5-8. The default is 8 . This defines how many stop bits the port uses to Stop either 1, 1.5, 2.
- Page 91 The Menu Interface User The User section defines various user parameters such as name and terminal type. Most fields are used in this section. A full description is given below: This field defines the user name of this port on the Name server.
- Page 92 Terminal Server - User and Administration Guide This field defines whether the server is using the CLI/Menu CLI or the menu interface. If the terminal is configured for menu interface but the terminal type is undefined or dumb, then the unit remains in the CLI.
- Page 93 The Menu Interface This is the destination IP address of the PPP/SLIP connections. If blank, the remote host must supply the IP address. If filled in, you designate an assigned IP address to loan the remote host. If the secure field on the Port Menu is No , this can be overridden by the incoming host.
- Page 94 Terminal Server - User and Administration Guide Access to the administration mode is enabled from this port. Port will accept IP addresses. Access to administration mode is disabled for this port. Port will reject IP addresses. Access to administration mode is disabled and dial-in access via PPP/SLIP is disabled.
- Page 95 The Menu Interface This field defines the character that generates a telnet erase character signal across the network. In addition, this key can be used to ‘reprogram’ the interpretation of the <left-arrow> key when operating in the menu mode. If the users terminal generates the same key sequence for <Left-Arrow>...
- Page 96 Terminal Server - User and Administration Guide Access This section controls the type of the connection made from this port. This is the most important section in defining a port. The parameters are as follows: This field defines the type of service that is Access operating on this port.
- Page 97 The Menu Interface This field defines how a user logs in. Default Authentication is none. This sets authentication off. None This forces the incoming user to enter the Local Terminal Server login authentication password (same password for all ports). This is full authentication requiring a user ID Host and password that will be checked against a designated authentication host.
- Page 98 Terminal Server - User and Administration Guide The server makes an immediate connection Preferred to the indicated host machine and port number. The Host , Remote and Mode fields must be filled in. Although the user is connected to a designated host, the user can hot key ^] back from this connection to the unit.
-
Page 99: Administration Menu
The Menu Interface 9.4 Administration The Administration Menu allows the user access to the main Menu configuration functions. All of the options can be accessed by a normal user (unless the secure field is set to Yes ). None of the configuration details may be altered unless the user has entered the administrator’s password. -
Page 100: Administration Menu (Password Level)
Terminal Server - User and Administration Guide Selecting this field allows the user to view the server Configuration Menu . Selecting this field allows the user to view the stats Statistics screens. Once the user has entered administration mode the display changes slightly to indicate this. -
Page 101: Access Menu For Remote System Access
The Menu Interface Selecting this field will take the user into the trap SNMP trap function menu. 9.5 Access Menu The Access section deals with remote access sites, devices and the authentication and logging parameters. The initial pop-up window is as follows: * Administrator ** ADMINISTRATION MENU REMOTE-ADMIN... - Page 102 Terminal Server - User and Administration Guide The parameters are as follows: This is the IP name or IP address of the remote Sitename site the Terminal Server will be calling. This is the user name required by the remote User name system for logging in.
-
Page 103: Remote Site Devices Screen
The Menu Interface Remote Site This first brings up a pop-up menu with 16 possible Devices UNUSED ENTRYs each corresponding to a port. ** Administrator ** REMOTE SITE DEVICES SCREEN REMOTE-ADMIN Type [Netchasr] IP Addresses Src Addr Dst Addr [204.17.209.212 ] Modem Config Dial Comm... -
Page 104: Host Authentication And Logging Menu
Terminal Server - User and Administration Guide This is the modem’s setup string. There are a Config few examples at the end of this document. Note: Leave this field blank for directly connected devices. This is the modem’s dial command. Dial Comm This is the modem’s hang up command. - Page 105 The Menu Interface The parameters are as follows: The IP name or address of the authentication Auth Host host to validate incoming users. The TCP port number of the authentication Authentication host, usually 23 (telnet) or 513 (Rlogin). A Port proprietary network number may be chosen to provide a personal user validation scheme.
-
Page 106: Change Password Options
Terminal Server - User and Administration Guide The logger’s user name for gaining access to the Log Username log file on the host. The pathname of the activity log file. Log File Logs a message to inform the host when the Log Power Terminal Server is powered up and when Up/Down... -
Page 107: Administration - Gateway Menu
The Menu Interface 9.7 Gateway The Gateway Menu allows the Terminal Server to make use Menu of a gateway (I P router) on the network. This allows flexible internetworking. ** Administrator ** GATEWAY MENU REMOTE-ADMIN Entry Destination Gateway Netmask [default ] [204.17.209.254 ] [default and so on.. -
Page 108: Administration - Host Address Menu
Terminal Server - User and Administration Guide host The Destination field is a host IP address and only packets for that host are allowed across the gateway. default Any IP address allowed across the gateway <dot notation Only addresses fitting the numerical mask value>... -
Page 109: Administration Menu - Lines Pop-Up Menu
The Menu Interface 9.10 Lines Menu This option allows the administrator to configure all of the parameters for any of the ports. The parameters accessible are exactly the same as those in the Port Setup Menu , but from these menus you can configure a set of parameters for all of the ports. -
Page 110: Lines - Flow Control Menu
Terminal Server - User and Administration Guide Flow Control The Flow Control section shows and allows changes to the flow control fields as described in The Port Menu - Flow Control Section above. ** Administrator ** FLOW CONTROL MENU REMOTE-ADMIN TTY Flow ctrl Input Flow Output Flow... -
Page 111: Lines - Options Menu
The Menu Interface Options The Options section shows and allows changes to the Options fields as described in The Port Menu - Options Section above. ** Administrator ** OPTIONS MENU REMOTE-ADMIN TTY Opt Rlogin/Telnet Keepalive [No ][No ] [No ] [Telnet] [No ] [No ][No ] [No ] [Telnet] [No ]... -
Page 112: Server Configuration Menu
Terminal Server - User and Administration Guide 9.14 Server This menu allows the user to define all of the main Terminal Configuration Server system parameters. Menu ** Administrator ** SERVER CONFIGURATION REMOTE-ADMIN Name [TSERVER Debug mode IP address [204.17.209.8 Subnet mask Ethernet address [00:80:d4:00:9e:a1] Ethernet interface [AUTO Language... - Page 113 The Menu Interface This field defines the globally unique ethernet Ethernet address of the Terminal Server. This address address can not be altered and matches the address provided on the physical back of the unit. In the unlikely event of this field being corrupted please contact your supplier.
- Page 114 Terminal Server - User and Administration Guide Downloading This field should only be filled in if the Boot host Administrator wishes to download a new firmware version. It contains the host name or IP address of the host machine that has the Terminal Server download image on it.
-
Page 115: Server Statistics Pop-Up Menu
The Menu Interface 9.15 Statistics The statistics screens are used for troubleshooting only. This Screens main screen shows the sub-menus that can be addressed. For more information on the statistics menu, see Troubleshooting & Maintenance (Appendix B). ** Administrator ** SERVER STATISTICS REMOTE-ADMIN === ETHERNET ===... - Page 116 Terminal Server - User and Administration Guide...
- Page 117 Command Line Interface A Command Line Interface This section outlines the use of the command line interface as opposed to the menu system. The Terminal Server supports the use of menus for a number of terminal types. It also supports a command line interface (CLI) for use on other terminal types and Telnet/Rlogin sessions.
- Page 118 Terminal Server - User and Administration Guide The user may now type in any of the indicated topics and press the return key. This gives more information on the indicated subject in the form of syntax and synopsis. In some cases, a further choice for more information (stating 'additional help is available for' and another list).
- Page 119 Command Line Interface 2. Enter set server. This will lead you to: ADMIN:local> set server Type ‘?’ at prompt to see list of valid options; <Esc> to abort changes. Name : ronald Debug mode : 0 IP address : 204.17.209.18 Subnet mask : 255.255.255.0 and so on…...
- Page 120 Terminal Server - User and Administration Guide The command will use telnet or rlogin depending on what is set in the Options section of the Port Menu . Example: local> connect Host/IP Address> microart TCP Port> 23 Note: If the user presses the return at the port prompt, the unit defaults to port 23 which is the standard telnet port (or 513, the standard rlogin port).
- Page 121 Command Line Interface Some configuration parameters only come into effect after the user has exited and re-entered the Terminal Server (e.g. the name field). FACRESET Syntax: facreset Description: This function will reset all parameters back to factory defaults. This option requires confirmation. GATEWAY Syntax: gateway <[add dest gate net][delete dest]>...
- Page 122 Terminal Server - User and Administration Guide LOCK Syntax: lock Description: This function allows the user to lock his terminal using a specific password. The server prompts the user for a password and a confirmation. This function can not be used unless the Lock enable flag is set (via set port command).
- Page 123 Command Line Interface Description: This function allows the user to save the Terminal Server configuration to a specified host machine and file. The configuration is saved to the specified Boot Host and put into the file name described in the Init File parameter (see Set server ).
- Page 124 Terminal Server - User and Administration Guide The modem commands are taken from the Modem Config field of the Remote site devices menu. set term This function allows a user to alter their terminal type. If the term field is left blank the Terminal Server displays a list of all the currently supported terminals (ansi, dumb, vt100, wyse50, wyse60, tvi925, ibm3151, vt320, falco, hp700).
- Page 125 Command Line Interface set server This function allows the administrator to alter the Terminal Server set-up including initial IP address and name. set slip [IP address] This function causes the port to go into SLIP mode provided secure is not set to LAN. You can specify an IP address to used by the remote host.
- Page 126 Terminal Server - User and Administration Guide The show statistics command is used to display any of the server statistics for troubleshooting only (tcp, ip, udp, icmp, tty, eth, gateway ). Example: show statistics tcp would show the TCP parameters screen. You can add a delay option which updates the screen every n seconds such as: show stats tcp 3 (use ESC to quit).
- Page 127 If you encounter problems when installing or using your Terminal Server, try the suggestions given in this chapter. Hopefully, the problems can be solved quickly, otherwise contact Black Box support. Email or fax as described in section 1.3, Getting Support . B.1 Terminals/PC...
- Page 128 Terminal Server - User and Administration Guide Faulty terminal Try a known working terminal on the Terminal Server port. Many terminals have more than one port (i.e. AUX). Check Wrong port on that the cable has been connected to the correct port . terminal Faulty Server port Try a known working terminal on the suspect port.
- Page 129 Troubleshooting & Maintenance B.2 Printer You can check some of the same problem notes in the Problems terminal section because most are applicable to printers. The main problem is with cabling. Testing the port If you experience printer problems, it’s a good idea to temporarily connect a terminal in place of the printer so you can ensure some of the basic functions are working correctly.
- Page 130 Terminal Server - User and Administration Guide Configuration The first method to test this is to check the Terminal Server Wrong Statistics - Users Status screen. This screen should show next to the port number, the printer name (if the administrator has added it) and then the diagnostic 'Waiting for incoming connection'.
- Page 131 Troubleshooting & Maintenance Testing the port The first thing to ascertain is that you can talk to the modem. Check this by telneting to the port and attempting to obtain a response from the modem. The command sequence is: telnet elroy 10006 (port 6 on Terminal Server elroy) If the modem is Hayes compatible, type the AT command and press the return key.
- Page 132 At times, a support problem may require you to reset or Your Terminal diagnose your Terminal Server. It is best to discuss this Server matter with Black Box technical support. A factory reset may be performed by using the reset switch.
- Page 133 Troubleshooting & Maintenance The reset switch access cover (black cap) is located on the side of the unit near the Ethernet connectors for the desktop unit, and on the rear of the Rack and 102/104 versions. In the unlikely event that you are not able to comunicate with your Terminal Server, it is still possible to reset it to factory default condition by the following procedure: 1 Power on the unit...
-
Page 134: Server Statistics Pop-Up Menu
Terminal Server - User and Administration Guide ** Administrator ** SERVER STATISTICS REMOTE-ADMIN === ETHERNET === Tx: Pkts: Errors: Collisions: ===== Statistics ===== Retries : Resets: Busy: | ETH/TTY/GATEWAY Rx: Pkts: Bufs: 170/300 No Bufs: | IP/ICMP/UDP Prot: Miss: Busy: | TCP | Users === SERIAL LINES ===... -
Page 135: Server Statistics Screen - Users
Troubleshooting & Maintenance ** Administrator ** SERVER STATISTICS REMOTE-ADMIN 1. ; ADMINISTRATION MENU <DSR+CTS >DTR+RTS 2. mark waiting for kbd or network <DSR+CTS >DTR+RTS 3. alan waiting for kbd or network >DTR+RTS 4. chris waiting for kbd or network <DSR+CTS >DTR+RTS 5. -
Page 136: Network Connection Status Screen
Terminal Server - User and Administration Guide ** Administrator ** Network Connection Status REMOTE-ADMIN Line Rcv-Q Snd-Q Local Address Foreign Address (state) 0 1104 tserver:23 mark:2744 ESTABLISHED *:10008 LISTEN *:10005 LISTEN LISTEN LISTEN LISTEN tserver:9051 roland:23 ESTABLISHED *:515 LISTEN ________________________________________________________________________________ Figure 54: Network Connection Status screen. -
Page 137: Server Statistics Screen - Port Activity
Troubleshooting & Maintenance ** Administrator ** SERVER STATISTICS REMOTE-ADMIN ====RECEIVED==== ===========TRANSMITTED=========== PORT PER SEC TOTAL XOFF PER SEC TOTAL 3837 2075 2075 ________________________________________________________________________________ Figure 54: Server Statistics screen - port activity. Line status This is a good screen for spotting baud rate and parity errors (if malformed is going up quickly, something’s wrong with the shape of the characters). - Page 138 Terminal Server - User and Administration Guide B.7 Using SNMP SNMP stands for Simple Network Management Protocol. A full description of SNMP is beyond the scope of this manual. However, if you’re familiar with SNMP, you can use this as a troubleshooting tool.
-
Page 139: C Cabling Guide
Cabling Guide C Cabling Guide The following guide describes pinouts and cables for the Desktop Terminal Server (DB25), Rack Terminal Server (RJ45) and 102/104 Terminal Server (RJ45) units. Versions equipped with RJ45 connectors are also available as RS-422 units. Any cable you use should be shielded to comply with FCC requirements. -
Page 140: Desktop Terminal Server Db-25 Connector
Terminal Server - User and Administration Guide C.1 Pinouts (DTE) RS-232 Figure 58: Desktop Terminal Server DB25 connector. Description Direction Protective ground Transmitted data (103) Output Received data (104) Input Output Request to send (105) Clear to send (106) Input Data set ready (107) Input... -
Page 141: Terminal Server Rj-45 Connector
Cabling Guide 1 2 3 4 5 6 7 Figure 60: Terminal Server RJ45 Connector. Description Direction Data carrier detect (109) Input Request to send (105) Output Data set ready (107) Input Transmitted data (103) Output Received data (104) Input Signal Ground (102) Clear to send... -
Page 142: Terminal Server Rj-45 Connector
Terminal Server - User and Administration Guide RS-422 1 2 3 4 5 6 7 Figure 62: Terminal Server RJ45 Connector. Description Direction No connection Signal Ground Received Data A Input Transmitted Data A Output Output Transmitted Data B Input Received Data B No connection Signal Ground... -
Page 143: Desktop Terminal Server Standard Modem Cables
Cabling Guide C.2 Standard Modem Cables Desktop Modem TServer (DB25) (DB25) Figure 64: Desktop Terminal Server Standard modem cables. Rack & 102/104 Modem TServers (RJ45) (DB25) Figure 65: Rack and 102/104 Terminal Servers Standard modem cables. -
Page 144: Desktop Terminal Server Standard Terminal/Pc Cables
Terminal Server - User and Administration Guide C.3 Standard Desktop Terminal TServer Terminal/PC Cables (DB25) (DB25) Figure 66: Desktop Terminal Server Standard Terminal/PC cables. Desktop TServer (DB9) (DB25) Figure 67: Desktop Terminal Server PC cables. Rack & 102/104 Terminal TServers (DB25) (RJ45) Figure 68: Rack and 102/104 Terminal Servers... -
Page 145: With Hardware Flow Control
Cabling Guide C.4 Printer Cables Desktop with Printer TServer Hardware Flow Control (DB25) (DB25) Figure 66: Desktop Terminal Server cables with Hardware Flow Control. Rack & Printer 102/104 TServers (DB25) (RJ45) Figure 67: Rack and 102/104 Terminal Servers cables with Hardware Flow Control. - Page 146 Terminal Server - User and Administration Guide...
-
Page 147: Power Requirements
Technical Specification D Technical Specification Power 110-230V AC ±10% Input tolerance: Requirements Frequency tolerance: 47-63Hz Power consumption: Desktop and Rack versions - 30W max. 102/104 version - 10W max. Dimensions Desktop: L-305 mm, W-250 mm, H-50 mm Mass-1.66 kg Rack: L-490 mm, W-300 mm, H-44 mm Mass-1.85 kg... - Page 148 Terminal Server - User and Administration Guide Interfaces Serial: 2, 4, 8 or 16 RS-232 ports (optional RS-422 for Rack version) with surge suppression and full modem control. Max speed 115.2 kbps, DB-25 connectors for Desktop version, RJ-45 for Rack and 102/104 versions. Ethernet: Single port, 802.3 compliant port with 10BASE2, 10BASE5 and 10BASE-T...
- Page 149 Technical Specification FEDERAL COMMUNICATIONS COMMISSION AND CANADIAN DEPARTMENT OF COMMUNICATIONS Radio Class B Digital Device. Frequency This equipment has been tested and found to comply with Interference the limits for a Class B computing device pursuant to Part 15 Statement of the FCC Rules.
- Page 150 Terminal Server - User and Administration Guide To meet FCC requirements, shielded cables and power cords are required to connect this device to a personal computer or other Class B certified device. This digital apparatus does not exceed the Class B limits for radio noise emission from digital apparatus set out in the Radio Interference Regulation of the Canadian Department of Communications.
- Page 151 Index Index Access Menu 93 Ethernet interface 140 Administration Menu 18, 91 Ethernet ports 13 ARP 14, 111 Authentication Host 40 Factory defaults 124 Modems 39, 96 Fast keys 78 Overview 39 FTP 10 Port 41 FTP sites 4 User 40 User services 43 Windows 45 Gateway Menu 99...
- Page 152 Terminal Server - User and Administration Guide DCD monitoring 34 Dial-in connections 33 Lines Menu 101 Dial-out connections 47 Logging 44 Dial-out routing 49 Menu 96 Hunt groups 53 Modems 39, 96 ioland 48 Overview 39 Logging 39, 96 Windows 45 Problems 122 Remote Access Devices 52, 95 Configuration 57...
- Page 153 Index Printers Logging 39 Ioland printing 55 Passwords 98 LPD printing 57 Secure field 85 Problems 121 TERM field 32 RCP printing 62 Serial interfaces 140 Printing 55 Server Configuration Menu 19, 104 Hunt groups 57, 62, 67 SLIP 33 LPD 57 SNMP 107, 131 RCP 62...
- Page 154 Terminal Server - User and Administration Guide...
- Page 156 Terminal Server - User and Administration Guide © Copyright 2001. Black Box Corporation. All rights reserved. 1000 Park Drive • Lawrence, PA 15055-1018 • Tel: 724-746-5500 • Fax 724-746-0746...