Table of Contents
Advertisement
Quick Links
Advertisement
Table of Contents

Related Manuals for VTech DS6177A


Summary of Contents for VTech DS6177A
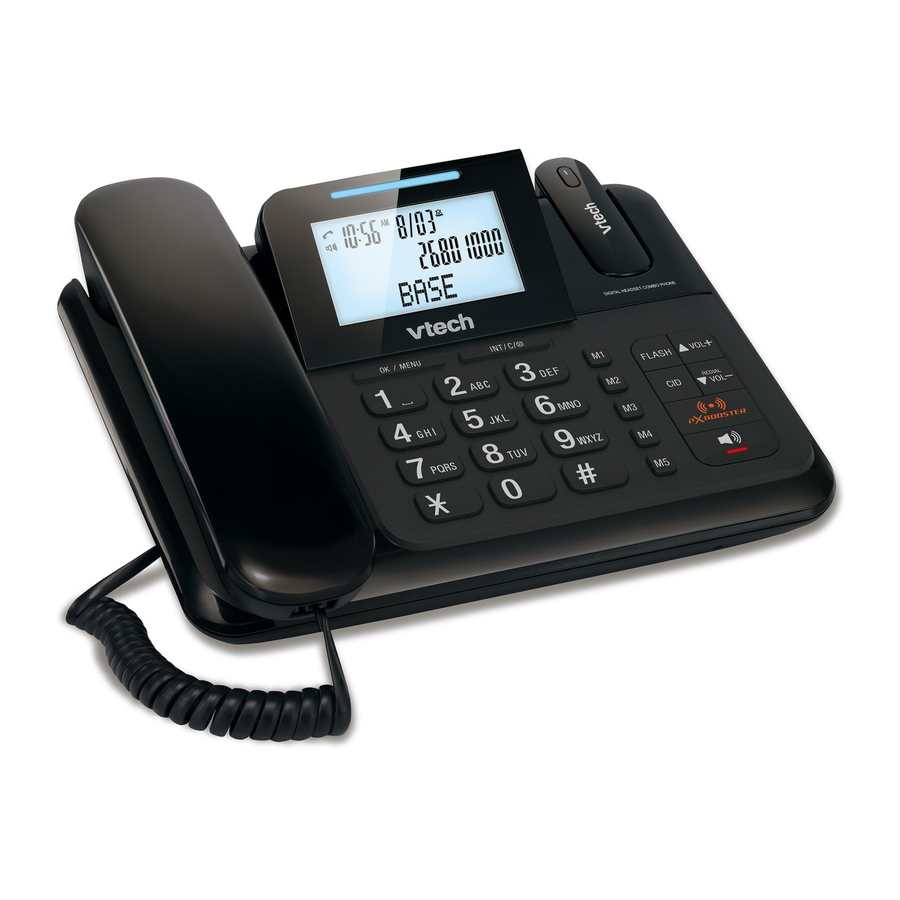
- Page 1 User’s manual h tt p :/ /h k ph on es . vtec h.c om Model: DS6177A...
-
Page 2: Table Of Contents
TABLE OF CONTENTS IMpOrTANT SAFETy INSTrUCTIONS ........1 SET Up THE TELEpHONE ............2 Package Contents ..............2 Location ..................2 Connect the Base Station............3 Connect the Corded Handset ........... 4 Charge the Headset ..............4 Earbud installation ..............5 GET TO KNOW yOUr pHONE ..........6 Base Station Overview ............... - Page 3 4.9.4 Delete the Entire Redial List ........14 4.10 Make an Internal Call by the Headset ........14 4.11 Transfer an External Call to Another Handset ......15 4.12 Make a 3-way Conference Call ..........15 prIvATE pHONEBOOK ............16 Store a Number Entry in the Phonebook........16 Review a Phonebook Entry ............
-
Page 4: Important Safety Instructions
Do not overload wall outlets and extension cords as this can result in the risk of fire or electric shock. Unplug this product from the wall outlet and refer servicing to VTech under the following conditions: •... -
Page 5: Set Up The Telephone
SET Up THE TELEpHONE package Contents The package contains the following items: • 1 Base station • 1 Handset • 1 Headset • 1 AC power adapter • 2 Telephone line cords • 1 Coiled handset cord • 3 Earbuds •... -
Page 6: Connect The Base Station
Connect the Base Station POWER 6.0V DC Power adapter cord Telephone line cord Plug the power cable and the telephone line cord into the base station as shown above. Plug the other end of the power adapter into the wall outlet not controlled by a wall switch. -
Page 7: Connect The Corded Handset
Connect the Corded Handset Plug the coiled handset cord into the handset as shown below. Plug the other end of the coiled handset cord into the telephone base, and put the handset on the telephone base. Charge the Headset After installing the telephone base, charge the headset on the telephone base for at least three hours at the first time. -
Page 8: Earbud Installation
When the headset is charging, the light on the headset turns on in red steadily. Earbud installation There are three earbuds of different sizes provided. Choose a suitable earbud. Press the earbud towards the earpiece until it clicks into place. Move the earbud around so that the protruding bump on the earbud is pointing towards your mouth when placed on your ear. -
Page 9: Get To Know Your Phone
GET TO KNOW yOUr pHONE Base Station Overview LED indicator light Flashes when there is an incoming call. OK / MENU In idle mode: Press to access the main menu. In sub-menu mode: Press to confirm the selection. In redial list / call list entry: Press to store the number into the phonebook. LCD display... - Page 10 INTErCOM / CANCEL/ MUTE ( In idle mode: Press to initiate an intercom call. In main menu mode: Press to go back to idle screen. In sub-menu mode: Press to go back to previous menu. In sub-menu mode: Press and hold to go back to idle screen. In editing / pre-dial mode: Press to delete a character / digit.
-
Page 11: Headset Overview
Headset Overview TALK ON/TALK OFF Press and hold to turn on or off the headset. Press to answer a call. Press to exit registration in registration mode. Steadily on in red when headset is charging on the base. Steadily on in blue when the headset is fully charged. Steadily on in purple: The headset is not registered to the phone Flashes in blue when the headset is in idle mode and not on the telephone base. -
Page 12: Lcd Display Icons And Symbols
LCD Display Icons and Symbols The LCD display gives you information on the current status of the telephone. Indicates there is a new call or reviewing a new call list entry. Indicates that a call is in progress. Indicates that you have accessed the phonebook menu. Indicates that there is more than one call from the same caller. -
Page 13: Menu Structure
Menu Structure In idle mode, press OK / MENU to enter the phonebook. Refer to the following table for the menu structure. Key press OK / MENU Main menu pHONEBOOK CALL LOG DATE & TIME Sub menu Review MISSED TIME FORMAT phonebook list RECEIVED SET CLOCK... -
Page 14: Text And Digit Entry Table
Text and Digit Entry Table The following table shows you where each letter and punctuation character can be found. This will be helpful when storing a name into the phonebook. In editing mode, a cursor is displayed to indicate the current text entry position. It is positioned at the right of the last character entered. -
Page 15: Use Your Phone
USE yOUr pHONE Make a Call 4.1.1 preparatory Dialing Enter the phone number, then lift the handset or press to dial the number. Press to clear the entry. 4.1.2 Direct Dialing Lift the handset or press on the base to take the line, and then enter the phone number. -
Page 16: Answer A Call
Answer a Call When the telephone is ringing, lift the handset, or press on the base, or TALK ON/TALK OFF on the headset to answer the call. Booster Feature The booster feature makes the listening volume louder and clearer. You can press to turn on the booster feature at any time while you are on a call. -
Page 17: Redial The Last Number
redial the Last Number You can redial up to 10 of the last numbers dialed. If you have stored a name in the phonebook to match with the number, the name will be displayed instead. The most recently dialed number will display at the top of the redial list. 4.9.1 redial a Number from the redial List In idle mode, press... -
Page 18: Transfer An External Call To Another Handset
The called headset rings. Press TALK ON/ TALK OFF on the called headset to establish the internal call. Note If only one headset is registered to the telephone base, pressing will call the headset immediately. If called headset do not answer within 60 seconds, the headset will stop ringing and the telephone base will return to idle mode. -
Page 19: Private Phonebook
prIvATE pHONEBOOK Your phone can store up to 50 private phonebook entries with names and numbers. Each phonebook entry can have a maximum of 20 digits for the phone number and 8 characters for the name. You can also select different ringer tones for your phonebook entries. -
Page 20: Delete A Phonebook Entry
Delete a phonebook Entry In idle mode: Press OK / MENU to select pHONEBOOK. Press OK / MENU and then to select DELETE. Press OK / MENU and then to select the entry to be deleted. Press OK / MENU, and the screen will display “CONFIrM?”. Press OK / MENU to confirm or press to cancel. -
Page 21: Caller Display (Network Dependent)
CALLEr DISpLAy (NETWOrK DEpENDENT) This feature is available if you have subscribed to the Caller ID service from your telephone service provide. Your phone can store up to 20 received calls (with date/time information) in the Call List. When the phone is ringing, the number will be shown on the LCD. -
Page 22: Delete The Entire List Of The Call List Entries
Follow Steps 1 to 4 in Section 6.1 . Press OK / MENU and then to select DELETE ? Press OK / MENU to confirm. Press OK / MENU to confirm again. Delete the Entire List of the Call List Entries Follow Steps 1 to 4 in Section 6.1 . -
Page 23: Phone Settings
pHONE SETTINGS Your phone comes with a selection of settings that you can customize your phone according to your preference. Set the Date and Time You need to set the correct date and time so that you know when you received calls. The date format is yyyy/MM/DD, and the time format is HH: MM (It can be 12 HR or 24 HR). -
Page 24: Set The Ringer Melody For Internal Calls
Set the ringer Melody for Internal Calls You can set the melody to customize your internal ringer. A total of 10 melodies are provided for your selection. Press OK / MENU and then to select SETTINGS. Press OK / MENU and then to select rING SETUp. -
Page 25: Change The Dial Mode
Change the Dial Mode The default dial mode best suits your country and network operator. You do not have to change this setting unless advised to do so. Press OK / MENU and then to select SETTINGS. Press OK / MENU and then to select DIAL MODE. -
Page 26: Change The System Pin Code
Change the System pIN Code Press OK / MENU and then to select SETTINGS . Press OK / MENU and then to select CHANGE pIN . Press OK / MENU and you are requested to enter the 4-digit system PIN. Enter the old system PIN. -
Page 27: Reset Your Phone And Headset
7.12 reset your phone and Headset You can reset your phone and headset to the default settings . After reset, all your personal settings, call log entries, and redial list will be deleted, whereas your contacts list remains unchanged. reset the phone: Press OK / MENU and then to select SETTINGS. -
Page 28: Default Settings
DEFAULT SETTINGS ITEMS Default values Default Settings of Base Station LANGUAGE ENGLISH EXT RINGER MELODY MELODY 6 INT RINGER MELODY MELODY 2 EXT RING VOLUME VOLUME 3 INT RING VOLUME VOLUME 3 EARPIECE VOLUME VOLUME 3 SPEAKER VOLUME VOLUME 3 KEY TONE DATE FORMAT DD--MM--YYYY... -
Page 29: Troubleshooting
TrOUBLESHOOTING If you have difficulty with your phone, please try the suggestion listed below. problem Solutions My telephone does • Make sure the power adapter is securely plugged into an not work at all. outlet not controlled by a wall switch. •... - Page 30 There is • Other electronic products may cause interference to your interference cordless telephone. Install your telephone as far away as during a possible from the following electronic devices: wireless telephone routers, radios, radio towers, pager towers, cellular conversation. telephones, digital telephones, intercoms, room monitors, My calls fade televisions, VCRs, personal computers, kitchen appliances, out when I...
-
Page 31: 10. Technical Specifications
10. TECHNICAL SpECIFICATIONS BASIC INFOrMATION Dimensions Base: width / depth / height= 170 X 215 X 70 mm Headset: width / depth / height= 71.2 X 21.8 X 28.5 mm Handset: width / depth / height= 200.5 X 47.2 X 35.5 mm Weight Base: 544 g Headset: 18.4 g... -
Page 32: Care And Maintenance Instructions
11. CArE AND MAINTENANCE INSTrUCTIONS Take care of your telephone • Your cordless telephone contains sophisticated electronic parts, so you must treat it with care. • Avoid rough treatment. • Place the handset down gently. • Save the original packing materials to protect your telephone if you ever need to ship it. - Page 33 Suite 1601, Lever Tech Centre, 69-71 King Yip Street, Kwun Tong, Kowloon, Hong Kong. Customer Service Hotline: (852) 2666 5558 Technical Inquiry Hotline: (852) 2667 7433 vTECH TELECOMMUNICATIONS LTD. A member of THE vTECH GrOUp OF COMpANIES. © 2014 VTech Telecommunications Ltd. All Rights Reserved.