Advertisement
BATTERY CHARGER
Instruction Manual
BEFORE USING OUR BATTERY CHARGER, READ IN DETAILS ALL
INSTRUCTIONS CONTAINED IN THIS MANUAL. KEEP THIS MANUAL IN A
SAFE PLACE AS YOU MAY NEED TO USE IT AT A LATER DATE.
We draw the attention of all users of this device: please follow the safety
and maintenance instructions which are part of this manual. Also read the
caution markings on the charger, the manual, and the gift box.
33
Advertisement
Table of Contents

Related Manuals for La Crosse Technology BC700


Summary of Contents for La Crosse Technology BC700
- Page 1 BATTERY CHARGER Instruction Manual BEFORE USING OUR BATTERY CHARGER, READ IN DETAILS ALL INSTRUCTIONS CONTAINED IN THIS MANUAL. KEEP THIS MANUAL IN A SAFE PLACE AS YOU MAY NEED TO USE IT AT A LATER DATE. We draw the attention of all users of this device: please follow the safety and maintenance instructions which are part of this manual.
- Page 2 INTRODUCTION: Congratulations on purchasing this intelligent charging unit which enables definitely quick and optimum charging to “AA” and “AAA” rechargeable batteries. With charging, discharging, refreshing and capacity test functions as well as individual LCD displays for charging compartments; this charging unit is reliable, user-friendly and ideal for use in the home, office or on journey.
- Page 3 CAUTIONS: The charger is restricted to charging NiCd and NiMH rechargeable batteries only. Never adopt this charger to other types of batteries such as alkaline, lithium, carbon zinc or other types that are not specified. The charging unit shall only be used only at normal indoor room conditions. Always follow the charging instructions for the rechargeable battery.
-
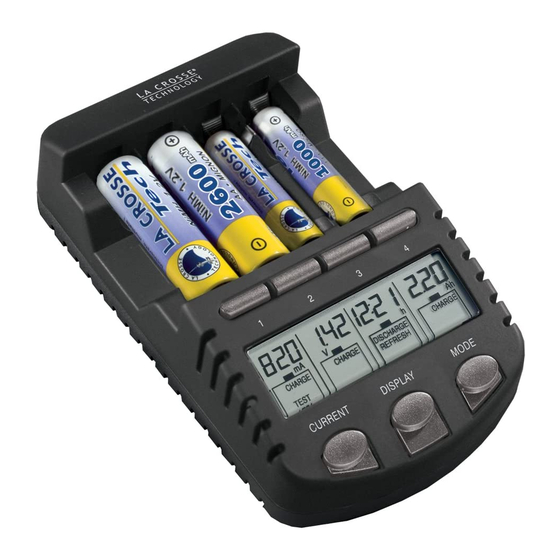
Page 4: Function Keys
Overheat detection to protect rechargeable batteries from over-charging Minus delta voltage (-dV) detection for charge termination Damaged batteries detection Discharge mode (first discharging and then charging) to remove memory effect of rechargeable batteries Refreshing old rechargeable batteries by discharging/ charging cycles Test function to check the capacities of rechargeable batteries Different Charging/ Discharging functions can be launched independently and simultaneously to each rechargeable battery in the compartments... -
Page 5: Mode Key
Compartment Number keys MODE key CURRENT key DISPLAY Compartment Number key Press and release the Number key to select a particular battery compartment for charge modes and/or display mode adjustment. MODE key The mode key shall first be pressed and held for about 1 second to activate the mode change. -
Page 6: Display Key
“Charge”, “Discharge”, “Test” and “Refresh” mode. To change the operating mode for individual rechargeable battery, first press corresponding NUMBER key then press the MODE key. DISPLAY key Press and release to select the displays of the charging current (in mA), time elapsed (in hh:mm), the terminal voltage (in V) and accumulated capacities (in mAh or Ah) during the charging or discharging process. -
Page 7: Charge Mode
Discharge then charge up the rechargeable battery (DISCHARGE) – to discharge the rechargeable battery then charge it for minimizing the memory effect. Refresh the rechargeable battery (REFRESH) – to refresh the rechargeable battery to its maximum capacity by charging and discharging the rechargeable battery repeatedly until no further increase in the capacity is estimated. - Page 8 The estimated time of charging by various charging current is tabulated in Table 1. Table 1. Charging Time with various charging current Size of battery Battery Capacity Charging current selected (mA) Estimated charging time ~3 hr 35 min 2500 mAh ~5 hr ~13 hr ~60 min...
- Page 9 mode to the new rechargeable batteries in order to achieve the optimum battery capacity. When the transformer has been plugged to the power source, the version number of the charger (for example “29” ) will be displayed first. Then all the segments will light up momentarily and the “null”...
- Page 10 START CHARGING THE RECHARGEABLE BATTERIES Once a rechargeable battery is inserted after the transformer has been plugged to the power source, the battery voltage (for example, “1.39V”) will be displayed for 4 seconds. Then “200 mA Charge” (default mode) will be shown on LCD for another 4 seconds, indicating that charging with 200 mA is to be started if no alternation in setting is made.
- Page 11 Charging current: 200 mA After 8 seconds from no more keys pressing, the LCD will blink once to indicate the setting is confirmed and Charge Mode the selected mode activated During charging, the different displays- Charging current (in mA), Time elapsed (in hh:mm), Terminal voltage (in V) and Accumulated capacities (in mAh or Ah) may be toggled and selected by pressing the DISPLAY key (refer Table 4).
- Page 12 “Full” sign is shown -The battery is fully charged Note : The current cannot be altered once the setting has been confirmed in the initial stage. This can avoid the user changing the current setting accidentally while doing setting on other rechargeable batteries. If one wants to change the applied current afterward, the rechargeable batteries must be taken out and inserted again.
- Page 13 Therefore, user is recommend to place the battery with the highest expected charging current at Compartment 1 first. To release the restriction of setting charging current, user shall take out all four rechargeable batteries from the charging unit. To change the operating mode during charging, one can press the MODE key (for selecting all rechargeable batteries) or NUMBER key then MODE key (for selecting individual rechargeable battery).
-
Page 14: Discharge Mode
For new rechargeable battery it is recommended to charge it with 200 mA current for re-conditioning it from the long storage status. DISCHARGE MODE Discharge mode will first discharge the rechargeable battery then charge it. It is for removing the memory effects of rechargeable batteries. By pressing the MODE key within 8 seconds after inserting the rechargeable batteries, the Discharge mode can be selected. -
Page 15: Refresh Mode
Note: The discharging current is always set to be half of the coming charging current whose upper limit is 700 mA (see Table 2). Therefore user is recommended to carefully select the discharging current so that the charging current afterward will not be too high. Table 2. - Page 16 Refresh mode will start with discharging the rechargeable battery, then charging it. The repeated discharging and charging cycles will be launched until no further increase in the measured capacities is estimated. Discharging current: 250 mA Refresh mode (the battery is being discharged) Note: By pressing the MODE key within 8 seconds after inserting the rechargeable...
-
Page 17: Test Mode
Then user may also select different discharging current by pressing the CURRENT key (see “Note” in Discharge mode and Table 2), within 8 seconds after inserting the batteries. (Or the display will blink once to indicate the end of setting and the current cannot be changed afterward.) It may take up to several days to finish the refreshing process, depending on the selected discharging current. - Page 18 The Charging current in (mA) Test mode Note: After selecting the Test mode, user may select different charging current in the Test mode by pressing the CURRENT key, within 8 seconds after the batteries are inserted. The afterward-discharging current will be half of the selected charging current (see Table 3).
-
Page 19: Trickle Charging
The maximum charging current is 700 mA. After the test mode is finished, the display will shift between the “Full” sign and the battery capacity (in mAh or Ah) automatically in 3-second intervals until the rechargeable batteries are removed. User can switch to other displays by pressing the DISPLAY key. -
Page 20: Display Mode Information
DISPLAY MODE INFORMATION User can use different display modes to monitor the rechargeable battery condition during the different operations (see below figure and Table 4 to 7). Different display modes are exhibited: Charging current, Time, Voltage and Capacity Different operating modes... - Page 21 Table 4. Various displays in Charge Mode Various displays (toggled by pressing DISPLAY key) Stage in Charge Capacity mode Voltage (V) Current (mA) *Time (hh:mm) (mAh/ Ah) During charging Charging current Instantaneous Charging time Accumulated Battery voltage elapsed capacity Full stage Trickle charging current Table 5.
- Page 22 Table 6. Various displays in Refresh Mode Various displays (toggled by pressing DISPLAY key) Stage in Capacity Refresh mode Voltage (V) Current (mA) *Time (hh:mm) (mAh/ Ah) During Instantaneous Discharging Discharging time Capacity during discharging Battery voltage current elapsed discharging processes Capacity During charging...
- Page 23 Table 7. Various displays in Test Mode Various displays (toggled by pressing DISPLAY key) Stage in Test Capacity mode Voltage (V) Current (mA) *Time (hh:mm) (mAh/ Ah) Charging time During charging Charging current “--- mAh” elapsed During Discharging Discharging time “--- mAh”...
-
Page 24: Care And Maintenance
In case the power source is shortly interrupted or terminated when the charger is being operated, the operational mode will automatically be set to “Charge mode at 200 mA” to charge up the battery once the power source is back to normal, regardless the operating mode (Charge, Discharge, Refresh or Test) which has been selected by user before. -
Page 25: Specifications
SPECIFICATIONS: Input voltage for AC/DC adapter 100-240 VAC Charging current range 200 mA - 700 mA Max charging capacity (capacity of rechargeable batteries) 3000 mAh Dimensions (L x H x W) of Charging unit 75 x 130 x 40 mm LIABILITY DISCLAIMER: The manufacturer and supplier cannot accept any responsibility for any improper or incorrect use and any consequences occur. -
Page 26: Caution: Safety Instructions
CAUTION - SAFETY INSTRUCTIONS : Attention of users is drawn to the following important safety instructions: As stated in the manual above », only use NiCd or NiMH rechargeable batteries. Indoor use only, do not expose to humidity. Do not place in water or submit to rain and/or snow.