
Related Manuals for Yanmar 6LYA-STP


Summary of Contents for Yanmar 6LYA-STP
- Page 1 OPERATION MANUAL Be sure to read this manuaI for safe and proper operation. Store this manual carefully after use....
-
Page 2: Proposition 65 Warning
Congratulations on your choice of YANMAR product from YANMAR DIESEL ENGINE CO., LTD. This manual describes operation, periodic inspection and maintenance servicing for the ENGINE manufactured by YANMAR DIESEL ENGINE CO., LTD. Please read this manual carefully before use, and operate... -
Page 3: Introduction
This manual should be considered a permanent part of the engin and remain it. ● Constant efforts are made to improve the quality and performance of Yanmar products, so some details included in this Operation Manual may differ slightly from your engine. If you have any questions about such difference, please contact your Yanmar Dealer or Distributor. -
Page 4: Table Of Contents
3.2.1 Supplying Fuel and Bleeding Air in the Fuel System ………………………………………………… 20 3.2.2 Supplying Engine Lube oil ………………………………………………………………………………… 21 3.2.3 Supplying lube oil to marine gear (for Yanmar model : KMH6A KMH6A1) ………………………… 22 3.2.4 Supplying Cooling Water ………………………………………………………………………………22~23 3.2.5 Starting after storage or new engine …………………………………………………………………… 23 3.2.6 Checking and Resupplying Lube Oil and Cooling Water ………………………………………………24... -
Page 5: For Safe Operation
1. FOR SAFE OPERATION Following the precautions described in this manual will enable you to use this engine with complete satisfaction. Failure to observe any of the rules and precautions, however, may result in injury, burns, fires, and engine damage. Read this manual carefully and be sure you fully understand it before beginning operation. -
Page 6: Safety Precautions
1.2 Safety Precautions (Observe these instructions for your own safety.) Precautions for Operation ■ Burns from Scalding DANGER ● Never remove the filler cap of the fresh water cooler while the engine is still hot. Steam and hot water will spurt out and seriously burn you. Wait until the water temperature has dropped, then wrap a cloth around the cap and loosen it slowly. - Page 7 WARNING Alcohol ● Never operate the engine while you are under the influence of alcohol or when you are ill or feel unwell as this results in accidents. ■ Safety Precautions for Inspection Battery Fluid DANGER ● Battery fluid is diluted sulfuric acid. It can blind you if it gets in your eyes, or burn your skin.
-
Page 8: Location Of Product Safety Labels ⋯⋯⋯⋯⋯⋯⋯⋯⋯⋯⋯⋯⋯⋯⋯⋯⋯⋯⋯⋯⋯⋯⋯⋯⋯⋯⋯⋯⋯⋯6
1.3 Location of Product Safety Labels To insure safe operation, warning device labels have Warning Device Labels, Parts Numbers been attached. Their location is shown in the Part Code No. diagram below. Keep the labels from becoming dirty ① 128296-07300 or torn and replace them if they are lost or damaged. -
Page 9: Explanation Of Product
The installation, fitting and surveying of this engine all require specialized knowledge and engineering skills. Consult Yanmar's local subsidiary in your region or your distributor or dealer. WARNING Never modify this product or release the limit devices (which limit engine speed, fuel injection quantity, etc.). -
Page 10: Engine Specifications
3. Fuel condition : Density at 15˚C = 0.860, Fuel oil temperature : 25˚C at the fuel injection pump inlet : ISO 8665 (Fuel oil temp. 40˚C at the fuel injection pump inlet) Marine gear (Option) ● ● For 6LYA-STP ● ● Model KMH6A HSW800A2 MG5050A 10°... -
Page 11: Names Of Parts
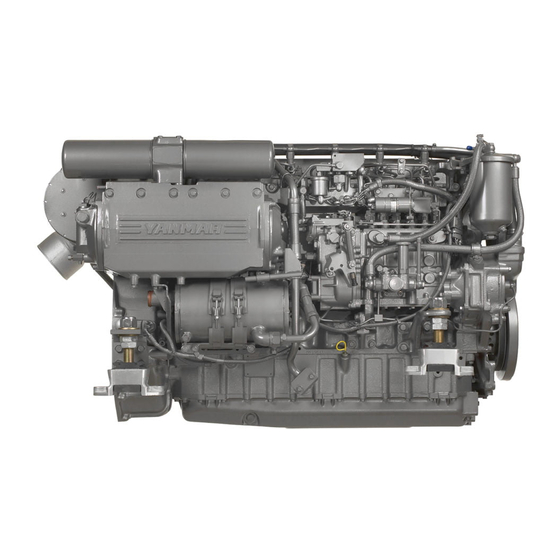
Fresh water filler cap Fresh water tank Turbo charger Fuel oil filter Dip stick Marine gear Fresh water cooler Starter motor Alternator Sea water pump V-belt 〈Note〉 This illustration shows Yanmar marine gear (Model : KMH6A) when it has been attached. -
Page 12: Major Servicing Parts
2.4 Major Servicing Parts Name of Part Function Removes dust and water from fuel. Drain the filter periodically, (there is a ●Fuel filter drain plug at the bottom). The internal element (filter) should be changed periodically. Feeds fuel to the fuel injection pump. ●Fuel feed pump Equipped with mechanical pump attached with the fuel injection pomp. -
Page 13: Control Equipment
2.5 Control Equipment The control equipment consists of the control panel and remote control handle, which are connected by the wires and cables to the control levers for remote control operation. Control Panel (Optional) 2.5.1 The control panel has the following gauges and alarm devices (optional accessories): No. - Page 14 TEMP PRESS. LEVEL FILTER CLUTCH DIESEL BOOST EXHAUST OIL.P. PREHEAT Available switches (for alarm) and senders (for meter) (attached with engine) ● 6LYA-STP 6LY2A-STP Battery not charge ○ ○ C.W.high temperature ○ ○ L.O low pressure ○ ○ C.W.level ×...
- Page 15 (1) Gauges and Equipment Gauges & Equipment Functions Starter switch OFF: The switch key can be inserted or removed. All power is turned off. Before starting O N: For engine operation. Gauges and alarm devices are turned on. during operation START: For engine starting.
-
Page 16: Functions Of Alarm/Warning Devices
(2) Functions of Alarm Devices (Alarm Buzzer & Lamps) The alarm buzzer sounds when any warning lamp (except the charge lamp) comes on. Warning lamps come on when sensors (switchs) detect an abnormality during engine operation. The warning lamps in the display column of the control panel are off during normal operation, but come on as follows when an abnormality arises: Charge Lamp ①... - Page 17 Function of Alarm Devices Before starting After Starting Key Operation START →ON →ON Alarm Buzzer O f f Alarm Lamps Charge Lamp O f f Cooling Water Temperature O f f O f f Engine Oil Pressure O f f Cooling Water Level O f f O f f...
-
Page 18: Remote Control Handle
Remote Control Handle 2.5.2 Use the remote control handle in the steering room for ahead, astern and speed control. Operation of Single Lever Remote Control Handle (Option) ● ① : The marine gear shift lever is in neutral. ② : The marine gear shift lever is in ahead or astern ③... -
Page 19: Operation
3. OPERATION 3.1 Fuel Oil, Lube Oil & Cooling Water 3.1.1 Fuel [ NOTICE ] Use of fuels not recommended in this Operation Manual may cause a decrease in engine performance and cause components to fail. (1) Selection of fuel Use the following diesel fuels for best engine performance: ISO8217 DMA, BS2869 A1 or A2 Fuels equivalent to Japanese Industrial Standard, JIS. -
Page 20: Lube Oil
API CD SAE Viscosity ……… 30 ● SAE Viscosity……………15W40 ● (2) Selection of Oil for marine gear. Yanmar KMH6A, KMH6A1…SAE Viscosity 30 ● Follow the instructions for other types of Marine Gear. (3) Handling the Lube Oil 1) When handling and storing lube oil, be careful not to allow dust and water to enter the Iube oil. - Page 21 2) Choose LLC which will not have any adverse effects on the materials (cast iron, aluminum, copper, etc.) of the engine's fresh water cooling system. Consult your Yanmar dealer or distributor on the use of coolant /antifreeze, and detergents. The coolans /antifreezes, which are good performance for example, are shown below.
-
Page 22: Before Lnitial Operation
3.2 Before Initial Operation Prepare for initial operation according to the following procedures : 3.2.1 Supplying Fuel and Bleeding Air in the Fuel System. DANGER ●Gasoline will catch fire! Check again before supplying that you are using the proper fuel. ●If any fuel is spilled, clean it off completely. -
Page 23: Supplying Engine Lube Oil
3.2.2 Supplying Engine Lube Oil 1) Remove the filler cap and supply the engine lube oil. 2) Supply lube oil up to the upper limit on the oil dipstick. To check the oil level, insert the dipstick in fully. Engine Lube Oil Capacity:All 20.0 (oil pan full 16.4 ) 3) Fasten the filler cap fully. -
Page 24: Supplying Lube Oil To Marine Gear (For Yanmar Model : Kmh6A Kmh6A1)
3.2.3 Supplying lube oil to marine gear (for Yanmar model KMH6A, KMH6A1) 1) Remove the filler cap and supply the lube oil to the marine gear. 2) Supply lube oil up to the upper limit on the oil dipstick. To check the oil level, insert the dipstick in fully. -
Page 25: Starting After Storage Or New Engine
6) Check the rubber hose connecting the sub- tank with the fresh water tank. If the hose is not water-tight, a lot of coolling water will be consumed. [Fig.10] DANGER If the filler cap is loose, hot steam and water will spout out and you may be burned. -
Page 26: Checking And Resupplying Lube Oil And Cooling Water
1) Resupplying engine lube oil (See 3. 2. 2.) 2) Resupplying lube oil to marine gear (for Yanmar model : KMH6A, KMH6A1) (See 3. 2. 3.) 3) Resupplying fresh water (See 3. 2. 4.) -
Page 27: How To Operate
Resuppiy lube oil up to the upper level mark on the lube oil dipstick. (See 3. 2. 2) (4) Checking and Resupplying marine gear Lube Oil (for Yanmar model : KMH6A, KMH6A1) 1) Check the marine gear oil level with the oil dipstick. - Page 28 In such cases, consult your Yanmar dealer or distributor without delay. (Note) The water level rises in the sub-tank during engine operation. This is not an abnormality.
-
Page 29: How To Start The Engine
(7) Checking the Alarm Devices When operating the starter switch, check that the alarm devices work normally. (See 2. 5. 1 (3).) (8) Preparing Fuel, Lube Oil and Cooling Fresh Water in Reserve Prepare sufficient fuel for the day's operation. Always store lube oil and cooling fresh water in reserve (for at least one refill) onboard, to be ready for emergencies. - Page 30 (3) Start up of the engine in cold weather When starting the engine under low temperature conditions (approx.0℃ or lower), use the air heater (optional) to enable easier starting. Starter key switch Turn the starter key from the OFF position to ●...
-
Page 31: Shifting
3.3.3 Shifting [ NOTICE ] Do not accelerate or decelerate sharply, 3.3.3.1 Single-lever type remote control overload, etc. for the first 50 hours when handle (optional) using a new engine. Return the control lever to neutral before perform- ing the following operation. (1) Ahead (Forward) Gradually tilt the control handle to "Ahead". -
Page 32: Stopping The Engine
How to Race the Engine Repeat a cycle of high speed and low speed operation about 5 times at no load with the clutch (marine gear) in Neutral position. Engine racing removes carbon deposits from the cylinder and the tip of the fuel injection valve. -
Page 33: Long Term Storage ⋯⋯⋯⋯⋯⋯⋯⋯⋯⋯⋯⋯⋯⋯⋯⋯⋯⋯⋯⋯⋯⋯⋯⋯⋯⋯⋯⋯⋯⋯⋯⋯⋯31~32
Alternator [Fig.17]shows the position of the seawater Fresh water tank drain cock for Yanmar model KMH6A, KMH6A1. Fresh water For detailed information on models other than cooler V-belt Yanmar models, refer to the Marine Gear Operation Manual. - Page 34 (5) Oil and grease the exposed area and joints of the remote control cable and the bearings of the remote control handle. (6) Cover the turbocharger, exhaust pipe, etc. with vinyl sheets and seal them to prevent moisture from entering. (7) Drain bilge in the hull bottom completely.
-
Page 35: Maintenance & Inspection
4. Maintenance & Inspection 4.1 General Inspection Rules Conduct Periodic Inspection for Your Safety: The functions of engine components will degenerate and engine performance will fall if periodic inspections are not performed. If the countermeasures of the problems are not taken, you may encounter unexpected troubles while cruising at sea. -
Page 36: Periodic Inspection
Inspection and servicing at 2000 hours of operation and thereafter require special knowledge and techniques. Consult your dealer or distributor or the Yanmar subsidiary in your region. ●:Consult nearest dealer Preiodical lnspection and Maintenance. - Page 37 Schedule Item Description Every 50 Every 250 Every 500 Every 1000 Every 2000 Daily service service hrs. service hrs. service hrs. service Page hrs. (or 1 yr.) (or 2 yrs.) (or 4 yrs.) hrs. ● Adiustment of injection timing Overhaul and check of fuel feed ●...
-
Page 38: Periodic Inspection Items
⑦Wait about 10 minutes after stopping the Fresh water cooler engine. Check the oil level with the oil Starter motor dipstick and refill to the specified level. Drain oil pump Lube oil filter Yanmar P/N [Fig.18] Full flow 119593-35100 By-pass 119593-35400 Lube oil filter... -
Page 39: Inspection Every 50 Hours
Lube oil filter (inside) by pressing it by coil spring. (KMH6A, KMH6A1) Do not forget to place the O-ring inside the Marine gear (YAnmar model: KMH6A) side cover. Drain oil pump (Optional) ④Supply new lube oil to the specified level. - Page 40 [NOTICE] The capacity of the specified alternator and battery is sufficient for regular operation, however, the capacity may be insufficient, if they are used for other purposes such as lights inside the boat, etc. Consult your Yanmar dealer or distributor.
-
Page 41: Inspection After First 250 Hrs
Inspection and adjustment must be made to correct opening/closing timing lags of the intake/ exhaust valves which might arise due to initial parts wear. This inspection requires specialized knowledge and techniques. Consult your Yanmar dear or distributor. (2) Inspection and Adjustment of Fuel Injection Valve (1st Time) lnspection and adjustment are necessary to obtain optimal fuel injection to ensure the good engine performance. -
Page 42: Cleaning The Turbocharger Blower
①Remove the threaded area and the connecting pivot of the remote control cable from the governor lever. Adjust the cable stroke by adjusting the fastening distance of the threaded area. ②Loosen the setting bolt of the remote control cable clamp bracket and adjust the fixing position of the remote control cable. -
Page 43: Replacing The Fuel Filter Element
⑤Run the engine at load for about 10 minutes to dry the turbocharger and check that engine output has recovered. If the output has not recovered, repeat the above cleaning cycle 3 or 4 times. If the output still has not recovered, consult your Yanmar dealer or distributor. ⑥Clean the pre-cleaner with detergent, dry it [NOTICE] and install it to the blower air inlet. - Page 44 Be sure to close the kingston cock before removing the plug to replace the anticorrosive zinc. < Note > [Fig 29] shows the position of the Yanmar marine gear (Model KMH6A). For detailed information on marine gears other than Yanmar ones, refer to the Marine Gear Operation Manual.
-
Page 45: Inspection Every 500 Hrs.(Or 2 Yrs.)
If the discharge volume of cooling seawater has decreased: (When disassembly servicing of the seawater pump is necessary, Lube oil cooler consult yanmar dealer or distributor.) ①Loosen the side cover set bolts and remove the side cover. (6 mounting bolts) Impelier ②IIuminate the inside of the the seawater... -
Page 46: Inspection Every 2000 Hrs
Adjustment is necessary to obtain the optimal fuel injection to ensure the good engine performance. This inspection requires specialized knowledge and techniques. Consult your Yanmar dealer or distributor. (4) Replace the marine gesr oil and clean filter. 4.3.7 Inspection Every 2000 Hrs. - Page 47 Adjustment necessary to maintain proper contact of valves and seats. This maintenance requires specialized knowledge. Consult your Yanmar dealer or distributor. (3) Inspection and Adjustment of Fuel Injection Timing Fuel injection timing must be adjusted to ensure optimal engine performance.
-
Page 48: Troubleshooting
5. Troubleshooting Trouble Probable Cause Measure Reference [NOTICE] ●Alarm buzzer sounds and alarm Shift to low speed operation immediately, check which lamp has lamps go on come on and stop the engine for inspection. during operation If no abnormality is identified and there is no problem with opera- tion, return to port at your lowest speed and request repairs. - Page 49 Reference Trouble Probable Cause Measure ○Charge lamp does V-belt broken or loose Replace V-belt; adjust 4.3.5(1) not go out tension during operation Battery defective. Check fluid level, specific gravity; replace. 4.3.2(3) Alternator power Ask for repairs. generation failure ●Starting Failures ○Starter works No fuel Resupply fuel;...
-
Page 50: System Diagrams
6. SYSTEM DIAGRAMS 6.1 Piping diagram... -
Page 51: Wiring Diagram
6.2 Wiring diagram (1) New B-type Control panel... - Page 52 (2) New C-type control panel...
- Page 53 (3) New D-type control panel...
-
Page 54: Warranty Service
If the problem has already been reviewed with the Service Manager, contact the owner of the dealership or the General Manager. If your problem still has not been resolved to your satisfaction, contact your Yanmar local ●... - Page 55 YANMAR EUROPE B.V. BRUGPLEIN 11, 1332 BS ALMERE-DE VAART, THE NETHERLANDS P. O. BOX 30112, 1303 TEL : 31-36-5493200 FAX : 31-36-5493209 YANMAR ASIA ( SINGAPORE ) CORPORATION PTE LTD. 4 TUAS LANE. SINGAPORE 638613 TEL : 65-861-3855 FAX : 65-862-5195...