Advertisement
- 1 IMPORTANT SAFEGUARDS
- 2 QUICK REFERENCE OVEN OPERATION
- 3 SPECIAL CORD SET INSTRUCTIONS
- 4 INTRODUCTION
- 5 FEATURES AND BENEFITS
- 6 BEFOREYOU BEGIN
- 7 GENERAL GUIDELINES
- 8 USE AND CARE
- 9 BROWNING SELECTION
- 10 CUSTOM SETTINGS
- 11 Combining Custom Settings
- 12 CLEANING AND MAINTENANCE
- 13 Oven rack position diagrams
- 14 Documents / Resources
IMPORTANT SAFEGUARDS
For your safety and continued enjoyment of this product, always read the instruction book carefully before using.
When using an electrical appliance, basic safety precautions should always be followed including the following:
- Read all instructions.
- Do not touch hot surfaces. Use handles.
- To protect against electrical shock, do not place any part of the toaster oven broiler in water or other liquid. See instructions for cleaning.
- This appliance should not be used by or near children or individuals with certain disabilities.
- UNPLUG FROM OUTLET WHEN NOT IN USE AND BEFORE CLEANING. Allow to cool before cleaning or handling.
- Do not operate any appliance with a damaged cord or plug or after the appliance has malfunctioned or has been dropped or damaged in any way or if it is not operating properly. Return the toaster oven broiler to the store or retailer or where purchased for examination or repair.
- The use of accessory attachments not recommended by Cuisinart may cause injury.
- Do not use outdoors.
- Do not let cord hang over the edge of the table or countertop where it could be pulled on inadvertently by children or pets, or touch hot surfaces which could damage the cord.
- Do not place toaster oven broiler on or near a hot gas or electric burner or in a heated oven.
- Do not use this toaster oven broiler for anything other than its intended purpose.
- Extreme caution should be exercised when using containers in the toaster oven broiler constructed of materials other than metal or glass.
- To avoid burns, use extreme caution when removing tray or disposing of hot grease.
- When not in use, unplug the unit. Do not store any materials other than manufacturer's recommended accessories in this oven.
- Do not place any of the following materials in the oven: paper, cardboard, plastic and like products.
- Do not cover crumb tray or any part of the oven with metal foil. This will cause overheating of the oven.
- Oversize foods, metal foil packages and utensils must not be inserted in the toaster oven broiler as they may involve a risk of fire or electric stock.
- A fire may occur if the toaster oven broiler is covered or touching flammable materials, such as curtains, draperies, and walls when in operation. Do not store any items on top of the appliance when in operation. Do not operate under wall cabinets.
- Do not clean with metal scouring pads. Pieces can break off the pad and touch electrical parts, involving a risk of electric shock.
- Do not attempt to dislodge food when the toaster oven broiler is plugged into electrical outlet.
![]()
To avoid possibility of fire, never leave toaster oven broiler unattended during use.- Use recommended temperature settings for baking and roasting.
- Do not rest cooking utensils or baking dishes on glass door.
SAVE THESE INSTRUCTIONS
Please read and keep these instructions handy. These instructions will help you to use your Cuisinart® Exact Heat™ Convection Toaster Oven Broiler to its fullest so that you will achieve consistent, professional results.
QUICK REFERENCE OVEN OPERATION
(See pages that follow for detailed instructions.)
PIZZA BAKE/CONVECTION BAKE
- Press Bake or Conv Bake
- Press Temp
- Press Up or Down arrow to enter temperature
- Press Start/Stop to start oven
BROIL OR TOP BROWN
- Press Broil
- Press Start/Stop to start oven
TOAST
- Press Toast
- Press Lighter or Darker arrow for Your Choice™ browning
- If desired, press one or more of the custom settings:
- 4-6 Slice
- Bagel
- Defrost
- Reheat – may be combined only with 4-6 Slice button
- Press Start/Stop to begin toasting
- Ready tone will sound at end of cycle
SET CLOCK
- Press Clock
- Press and hold Hour to change hours
- Press and hold Min to change minutes
- Clock will start automatically when blinking stops
SET TIMER
To set timer, set Broil or Bake function and then:
- Press Timer
- Press and hold Hour to change hours
- Press and hold Min to change minutes
- Timer will start automatically when blinking stops
- Timer will ring continuously at 0:00 when time is up
- To clear or reset timer to 0:00, press timer button two more times
SPECIAL CORD SET INSTRUCTIONS
A short power supply cord is provided to reduce the risks resulting from becoming entangled in or tripping over a longer cord.
Longer extension cords are available and may be used if care is exercised in their use.
If a long extension cord is used, the marked electrical rating of the extension cord must be at least as great as the electrical rating of the appliance and the longer cord should be arranged so that it will not drape over the countertop or tabletop where it can be pulled on by children or tripped over.
 NOTICE
This appliance has a polarized plug (one blade is wider that the other). As a safety feature, this plug will fit in a polarized outlet only one way. If the plug does not fit fully in the outlet, reverse the plug. If it still does not fit, contact a qualified electrician. Do not attempt to defeat this safety feature.
INTRODUCTION
Congratulations on your purchase of one of the most versatile countertop appliances you will ever own. The Cuisinart® Exact Heat™ Convection Toaster Oven Broiler is stunning to look at and capable of performing a variety of cooking and toasting functions. . . right on your kitchen counter! And it's big enough to do an entire meal at once. Whether you are baking, broiling, top browning or toasting, Cuisinart promises perfect results. Every time.
FOR HOUSEHOLD USE ONLY
NOT INTENDED FOR COMMERCIAL USE
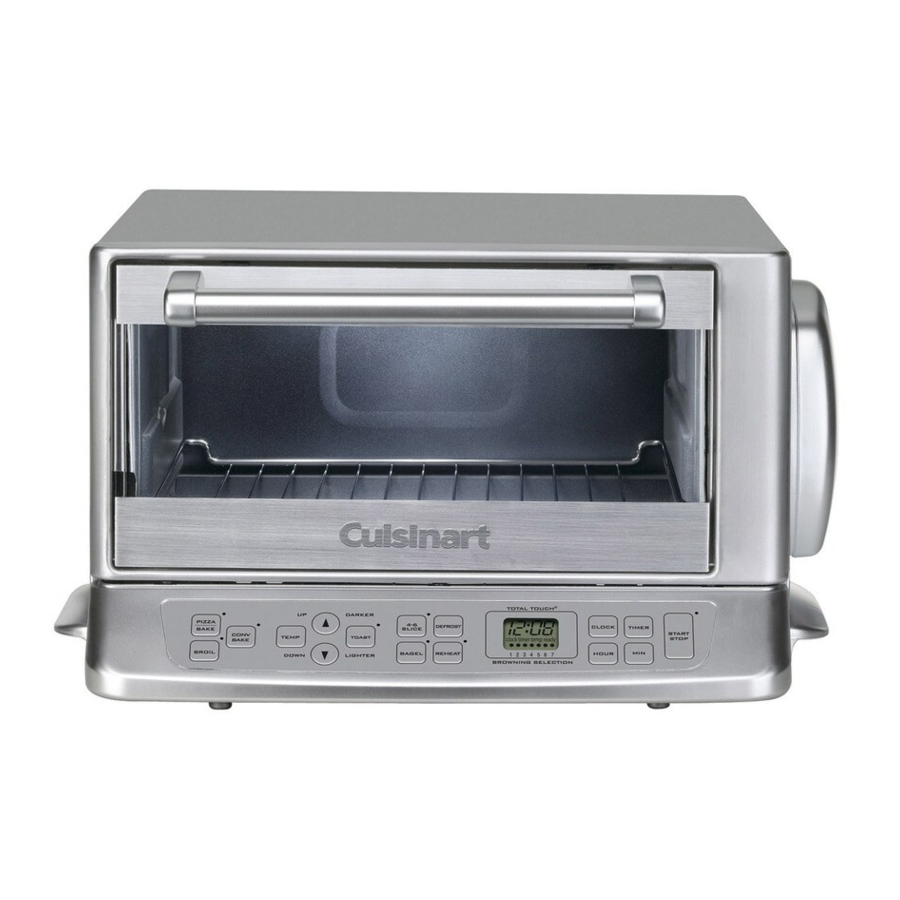
FEATURES AND BENEFITS

- Pizza Bake or Convection Bake
Bake everything from a 12" pizza, stuffed mushrooms and roasted chicken to cakes and pies. Because the Cuisinart® Exact Heat™ Convection Toaster Oven Broiler has been designed with our Exact Heat™ sensor everything comes out mouth-watering and delicious.
1a) Oven Temperature
Select your desired temperature and the oven will beep to let you know when your temperature is reached.
- Broil
Broiling is fast and easy. The Cuisinart® Exact Heat™ Convection Toaster Oven Broiler comes with a broiling pan and drip tray for your convenience.
- Toast
The Toast button allows toasting of a wide variety of breads and bagels.
The oven easily holds 6 large slices. It is preset to toast 2 slices of standard white bread.
3a) Total Touch® Browning Selection
Select from seven browning settings memorized by the toaster oven broiler. Combine with custom settings for toast the way you want it. Push the Lighter button to make toast lighter. Push the Darker button to make toast darker. Your browning selection is indicated at the bottom of the clock display and will remain in the oven's memory until you change it .
3b) LCD Bar
The row of dots increases when Darker is pushed, and decreases when Lighter is selected. The LCD window indicates the level of brownness, light to dark, from setting one (1) through seven (7).
3c) Custom Settings for 4-6 Slice Toasting
Touchpad control adjusts toasting time when you're toasting four to six slices and gives you accurate browning results without overtoasting. LED indicator lights when selected.
3d) Custom Setting for 1-Slice Toasting (not shown)
When toasting one slice, press the Toast button and set the browning control at a lighter setting than for 6 slices.
3e) Custom Setting for Bagels
Touchpad control adds the right amount of time to the browning cycle for toasting bagels. Also use for English muffins and thick bread slices. LED indicator lights when selected.
3f) Custom Setting for Defrost
Touchpad control defrosts and then toasts frozen bread by adding time to the toast cycle chosen by the browning control. LED indicator lights when selected.
3g) Custom Setting for Reheat
Touchpad control reheats without browning. LED indicator lights when selected.
3h) Combination Settings (not shown)
The four Perfect Timing™ custom settings can be combined to give you the toast you want. Press the Toast button and the Bagel button for a sliced bagel toasted to your liking. Combine the 4-6 Slice button, Defrost button and the Bagel button to defrost, then toast 4 bagel halves. For English muffins, press the Bagel button. See Combining Custom Settings section for possible combinations.
- Always Even™ Shade Control (not shown)
Electronically monitors and adjusts the oven's internal temperature to provide consistent toasting results from one use to the next. Heating elements deliver even heat for uniform browning.
- Clock
Time is always displayed.
5a) Hour and minute function
Use to set clock and timer.
- Timer
Enter cooking time on the built-in timer. The timer will ring until you shut it off.
- Start/Stop Function
Starts a function when pressed the first time, and stops the function when pressed the second time.
- Oven Rack
Has two positions. The top position has a 50% stop feature so the rack stops halfway out of the oven. It can be removed by lifting the front of the rack and sliding it out.
- Slide-out Crumb Tray (not shown)
Removes easily from the back of the toaster oven broiler to clean crumbs from bottom of oven.
- Cord Storage (not shown)
Takes up excess cord and keeps countertop neat.
- Easy Clean Interior (not shown)
The sides of the oven have a nonstick coating for an easy-to-clean surface.
- Broiling Pan
A broiling pan is included for your convenience. The broiling pan has two positions to accommodate a variety of meats, poultry, and fish for broiling.
- Baking Pan/Drip Tray
BEFOREYOU BEGIN
Place your oven on a flat surface.
Before using your oven, move it two to four inches away from the wall or from any objects on the countertop. Do not use on heat-sensitive surface.
OBJECTS SHOULD NOT BE STORED ON THE TOP OF THE OVEN. IF THEY ARE, REMOVE ALL OBJECTS BEFORE YOU TURN ON YOUR OVEN. THE EXTERIOR WALLS GET VERY HOT WHEN IN USE. KEEP OUT OF REACH OF CHILDREN.
GENERAL GUIDELINES
Conventional Baking: Conventional baking is used as you would normally use your large kitchen oven.
Convection/Bake: The convection/bake function can be used for all the same functions as conventional bake or roast, but will cook faster and more efficiently. With convection baking the key is the airflow, so it is important to use the right cooking pan and place it in the oven as directed in the rack position in each recipe.
Broiling: Broiling can be used for beef, chicken, pork, fish and more. Broiling can also be used to top-brown casseroles and gratins.

Aluminum foil is not recommended for covering the broiling pan. Foil is extremely dangerous when broiling fatty foods. Grease will accumulate and may catch fire. We don't recommend the use of foil, but if foil is used to cover drip tray, be sure foil is tucked neatly around the pan and does not touch the walls or heating rods. Never cover crumb tray.
Toasting: Always have the rack in rack position B, as indicated in the diagram for even toasting. Always center your item/items in the middle of the rack.

Placing the rack in the bottom position or in the top position with the rack turned upward while toasting may result in a fire. Refer to rack position diagram for proper use.
Turning off the toaster oven broiler: The Start/ Stop button, when pushed the first time, will start the oven. When pushed the second time, during oven operation, the Start/Stop button will turn the oven off. You will know the oven is off when the LED light turns off.
USE AND CARE
Unwind the power cord. Check that the crumb tray is in place and that there is nothing in the oven. Plug power cord into the wall outlet.
PIZZA/BAKE
To bake, press the Bake button. The LED light above the Bake button will turn on. The oven temperature is preset for 150°F. Press the temp button and the Up arrow to increase the temperature or Down arrow to decrease to your desired temperature. Note that the temperature will increase and decrease in increments of 25ºF. The temperature will read out on the clock display. Press the Start/Stop button to start the oven. When oven reaches the selected temperature, the words "Temp. Ready" will be displayed on the clock display, and the oven will beep 5 times to let you know it is ready to bake.
The built-in timer can be used with this function. See timer instructions below.
NOTE: AS A SAFETY MEASURE, THIS OVEN WILL AUTOMATICALLY SHUT OFF AFTER FOUR HOURS OF CONTINUOUS USE.
NEVERTHELESS, ALWAYS UNPLUG THE OVEN WHEN NOT IN USE AND NEVER LEAVE THE OVEN ON WHEN UNATTENDED.
PIZZA
When baking pizza, please follow these guidelines:
- If baking fresh pizza, use the baking tray/pan provided with this toaster oven.
- Sprinkle the pan with cornmeal or lightly spray to make removing the pizza dough easier.
- Bake in rack position B.
- If baking a frozen pizza, you can place the pizza directly on the rack in position B.
CONVECTION BAKE
Convection baking/roasting uses a fan to circulate heated air around food as it cooks. For best results use cookie sheets with no sides and baking dishes and roasting pans with very low sides to let maximum airflow reach food. For the same reason, do not cover foods while cooking. Most baking recipes recommend reducing temperatures by 25 degrees when using the convection feature. Always check 10 minutes before suggested cooking time.
If food might drip, place the baking tray on the rack below the rack that the food is on. Tray will catch drips and more airflow will reach food.
When using the baking tray in the bottom rack position, center it so air flows in back, as well as front of the oven.
To convection bake, press the Conv Bake button. The LED light above the Conv Bake button will turn on. The oven temperature is preset for 150ºF. Press the Temp button and the Up arrow to increase the temperature or Down arrow to decrease to your desired temperature.
Note that the temperature will read out on the clock display. Press the Start/Stop button to start the oven. When oven reaches the selected temperature, the words "Temp Ready" will be displayed on the clock display, and the oven will beep 5 times.
The built-in timer can be used with this function. See time instructions below.
NOTE: AS A SAFETY MEASURE, THIS OVEN WILL AUTOMATICALLY SHUT OFF AFTER 4 HOURS OF CONTINUOUS USE. NEVERTHELESS, ALWAYS UNPLUG THE OVEN WHEN NOT IN USE AND NEVER LEAVE THE OVEN ON WHEN UNATTENDED.
BROIL
Note: When broiling, add approximately ¼ cup water to the bottom of the baking pan/drip tray to reduce sizzling and splatter. Place the broiling pan in the drip tray.
Note: there are two positions for the broiling pan so that a variety of thicknesses of foods can be broiled. Also, the oven rack can be turned up or down depending on the thickness of the food being broiled. In most cases the oven rack should be in the higher position (position C – see rack position diagram).
To broil, press the Broil button on the touchpad. The LED light above the Broil button will turn on. The temperature will automatically set to broil temperature (500˚F). Temperature cannot be changed. Press the Start/Stop button to start to broil. Preheat oven for five minutes with door closed. The clock display will indicate "brl" for broil. After the five-minute preheat period, place the broiling pan in the oven. Always leave door ajar when broiling. To stop broil operation, press the Start/Stop button.
Note: Never use oven glass dishes to broil.
The built-in timer can be used with this function. See timer instructions below.
TIMER
First set oven to bake or broil.
Once the oven has reached temperature, place the item in the center of the rack and close the door (exception: when broiling keep door ajar). Press the Timer button. Press and hold the Hour button to increase the hours. The total maximum cook time is 4 hours. Press and hold the Min button to increase minutes. The set time will blink five times and then stop blinking. Once it stops blinking, the timer is set and will begin to count down. You do not need to press the Timer button again.
Note: If you do press the Start/ Stop button and you have already started the oven, the oven will turn off.
If while setting the timer you set the incorrect time, press the Timer button once to clear the timer to 0:00, then begin again to set the correct time. If the Timer has been set and is counting down, the timer can be reset to 0:00 by pressing the timer button two times. The display will begin to blink to let you know you can enter the correct time.
At the end of timer setting, the timer will ring continuously until it is turned off. To stop timer ring, press timer button. Pressing Start/Stop can turn off both the timer and oven. To view the temperature setting while the timer is running, press the Temp button. The oven temperature will be displayed on the clock for 5 seconds. After 5 seconds the display will return to the timer countdown without interruption. This can be done only while using the bake function. It will not work with the broil function.
The broil function is set to 500ºF.
IMPORTANT NOTES ON OVEN USE
The Bake feature is always used with the Temp selection button.
The Broil button has only one temperature (preset to 500ºF) so it cannot be used with the Temp button.
The timer can be used only with the bake or broil functions.
TOAST
To toast, make sure the oven rack is in rack position B, as indicated in the diagram. If toasting two items, center them in the middle of the rack. Four or six items should be evenly spaced – two/three in front, two/three in back. Close the glass door. Press the Toast button and the Start/Stop button to toast.
The default is set to 2 slices of medium toast (Browning Selection number 4) using standard white bread.
To select a browning shade, press the Toast button and then the Up arrow for darker toast or the Down arrow for lighter toast. You have seven browning selection shades to choose from. Your browning selection is indicated by the black dots located at the bottom of the clock display. The row of dots will shrink for lighter shades and grow for darker shades. The browning number you have selected will also be displayed on the clock.
Your browning selection will remain in the memory of the oven until you change it or unplug the oven. When you unplug the oven, the browning selection will automatically return to number 4, medium brown setting.
When toasting, the toasting time will count down on the clock display. The timing will be different for each custom setting you choose. Keep in mind that the timing is adjusted by the oven thermostat. So if your oven is already warm, the toasting time will be less than if you start with a cold oven.
BROWNING SELECTION
To make lighter toast, first press the Toast button and then the Down arrow located to the bottom left of the toast button. Each time you press this arrow, the browning selection will get lighter by one setting.
To make darker toast, press the Up arrow located to the top left of the toast button. Each time you press this arrow, the browning selection will get darker by one setting.
The browning level selected will appear at the bottom of the clock window by the numerical and LCD display.
| Desired Color | LCD Light Position |
| Light | Setting 1 or 2 |
| Medium | Setting 3, 4, or 5 |
| Dark | Setting 6 or 7 |

CUSTOM SETTINGS
Toasting
The toaster is preset for browning 2 slices of bread to a medium (#4) setting. Custom settings will adjust the time required to achieve the browning shade you selected. If you desire a custom setting, select one or more of the following:
4-6 Slice – Increases toasting time for preparing four to six slices of toast.
Bagel – Adds correct amount of time to toast cycle for bagels. Can also use this button for English muffins and thickly sliced breads.
Defrost – Will defrost, then toast your item. Adds time to the toast cycle for defrosting.
Reheat – For reheating pretoasted bread. Will reheat without browning.
Note: To prepare one slice without overtoasting, press the toast button and choose a lighter browning setting than usual.
When choosing these custom settings, a red LED light will come on above the selected feature button(s). You can combine as many as three of these custom settings simultaneously to customize your toasting cycle. The Reheat setting can only be combined with the 4-6 Slice setting.
Stop Toasting
When the toasting cycle is finished, the oven will beep 5 times and turn off.
If you wish to stop the toasting cycle before it is finished, simply press the Start/Stop button. The toaster oven broiler will cancel your toast cycle and hold your browning selection in memory until you change the selection or unplug the unit. The browning selection will return to the number 4 medium setting when the oven is unplugged.
Important notes on toasting use
The Toast button must be pressed first before you can choose your custom or browning selections.
The oven rack must be in rack position B as indicated in the diagram.
The timer can be used only with the bake or broil selections.
Helpful browning notes
Toasting is a combination of drying and cooking the bread. Therefore, differences in denseness and moisture level from one bread to another can result in varying toasting times. For slightly dry bread or thinly sliced bread, use a lighter setting than you normally would, as it will toast more quickly.
For very fresh bread, thickly sliced bread or whole wheat bread, use a darker setting than normal. Dense, moist bread may also require a darker setting.
Breads with very uneven surfaces (such as English muffins) will require a darker toast setting. For English muffins, we suggest you use the Total Touch® browning selection on the custom settings panel and setting #6. Thickly cut pieces of bread (including bagels) will take longer, since more moisture must be evaporated from the bread before toasting occurs. We suggest you use the Total Touch® browning selection which will add to the normal toasting time. For moister breads or very thick pieces, you may need to make the toast setting darker than you normally would. Very thick pieces may require two cycles.
Before toasting bagels, slice each bagel into two equal halves. Select the Bagel button, which adds the extra time needed for toasting most bagels.
When toasting raisin or other fruit breads and muffins, remove any loose fruit, etc. from the surface of the bread before placing into the oven. This will help prevent pieces from falling and baking onto the crumb tray.
This oven can be adjusted for four slices of toast by pressing the 4-6 Slice button on the custom settings control panel. To prevent overtoasting of a single slice, select the Toast button and set browning control to a lighter setting than you normally would.
4-6 Slice Button
The unique 4-6 Slice feature will add the right amount of time to toast 4-6 slices of bread at once.
- Place 4 to 6 slices of bread on the center of the oven rack, 2 to 3 slices in the front and 2 to 3 slices in the back. Close oven door.
- Press Toast button.
- Set the browning control: Select desired shade of browning using the Lighter and Darker buttons located to the left of the Toast button.
- Press the 4-6 Slice button: The LED will illuminate when this feature is selected.
- If defrosting frozen bread slices, also press the Defrost button.
- If you are toasting bagel halves, English muffin halves, or slices of wide toast, you should also press the Bagel button.
- Press the Start/Stop button to start toasting.
To stop cycle
When the 4-6 Slice cycle is complete, the toaster oven broiler will alert you by beeping 5 times. If you wish to stop the cycle before it is finished, simply press Stop/Start to interrupt.

Bagel Button
The bagel feature adds the appropriate amount of extra time to the toasting cycle to toast your bagels at the color level selected with the touchpad shade control. The Bagel button is designed for the standard bagel size (3 ounces). For deli-size bagels (3-6 ounces) you may need to increase the darkness setting. The Bagel button can also be used to toast English muffins, thick sliced breads, and thick sliced specialty Italian or Portuguese breads, which require longer toasting times than an average slice of white bread.
- Center bagel half or halves on the oven rack. Close oven door.
- Press Toast button.
- Set the browning control: Select desired shade of browning using the Lighter and Darker buttons to the left of the Toast button.
- Press the Bagel button. The LED will illuminate when this feature is selected.
- If defrosting frozen bagel halves, also press the Defrost button.
- To defrost and toast 4 bagel halves, press the 4-6 Slice button.
- Press the Start /Stop button to start toasting.
To stop cycle
When the bagel cycle is complete, the toaster oven broiler will beep 5 times.
If you wish to stop the cycle before it is finished, simply press the Start/Stop button to interrupt.

Defrost Button
The Defrost button is designed to first defrost and then toast the bread, which extends the toasting cycle slightly.
- Center slice(s) of bread on the oven rack. Close oven door.
- Press Toast button.
- Set the browning control: Select desired shade of browning using the Lighter and Darker buttons to the left of the Toast button.
- Press the Defrost button: The LED will illuminate when this feature is selected.
- If you are defrosting bagel halves, English muffin halves or extra-wide toast, you should also press the Bagel button.
- If you are toasting four slices you should also press the 4-6 Slice button.
- Press the Start/Stop button to start toasting.
To stop cycle
When the Defrost and Toast cycle are complete, the toaster oven broiler will beep 5 times. If you wish to stop the cycles before it is finished, simply press the Start /Stop button to interrupt.

Reheat Button
The reheat feature allows you to reheat toasted bread without browning or toasting.
- Center slice(s) of bread on the oven rack.
- Press the Reheat button.
- Press the Start /Stop button to start the function.
To stop cycle
When the reheat cycle is complete, the toaster oven broiler will beep 5 times. If you wish to stop the cycle before it is finished, simply press the Start /Stop button to interrupt.

Combining Custom Settings
We recognize that all toast is not created equal. To help you get the browning results you want, we have developed custom settings to allow you to combine them for better toasting results.
Without making any selections at all, the Total Touch® will toast for 2 slices of bread. If you are toasting one slice or several slices of bread, bagel halves, English muffin halves, or frozen bread, you can combine the settings for your toasting task.
Here are the possible combinations:
2 slices (no button required) – Press Toast + Start/Stop
2 slices (no button required) – Press Toast + Defrost + Start/Stop
2 slices (no button required) – Press Toast + Bagel + Start/Stop
2 slices (no button required) – Press Toast + Reheat + Start/Stop
2 slices (no button required) – Press Toast + Defrost + Bagel + Start/Stop
4 to 6 slices – Press Toast + 4-6 Slice + Start/ Stop
4 to 6 slices – Press Toast + 4-6 Slice + Defrost + Start/Stop
4 to 6 slices – Press Toast + 4-6 Slice + Bagel + Start/Stop
4 to 6 slices – Press Toast + 4-6 Slice + Reheat + Start/Stop
4 to 6 slices – Press Toast + 4-6 slice + Defrost + Bagel + Start/Stop
The custom settings you choose adjust the toasting time to achieve the browning results you have selected with the Browning Selection. If you do not make a selection with the Browning Selection, the oven will operate at the medium (4) brown setting. If you choose a lighter or darker setting on the Browning Selection, your toaster oven broiler with Exact Heat™ Sensor will hold the setting in memory until you change it or unplug the toaster. The custom settings will not remain in memory; only your browning selection will remain in the oven's memory.
CLEANING AND MAINTENANCE
Always allow the oven to cool completely before cleaning.
- Always unplug the oven from the electrical outlet when it is not in use.
- Do not use abrasive cleansers as they will damage the finish. Simply wipe the exterior with a clean damp cloth and dry thoroughly. Apply the cleansing agent to a cloth, not to the toaster, before cleaning.
- To clean interior walls, use a damp cloth and a mild liquid soap solution or a spray solution on a sponge. Never use harsh abrasives or corrosive products. These could damage the oven surface. Never use Brillo® pads, etc. on interior of oven.
- To remove crumbs, slide out the crumb tray and discard crumbs. Wipe clean and replace. Crumb tray is dishwasher safe. To remove baked-on grease, soak the tray in hot sudsy water or use nonabrasive cleaners. Never operate the oven without the crumb tray in place.
- Wire rack, broiling pan and drip tray are dishwasher safe. If heavily soiled, soak in hot sudsy water or use a nylon scouring pad or nylon brush.
- Never wrap the cord around the outside of the oven. Use the cord storage cleats on the back of the oven.

After cooking greasy foods and after your oven has cooled, always clean top interior of oven. If this is done on a regular basis your oven will perform like new. Removing the grease will help to keep toasting consistent cycle after cycle.
All of our recipes have been tested in our kitchen and specially developed to work in the Cuisinart® Exact Heat™ Convection Toaster Oven Broiler. These mouth-watering recipes are just a sampling of what the Cuisinart® Exact Heat™ Convection Toaster Oven Broiler can do.
Oven rack position diagrams
Each recipe gives you step-by-step directions and will even tell you in which position the oven rack should be for best results. Please refer to the diagram below for oven rack positions. Each position is described with a letter that is referred to in the recipe.
RACK POSITION A

RACK POSITION B

RACK POSITION C


Documents / ResourcesDownload manual
Here you can download full pdf version of manual, it may contain additional safety instructions, warranty information, FCC rules, etc.
Download Cuisinart Exact Heat TOB-195 Series - Convection Toaster Oven Broiler Manual
Advertisement
Thank you! Your question has been received!


Need Assistance?
Do you have a question about the Exact Heat TOB-195 Series that isn't answered in the manual? Leave your question here.