Sign In
Upload
Manuals
Brands
Topcon Manuals
Medical Equipment
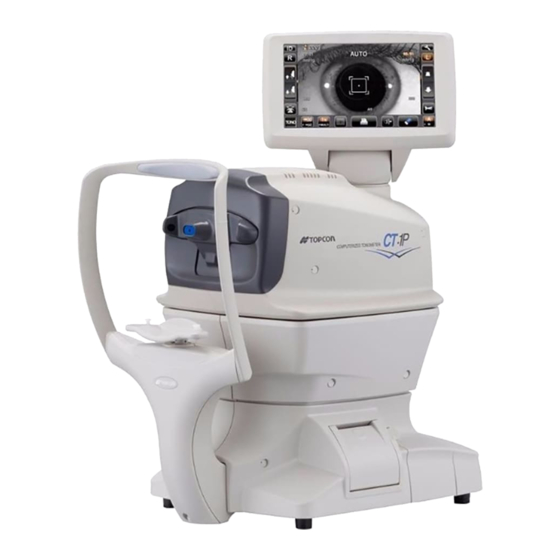
CT-1P
Topcon CT-1P Computerized Tonometer Manuals
Manuals and User Guides for Topcon CT-1P Computerized Tonometer. We have
1
Topcon CT-1P Computerized Tonometer manual available for free PDF download: User Manual
Topcon CT-1P User Manual (132 pages)
COMPUTERIZED TONOMETER
Brand:
Topcon
| Category:
Medical Equipment
| Size: 24 MB
Table of Contents
Table of Contents
5
Introduction
3
Table of Contents
5
General Safety Information
9
How to Use this Manual
11
General Maintenance Information
11
User Maintenance
11
Fuse Change
11
Cleaning the Measuring Window Glass
11
Cleaning the Nozzle and Window Glass Inside the Nozzle
11
Disclaimers
11
Displays and Symbols for Safe Use
12
Displays
12
Symbols
12
Positions of Warning and Caution Indications
13
Components
14
Component Names
14
Composition of Parts Which Contact the Human Body
14
Operation Method of Control Panel
15
Control Panel Components
15
Ct-1
16
Function Button (Ct-1P)
18
Function Button (Ct-1)
18
Monitor Screen
19
Setup Screen
20
Printer Output
23
Standard Accessories
29
Preparations
30
Installation
30
Connecting Power Cable
30
Connecting External I/O Terminals
31
Data Output
31
Data Input
32
Printer Paper Setting
32
Recovery from Power Save Status
34
Adjusting the Control Panel Position
34
Basic Operations Preparation before Measurement
35
Turning on the Instrument
35
Selecting the Measurement Mode
36
Checking the Measuring Nozzle
36
Air Check
37
Patient Positioning
38
Setting the Safety Stopper
39
Setting the Patient ID
42
Auto Mode Measurement
44
Setting the Auto Mode
44
Setting the Measuring Range
45
Alignment and Measurement
45
Ment Is Performed, Auto/Manual Mark Is Changed to
47
Displaying Measurement Values
47
Manual Measurement Mode
48
Setting the Manual Mode
48
Setting the Measuring Range
48
Alignment and Measurement
49
Displaying Measurement Values
53
Error: over
53
To Stop Alignment in the Middle, Tap the It Is Possible to Stop Alignment also by Tapping the Control Panel Anywhere, While an "Align Stopped. Please Re-Touch Pupil." Is Displayed, Please Tap the Pupil on the Control Panel Again
53
When the Reliability of Measurement Is Low.(Only TONO) Measurement was Not Done Correctly
53
When the Measurement Range Is Exceeded.(Only TONO)
53
In TONO Average Value Display, Low-Reliability Numerical Data
53
However, if All Measurement Data Are Numerical Data with [ ]
53
For Explanation of the Messages on the Control Panel Screen, Refer to "MESSAGE LIST
53
Alignment Stop
53
Button Is Displayed. When
53
Printout of Measurement Values
54
Clearing Measurement Values
55
Displaying All Measurement Data
56
Operation after Use
58
Optional Operations
59
Displaying the Patient ID (Patient No.) or Operator ID
59
Measuring One Eye Only
59
Measuring the Right Eye Only
59
Measuring the Left Eye Only
60
Output Using Rs232C
60
Input Using Usb
60
Output Using Lan
60
Setting Functions on the Setup Screen
61
Operating the Setup Screen
61
Preparations for Setting
61
Outline of Setup Screen Operations
62
Button, as Necessary
62
Returning to the Measurement Screen
64
List of Setup Items
65
Setting of Internal Printer (Print)
67
Data Communication (Comm)
68
Lan Connection (Lan)
68
Operator ID
69
Special
69
Initial Setting (Initial)
70
Setting the Buzzer Sound
70
Setting the Start Mode
71
Setting Auto Print
71
Setting the Printer
71
Displaying the Tono Value
72
Displaying the Pacho Value
72
Displaying the Tono Average Value
73
Displaying the Adjusted Value
73
Resetting the Patient no
74
Displaying the Patient ID
74
Setting the Required Patient ID
75
Setting the Device ID Number
75
Displaying the Device ID Number
76
Setting the Waiting Position after Measurement
76
Setting the Auto Power Save
77
Setting the Touch Measurement
77
Setting the Number of Continuous Measurements (Tono)
78
Setting the Number of Continuous Measurements (Pacho)
78
Setting the Additional Measurement
79
Setting Low Credibility Measurement
79
Setting the Date and Time (Date/Time)
80
Setting the Initial Measurement Mode
80
Setting the Display Unit of Ocular Pressure Measurement Values (Tono)
81
Setting the Display Unit of Cornea Thickness Measurement Values (Pacho)
81
Setting the Average Value of the Ocular Pressure Measurement Mode
82
Setting the Iop Adjustment
82
Setting the Central Cornea Thickness Base Value
83
Setting the Adjustment Coefficient
83
Setting the Pupil Distance
84
Setting the R/L Move
84
Setting the Chinrest Height
85
Setting the Control Panel Brightness
85
Setting the R/L Notation
86
Setting the Packing Mode
86
Setting the Shaded Characters
86
Setting the Xz Motor Direction
87
Setting the Measurement Data Recording Way
87
Setting the Measurement Count Change Mode
88
Setting the Iol Led Brightness
88
Setting the Printer
89
Setting the Barcode
89
Setting the Operator ID
90
Setting the Name Column
90
Printing the Date
90
Setting the Date Style
91
Setting the Patient No./ Patient ID
91
Printing the Device ID Number
91
Printing the Serial Number
92
Printing the Topcon Logo
92
Setting the Message
92
Setting the Message Data
93
Setting the Printing Order
93
Setting the Measurement Correction Value
94
SETTING the Mmhg DISPLAY UNIT on Hpa
94
Setting the Iop Adj Formula
95
Setting the Auto Cut
95
Data Communication
96
Setting the Output Data Style
96
Setting the Format
96
Setting the Output Port
97
Setting the Baudrate
97
Lan Connection
98
Setting the Lan Connection
98
Setting the Xml File Output
98
Setting the Data Output Format
99
Setting the Shared Folder
99
Setting the Ip Address Setting
99
Setting the Ip Address
100
Setting the Subnet Mask
100
Setting the Default Gateway
100
Setting the Primary Dns Server
101
Setting the Secondary Dns Server
101
Operator ID
102
Setting the Use Operator ID Function
102
Setting the Prefix of Operator ID Function
102
Setting the Operator ID Request
103
Setting the Fixed Operator ID
103
Setting the Input Fixed Operator ID Function
103
Reference Technical Data
104
The Iop Correction Values
104
Daily Checkups
105
Cleaning the Instrument
105
Cleaning the Measuring Window Glass
105
Cleaning the Nozzle and the Glass Inside the Measuring Nozzle
106
Cleaning the Components that Come into Contact with the Patient
107
Daily Maintenance
107
Ordering Consumable Items
107
User Maintenance Items
108
Manufacturer Maintenance Items
108
Brightness Adjustment of the Control Panel
108
Printer Paper Jam
109
Print out
109
Fuse Change
110
Replacing the Chinrest Tissue Paper
111
Maintenance
112
Cleaning the Cover
112
Cleaning the Control Panel
112
Before Requesting Service
113
Trouble-Shooting Operations
113
Message List
113
Air Check
116
Trouble-Shooting Operations
116
Specifications and Performance
117
General Information on Usage and Maintenance
118
Intended Patient Population
118
Intended User Profile
118
Environmental Conditions for Use
118
Storage, Usage Period
118
Environmental Conditions for Packaging in Storage
118
Environmental Conditions for Packaging in Transportation
119
Electric Rating
119
Dimensions and Weight
119
Safety Designations Per Iec 60601-1 Standard
119
Operation Principles
120
Disposal
121
Electromagnetic Compatibility
122
Patient's Environment
126
Reference Material
127
Optional Accessories
127
Shape of Plug
127
Ipa Font License Agreement V1.0
128
Advertisement
Advertisement
Related Products
Topcon CT-1
Topcon CT-80
Topcon Compu-Vision CV-5000
Topcon CV-50000
Topcon CV-5000PC
Topcon CC-100XP
Topcon Chronos
Topcon COMPU VISION CV-5000
Topcon CT-800
Topcon CT-800A
Topcon Categories
Measuring Instruments
Medical Equipment
Receiver
Laser Level
Controller
More Topcon Manuals
Login
Sign In
OR
Sign in with Facebook
Sign in with Google
Upload manual
Upload from disk
Upload from URL