Sign In
Upload
Manuals
Brands
Suote Manuals
Sewing Machine
ST-9820
Suote ST-9820 Manuals
Manuals and User Guides for Suote ST-9820. We have
1
Suote ST-9820 manual available for free PDF download: Instruction Manual
Suote ST-9820 Instruction Manual (267 pages)
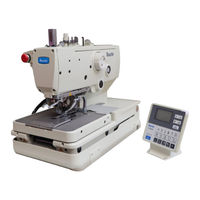
ELECTRONIC EYELET BUTTON HOLER
Brand:
Suote
| Category:
Sewing Machine
| Size: 11 MB
Table of Contents
汉语
10
Table of Contents
10
清扫和点检
78
标准调整
81
缝纫菊花孔
126
误码表
127
故障检修
132
English
141
Names of Major Parts
143
Machine Specifications
144
Specifications
144
Sewing Shapes
145
Installation
146
When Setting up on Top of the Table
147
When Embedding into the Table
148
Installing the Control Box
149
Installing the Machine Head
150
Installing the Table Reinforcement Plates (Embedded Installation Only)
150
When Setting up on Top of the Table
150
When Embedding into the Table
152
Tilting Back and Returning the Machine Head
153
Installing the Belt Cover and Feed Bar Cover U
154
Installing the Oiler
154
Installing the Cotton Stand
155
Installing the Operation Panel
155
Installing the 2-Pedal Foot Switch (When Using the 2-Pedal Foot Switch)
156
Installing the Air Unit and Valve Unit
156
Installing the Treadle Unit (When Using the Treadle)
157
When Embedding into the Table
157
When Setting up on Top of the Table
157
Installing the Hand Start Switch (When Using the Hand Start Switch)
158
Connecting the Connectors Inside the Control Box
160
Connecting the Cords
160
Connecting the Ground Wire
164
Connecting the Power Cord
165
Connecting the Air Tubes
166
Securing the Cords
166
Adjusting the Air Pressure
167
Installing the Air Hose
167
Installing the Dust Bag
168
Installing the Eye Guard
168
Installing and Removing the Work Clamp Plates
169
Adding Oil
170
Lubrication
170
Lubrication
171
Installing the Needle
172
Preparation before Sewing
172
Threading the Upper Thread
173
Threading the Lower Thread
174
Threading the Gimp
175
Threading the Threads When the Cotton Stand Is Installed on the Right Side
176
Setting the Material
177
Name and Function of each Operation Panel Item
178
Operation)
178
Using the Sewing Machine
178
Starting the Sewing Machine
180
Program Setting Method
181
Parameter List
183
Checking the Sewing Pattern in Test Mode
188
Switching Cutting Operation
190
Changing the Material Setting Position
191
Using Threading Mode
192
Automatic Sewing (Automatic Mode)
193
Using the Sewing Machine (Sewing Operation)
193
Pausing Sewing During Automatic Sewing
194
Using the STOP Switch
194
Canceling Manual Sewing or Test Feeding
196
Adjusting the Thread Tension
197
Using Cycle Programs
199
Using the Sewing Machine (Operation Panel: Advanced Operation)
199
Setting Memory Switches
202
List of Memory Switch Settings
203
Resetting the Data (Initialization)
204
Changing the Production Counter Setting
205
Displaying the Help Screen
206
Manual Sewing (Manual Mode)
207
Switching the Sewing Mode While Sewing Is in Progress
209
Cleaning
210
Cleaning and Inspection
210
Daily Cleaning and Inspection
210
Checking the Air Filter
211
Checking the Needle
211
Cleaning the Control Box Air Inlet Port
211
Monthly Cleaning and Inspection
211
Cleaning and Inspection as Required
212
Cleaning the Eye Guard
212
Draining Lubricating Oil
212
Draining Water
212
Lubrication
212
Adjusting the Heights of the Spreaders and Loopers
213
Standard Adjustments
213
Adjusting the Zigzag Width (Stitch Width)
214
Adjusting the Zigzag Base Line Position
215
Adjusting the Needle and Looper Timing
218
Adjusting the Looper Stroke
219
Adjusting the Height of the Needle Bar
220
Adjusting the Clearance between the Loopers and Needle
221
Adjusting the Needle Guard
221
Adjusting the Spreader Installation Positions
222
Adjusting the Spreader Timing
223
Adjusting the Height of the Throat Plate
224
Changing the Cutting Length (Replacing the Hammer)
225
Adjusting the Cutting Surface of the Hammer
226
Filing the Cutting Surface of the Hammer
226
Adjusting the Axial Play of the Hammer
227
Adjusting the Contact between the Knife and the Hammer
227
Making the Cutter Driving Shaft and Driving Shaft Presser Move Together
228
Replacing the Knife
229
Replacing the Knife and Adjusting Its Position
229
Making Fine Adjustments to the Knife Position
230
Adjusting the Cutting Pressure
232
Adjusting the Work Clamp Lift Amounts
233
Adjusting the Work Clamp Positions
234
Adjusting the Positions of the Work Clamp Plates
235
Adjusting the Cloth Opening Amounts
236
Adjusting the Upper Thread Feeding Amount
237
Adjusting the Lower Thread Feeding Amount <-01 Specifications Only
238
Replacing and Adjusting the Upper Movable Knife
238
Replacing the Upper Movable Knife
238
Adjusting the Upper Movable Knife
239
Adjusting the Position of the Thread Trimmer Lever Bracket
240
Replacing and Adjusting the Movable Knife and Fixed Knife (for the Lower Thread and Gimp) <-01 Specifications
241
Replacing the Movable Knife and Fixed Knife
241
Adjusting the Cutting Pressure
242
Adjusting the Meshing Amount
242
Adjusting the Thread Nipper Assembly and Opener
243
Adjusting the Thread Handler
245
Adjusting the Cutting Pressure
246
Replacing and Adjusting the Movable Knife and Fixed Knife (for the Lower Thread and Gimp) <-02 Specifications
246
Replacing the Movable Knife and Fixed Knife
246
Adjusting the Movable Knife Installation Position
247
Adjusting the Position of the Auxiliary Clamp
248
Adjusting the Gimp Trailing Length <-02 Specifications Only
249
Adjusting the Position of the Lower Thread Presser <-02 Specifications Only
250
Installing (Replacing) the Auxiliary Clamp on the Left Side
251
Adjusting the Throttle Valve of the Cutter Valve
256
Adjusting the Throttle Valves
256
Adjusting the Throttle Vales of the Solenoid Valves
257
Sewing Circular Stitches
258
Error Codes
259
Troubleshooting
264
Advertisement
Advertisement
Related Products
Suote Categories
Sewing Machine
More Suote Manuals
Login
Sign In
OR
Sign in with Facebook
Sign in with Google
Upload manual
Upload from disk
Upload from URL