Sign In
Upload
Manuals
Brands
Pioneer Manuals
Car Video System
AVH-P2300DVD
Pioneer AVH-P2300DVD Manuals
Manuals and User Guides for Pioneer AVH-P2300DVD. We have
3
Pioneer AVH-P2300DVD manuals available for free PDF download: Service Manual, Owner's Manual
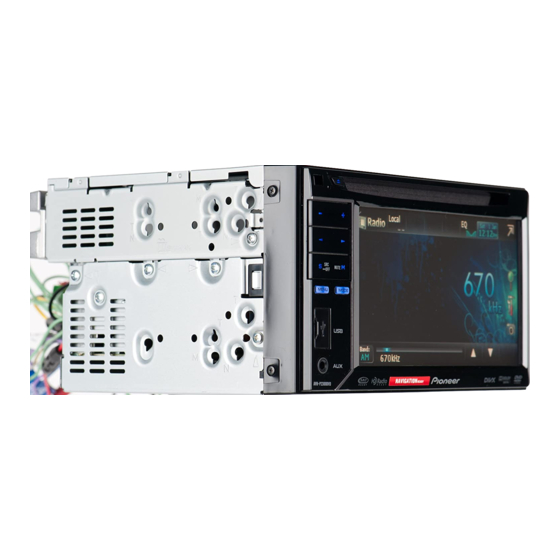
Pioneer AVH-P2300DVD Service Manual (173 pages)
DVD RDS AV receiver
Brand:
Pioneer
| Category:
Car Receiver
| Size: 15.3 MB
Table of Contents
Caution
2
Safety Information
2
Warning
2
Additional Laser Caution
3
Laser Diode Characteristics
3
Adjustments
4
Important Check Points for Good Servicing
4
Lubricants, Glues, and Replacement Parts
4
Product Safety
4
Table of Contents
5
1 Service Precautions
6
Resetting the Mode
6
Notes on Soldering
7
2 Specifications
8
Disc/Content Format
11
Panel Facilities
11
Head Unit
11
Remote Control
12
Connection Diagram
13
When Connecting to Separately Sold Power Amp
13
Connecting the System
13
Connecting the Power Cord
14
When Connecting the External Video Component and the Display
15
When Using a Display Connected to Rear Video Output
15
When Connecting with a Rear View Camera
15
3 Basic Items for Service
16
Check Points after Servicing
16
Pcb Locations
17
Jigs List
18
Cleaning
18
4 Block Diagram
20
Overall Connection Diagram
20
Block Diagram
22
5 Diagnosis
30
Operational Flowchart
30
Inspection Method of Pickup Unit
31
LD Current Check
32
ASMAX Check
33
Error Rate Check
33
Diagnosis Flowchart
34
Standby OK?
35
Is VDD5 (VCC33, VCC12) Power Supply Voltage OK?
36
Power Supply Configuration
36
VDD5, VCC33, VCC12 Voltage Check Points
36
Reset OK?
37
RESET Check Point
37
Is VSENS OK?
38
Power Supply Configuration and VSENS
38
VSENS Check Point
38
27 Mhz Normal?
39
Clock Configuration
39
Clock Specification Value
39
Mhz Check Point
39
Is SDRAM I/F OK?
40
Sdram I/F
40
SDRAM I/F Check Point
42
Is VD8, VCC5 Power Supply Voltage OK?
43
Is AVCC5 Voltage OK?
44
Is DACCLK Normal?
45
27 Mhz, DACCLK Check Point
46
Is the Audio Circuit OK?
47
Audio Circuit
47
Serial 3 Lines Specification Value
47
Serial 3 Lines Check Points
48
Analog Audio out (LO, RO) Specification Value
49
Analog Audio out Check Point
49
Digital Audio Signal (IECOUT) Check Point
50
Is the Video Circuit OK?
51
Video Circuit
51
Waveform for the Case of Composite White 100% Output
51
VIDEO Signal Check Point
52
How to Judge Whether the Flash Memory Has Reached Its Life or Not
53
48 Mhz Normal?
54
48Mhz Check Point
55
Is USB Circuit OK?
56
USB Circuit
56
USB Circuit Communication Wave
56
Audio
58
Video
59
USB Memory
59
Ipod
60
Error Code List
61
External Storage Device (USB)
63
Connector Function Description
65
6 Service Mode
66
Monitor Test Mode
66
Version Check
66
Method for Mode in
66
Touch Panel Test
67
How to Activate the Touch Panel Test Mode
67
Menu Types in the Mode
67
Description of the Top Menu
67
Outermost Circumference Inspection
68
When the Value Is Within the Range
68
Display Specifications
68
16 Points Adjustment
69
Coordinate Inspection
70
Calibration Verification
71
Data Initialization
72
Calibration Inspection
72
User Calibration Inspection
72
EEPROM Adjust
73
EEPROM Initialize
73
Display Test
74
Rgb
74
Monochrome Stripe
74
Color Bar
74
Ramp & 10Step
75
Raster Signal
75
Contrast
75
Center Marker
75
DVD Test Mode
76
Image of the Test Mode
76
Image of the Front End Test Mode
76
EDC. Image of the Test Mode
78
Image of the LD Power on Time Mode
78
Simple Test Mode
79
7 Disassembly
80
Removing the Monitor Assy
80
Removing the LCD Assy
80
Removing the Monitor PCB
80
Removing the DVD Mechanism Module
81
Removing the Heat Sink and Holder
81
Removing the the Upper Chassis
81
Removing the Service Unit (Mother Assy)
82
How to Have It
83
Mecha Module_Bringing into the Clamp State with no Disc Loaded
84
CRG Mecha_Bringing into the Clamp State with no Disc Loaded
85
Removing the Module PCB
86
Removing/Installing the Relay PCB
86
Removing the PU Unit
87
Sending the PU to the Outer Periphery
87
8 Each Setting and Adjustment
88
DVD Adjustment
88
SKEW Adjustment
89
Test Mode
91
CRG Move Outer
92
Locations to Make SKEW Adjustment
93
Locations to Adhere the SKEW 1,2,3: BOND QUICK MENDER
93
Bond for Resonance 4:Three Bond 1530
94
Bond for Locking the Screw 5,6 : Three Bond 1401M
94
Precautions on Handling the PU
95
Mother Pcb Adjustment
96
Adjustment Point
96
Monitor Pcb Adjustment
98
Pcl Output Confirmation
100
9 Exploded Views and Parts List
102
Packing
102
Packing Section Parts List
103
Contrast Table
103
Exterior (1)
104
Exterior Section Parts List
105
Exterior (2)
106
Exterior (3)
108
DVD Mechanism Module
110
DVD Mechanism Module Section Parts List
111
10 Schematic Diagram
114
Mother Pcb (Analog Part)
114
Mother Pcb (System Part) (Guide Page)
116
Mother Pcb (Power Supply Part)
122
Mother Pcb (In/Out Part)
124
Interface Pcb
126
Keyboard Pcb
127
Monitor Pcb
127
DVD Core Unit (Guide Page)
128
Connect Pcb
134
Keyboard Pcb
136
Monitor Pcb (Guide Page)
138
Waveforms
144
DVD Core Unit
144
11 Pcb Connection Diagram
146
Mother Pcb
146
Interface Pcb
150
DVD Core Unit
152
Connect Pcb
154
Keyboard Pcb
156
Monitor Pcb
158
Touch Panel
159
12 Electrical Parts List
162
Advertisement
Pioneer AVH-P2300DVD Owner's Manual (88 pages)
DVD RDS AV Receier
Brand:
Pioneer
| Category:
Car Video System
| Size: 2.02 MB
Table of Contents
Table of Contents
2
Precautions IMPORTANT SAFEGUARDS
4
Precautions
4
Important Safeguards
4
To Ensure Safe Driving
4
To Avoid Battery Exhaustion
5
Before You Start
6
Information to User
6
For Canadian Model
6
The Safety of Your Ears Is in Your Hands
6
About this Unit
6
DVD Video Disc Region Numbers
7
About this Manual
7
Operating Environment
7
After-Sales Service for Pioneer Products
7
Visit Our Website
7
Resetting the Microprocessor
8
Demo Mode
8
Adjusting the Response Positions of the Touch Panels (Touch Panel Calibration)
8
Use and Care of the Remote Control
8
Using the Remote Control
9
What's What
10
Head Unit
10
Remote Control
11
Basic Operations
12
Operating the Scroll Bar and the Scrubber Bar
13
Activating the Touch Panel Keys
13
Common Operations for Menu Settings/Lists
14
Ejecting a Disc
14
Setting the Clock
14
Tuner Introduction of Tuner Operations
15
Tuner
15
Introduction of Tuner Operations
15
Introduction of Video Playback Operations
16
Playing Audio
19
Introduction of Sound Playback
19
Text Information
20
Playing Still Images
21
Introduction of Still Image Playback
21
Operations
22
Introduction of Still Image Playback as a Slideshow Operations
22
XM/SIRIUS Tuner
23
Introduction of XM/SIRIUS Tuner Operations
23
HD Radioä Tuner
25
Introduction of HD Radioä Tuner Operations
25
Operations
26
Introduction of Bluetooth Telephone Operations
26
Using Bluetooth Wireless Technology
27
Bluetooth Audio Operations
27
Setting up for Bluetooth Audio
28
Detailed Instructions
29
Storing and Recalling Stations
29
Storing the Strongest Stations
29
Tuning in to Strong Signals
29
Tuning in to Strong HD Radio Signals
29
Switching the Media File Type
30
Operating the DVD Menu
30
Operating this Unit's Ipod Function from Your Ipod
30
Random Play (Shuffle)
31
Playing All Songs in Random Order (Shuffle All)
31
Repeating Playback
31
Playing Videos from Your Ipod
31
Browsing for a Video/Music on the Ipod
32
Resume Playback (Bookmark)
33
Frame-By-Frame Playback
33
Slow Motion Playback
33
Searching for the Part You Want to Play
33
Changing Audio Language During Playback (Multi-Audio)
33
Changing the Subtitle Language During Playback (Multi-Subtitle)
34
Changing the Viewing Angle During Playback (Multi-Angle)
34
Return to the Specified Scene
34
Selecting Audio Output
34
PBC Playback
34
Selecting Tracks from the Track Title List
35
Selecting Files from the File Name List
35
Using Sound Retriever
35
Changing Audiobook Speed
35
Displaying Lists Related to the Currently Playing Song (Link Search)
35
Playing DIVXâ VOD Content
35
Capture an Image in JPEG Files
36
Changing the Wide Screen Mode
36
Switching the XM/SIRIUS Channel Selection Mode
37
Selecting an XM/SIRIUS Channel Directly
37
Using the Mymix Function
38
Using the Game Alert Function
40
Displaying the Radio ID
41
Switching the SIRIUS Display
41
Using the Instant Replay Function
41
Switching the Seek Mode
42
Switching the Reception Mode
42
Using the Missed, Received and Dialed Call Lists on the Optional Bluetooth Adapter
42
Setting Automatic Answering
42
Switching the Ring Tone
42
Using a Cellular Phone to Initiate a Connection
43
Registering a Connected Cellular Phone
43
Voice Recognition
43
Connecting a Bluetooth Audio Player
43
Connecting to a Bluetooth Device Automatically
43
Displaying Bluetooth Device Address
44
Menu Operations
45
Introduction of Menu Operations
45
Audio Adjustments
46
Boosting the Bass
47
Adjusting Loudness
47
Using the High Pass Filter
47
Using Subwoofer Output
47
Setting up the DVD Player
48
Setting the Aspect Ratio
49
Setting the Menu Language
49
Setting the Slide Show Interval
50
Setting Parental Lock
50
Setting the DIVX Subtitle File
51
Automatic Playback of Dvds
51
System Settings
52
Selecting the Menu Language
53
Setting the Rear View Camera
54
Setting the Video Signal
54
Entertainment Settings
55
Customizing Menus
56
Other Functions Changing the Picture Adjustment
57
Other Functions
57
Changing the Picture Adjustment
57
Adjusting the Response Positions of the Touch Panels (Touch Panel Calibration)
57
Using an AUX Source
58
Using an External Unit
58
Installation Connecting the Units
60
Installation
60
Connecting the Units
60
When Connecting to Separately Sold Power Amp
62
Connecting the System
63
Connecting the Power Cord
64
When Connecting the External Video Component and the Display
66
When Connecting with a Rear View Camera
67
Installation
68
Additional Information Troubleshooting
69
Additional Information
69
Troubleshooting
69
Error Messages
71
Understanding Messages
74
Indicator List
75
Handling Guidelines
76
Usb Storage Device
77
Compressed Audio Compatibility (Disc, USB)
78
DIVX Compatibility
79
Ipod Compatibility
80
Sequence of Audio Files
80
Using the Display Correctly
80
Handling the Display
81
Keeping the Display in Good Condition
81
Copyright and Trademark
82
Language Code Chart for DVD
84
Specifications
85
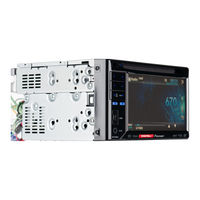
Pioneer AVH-P2300DVD Service Manual (172 pages)
DVD RDS AV receiver
Brand:
Pioneer
| Category:
Car Receiver
| Size: 23.37 MB
Table of Contents
Safety Information
2
Table of Contents
5
1 Service Precautions
6
Notes on Soldering
7
2 Specifications
8
Q Q
9
Disc/Content Format
11
Panel Facilities
11
Remote Control
12
Connection Diagram
13
3 Basic Items for Service
16
Check Points after Servicing
16
Pcb Locations
17
Jigs List
18
Cleaning
18
4 Block Diagram
20
Overall Connection Diagram
20
Block Diagram
22
5 Diagnosis
30
Operational Flowchart
30
Inspection Method of Pickup Unit
31
Diagnosis Flowchart
34
Error Code List
61
Connector Function Description
65
6 Service Mode
66
Monitor Test Mode
66
DVD Test Mode
76
7 Disassembly
80
8 Each Setting and Adjustment
88
DVD Adjustment
88
Mother Pcb Adjustment
96
Monitor Pcb Adjustment
98
Tel 13942296513
98
Pcl Output Confirmation
100
9 Exploded Views and Parts List
102
Packing
102
Exterior (1)
104
Exterior (2)
106
Exterior (3)
108
DVD Mechanism Module
110
10 Schematic Diagram
114
D 10. Schematic Diagram
114
Mother Pcb (Analog Part)
114
Mother Pcb (System Part) (Guide Page)
116
Mother Pcb (Power Supply Part)
122
Mother Pcb (In/Out Part)
124
Interface Pcb
126
DVD Core Unit (Guide Page)
128
Connect Pcb
134
Keyboard Pcb
136
Monitor Pcb (Guide Page)
138
Waveforms
144
11 Pcb Connection Diagram
146
Mother Pcb
146
Interface Pcb
150
DVD Core Unit
152
Connect Pcb
154
Keyboard Pcb
156
Monitor Pcb
158
Electrical Parts List
162
Ao y U163
172
Ao Co
172
Advertisement
Advertisement
Related Products
Pioneer AVH-P7600DVD
Pioneer AVHP5700DVD - In-Dash 6.5 Monitor DVD Player
Pioneer Super Tuner IIID AVH-P4000DVD
Pioneer Super Tuner IIID AVH-P5200BT
Pioneer Super Tuner IIID AVH-P6000DVD
Pioneer AVH-P7850DVD
Pioneer AVH-P7600D
Pioneer AVH-P4900D
Pioneer AVH-P5750DVD
Pioneer AVH-P4100
Pioneer Categories
Car Receiver
Receiver
Stereo Receiver
Amplifier
CD Player
More Pioneer Manuals
Login
Sign In
OR
Sign in with Facebook
Sign in with Google
Upload manual
Upload from disk
Upload from URL