Sign In
Upload
Manuals
Brands
Olivetti Manuals
Copier
d-Color MF45
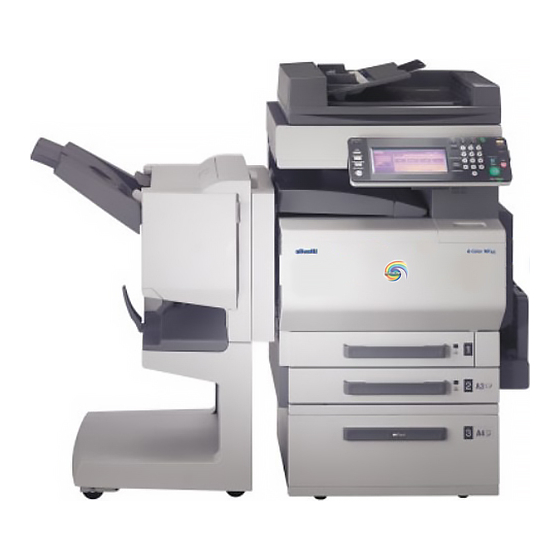
Olivetti d-Color MF45 Manuals
Manuals and User Guides for Olivetti d-Color MF45. We have
1
Olivetti d-Color MF45 manual available for free PDF download: Operation Manual
Olivetti d-Color MF45 Operation Manual (656 pages)
Brand:
Olivetti
| Category:
Copier
| Size: 21 MB
Table of Contents
Table of Contents
3
1 Introduction
17
Energy Star
19
What Is an ENERGY STAR® Product
19
Trademarks and Registered Trademarks
20
Openssl Statement
20
Available Features
23
Selecting the Print Color
23
Automatically Selecting the Paper
23
Adjusting Copies to the Size of the Paper
23
Specifying Separate Horizontal and Vertical Zoom Ratios
23
Scanning the Document in Separate Batches
23
Center Binding
24
Sorting Copies
24
Stapling Copies
24
Punching Holes in Copies
25
Copying Multiple Document Pages Onto a Single Page
25
Copying a Document Containing Various Page Sizes
25
Adjusting Copies According to the Image Quality of the Original
26
Inserting Paper between Copies of Overhead Projector Transparencies
26
Adding a Cover Page
26
Inserting Different Paper into Copies
27
Inserting Pages from a Different Document at Specified Locations in a Copy
27
Printing Double-Sided Copies with the Specified Page on the Front Side
28
Copying with Reversed Colors
28
Printing a Mirror Image
28
Copying with a Background Color
29
Improving the Copy Color Quality
29
Separately Copying a Page Spread
29
Creating Booklets from Copies of Pamphlets
29
Repeating Copy Images
30
Printing the Enlarged Image on Multiple Pages
30
Making Copies for Filing
30
Copying with the Page Layout of a Magazine
31
Erasing Sections of Copies
31
Adjusting the Image to Fit the Paper Size
31
Printing Distribution Text on Copies
32
Managing Jobs
32
Programming Copy Settings
32
Checking the Copy Settings
32
Enlarging the Size of Text in Touch Panel Screens
32
Displaying Explanations of Functions and Settings
32
Interrupting a Copy Job
33
Printing a Sample Copy
33
Adjust Color Parameters
34
General Information about Color
36
Relationship between Hue, Brightness and Saturation (Color Model)
37
Red" Parameter
38
Green" Parameter
39
Blue" Parameter
40
Color Balance" Parameter (CMYK Color Adjustment)
41
Brightness" Parameter
43
Contrast" Parameter
44
Saturation" Parameter
45
Sharpness" Parameter
46
Hue" Parameter
47
Copy Density" Parameter
48
Single Color" Function
49
Color" Function
50
Background Color" Function
51
Neg-/Pos. Reverse" Function
52
Monotone Copy
52
Full-Color Copy and "Background Color" Function
53
Mirror Image" Function
54
Explanation of Manual Conventions
55
Safety Advices
55
Sequence of Action
55
Tips
56
Special Text Markings
56
Descriptions and Symbols for Documents and Paper
57
Width" and "Length
57
Paper Orientation
57
User Manuals
58
User Manual [Copy Operations] <This Manual
58
User Manual [Network Scanner Operations]
58
User Manual [Box Operations]
58
User Manual [Enlarge Display Operations]
58
User Manual [Facsimile Operations]
58
User Manual [Print Operations]
58
Legal Restrictions on Copying
59
2 Installation and Operation Precautions
61
Safety Information
63
Warning and Precaution Symbols
63
Meaning of Symbols
64
Disassemble and Modification
64
Power Cord
65
Power Source
66
Power Plug
67
Grounding
67
Installation
68
Ventilation
69
Actions in Response to Troubles
69
Consumables
70
When Moving the Machine
71
Before Successive Holidays
71
Regulation Notices
72
CE Marking (Declaration of Conformity) for Users of the European Union (EU)
72
USER INSTRUCTIONS FCC PART 15 - RADIO FREQUENCY DEVICES (for U.S.A. Users)
72
INTERFERENCE-CAUSING EQUIPMENT STANDARD (ICES-003 ISSUE 4) (for Canada Users)
72
For Users in Countries Not Subject to Class B Regulations
73
LED Radiation Safety
73
Ozone Release
73
Acoustic Noise (for European Users Only)
74
For EU Member States Only
74
Caution Notations and Labels
75
Space Requirements
76
Operation Precautions
77
Power Source
77
Operating Environment
77
Storage of Copies
77
3 Before Making Copies
79
Part Names and Their Functions
81
Options
81
Outside of Machine
84
Inside of Machine
90
Finisher FS-603/Punch Kit PK-501
91
Finisher FS-507/Job Separator JS-601
93
Control Panel
96
Basic Settings Screen (Basic Screen)
99
Icons that Appear in the Screen
100
Adjusting the Angle of the Control Panel
101
To Adjust the Angle of the Control Panel
101
Turning on the Main Power and the Auxiliary Power
103
To Turn on the Machine
103
To Scan During Warm-Up
105
To Turn off the Machine
107
Automatically Canceling the Settings (Automatic Panel Reset)
109
Automatically Canceling the Mode Screen (Automatic System Reset)
110
Automatically Conserving Energy (Low Power Mode)
111
Automatically Conserving Energy (Sleep Mode)
112
Manually Conserving Energy
113
Automatically Turning the Machine On/Off (Weekly Timer)
114
Controlling each User's Use of this Machine (User Authentication)
116
Controlling each Account's Use of this Machine (Account Track)
121
Loading Paper into the 1St Drawer
124
To Load Paper (1St Drawer)
124
Loading Paper into the 2Nd, 3Rd or 4Th Drawer
129
To Load Paper (2Nd, 3Rd or 4Th Drawer)
129
Loading Paper into the LCT
132
To Load Paper (LCT)
132
Loading Paper into the Bypass Tray
135
To Load Paper (Bypass Tray)
135
4 Basic Copy Operations
143
General Copy Operation
145
To Make a Copy
145
Operations that Cannot be Combined
148
Operations Where the Setting Specified Last Is Given Priority
148
Operations Where the Setting Specified First Is Given Priority
150
Feeding the Document
151
To Load the Document into the ADF
151
To Place the Document on the Original Glass
153
Scanning the Document in Separate Batches ("Separate Scan" Setting)
155
Scanning a Multi-Page Document from the Original Glass
158
Specifying Original Settings
161
Copying Documents of Mixed Sizes ("Mixed Original" Setting)
161
Copying Thick Documents ("Thick Original" Setting)
163
Selecting the Document Orientation (Original Direction Settings)
165
To Specify an Original Direction Setting
167
Selecting the Position of the Binding Margin (Margin Settings)
169
To Specify a Margin Setting
171
To Change Scan Settings for each Document
173
Selecting a Color Setting
177
To Select a Color Setting
178
Selecting a Paper Setting
180
Automatically Selecting the Paper Size ("Auto Paper Select" Setting)
181
Manually Selecting the Desired Paper Size
182
Specifying a Zoom Setting
183
Automatically Selecting the Zoom Ratio ("Auto Zoom" Setting)
183
Specifying the same Zoom Ratio as the Document ("×1.0" Setting)
185
Slightly Reducing the Copy ("Minimal" Setting)
186
Selecting a Preset Zoom Ratio (Enlarge and Reduce Settings)
188
Typing in the Zoom Ratio (Zoom with Constant X and y Ratio Setting)
189
Typing in Separate X and y Zoom Ratios (Independent Zoom Settings)
191
Selecting a Stored Zoom Ratio
194
Storing the Desired Zoom Ratio
195
Selecting the Document and Copy Type Settings
197
(1-Side/2-Sides Settings)
197
To Select Single-Sided Copies
198
To Select Double-Sided Copies
200
Selecting the Quality of the Document
202
Loading Documents with Small Print or Photos (Orig. Image Type Settings)
202
To Specify an Original Type Setting
204
Specifying the Density Settings
207
Adjusting the Print Density (Density Settings)
208
Adjusting the Background Density (Background Removal Settings)
210
Printing with a Glossy Finish ("Glossy" Setting)
212
Adjusting the Reproduction Quality of Text
213
Selecting a Combine Originals Setting
215
Copying Multiple Document Pages Onto a Single Page (Combine Originals)
217
Selecting Finishing Settings
219
Separating Copies by Sets ("Sort" Setting)
222
Separating Copies by Pages ("Group" Setting)
224
Stapling Copies (Staple Settings)
226
To Bind Copies with Staples
228
Punching Holes in Copies (Punch Settings)
230
To Punch Holes in Copies
231
Specifying Center Binding
233
To Bind Copies at the Center ("Fold & Staple")
234
Scanning the Next Document to be Copied While a Copy Job Is Being Printed (Next Job Reservation)
236
To Reserve a Copy Job
236
Stopping Scanning/Printing
238
To Stop Scanning/Printing
238
Deleting a Stopped Job
239
To Delete a Stopped Job
239
5 Additional Copy Operations
241
Checking the Copy Settings (Mode Check)
243
To Check the Settings
243
To Change the Settings
245
Printing a Proof Copy to be Checked (Proof Copy)
246
To Make Test Prints
246
Interrupting a Copy Job (Interrupt Mode)
249
To Interrupt a Copy Job
249
Registering Copy Programs (Mode Memory)
251
To Store a Copy Program
251
To Delete a Copy Program
254
Copying with Programmed Copy Settings (Mode Memory)
255
To Recall a Stored Job
255
Displaying Function Descriptions (Help)
258
Overview of Help Screens
258
To Display the Main Help Menu Screen
262
To Display the Help Screen While Specifying a Setting
264
Specifying Control Panel Settings (Accessibility Mode)
265
Displaying the Accessibility Setting Screen
265
To Set the "Key Repeat Start/Interval Time" Function
265
To Set the "Enlarge Display Timer Setting" Function
268
To Set the "Message Display Time" Function
270
To Set the "Sound Setting" Function
272
To Set the "Touch Panel Adj." Function
275
To Set the "Auto Reset Notification" Function
277
To Set the "Enlarge Display Confirmation Screen" Function
280
6 Troubleshooting
283
When the Message "Malfunction Detected." Appears (Call Technical Representative)
285
To Call the Technical Representative
287
When the Message "Misfeed Detected." Appears
289
Location of Paper Misfeed
289
Paper Misfeed Indications
291
To Clear a Paper Misfeed in the Bypass Tray
292
To Clear a Paper Misfeed in the Automatic Duplex Unit
294
To Clear a Paper Misfeed in the 1St or 2Nd Drawer
295
To Clear a Paper Misfeed in a Paper Drawer (3Rd or 4Th Drawer)
296
To Clear a Paper Misfeed in the LCT
297
To Clear a Paper Misfeed in the Right-Side Door
298
To Clear a Paper Misfeed in the Fusing Unit
301
To Clear a Banner Paper Misfeed
304
To Clear a Paper Misfeed in the ADF
308
To Clear a Paper Misfeed in Finisher FS-507
312
To Clear a Paper Misfeed in Finisher FS-603
316
When the Message "Replenish Paper." Appears
320
To Replenish Paper
320
When the Message
321
Memory Becomes Full While Scanning
321
Memory Becomes Full While Queuing a Job
322
When "Please Replace Following Unit(S)." Appears
323
When the Message "Please Replace XXXX." Appears
325
Simple Troubleshooting
327
Main Unit
327
Adf
329
Finisher
330
Main Messages and Their Remedies
331
7 Specifications
333
Specifications
333
Automatic Duplex Unit
337
Adf
337
Option Specifications
338
Paper Feed Cabinet Pc
338
Finisher FS-603
340
Punch Kit Pk
341
Finisher FS-507
342
Job Separator Js
343
8 Copy Paper/Original Documents
345
Copy Paper
347
Possible Paper Sizes
347
Paper Types and Paper Capacities
348
Special Paper
350
Precautions for Paper
351
Paper Storage
351
Automatic Paper-Drawer-Switching Feature
352
Order for Selecting the Paper Drawers
352
Selecting the Paper Settings
353
To Automatically Detect the Paper Size ("Auto Paper Select" Setting)
353
To Specify a Paper Size (Set Size Settings)
355
To Specify a Non-Standard Paper Size (Custom Size Settings)
357
To Store a Non-Standard Paper Size (Custom Size Settings)
360
To Specify a Setting for Oversized Paper (Oversized Paper Settings)
363
To Specify a Setting for Special Paper
366
Original Documents
368
Documents that Can be Loaded into the ADF
368
Precautions for Loading Documents into the ADF
370
Documents that Can be Placed on the Original Glass
370
Precautions for Positioning Documents on the Original Glass
371
9 Application Functions
373
Inserting Paper between Overhead Projector Transparencies ("OHP Interleave" Function)
375
To Copy Using the "OHP Interleave" Function
376
Adding Cover Pages ("Cover Mode" Function)
379
To Copy Using the "Cover Mode" Function
380
Inserting Different Paper into Copies ("Insert Sheet" Function)
383
To Copy Using the "Insert Sheet" Function
385
Inserting Copies of a Different Document for a Specified Page ("Insert Image" Function)
389
To Copy Using the "Insert Image" Function
390
Specifying Pages to be Printed on the Front Side ("Chapters" Function)
394
To Copy Using the "Chapters" Function
395
Producing Separate Copies of each Page in a
398
("Book Copy" Function)
398
To Copy Using the "Book Copy" Function
399
Copying Pamphlets ("Booklet Original" Function)
404
To Copy Using the "Booklet Original" Function
405
Tiling Copy Images ("Image Repeat" Function)
408
To Copy Using the "Image Repeat" Function
409
Copying an Enlarged Image on Multiple Pages ("Poster Mode" Function)
413
To Copy Using the "Poster Mode" Function
413
Copying with the Page Layout of a Magazine ("Booklet" Function)
418
To Copy Using the "Booklet" Function
419
Copying with Image Colors Inversed ("Neg-/Pos. Reverse" Function)
421
To Copy Using the "Neg-/Pos. Reverse" Function
421
Copying in a Mirror Image ("Mirror Image" Function)
423
To Copy Using the "Mirror Image" Function
423
Adding a Background Color to Copies ("Background Color" Function)
427
To Copy Using the "Background Color" Function
427
Adjusting the Copy Color Quality (Adjust Color Parameters)
430
To Adjust the Adjust Color Parameters
431
Checking the Print Result of the Adjust Color Settings (Sample Copy)
434
To Make Sample Copies
435
Adding Filing Margins to Copies ("Page Margin" Function)
436
To Copy Using the "Page Margin" Function
437
Erasing Specified Areas of Copies ("Erase" Function)
439
To Copy Using the "Erase" Function
439
Adjusting the Image to Fit the Paper (Image Adjustment Settings)
441
To Copy Using the Image Adjustment Settings
442
Printing the Date/Time, Page Number or Distribution Number on Copies (Stamp Functions)
445
Printing the Date/Time ("Date/Time" Function)
446
To Copy Using the "Date/Time" Function
446
Printing the Page Number ("Page #" Function)
449
To Copy Using the "Page #" Function
449
Printing the Distribution Number ("Set Numbering" Function)
453
To Copy Using the "Set Numbering" Function
453
10 Replacing Toner Cartridges and Staples and Emptying Waste Containers
455
Replacing the Toner Cartridge
457
To Replace the Toner Cartridge
460
Replacing the Staples
464
Clearing a Staple Jam
473
Emptying the Waste Containers
483
To Empty the Hole-Punch Waste Container in Finisher
486
To Empty the Hole-Punch Waste Container for Finisher
488
11 Care of the Machine
489
Cleaning
491
Housing
491
Original Glass
491
Control Panel
492
Document Transfer Belt
493
Paper Take-Up Roller
494
Electrostatic Charger Wire
495
Viewing Counters (Meter Count)
496
Viewing Counters
496
To View the Counters
496
Viewing the Coverage Rate
498
To View the Coverage Rate
498
When the Message "Preventive Maintenance Time." Appears
499
12 Managing Jobs (Job List)
501
Overview of the Job List Screen
503
Jobs
503
Multi-Job Feature
503
Job List Screens
504
Performing Operations on Jobs
507
To Delete a Job
507
To Check the Job Settings
509
Displayed Information
510
To Check the Job Details
511
To Display Current Jobs (Held Jobs and Active Jobs Lists)
512
To Display Job History
513
To Print a Sample Copy of a Stored Job
514
To Print a Stored Job
516
To Increase Priority for Printing
518
13 Utility
521
Overview of Utility Mode Parameters
523
List of Registration Information and Parameters
523
Selecting a Destination Register
542
Scan
542
User Box
543
Displaying the Destination Register Screen
544
Specifying User Settings
546
System Setting
546
Display Setting
548
Copy Screen
549
Initial Setting
550
Copier Setting
551
Scanner Setting
553
Printer Setting
553
Displaying the Utility Setting Screen
554
Specifying Administrator Settings
556
System Setting
556
Restrict User Access
558
Administrator/Machine Setting
565
One-Touch Registration
565
User Authentication/Account Track
566
Counter List
568
Network Setting
568
Copier Setting
569
Printer Setting
569
Fax Setting
570
System Connection
570
Security Setting
571
Security Details
572
Enhanced Security Mode
574
Hdd Setting
574
Displaying the Administrator Setting Screen
575
Overview of Weekly Timer Settings
577
Adjusting the Printer
578
Adjusting the Starting Print Position at the Leading Edge Position
578
Adjusting the Starting Print Position at the Left Edge
580
Adjusting the Starting Print Position for the Second Side
582
Adjusting the Finisher
584
Adjusting the Center Stapling Position
584
Adjusting the Center Folding Position
587
Adjusting the Color Registration
590
Adjusting the Color Registration for Black
590
Adjusting the Color Registration for Yellow, Magenta and Cyan
593
Adjusting the Gradation Levels
597
Requisite
597
13.10 Authentication Method
600
User Authentication and Account Track
600
When User Authentication and Account Track Are Synchronized
601
When User Authentication and Account Track Are Used Separately
602
To Select an Authentication Method
603
13.11 User Authentication Setting
608
Administrative Setting-User Name List
608
Default Function Permission
610
To Specify the Default Function Permissions
610
Authenticating Public Users
612
User Registration
613
User Counter
619
To Check the Counter
621
13.12 Account Track Setting
622
Account Track Registration
622
Account Track Counter
627
To Check the Counter
629
13.13 Password Rules
630
Conditions of the Password Rules
630
13.14 Enhanced Security Settings
632
13.15 Viewing the Status of the Consumables
636
Displaying the Unit Life Indicator Screen
637
14 Appendix
639
Entering Text
641
To Type Text
643
List of Available Characters
643
Glossary
644
Index
649
Advertisement
Advertisement
Related Products
olivetti d-Color MF25
Olivetti d-Color MF364
Olivetti d-Color MF2613 Plus
Olivetti d-Color MF2614En
Olivetti d-Color MF369
Olivetti d-Color MF259
Olivetti d-Color MF2552 plus
Olivetti d-color MF3003
Olivetti Color MFP 30/30 ppm
Olivetti Color MFP 36/36 ppm
Olivetti Categories
All in One Printer
Printer
Cash Register
Copier
Fax Machine
More Olivetti Manuals
Login
Sign In
OR
Sign in with Facebook
Sign in with Google
Upload manual
Upload from disk
Upload from URL