Table of Contents
Advertisement
Quick Links
See also:
Quick Manual
Advertisement
Table of Contents

Related Manuals for Acer Aspire 5335 Series


Summary of Contents for Acer Aspire 5335 Series
- Page 1 Aspire 5735/5735Z/5335 Series Service Guide Service guide files and updates are available on the ACER/CSD web; for more information, please refer to http://csd.acer.com.tw PRINTED IN TAIWAN...
-
Page 2: Revision History
Revision History Please refer to the table below for the updates made on Aspire 5735/5735Z/5335 Series service guide. Date Chapter Updates... - Page 3 Copyright Copyright © 2008 by Acer Incorporated. All rights reserved. No part of this publication may be reproduced, transmitted, transcribed, stored in a retrieval system, or translated into any language or computer language, in any form or by any means, electronic, mechanical, magnetic, optical, chemical, manual or otherwise, without the prior written permission of Acer Incorporated.
- Page 4 Conventions The following conventions are used in this manual: SCREEN MESSAGES NOTE WARNING CAUTION IMPORTANT Denotes actual messages that appear on screen. Gives bits and pieces of additional information related to the current topic. Alerts you to any damage that might result from doing or not doing specific actions.
- Page 5 Preface Before using this information and the product it supports, please read the following general information. This Service Guide provides you with all technical information relating to the BASIC CONFIGURATION decided for Acer's "global" product offering. To better fit local market requirements and enhance product competitiveness, your regional office MAY have decided to extend the functionality of a machine (e.g.
-
Page 7: Table Of Contents
System Specifications Features ............1 System Block Diagram . - Page 8 Aspire 5735/5735Z/5335 Series ........
- Page 9 Online Support Information Index Table of Contents...
- Page 10 Table of Contents...
-
Page 11: System Specifications
Up to 2 GB of DDR2 667 MHz memory, upgradeable to 4 GB using two soDIMM modules* • Display and graphics 15.6" HD 1366 x 768 • ® Mobile Intel GL40/GM45 Express Chipset (GM45 for Aspire 5735/5735Z/5335)* • Storage subsystem 2.5" hard disk drives • Optical drive options: •... - Page 12 High-definition audio support • MS-Sound compatible • Built-in microphone • Communication Integrated Acer Crystal Eye webcam* • WLAN: • ™ ™ Acer InviLink Nplify • ™ Acer InviLink 802.11b/g* • ® WPAN: Bluetooth 2.0+Enhanced Data Rate (EDR)* • LAN: Gigabit Ethernet; Wake-on-LAN ready •...
-
Page 13: System Block Diagram
System Block Diagram Cathedral Peak II Block Diagram CLK GEN. ICS 9LPRS365BKLFT (71.09365.A03) RTM 875N-606-LFT (71.00875.C03) DDR2 DIMM1 667/800MHz 667/800 MHz DDR2 DIMM2 667/800MHz 667/800 MHz INT.MIC Codec AZALIA ALC268 MIC In OP AMP APA2057 INT.SPKR Line Out (NO SPDIF) MODEM RJ11 MDC Card... -
Page 14: Your Acer Notebook Tour
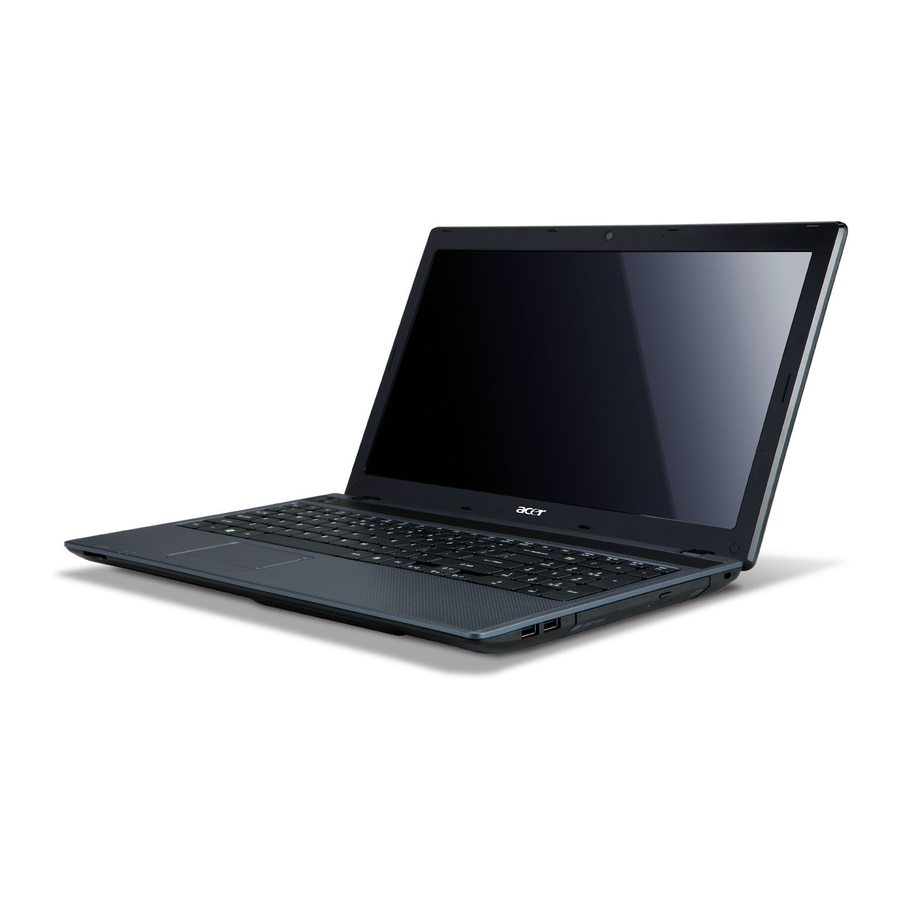
Your Acer Notebook tour After knowing your computer features, let us show you around your new computer. Front View Icon Acer Crystal Eye webcam Display screen Power button Empowering key Keyboard Touchpad 7/14 Status indicators Item Web camera for video communication (only for certain models). Also called Liquid-Crystal Display (LCD), displays computer output. -
Page 15: Closed Front View
Icon Click buttons (left and right) Palmrest Speakers Microphone Easy-launch buttons VOL+/ Volume up/Volume VOL- down Closed Front View Icon Chapter 1 Item The left and right buttons function like the left and right mouse buttons. Comfortable support area for your hands when you use the computer. -
Page 16: Right View
Left View Icon External display (VGA) port Ethernet (RJ-45) port USB 2.0 ports Microphone-in jack Headphones/ speaker/line-out jack with S/PDIF support 5-in-1 card reader ExpressCard/54 slot Right View Icon Item Connects to a display device (e.g., external monitor, LCD projector). Connects to an Ethernet 10/100/1000-based network. -
Page 17: Rear View
Icon Rear View Icon Chapter 1 Item Emergency eject hole Ejects the optical drive tray when the computer is turned off. Note: Insert a paper clip to the emergency eject hole to eject the optical drive tray when the computer is off. Modem (RJ-11) port Connects to a phone line. -
Page 18: Bottom View
Bottom View Icon Battery bay Battery release latch Battery lock Memory compartment Hard disk bay Ventilation slots and cooling fan Item Description Houses the computer's battery pack. Releases the battery for removal. Locks the battery in position. Houses the computer's main memory. Houses the computer's hard disk (secured with screws). -
Page 19: Indicators
Indicators The computer has several easy-to-read status indicators. The front panel indicators are visible even when the computer cover is closed. Icon Function Num Lock Caps Lock Power Battery NOTE: 1. Charging: The light shows amber when the battery is charging. 2. Fully charged: The light shows green when in AC mode. -
Page 20: Touchpad Basics (With Two-Click Buttons)
Touchpad basics (with two-click buttons) The following items show you how to use the touchpad with two-click buttons. Move your finger across the touchpad (1) to move the cursor. • Press the left (2) and right (3) buttons located beneath the touchpad to perform selection and execution •... -
Page 21: Using The Keyboard
Using the Keyboard The keyboard has full-sized keys and an embedded numeric keypad, separate cursor, lock, Windows, function and special keys. Lock Keys and embedded numeric keypad The keyboard has three lock keys which you can toggle on and off. Lock key Caps Lock When Caps Lock is on, all alphabetic characters typed are... -
Page 22: Windows Keys
Windows Keys The keyboard has two keys that perform Windows-specific functions. Windows Pressed alone, this key has the same effect as clicking on the Windows Start button; it launches the Start menu. It can also be used with other keys to provide a variety of functions: <... -
Page 23: Hot Keys
Hot Keys The computer employs hotkeys or key combinations to access most of the computer’s controls like screen brightness, volume output and the BIOS utility. To activate hot keys, press and hold the <Fn> key before pressing the other key in the hotkey combination. Hotkey Icon <Fn>... -
Page 24: Special Key (Only For Certain Models)
Special Key (only for certain models) You can locate the Euro symbol and the US dollar sign at the upper-center and/or bottom-right of your keyboard. The Euro symbol Open a text editor or word processor. Either press < > at the bottom-right of the keyboard, or hold <Alt Gr> and then press the <5> key at the upper-center of the keyboard. -
Page 25: Acer Empowering Technology
Acer Empowering Technology The Empowering Technology toolbar makes it easy for you to access frequently used functions and manage your new Acer system. Activated by pressing the Empowering Key, it provides access to the following utilities: NOTE: The following content is for general reference only. Actual product specifications may vary. Acer eAudio Management allows you to easily control the enhanced sound effects of Dolby Home •... -
Page 26: Empowering Technology Password
Empowering Technology password You must set the Empowering Technology password to use the password protection feature of Acer eRecovery Management to protect your data. To set the Empowering Technology password: Launch Acer eRecovery Management. Click the Restore tab. Click Password settings. The Empowering Technology Password Center dialogue box pops up. Click Create a new password. -
Page 27: Acer Eaudio Management (Only For Certain Models)
Acer eAudio Management Acer eAudio Management allows you to easily control the enhanced sound effects of Dolby Home Theater on your system. Select Movie or Game mode to experience the awesome realism of 5.1-channel audio output from the speakers fitted to your system via Dolby Surround sound technology. Music mode lets you enjoy your favorite tunes, in vivid detail. -
Page 28: Acer Epower Management
Acer ePower Management Acer ePower Management features a straightforward user interface for configuring your power management options. To access this utility, select Acer ePower Management from the Empowering Technology toolbar, run the program from the Acer Empowering Technology program group in Start menu, or right-click the Windows power icon in the system tray and select Acer ePower Management. -
Page 29: Acer Edatasecurity Management (Only For Certain Models)
Battery status The quick menu shows the remaining battery life based on current usage. You can also launch the Acer ePower Management application and refer to the Battery status panel located just below the power plans. Click the Battery tab to view remaining battery life, battery status, and remaining battery life in standby and hibernate modes. -
Page 30: Acer Erecovery Management
If you set a different password to encrypt a file, but you forgot the encryption password, you can use the Master Password to decrypt the file. NOTE: The password used to encrypt a file is the unique key that the system needs to decrypt it. If you lose the password, the Master Password is the only other key capable of decrypting the file. - Page 31 Back up factory default to CD/DVD • Back up drivers and applications to CD/DVD • Create user backup • Manage user backups • Restore: • Restore system to factory default • Reinstall applications/drivers • Restore system from user backup • Password settings •...
-
Page 32: Acer Esettings Management
Acer eSettings Management Acer eSettings Management allows you to inspect hardware specifications, set BIOS passwords and modify boot options. Acer eSettings Management also: Provides a simple graphical user interface for navigation. • Prints and saves hardware specifications. • Lets you set an asset tag for your system. •... -
Page 33: Windows Mobility Center
Windows Mobility Center The Windows Mobility Center collects key mobile-related system settings in one easy-to-find place, so you can quickly configure your Acer system to fit the situation as you change locations, networks or activities. Settings include display brightness, volume, power plan, wireless networking on/off, external display settings, synchronization status and presentation settings. -
Page 34: Using The System Utilities
Using the System Utilities Acer GridVista (dual-display compatible) NOTE: This feature is only available on certain models. To enable the dual monitor feature of the notebook, first ensure that the second monitor is connected, then select Start, Control Panel, Display and click on Settings. Select the secondary monitor (2) icon in the display box and then click the check box Extend my windows desktop onto this monitor. - Page 35 NOTE: Please ensure that the resolution setting of the second monitor is set to the manufacturer's recommended value. Chapter 1...
-
Page 36: Hardware Specifications And Configurations
T3200 (2.0G)/T3400 for Aspire 5735Z ® ® Intel Celeron M 575 (2.0G)/585 (2.16G)/T1600 (1.66G) for Aspire 5335 Intel® Core™2 Duo Mobile Processor P8400 (2.26G), P8600 (2.4 G), P9500 (2.53G), T9400 (2.53G), T9600 (2.8G) Mobile Intel® 945 Express Chipset Socket P 1.0375V to 1.3V Acoustic Level (dBA) °... - Page 37 Memory Combinations Slot 1 512MB 512MB 512MB 1024MB 1024MB 1024MB 1024MB 2048MB 2048MB 2048MB 2048MB NOTE: Above table lists some system memory configurations. You may combine DIMMs with various capacities to form other combinations. On above table, the configuration of slot 1 and slot 2 could be reversed.
- Page 38 Wireless Module 802.11b/g Item Protocol Interface Hard Disk Drive Interface Item Vendor & HGST Model Name HTS542512K9SA00 BRONCO-B LF SEAGATE ST9120817AS LF TOSHIBA MK1246GSX LF WD1200BEVS- 22UST0 ML125 LF Capacity 120000 (MB) Bytes per sector Data heads Drive Format Disks Spindle 5400 RPM speed...
- Page 39 Optical Disc Drive Item Transfer rate (KB/sec) Buffer Memory Interface Applicable disc format Loading mechanism Power Requirement Input Voltage Audio Interface Item Audio Controller Audio onboard or optional Mono or Stereo Resolution Compatibility Sampling rate Internal microphone Chapter 1 Specification Sustained: Max 3.6Mbytes/sec SATA...
- Page 40 Audio Interface Item Internal speaker / Quantity Video Memory Item Chipset Memory size Item Chipset USB Compliancy Level OHCI Number of USB port Location Serial port function control System Board Major Chips Item Core logic USB 2.0 Super I/O controller MODEM Bluetooth Wireless 802.11 b+g...
- Page 41 Battery Item Battery Type Pack capacity Number of battery cell Package configuration LCD 15.4” inch Item Vendor & model name Screen Diagonal (mm) Display resolution (pixels) Pixel Pitch Pixel Arrangement Display Mode Typical White Luminance (NIT) also called Brightness Luminance Uniformity Contrast Ratio Response Time msec Nominal Input Voltage VDD...
- Page 42 System Power Management ACPI mode Suspend to RAM (S3) Save to Disk (S4) Power Management CPU set power down VGA Suspend PCMCIA Suspend Audio Power Down Hard Disk Power Down CD-ROM Power Down Super I/O Low Power mode Also called Hibernation Mode. System saves all system states and data onto the disc prior to power off the whole system.
-
Page 43: System Utilities
System Utilities BIOS Setup Utility The BIOS Setup Utility is a hardware configuration program built into your computer’s BIOS (Basic Input/ Output System). Your computer is already properly configured and optimized, and you do not need to run this utility. However, if you encounter configuration problems, you may need to run Setup. -
Page 44: Navigating The Bios Utility
Navigating the BIOS Utility There are five menu options: Information, Main, Security, Boot, and Exit. Follow these instructions: To choose a menu, use the left and right arrow keys. To choose an item, use the up and down arrow keys. To change the value of a parameter, press F5 or F6. -
Page 45: Information
Information The Information screen displays a summary of your computer hardware information. I n f o r m a t i o n M a i n C P U Ty p e : C P U S p e e d : I D E 0 M o d e l N a m e : I D E 0 S e r i a l N u m b e r : ATA P I M o d e l N a m e :... -
Page 46: Main
Main The Main screen allows the user to set the system time and date as well as enable and disable boot option and recovery. I n f o r m a t i o n M a i n S y s t e m Ti m e : S y s t e m D a t e : S y s t e m M e m o r y : E x t e n d e d M e m o r y :... - Page 47 The table below describes the parameters in this screen. Settings in boldface are the default and suggested parameter settings. Parameter System Time Sets the system time. The hours are displayed with 24-hour format. System Date Sets the system date. System Memory This field reports the memory size of the system.
-
Page 48: Security
Security The Security screen contains parameters that help safeguard and protect your computer from unauthorized use. I n f o r m a t i o n M a i n S u p e r v i s o r P a s s w o r d s : U s e r P a s s w o r d s : H D D P a s s w o r d i s S e t S u p e r v i s o r P a s s w o r d... -
Page 49: Setting A Password
The table below describes the parameters in this screen. Settings in boldface are the default and suggested parameter settings. Parameter Supervisor Password Is User Password Is HDD Password Is Set Supervisor Password Set User Password Set HDD Password Password on Boot NOTE: When you are prompted to enter a password, you have three tries before the system halts. -
Page 50: Removing A Password
Removing a Password Follow these steps: Use the w and y keys to highlight the Set Supervisor Password parameter and press the e key. The Set Password box appears: Type the current password in the Enter Current Password field and press e. Press e twice without typing anything in the Enter New Password and Confirm New Password fields. - Page 51 If the current password entered does not match the actual current password, the screen will show you the Setup Warning. If the new password and confirm new password strings do not match, the screen will display the following message. Chapter 2...
-
Page 52: Boot
Boot This menu allows the user to decide the order of boot devices to load the operating system. Bootable devices includes the diskette drive in module bay, the onboard hard disk drive and the CD-ROM in module bay. I n f o r m a t i o n M a i n B o o t p r i o r i t y o r d e r : 1 : I D E H D D : X X X X X X X X X X X - ( X X ) -
Page 53: Exit
Exit The Exit screen contains parameters that confirmed or discard the changes made to the parameters in the BIOS Setup Utility. I n f o r m a t i o n M a i n E x i t S a v i n g C h a n g e s E x i t D i s c a r d i n g C h a n g e s L o a d S e t u p D e f a u l t s D i s c a r d C h a n g e s... -
Page 54: Bios Flash Utility
BIOS Flash Utility The BIOS flash memory update is required for the following conditions: New versions of system programs New features or options Restore a BIOS when it becomes corrupted. Use the Flash utility to update the system BIOS flash ROM. NOTE: If you do not have a crisis recovery diskette at hand, then you should create a Crisis Recovery Diskette before you use the Flash utility. -
Page 55: Remove Hdd/Bios Utility
Remove HDD/BIOS Utility This section provide you with removing HDD/BIOS method: Remove HDD Password: If you key in wrong HDD password for three time, “HDD password error code” would display on the screen. See the image below. If you need to solve HDD password locked problem, you can run HDD_PW.EXE Key in “hdd_pw 15494 0”... - Page 56 Chapter 2...
-
Page 57: Machine Disassembly And Replacement
Machine Disassembly and Replacement This chapter contains step-by-step procedures on how to disassemble the notebook computer for maintenance and troubleshooting. Disassembly Requirements To disassemble the computer, you need the following tools: Wrist grounding strap and conductive mat for preventing electrostatic discharge •... -
Page 58: General Information
General Information Pre-disassembly Instructions Before proceeding with the disassembly procedure, make sure that you do the following: Turn off the power to the system and all peripherals. Unplug the AC adapter and all power and signal cables from the system. Place the system on a flat, stable surface. -
Page 59: External Module Disassembly Process
External Module Disassembly Process External Modules Disassembly Flowchart The flowchart below gives you a graphic representation on the entire disassembly sequence and instructs you on the components that need to be removed during servicing. For example, if you want to remove the main board, you must first remove the keyboard, then disassemble the inside assembly frame in that order. -
Page 60: Removing The Battery Pack
Removing the Battery Pack Turn base unit over. Slide the battery lock/unlock latch to the unlock position. Slide the battery release latch to the release position to pop out the battery pack, then remove the battery pack from the main unit. Chapter 3... -
Page 61: Removing The Sd Dummy Card
Removing the SD dummy card Push the SD dummy card all the way in to eject it. Pull it out from the slot. Removing the ExpressCard dummy card Push the ExpressCard dummy card all the way in to eject it. Chapter 3... -
Page 62: Removing The Lower Cover
Pull it out from the slot. Removing the Lower Cover See “Removing the Battery Pack” on page 50. Remove the four captive screws and the six screws (A) on the lower cover. Step Size (Quantity) M2.5 x L8 (6) Color Black 3.0 kgf-cm Torque... -
Page 63: Removing The Dimm
Use a plastic screw driver to carefully pry open the lower cover. Remove the lower cover from the lower case. Removing the DIMM See “Removing the Battery Pack” on page 50. See “Removing the Lower Cover” on page 52.. Push out the latches on both sides of the DIMM socket to release the DIMM. Chapter 3... -
Page 64: Removing The Wlan Board Modules
Remove the DIMM module. Removing the WLAN Board Modules See “Removing the Battery Pack” on page 50. See “Removing the Lower Cover” on page 52. Remove the white antenna cable that is taped to the WLAN board module. Chapter 3... - Page 65 Disconnect the antenna cables from the WLAN board. NOTE: There are 2 antenna cables connected to the WLAN board module. The Black antenna cable is connected to the MAIN connector and the Gray antenna cable is connected to the AUX connector. Move the antenna away from the WLAN board and remove the one screw (H) on the WLAN board to release the WLAN board.
-
Page 66: Removing The Hard Disk Drive Module
Detach the WLAN board from the WLAN socket. NOTE: When attaching the antenna back to the WLAN board, make sure the cable are arranged properly. Removing the Hard Disk Drive Module See “Removing the Battery Pack” on page 50. See “Removing the Lower Cover” on page 52. Remove the one screw (C) securing the hard disk drive module. - Page 67 Slide the hard disk drive module away from the connector. Lift the hard disk drive module and remove it from the hard disk drive bay. NOTE: To prevent damage to device, avoid pressing down on it or placing heavy objects on top of it. Remove the two adhesive tape covering the two screws.
-
Page 68: Removing The Optical Drive Module
Remove the two screws (D) securing the hard disk to the bracket and remove the hard disk from the bracket. Step Size (Quantity) M3 x L4 (2) Removing the Optical Drive Module See “Removing the Battery Pack” on page 50. See “Removing the Lower Cover”... - Page 69 Use a pin and push it inside the emergency eject hole to eject the odd drive tray. Carefully pull out the odd drive tray until the part of the module is visible and then slowly push back to close the tray into the module with the module still partially exposed. Slowly pull out the odd module from the odd drive bay.
- Page 70 Remove the two screws (C) securing the locker bracket and remove the locker bracket from the optical disk drive module. Step Size (Quantity) Color Torque M2 x L3 (2) Silver 1.6 kgf-cm Chapter 3...
-
Page 71: Main Unit Disassembly Process
Main Unit Disassembly Process Main Unit Disassembly Flowchart MAIN UNIT MIDDLE COVER KEYBOARD Ax2, Ex2 LCD MODULE A x 11, G x 4 UPPER CASE C x 1 MODEM CARD BLUETOOTH MAIN MODULE BOARD Screw List Item Screw M2 x L8 M2 x L3 M2.5 x L10 M2 x L4... -
Page 72: Removing The Middle Cover
Removing the Middle Cover See “Removing the Battery Pack” on page 50. Use a plastic screw driver to pry loose the side of the middle cover. Carefully pry loose the middle cover from the latches securing it and remove the middle cover. Chapter 3... -
Page 73: Removing The Keyboard
Removing the Keyboard See “Removing the Battery Pack” on page 50. See “Removing the Middle Cover” on page 62. Push down on the lock and release the latches securing the keyboard to the upper case. Carefully pry loose the keyboard and turn it over on the touchpad area. Chapter 3... -
Page 74: Removing The Heatsink Fan Module
Disconnect the keyboard cable from the main board to remove the keyboard. Removing the Heatsink Fan Module See “Removing the Battery Pack” on page 50. See “Removing the Lower Cover” on page 52. Disconnect the heatsink fan connector from the main board. Chapter 3... -
Page 75: Removing The Cpu Heatsink Module
Remove the one screw (C) securing the heatsink fan module in place. Step Size (Quantity) M2 x L3 (1) Carefully lift up the heatsink fan module. Removing the CPU Heatsink Module See “Removing the Battery Pack” on page 50. See “Removing the Lower Cover” on page 52. See “Removing the Heatsink Fan Module”... -
Page 76: Removing The Cpu
Remove the four screws securing the CPU heatsink module. Carefully remove the heatsink module from the system. Removing the CPU See “Removing the Battery Pack” on page 50. See “Removing the Lower Cover” on page 52. See “Removing the Heatsink Fan Module” on page 64. See “Removing the CPU Heatsink Module”... -
Page 77: Removing The Lcd Module
Lift up carefully to remove the CPU. NOTE: When installing the CPU, make sure to install the CPU with PIN 1 at the corner as shown. Removing the LCD Module See “Removing the Battery Pack” on page 50. See “Removing the SD dummy card” on page 51. See “Removing the ExpressCard dummy card”... - Page 78 Turn over the system and remove the two screws (A) from the bottom of the left and right hinges. Step Size (Quantity) Color Torque M2.5 x L8 (2) Black 3.0 kgf-cm 10. Disconnect the LCD cable connector from the main board. Chapter 3...
- Page 79 11. Carefully pull out the wireless antenna cables from the hole and release the cables from the latches. 12. Remove the two screws (E) from the left and right hinge of the LCD module. Step Size (Quantity) Color Torque M2.5 x L10 (2) Silver 3.0 kgf-cm Chapter 3...
-
Page 80: Separating The Upper Case From The Lower Case
13. Carefully remove the LCD module from the base unit. NOTE: When connecting the cable back to the unit, please note that the cable should be routed well. Separating the Upper Case from the Lower Case See “Removing the Battery Pack” on page 50. See “Removing the SD dummy card”... - Page 81 15. Disconnect the touchpad cable from the TPAD1 connector on the main board. 16. Disconnect the LED cable from LEDCN1 on the main board. Chapter 3...
- Page 82 17. Disconnect the speaker cable from the INTSPK1 connector on the main board. 18. Remove the eleven screws (11 x A, 1 x G) from the bottom panel. Step Size (Quantity) 1~11 M2.5 x L8 (11) M2 x L4 (1) Color Black 3.0 kgf-cm...
-
Page 83: Removing The Led Board
19. Turn the unit over and remove the three screws (G) from the top panel. Step Size (Quantity) M2 x L4 (3) 20. Gently remove the upper case from the lower case. Removing the LED Board See “Removing the Battery Pack” on page 50. See “Removing the SD dummy card”... - Page 84 11. See “Removing the Heatsink Fan Module” on page 64. 12. See “Removing the CPU Heatsink Module” on page 65. 13. See “Removing the CPU” on page 66. 14. See “Removing the LCD Module” on page 67. 15. See “Separating the Upper Case from the Lower Case” on page 70. 16.
-
Page 85: Removing The Speaker Module
18. Remove the one screw (C) securing the LED board. Step Size (Quantity) M2 x L3 (1) 19. Remove the LED board from the upper cover. Removing the Speaker Module See “Removing the Battery Pack” on page 50. See “Removing the SD dummy card” on page 51. See “Removing the ExpressCard dummy card”... - Page 86 11. See “Removing the Heatsink Fan Module” on page 64. 12. See “Removing the CPU Heatsink Module” on page 65. 13. See “Removing the CPU” on page 66. 14. See “Removing the LCD Module” on page 67. 15. See “Separating the Upper Case from the Lower Case” on page 70. 16.
-
Page 87: Removing The Touchpad Module
18. Release the speaker cable from the latches. 19. Remove the speaker module from the upper case. Removing the Touchpad Module See “Removing the Battery Pack” on page 50. See “Removing the SD dummy card” on page 51. See “Removing the ExpressCard dummy card” on page 51. See “Removing the Lower Cover”... - Page 88 13. See “Removing the CPU” on page 66. 14. See “Removing the LCD Module” on page 67. 15. See “Separating the Upper Case from the Lower Case” on page 70. 16. Remove the touchpad cable that is glued to the bracket. 17.
- Page 89 18. Remove the two screws (C) securing the bracket to the upper case. Step Size (Quantity) Color Torque M2 x L2 (2) Silver 1.6 kgf-cm 19. Remove the touchpad bracket. Chapter 3...
-
Page 90: Removing The Modem Board
20. Carefully pry loose and remove the touch pad board. WARNING:The touchpad board is glued to the upper case, only remove the touchpad board if it is defective. Removing the Modem Board See “Removing the Battery Pack” on page 50. See “Removing the SD dummy card”... - Page 91 13. See “Removing the CPU” on page 66. 14. See “Removing the LCD Module” on page 67. 15. See “Separating the Upper Case from the Lower Case” on page 70. 16. Remove the one screw (C) securing the modem card. Step Size (Quantity) Color...
-
Page 92: Removing The Main Board
18. Disconnect the cable from the modem board. Removing the Main Board See “Removing the Battery Pack” on page 50. See “Removing the SD dummy card” on page 51. See “Removing the ExpressCard dummy card” on page 51. See “Removing the Lower Cover” on page 52. See “Removing the DIMM”... - Page 93 17. Disconnect the USB cable from the USBCN1 connector on the main board. 18. Disconnect the bluetooth cable from the BLUE1 connector on the main board. 19. Remove the one screw (C) securing the main board in place. Step Size (Quantity) Color Torque M2 x L3 (1)
-
Page 94: Removing The Usb Board Module
20. Carefully remove the main board. Removing the USB Board Module See “Removing the Battery Pack” on page 50. See “Removing the SD dummy card” on page 51. See “Removing the ExpressCard dummy card” on page 51. See “Removing the Lower Cover” on page 52. See “Removing the DIMM”... - Page 95 17. Remove the one screw (C) securing the USB board module to the lower case. Step Size (Quantity) Color Torque M2 x L3 (1) Silver 1.6 kgf-cm 18. Release the USB cable from the latch. 19. Remove the USB board module from the lower case. Chapter 3...
-
Page 96: Removing The Bluetooth Modules
Removing the Bluetooth Modules See “Removing the Battery Pack” on page 50. See “Removing the SD dummy card” on page 51. See “Removing the ExpressCard dummy card” on page 51. See “Removing the Lower Cover” on page 52. See “Removing the DIMM” on page 53. See “Removing the WLAN Board Modules”... -
Page 97: Lcd Module Disassembly Process
LCD Module Disassembly Process LCD Module Disassembly Flowchart LCD ASSEMBLY LCD FPC LEFT LCD CABLE BRACKET Screw List Item Screw M2.5 x L6 M2 x L4 Chapter 3 LCD MODULE DISASSEMBLY LCD MODULE LCD BEZEL RIGHT LCD BRACKET ANTENNAS Color Black Silver LCD BACK PANEL... -
Page 98: Removing The Lcd Bezel
Removing the LCD Bezel See “Removing the Battery Pack” on page 50. See “Removing the SD dummy card” on page 51. See “Removing the ExpressCard dummy card” on page 51. See “Removing the Lower Cover” on page 52. See “Removing the WLAN Board Modules” on page 54. See “Removing the Middle Cover”... -
Page 99: Removing The Lcd Panel With The Brackets
12. Carefully pry open the LCD bezel and place the bezel on top of the LCD panel. Removing the LCD panel with the Brackets See “Removing the Battery Pack” on page 50. See “Removing the SD dummy card” on page 51. See “Removing the ExpressCard dummy card”... -
Page 100: Removing The Inverter Board And Fpc Cable
11. Disconnect the cable from the web camera. 12. Remove the five screws (5 x B) securing the LCD module. Step Size (Quantity) M2.5 x L6 (5) 13. Remove the LCD with the brackets from the back cover. Removing the Inverter Board and FPC Cable See “Removing the Battery Pack”... - Page 101 See “Removing the SD dummy card” on page 51. See “Removing the ExpressCard dummy card” on page 51. See “Removing the Lower Cover” on page 52. See “Removing the WLAN Board Modules” on page 54. See “Removing the Middle Cover” on page 62. See “Removing the Heatsink Fan Module”...
- Page 102 13. Detach any adhesive tapes and any cable that is glued to the LCD panel. Chapter 3...
-
Page 103: Removing The Lcd Brackets
14. Disconnect the FPC cable from the LCD panel. Removing the LCD Brackets See “Removing the Battery Pack” on page 50. See “Removing the SD dummy card” on page 51. See “Removing the ExpressCard dummy card” on page 51. See “Removing the Lower Cover” on page 52. See “Removing the WLAN Board Modules”... -
Page 104: Removing The Antennas
Step Size (Quantity) M2 x L4 (4) Removing the Antennas See “Removing the Battery Pack” on page 50. See “Removing the SD dummy card” on page 51. See “Removing the ExpressCard dummy card” on page 51. See “Removing the Lower Cover” on page 52. See “Removing the WLAN Board Modules”... -
Page 105: Removing The Web Camera
13. Remove the left and right antenna cables together with the tapes holding them in place. NOTE: There is no need to remove the antenna unless you really need to replace it. Removing the Web Camera See “Removing the Battery Pack” on page 50. See “Removing the SD dummy card”... - Page 106 12. Remove the Web camera from the back cover. Chapter 3...
-
Page 107: Troubleshooting
Troubleshooting Use the following procedure as a guide for computer problems. NOTE: The diagnostic tests are intended to test only Acer products. Non-Acer products, prototype cards, or modified options can give false errors and invalid system responses. Obtain the failing symptoms in as much detail as possible. Verify the symptoms by attempting to re-create the failure by running the diagnostic test or by repeating the same operation. -
Page 108: System Check Procedures
System Check Procedures External Diskette Drive Check Do the following to isolate the problem to a controller, driver, or diskette. A write-enabled, diagnostic diskette is required. NOTE: Make sure that the diskette does not have more than one label attached to it. Multiple labels can cause damage to the drive or cause the drive to fail. -
Page 109: Memory Check
External keyboard If any of these devices do not work, reconnect the cable connector and repeat the failing operation. Memory Check Memory errors might stop system operations, show error messages on the screen, or hang the system. Boot from the diagnostics diskette and start the diagnostic program (please refer to main board. Go to the diagnostic memory in the test items. -
Page 110: Check The Power Adapter
Check the Power Adapter Unplug the power adapter cable from the computer and measure the output voltage at the plug of the power adapter cable. See the following figure If the voltage is not correct, replace the power adapter. If the voltage is within the range, do the following: Replace the System board. -
Page 111: Touchpad Check
Check the Battery Pack To check the battery pack, do the following: From Software: Check out the Power Management in control Panel In Power Meter, confirm that if the parameters shown in the screen for Current Power Source and Total Battery Power Remaining are correct. -
Page 112: Power-On Self-Test (Post) Error Message
Power-On Self-Test (POST) Error Message The POST error message index lists the error message and their possible causes. The most likely cause is listed first. NOTE: Perform the FRU replacement or actions in the sequence shown in FRU/Action column, if the FRU replacement does not solve the problem, put the original part back in the computer. -
Page 113: Index Of Error Messages
Index of Error Messages Error Code List Error Codes <No error code> <No error code> Error Message List Error Messages Failure Fixed Disk Stuck Key Keyboard error Keyboard Controller Failed Keyboard locked - Unlock key switch Monitor type does not match CMOS - Run Setup Shadow RAM Failed at offset: nnnn System RAM Failed at offset: nnnn... - Page 114 Error Message List Error Messages System timer error Real time clock error Previous boot incomplete - Default configuration used Memory size found by POST differed from CMOS Diskette drive A error Incorrect Drive A type - run SETUP System cache error - Cache disabled CPU ID: DMA Test Failed Software NMI Failed...
- Page 115 Error Message List No beep Error Messages No beep, power-on indicator turns off and LCD is blank. No beep, power-on indicator turns on and LCD is blank. No beep, power-on indicator turns on and LCD is blank. But you can see POST on an external CRT.
-
Page 116: Phoenix Bios Beep Codes
Phoenix BIOS Beep Codes Code Beeps Verify Real Mode Disable Non-Maskable Interrupt (NMI) Get CPU type Initialize system hardware Initialize chipset with initial POST values Set IN POST flag Initialize CPU registers Enable CPU cache Initialize caches to initial POST values Initialize I/O component Initialize the local bus IDE Initialize Power Management... - Page 117 Code Chapter 4 Beeps Advanced configuration of chipset registers Load alternate registers with CMOS values Initialize interrupt vectors POST device initialization 2-1-2-3 Check ROM copyright notice Check video configuration against CMOS Initialize PCI bus and devices Initialize all video adapters in system QuietBoot start (optional) Shadow video BIOS ROM Display BIOS copyright notice...
- Page 118 Code Beeps Detect and install external RS232 ports Configure non-MCD IDE controllers Detect and install external parallel ports Initialize PC-compatible PnP ISA devices Re-initialize onboard I/O ports Configure Motherboard Configurable Devices (optional) Initialize BIOS Area Enable Non-Maskable Interrupts (NMIs) Initialize Extended BIOS Data Area Test and initialize PS/2 mouse Initialize floppy controller Determine number of ATA drives...
- Page 119 Code Code Chapter 4 Beeps Prepare Boot Initialize DMI parameters Initialize PnP Option ROMs Clear parity checkers Display MultiBoot menu Clear screen (optional) Check virus and backup reminders Try to boot with INT 19 Initialize POST Error Manager (PEM) Initialize error logging Initialize error display function Initialize system error handler PnPnd dual CMOS (optional)
- Page 120 Code Beeps Boot to Mini DOS Clear Huge Segment Boot to Full DOS Chapter 4...
-
Page 121: Index Of Symptom-To-Fru Error Message
Index of Symptom-to-FRU Error Message LCD-Related Symptoms Symptom / Error LCD backlight doesn't work LCD is too dark LCD brightness cannot be adjusted LCD contrast cannot be adjusted Unreadable LCD screen Missing pels in characters Abnormal screen Wrong color displayed LCD has extra horizontal or vertical lines displayed. - Page 122 Power-Related Symptoms Symptom / Error The system doesn’t power-off. Battery can’t be charged PCMCIA-Related Symptoms Symptom / Error System cannot detect the PC Card (PCMCIA) PCMCIA slot pin is damaged. Memory-Related Symptoms Symptom / Error Memory count (size) appears different from actual size.
- Page 123 Power Management-Related Symptoms Symptom / Error The system doesn't resume from hibernation mode. The system doesn't resume from standby mode after opening the LCD. Battery fuel gauge in Windows doesn’t go higher than 90%. System hangs intermittently. Peripheral-Related Symptoms Symptom / Error System configuration does not match the installed devices.
- Page 124 Keyboard/Touchpad-Related Symptoms Symptom / Error Touchpad does not work. Modem-Related Symptoms Symptom / Error Internal modem does not work correctly. NOTE: If you cannot find a symptom or an error in this list and the problem remains, see “Undetermined Problems” on page 116. Action in Sequence Reconnect touchpad cable.
-
Page 125: Intermittent Problems
Intermittent Problems Intermittent system hang problems can be caused by a variety of reasons that have nothing to do with a hardware defect, such as: cosmic radiation, electrostatic discharge, or software errors. FRU replacement should be considered only when a recurring problem exists. When analyzing an intermittent problem, do the following: Run the advanced diagnostic test for the system board in loop mode at least 10 times. -
Page 126: Undetermined Problems
Undetermined Problems The diagnostic problems does not identify which adapter or device failed, which installed devices are incorrect, whether a short circuit is suspected, or whether the system is inoperative. Follow these procedures to isolate the failing FRU (do not isolate non-defective FRU). NOTE: Verify that all attached devices are supported by the computer. -
Page 127: Jumper And Connector Locations
Chapter 5 Jumper and Connector Locations Top and Bottom View Chapter 5... - Page 128 Chapter 5...
-
Page 129: Clearing Password Check And Bios Recovery
Clearing Password Check and BIOS Recovery This section provide you the standard operating procedures of clearing password and BIOS recovery for Aspire 5730Z/5330 Series. Aspire 5730Z/5330 Series provide one Hardware Open Gap on main board for clearing password check, and one Hotkey for enabling BIOS Recovery. Clearing Password Check Hardware Open Gap Description Hardware... -
Page 130: Bios Recovery By Crisis Disk
BIOS Recovery by Crisis Disk BIOS Recovery Boot Block: BIOS Recovery Boot Block is a special block of BIOS. It is used to boot up the system with minimum BIOS initialization. Users can enable this feature to restore the BIOS firmware to a successful one once the previous BIOS flashing process failed. -
Page 131: Fru (Field Replaceable Unit) List
Chapter 6 FRU (Field Replaceable Unit) List This chapter gives you the FRU (Field Replaceable Unit) listing in global configurations of 5730Z/5330 Series. Refer to this chapter whenever ordering for parts to repair or for RMA (Return Merchandise Authorization). Please note that WHEN ORDERING FRU PARTS, you should check the most up-to-date information available on your regional web or channel. -
Page 132: Aspire 5735/5735Z/5335 Series Exploded Diagram
Aspire 5735/5735Z/5335 Series Exploded Diagram Chapter 6... - Page 133 Aspire 5735/5735Z/5335 Series FRU List Aspire 5735 Series FRU List CATEGORY ADAPTER BATTERY BOARDS Chapter 6 PART NAME DESCRIPTION ADAPTER 65W ADT 65W SADP-65KB DELTA SADP-65KB DFA LF DELTA DFA LF LEVEL-4 ADAPTER 65W ADP 65W 3P SADP-65KB 3PIN DELTA SADP-...
- Page 134 CATEGORY CABLES PART NAME DESCRIPTION TOUCHPAD TOUCHPAD SYNAPTICS BOARD TM00540-005 SYNAPTICS TM00540-005 WIRELESS LAN WLAN 802.11ABGN BOARD SHIRLEYPEAK1*2 512AN_MMWG SHIRLEY PEAK 5100 MM#895361 WIRELESS LAN WLAN 802.11ABG BOARD SHIRLEYPEAK1*2 512AG_MMWG SHIRLEY PEAK 5100 MM#897004 WIRELESS LAN WLAN 802.11ABGN BOARD SHIRLEYPEAK3*3 533AN_MMWG SHIRLEY PEAK MM#895362...
- Page 135 CATEGORY CASE/COVER/BRACKET ASSEMBLY Chapter 6 PART NAME DESCRIPTION POWER CORD 10A CORD CHINA 10A 250V 250V 3PIN CHINA POWER CORD 10A CORD 10A 250V 3P 250V 3PIN CHINA CHINA BK POWER CORD 10A CORD ITALY 10A 250V 250V 3PIN ITALY 3P BK POWER CORD 10A CORD 10A 250V 3P...
- Page 136 CATEGORY CABLES SPEAKER CASE/COVER/BRACKET ASSEMBLY CABLES MICROPHONE MICROPHONE MICROPHONE MICROPHONE SPEAKER SPEAKER SPEAKER CPU/PROCESSOR CPU/PROCESSOR PART NAME DESCRIPTION LOWER CASE W/ 60 LCASE ASSY CP2 DC-IN CABLE&MODEM CABLE&SPEAKER RIGHT DC-IN CABLE C.A. DC IN CABLE CP2 DC-IN CABLE C.A.DC IN CABLE CP2 DC-IN CABLE C.A.DC IN CABLE CP2 MODEM CABLE...
- Page 137 CATEGORY CPU/PROCESSOR CPU/PROCESSOR CPU/PROCESSOR CPU/PROCESSOR CPU/PROCESSOR DVD-RW DRIVE CASE/COVER/BRACKET ASSEMBLY CASE/COVER/BRACKET ASSEMBLY DVD-RW DRIVE DVD-RW DRIVE DVD-RW DRIVE DVD-RW DRIVE DVD-RW DRIVE HDD/HARD DISK DRIVE Chapter 6 PART NAME DESCRIPTION CPU INTEL IC CPU PENRYN P7350 CORE2DUAL P7350 2.0G PGA PGA 2.0G 3M 1066 CPU INTEL IC CPU PENRYN P8400...
- Page 138 CATEGORY CASE/COVER/BRACKET ASSEMBLY HDD/HARD DISK DRIVE HDD/HARD DISK DRIVE HDD/HARD DISK DRIVE HDD/HARD DISK DRIVE CASE/COVER/BRACKET ASSEMBLY HDD/HARD DISK DRIVE HDD/HARD DISK DRIVE HDD/HARD DISK DRIVE HDD/HARD DISK DRIVE HDD/HARD DISK DRIVE CASE/COVER/BRACKET ASSEMBLY HDD/HARD DISK DRIVE HDD/HARD DISK DRIVE PART NAME DESCRIPTION HDD BRACKET...
- Page 139 CATEGORY HDD/HARD DISK DRIVE HDD/HARD DISK DRIVE HDD/HARD DISK DRIVE CASE/COVER/BRACKET ASSEMBLY HDD/HARD DISK DRIVE HDD/HARD DISK DRIVE HDD/HARD DISK DRIVE HDD/HARD DISK DRIVE HEATSINK HEATSINK HEATSINK HEATSINK HEATSINK HEATSINK KEYBOARD KEYBOARD KEYBOARD Chapter 6 PART NAME DESCRIPTION HDD 250GB HDD 250GB SGT SATA 5400RPM SATA ST9250827AS...
-
Page 140: Model Definition And Configuration
CATEGORY KEYBOARD KEYBOARD KEYBOARD KEYBOARD KEYBOARD KEYBOARD KEYBOARD KEYBOARD KEYBOARD KEYBOARD KEYBOARD KEYBOARD KEYBOARD KEYBOARD KEYBOARD KEYBOARD KEYBOARD KEYBOARD PART NAME DESCRIPTION KEYBOARD 17KB- KB DARFON NSK-AFF0H FV5 BLACK 105KS HE HEBREW INTERNATIONAL HEBREW KEYBOARD 17KB- KB DARFON NSK-AFF0T FV5 BLACK 106KS TR TURKISH TURKISH KEYBOARD 17KB-... - Page 141 CATEGORY KEYBOARD KEYBOARD KEYBOARD KEYBOARD KEYBOARD KEYBOARD KEYBOARD BOARDS BOARDS BOARDS BOARDS CABLES CABLES CABLES CABLES CAMERA CAMERA CASE/COVER/BRACKET ASSEMBLY Chapter 6 PART NAME DESCRIPTION KEYBOARD 17KB- KB DARFON NSK-AFF0M FV5 BLACK 106KS FC FR-CANA CANADIAN FRENCH KEYBOARD 17KB- KB DARFON NSK-AFF1B FV5 BLACK 106KS BP BRAZ-PT BRAZILIAN...
- Page 142 CATEGORY CASE/COVER/BRACKET ASSEMBLY CASE/COVER/BRACKET ASSEMBLY CASE/COVER/BRACKET ASSEMBLY CASE/COVER/BRACKET ASSEMBLY CASE/COVER/BRACKET ASSEMBLY BOARDS BOARDS BOARDS BOARDS CABLES CABLES CABLES CABLES CAMERA CAMERA PART NAME DESCRIPTION LCD BRACKET W/ HINGE LCD R CP2 SZS HINGE RIGHT LCD BRACKET W/ HINGE LCD L CP2 LH HINGE LEFT LCD BRACKET W/ HINGE LCD L CP2 SZS...
- Page 143 CATEGORY CASE/COVER/BRACKET ASSEMBLY CASE/COVER/BRACKET ASSEMBLY CASE/COVER/BRACKET ASSEMBLY CASE/COVER/BRACKET ASSEMBLY CASE/COVER/BRACKET ASSEMBLY CASE/COVER/BRACKET ASSEMBLY MAINBOARD BOARDS MEMORY MEMORY MEMORY MEMORY Chapter 6 PART NAME DESCRIPTION LCD BRACKET W/ HINGE LCD R CP2 LH HINGE RIGHT LCD BRACKET W/ HINGE LCD R CP2 SZS HINGE RIGHT LCD BRACKET W/ HINGE LCD L CP2 LH...
- Page 144 CATEGORY MEMORY MEMORY MEMORY MEMORY MEMORY MISCELLANEOUS MISCELLANEOUS MISCELLANEOUS SCREWS SCREWS SCREWS SCREWS SCREWS SCREWS SCREWS PART NAME DESCRIPTION SODIMM 1GB SODIMM 1G DDRII667 A-DATA HYOPE1A0834Z HYOPE1A0834Z LF SODIMM 2GB SODIMM 2G DDRII667 M470T5663QZ3-CE6 SAMSUNG M470T5663QZ3- CE6 LF SODIMM 2GB SODIMM 2G DDRII667 NANYA NT2GT64U8HD0BN-3C...
- Page 145 Chapter 6...
-
Page 146: Aspire 5735/5735Z/5335 Series
Model Definition and Configuration Aspire 5735/5735Z/5335 Series Please double click the red paper clip below for model definition and configurations details. Appendix A Appendix A... -
Page 147: Test Compatible Components
Appendix B Test Compatible Components This computer’s compatibility is tested and verified by Acer’s internal testing department. All of its system ® ® functions are tested under Windows XP Home, Windows XP Pro environment. Refer to the following lists for components, adapter cards, and peripherals which have passed these tests. Regarding configuration, combination and test procedures, please refer to the Aspire 5730Z/5330 series Compatibility Test Report released by the Acer Mobile System Testing Department. -
Page 148: Microsoft® Windows® Vista Environment Test
Microsoft Windows ® Item CRT Port Test CRT Monitor LCD Monitor Projector USB Port Test USB Keyboard/Mouse USB Speaker/Joystick USB Storage Drive USB Camera USB HUB and Others USB Printer/Scanner USB Flash Drive USB ODD 1394 Camera Access Point 802.11a Access Point 802.11g Access Point 802.11n Bluetooth Device... - Page 149 Item PCMCIA Test LAN/Modem Card Storage Card 1394 Card USB2.0 Card Wireless Lan Card (Not recommended for wireless ready model) ISDN Card GPRS Card ExpressCard Test Express Card Memory Card Test (SD/MS/MMC/SM/CF/Microdrive/XD) SD Card MS Card MMC Card XD Card CF Card Appendix B Specification...
- Page 150 Appendix B...
-
Page 151: Online Support Information
Online Support Information This section describes online technical support services available to help you repair your Acer Systems. If you are a distributor, dealer, ASP or TPM, please refer your technical queries to your local Acer branch office. Acer Branch Offices and Regional Business Units may access our website. However some information sources will require a user i.d. - Page 152 Appendix C...
- Page 153 AFLASH Utility Antennas Audio Battery Pack BIOS vendor Version 33–44 BIOS Utility Navigating Onboard Device Configuration 37, 38 Security System Security Board Layout Top View brightness hotkeys caps lock on indicator computer on indicator CPU Fan True Value Table DIMM Module Display display hotkeys...
- Page 154 Model Definition Modem Board Notebook Manager hotkey num lock on indicator Online Support Information Panel Bottom left PC Card Power System Check Battery Pack Power Adapter Processor Screw List speakers hotkey System Block Diagram System Check Procedures System Memory System Utilities Test Compatible Components touchpad hotkey...