Table of Contents
Advertisement
Quick Links
DIGITAL VOICE
RECORDER
VP-10
USER MANUAL
Thank you for purchasing an Olympus digital voice recorder.
Please read these instructions for information about using the product
correctly and safely.
Keep the instructions handy for future reference.
To ensure successful recording, we recommend that you test the record
function and volume before use.
EN
1
2
3
4
5
6
Advertisement
Table of Contents

Related Manuals for Olympus VP-10


Summary of Contents for Olympus VP-10
-
Page 1: Table Of Contents
Menu Use with a PC Other information USER MANUAL Thank you for purchasing an Olympus digital voice recorder. Please read these instructions for information about using the product correctly and safely. Keep the instructions handy for future reference. To ensure successful recording, we recommend that you test the record... - Page 2 Table of contents Names of parts ................4 Changing the information screen during playback or stop ...31 Recorder ....................4 Changing the information screen during playback or stop ....31 Display ....................5 Searching for a file [Date Search] ..........32 Using the date search function ............32 1 Getting started Erasing files ................33 Erasing files ..................33...
- Page 3 Table of contents Dividing files [File Divide] ............50 Dividing files [File Divide] ..............50 Changing the folder for playback [Play Folder] ......52 Changing the folder for playback [Play Folder] ........52 Formatting the internal memory [Format] ........54 Formatting the internal memory [Format].........54 5 Use with a PC PC operating environment ............56 PC connection/disconnection ............58...
-
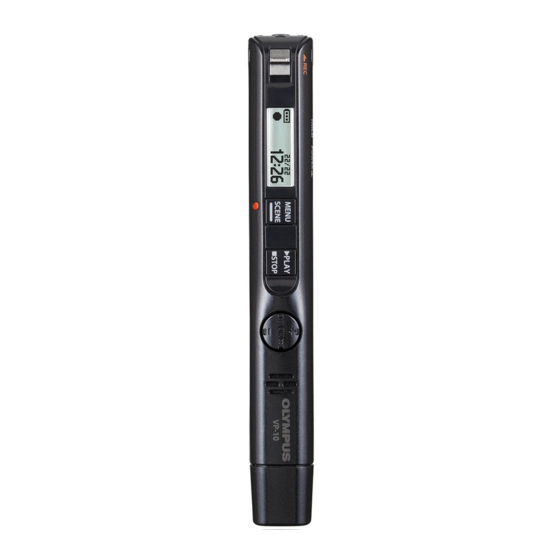
Page 4: Names Of Parts
Names of parts Recorder & 1 Earphone jack ( ! + button 2 REC (record) switch @ 9 button 3 Display # OK button 4 MENU/SCENE button $ Built-in stereo microphone (L) 5 ` PLAY/4STOP button % Clip 6 Built-in speaker ^ LED indicator light (LED) 7 Built-in stereo microphone (R) &... -
Page 5: Display
Names of parts Display 4 During recording 4 During stop or playback 1 Battery (☞ P.12) 5 File length/Elapsed playback time 2 Voice recorder status indicator 6 Playback range (☞ P.41) 7 Repeat ]: Recording (☞ P.16) 8 File lock (☞ P.37) ]: VCVA recording stand-by (☞... -
Page 6: Getting Started
Getting started Setup After unpacking the voice recorder, follow the steps below to have it ready for use. Inserting the battery Step Turning the power ON Step Selecting the battery setting Step Select the battery setting to match the inserted battery. Select the setting for a nickel-metal hydride rechargeable battery or the setting for an alkaline battery. -
Page 7: Inserting The Battery
Setup Inserting the battery Before using the voice recorder, insert the battery in the battery compartment of the voice recorder. Open the battery cover while Close the battery cover until it is pressing the cover lock knob in completely closed. the direction of the arrow. -
Page 8: Turning The Power On
Press the + or – button to select off, slide the POWER/HOLD switch the type of battery you inserted. in the direction of the arrow. [Ni-MH] ( Select if you inserted an Olympus nickel-metal hydride rechargeable battery (model BR404). [Alkaline] ( Select if you inserted an alkaline battery. -
Page 9: Setting The Date/Time
Setup Setting the date/time Press the 9 or 0 button to select the item to set. • You can change the clock display format. See “Setting the date/time [Time & Date]” (☞ P.47) for the procedure. Press the + or – button to change the number. -
Page 10: Charging The Battery By Connecting To A Pc's Usb Connector
Setup Charging the battery by connecting to a PC’s USB connector Press the OK button to start NOTE charging. • Before charging the battery, insert the rechargeable battery provided and set [Battery] to [Ni-MH]. • Before connecting the USB connector, release HOLD mode (☞ P.30). -
Page 11: Connection (Model A514)
Connect the voice recorder to charging. the USB connector on the AC Charging has finished when adapter. [Battery full] appears. To USB connector of AC adapter NOTE (model A514) • Use only the Olympus USB connecting AC adapter model provided (A514). - Page 12 • Use the USB extension cable provided HOLD mode. While the recorder is in if needed. HOLD mode, any button operations are • Use only a compatible Olympus USB disabled (☞ P.30). extension cable. Operation is not • Charging time: About 3 hours* guaranteed if another manufacturer’s...
-
Page 13: Batteries
• When replacing the battery, use an AAA battery (model BR404). alkaline dry cell battery or an Olympus 4 Discharging nickel-metal hydride rechargeable battery (model BR404). Operation is not Rechargeable batteries discharge naturally guaranteed. - Page 14 Batteries • Always turn power off before replacing the battery. Files may be damaged if the battery is removed while the voice recorder is recording or performing an operation such as erasing a file. • Even if the battery indicator is [ ...
-
Page 15: Turning The Power Off
Turning the power OFF Turning the power OFF Existing data, mode settings and the clock setting are saved when the power is turned OFF. Slide the POWER/HOLD switch in Auto power off mode the direction of the arrow for at least 0.5 seconds. -
Page 16: Recording
Recording Recording Even if a recording opportunity suddenly arrises, you can start recording from the power off state. Up to 999 recordings can be made. Basic recording procedure b Recording indicator Point the built-in microphone c Elapsed recording time in the direction of the sound to record. - Page 17 Recording NOTE Sound files recorded with the voice • To prevent the beginning of the recorder are automatically given a file recording being cut off, start recording name in the format below. after the LED indicator light has lit or VP100001 .MP3 mode indicator has appeared in the display.
- Page 18 Recording Recording linear PCM format data over Recording settings 2 GB For various recording conditions, different recording settings are available. When recording a linear PCM format file, recording will continue even after the file size [Rec Level] Sets the recording sensitivity. exceeds 2 GB.
-
Page 19: Using Earphones
Recording Using earphones If you connect commercially available NOTE earphones to the earphone jack ( ) of the • To avoid unpleasantly loud sound, set voice recorder, you will be able to listen to the the volume to [00] before plugging in audio during recording and playback. -
Page 20: Selecting The Automatic Recording Setting [Rec Scene]
Selecting the automatic recording setting [Rec Scene] Selecting the automatic recording setting [Rec Scene] The voice recorder has preregistered templates of optimum settings tailored to various recording applications such as conference and dictation. When selecting one of these templates you can enter several settings recommended for your recording application all in a single operation. - Page 21 Selecting the automatic recording setting [Rec Scene] Selecting the automatic recording setting [Rec Scene] NOTE Preregistered [Rec Scene] settings • When a recording scene is selected, [Pocket]: recording-related menu settings cannot be used in combination with [Rec Level] [High] the recording scene. If you attempt to [Rec Mode] [MP3 128k ST] use any of those functions, the [Rec...
-
Page 22: Changing The Information Screen During Recording
Changing the information screen during recording Changing the information screen during recording You can change the information screen during recording. While the voice recorder is in recording mode, press the OK button. • Each press of the OK button changes the information screen. 1 Elapsed recording time screen (default screen) You can display the elapsed recording time and current file number in folder. -
Page 23: Playback
Playback Playback In addition to files recorded by the voice recorder, you can also play files in WAV, MP3 and WMA format transferred from a PC. Basic playback procedure Press the 0 or 9 button to Press the + or – button to adjust select the desired playback file. -
Page 24: Fast-Forwarding
Playback Fast-forwarding Rewinding 9 button 0 button Fast-forwarding during playback Rewinding during playback Press and hold the 9 button Press and hold the 0 button during playback. during playback. • Playback starts from the current • Playback starts from the current position when you release the 9 position when you release the 0 button. -
Page 25: Skipping To The Beginning Of A File
Playback NOTE Skipping to the beginning of a file • If an index mark or temp mark is reached when skipping to the Skipping to the beginning of the beginning of a file during playback, next file playback starts from the position of the mark. - Page 26 Playback Playback settings You can select various file playback methods tailored to different applications and tastes. A setting that makes recorded [Noise Cancel]* voices more discernable when (☞ P.41) muffled by projector noise or similar sounds. Compensates low-volume [Voice Balancer]* portions of recorded audio files (☞...
-
Page 27: Selecting The Automatic Playback Operation [Play Scene]
Selecting the automatic playback operation [Play Scene] Selecting the automatic playback operation [Play Scene] The beginning or end of the wrong file is never selected even when you perform the forward or return operation repeatedly. You can also use the fast or slow playback function at the same time. -
Page 28: Changing The Playback Speed
Changing the playback speed Changing the playback speed You can change the playback speed. Changing the playback speed is handy for speeding up conference presentations, or for slowing down parts difficult to discern when learning a language. Press and hold the `PLAY/4STOP NOTE button during playback. -
Page 29: Index Marks/Temp Marks
Index marks are added to the files created using Olympus voice recorders and temp marks are added to files created using other devices. The position you wish to start listening from can be temporarily stored in a file during playback. -
Page 30: Preventing Accidental Operation
Preventing accidental operation Setting the voice recorder to HOLD mode maintains the current operation and disables button operations. HOLD mode is a handy feature for preventing unintentional operation from accidental button presses when the voice recorder is carried in a bag or pocket. Setting HOLD mode Releasing HOLD mode Slide the POWER/HOLD switch to... -
Page 31: Changing The Information Screen During Playback Or Stop
Changing the information screen during playback or stop Changing the information screen during playback or stop You can change the information screen during playback or stop. While the voice recorder is in playback mode or stop mode, press the OK button. -
Page 32: Searching For A File [Date Search]
Searching for a file [Date Search] Using the date search function You can search for voice files by specifying a recording date. While the voice recorder is in stop Press the + or – button to select mode, press and hold the MENU/ the desired file. -
Page 33: Erasing Files
Erasing files Erasing files This section describes how to erase a single unneeded file from a folder, erase all the files in the current folder at once. Press the 0 or 9 button to Press the + or – button to select select the file you want to erase. - Page 34 Erasing files NOTE • Files cannot be restored after being erased, so please check carefully before erasing a file. • Locked files and read-only files cannot be erased (☞ P.37). • If there is a file that cannot be recognized by the recorder, the file will not be erased.
-
Page 35: Menu
Menu Setting menu items Basic operation The menus consist of the following five setting menus: [File Menu], [Rec Menu], [Play Menu], [LCD/Sound], and [Device], which each provide useful functions to meet a variety of needs. Follow the steps below to set a menu item. •... -
Page 36: During Recording
Setting menu items Basic operation Press the `PLAY/4STOP button to 4 Menu items that can be set exit the menu screen. during recording; • Backlight • LED 4 Menu items that can be set during playback; • When you enter the menu screen during recording or playback, press •... -
Page 37: File Menu [File Menu]
File menu [File Menu] Preventing accidental file erasure Displaying file information [File Lock] [Property] The file lock feature lets you lock important You can display the information of a file from files to prevent them being accidentally a menu screen. erased. -
Page 38: Recording Menu [Rec Menu]
Recording menu [Rec Menu] Selecting the recording sensitivity Setting the recording mode [Rec Level] [Rec Mode] You can change the recording level You can prioritize sound quality or recording (sensitivity) as needed for your recording time. Select the recording mode that best application. -
Page 39: Reducing Noise Caused By Rubbing During Recording [Anti-Rustle]
Recording menu [Rec Menu] Reducing noise caused by rubbing Voice-activated recording function during recording [Anti-Rustle] [ VCVA] Reduce noise caused by the voice recorder The voice-activated recording function rubbing against clothing (rustling sounds) (VCVA) automatically starts recording when when recording in your pocket. a sound louder than a preset voice activation level is detected, and automatically pauses NOTE... - Page 40 Recording menu [Rec Menu] Press the 9 or 0 button to adjust the voice activation level. a Voice activation level (moves left/ right to match set level) b Level meter (changes in proportion to recording sound volume) • The setting can be adjusted in 23 steps.
-
Page 41: Playback Menu [Play Menu]
Playback menu [Play Menu] [OFF]: Reducing noise during playback The voice balancer function is [Noise Cancel] disabled. NOTE Use the [Noise Cancel] function to reduce • [Voice Balancer] function is only noise when a recorded voice is difficult to available when a file in the [Recorder] discern. -
Page 42: Setting The Repeat Playback [Repeat]
Playback menu [Play Menu] NOTE Setting a skip space [Skip Space] • When you set [Playback range] to [File], [End] blinks in the display for 2 This function skips (forward) or reverse skips seconds after the last file in the folder (rewinds) the file being played back for a set has been played, then playback stops amount of time and it is a convenient way to... -
Page 43: Changing The Folder For Playback [Play Folder]
Playback menu [Play Menu] Forward/reverse skip playback Press the `PLAY/4STOP button to start playback. Press the 9 or 0 button during playback. • Playback starts after skipping forward or backward by the set amount. Changing the folder for playback [Play Folder] You can switch the play folder to the [Recorder] folder containing the files recorded with the built-in microphone or... -
Page 44: Lcd/Sound Menu [Lcd/Sound]
LCD/Sound menu [LCD/Sound] Setting the backlight [Backlight] Setting the LED indicator light [LED] The display backlights are switched on for a preset amount of time when a button You can set the unit so that the LED indicator operation is performed. light does not light. -
Page 45: Selecting The Speaker Output [Speaker]
LCD/Sound menu [LCD/Sound] Selecting the speaker output [Speaker] You can set the built-in speaker to be ON or OFF when the earphones are not connected. [ON]: When the earphone is connected, sound is output from the earphone and when the earphone is disconnected, sound is output from the built-in speaker. -
Page 46: Device Menu [Device]
[Ni-MH]: enabled, the voice recorder will remain Select this setting when using in recording standby state even after an Olympus Ni-MH rechargeable the power is turned off so the battery battery (model BR404). will deplete more quickly. Once the [Alkaline]:... -
Page 47: Setting The Date/Time [Time & Date]
Device menu [Device] • When setting the month and day, Setting the date/time each time the MENU/SCENE button is [Time & Date] pressed, the display order changes. Example: March 24, 2015 Set the date and time beforehand to enable 3M 24D 2015Y (default format) easier management of recorded files. -
Page 48: Restoring The Default Settings [Reset Settings]
Device menu [Device] Restoring the default settings LCD/Sound: [Reset Settings] Backlight: 10 sec. Contrast: Level 06 LED: ON This setting is used to return various Beep: ON functions to the factory default settings Speaker: ON (factory default). The clock setting and file Intro Play: ON numbers are retained. -
Page 49: Checking The Internal Memory Information [Memory Info.]
Device menu [Device] Checking the internal memory information [Memory Info.] You can display the capacity and remaining memory space of the internal memory from a menu screen. NOTE • Some memory capacity is used as a management area, so the actual usable capacity will always be slightly less than the displayed capacity. -
Page 50: Dividing Files [File Divide]
Dividing files [File Divide] Dividing files [File Divide] Large files or files with long recording times can be divided for easier management and editing. Press the + button to select NOTE [Start]. Only MP3-format and PCM-format files recorded on the voice recorder can be divided. - Page 51 Dividing files [File Divide] Dividing files [File Divide] • The file names after division become “File name_1” for the first half and “File name_2” for the latter half. NOTE • Files cannot be divided if there are 999 files in the folder. •...
-
Page 52: Changing The Folder For Playback [Play Folder]
PC. The voice recorder can recognize folders up to the second level (C in the figure) in the [Music] folder. First level Second level Third level RECORDER VP-10 MUSIC Folder File While the voice recorder is in stop Press the + or – button to select [Recorder] or [Music] (Fig. - Page 53 Changing the folder for playback [Play Folder] Changing the folder for playback [Play Folder] Press the OK button. Press the OK button. Press the + or – button to select Press the + or – button to select the file or sub folder (Fig. B). the file (Fig.
-
Page 54: Formatting The Internal Memory [Format]
Formatting the internal memory [Format] Formatting the internal memory [Format] Formatting the internal memory erases all existing files saved on it. While the voice recorder is in stop Press the OK button. mode, press the MENU/SCENE button. Press the + or – button to select [Device]. - Page 55 Formatting the internal memory [Format] Formatting the internal memory [Format] NOTE • Never format the voice recorder from a PC. • Formatting erases all the existing data, including locked files and read-only files. • Before formatting, charge or replace the battery to ensure it will not run out before the process is finished.
-
Page 56: Use With A Pc
Use with a PC When connecting the voice recorder to a PC you can do the following: • You can enjoy language content or music files in WMA, MP3 and WAV format stored on your PC (☞ P.64). • Use the voice recorder as external storage to save or load data to/from your PC (☞... - Page 57 PC operating environment PC connection precautions • When uploading or downloading a file to or from the voice recorder, data transfer will continue as long as the voice recorder’s LED indicator light is flashing, even if the PC data communication screen disappears. Never disconnect the USB connector before data communication has finished.
-
Page 58: Pc Connection/Disconnection
• Use the USB extension cable provided USB connector to a USB port on a if needed. When you use an Olympus nickel- metal hydride rechargeable battery: • To charge the battery, press the OK button. - Page 59 USB hub may result in unstable operation. Do not use a USB hub if operation is unstable. • Use only a compatible Olympus USB extension cable. Operation is not guaranteed if another manufacturer’s cable is used. Also, never use this dedicated cable with any other company’s products.
-
Page 60: Disconnecting The Voice Recorder From A Pc
PC connection/disconnection Disconnecting the voice recorder from a PC Windows Macintosh Click [ ] on the task bar in the Drag-and-drop the removable lower right hand corner of the disk icon for the voice recorder screen and click [Eject DIGITAL shown on the desktop to the VOICE RECORDER]. -
Page 61: Loading A File To A Pc
PC. You can copy voice recorder files to any folder on the PC. 4 Voice recorder drive name and folder names on the PC Copying files recorded with the built-in microphone to a PC VP-10 The folder can store up to 999 files. RECORDER Copy these files to the PC. - Page 62 Loading a file to a PC • Up to 130 folders can be created within the [Music] folder (including a [Music] folder itself ). • The voice recorder can only recognize two folder sublevels. NOTE • To prevent the risk of data damage, never disconnect the voice recorder from the USB port while the LED indicator light is flashing.
-
Page 63: Usage As External Memory Of The Pc
Usage as external memory of the PC Connecting the voice recorder to a PC lets you transfer voice recorder data to save in the PC, and vice-versa. Windows Macintosh Connect the voice recorder to the Connect the voice recorder to the PC (☞ P.58). -
Page 64: Listening To Files Transferred From A Pc
Listening to files transferred from a PC To listen a transferred file You can listen to music files, study content, etc. transferred from a PC. Press the `PLAY/4STOP button to NOTE start playback. • Connect the voice recorder to a PC and transfer the music files and study content to the [Music] folder of the voice recorder beforehand (☞ P.61). - Page 65 Listening to files transferred from a PC To listen a transferred file Playable files The sampling rate, bit count and bit rate combinations supported for file playback are shown below. Bit count/bit File format Sampling rate rate 22.05 kHz, WAV format 16 bits 44.1 kHz MPEG 1 Layer 3:...
-
Page 66: Other Information
(99) have been written in the file. The maximum number of files (999) have Folder Full Erase unneeded files (☞ P.33). been saved in the folder. Contact the Olympus Customer Support Mem. Error An internal memory error occurred. Center (☞ back cover). Memory Full There is no remaining memory. - Page 67 A bus power error occurred. Cancel the USB connection (☞ P.60). An attempt was made to charge an AAA can't charge Use an Olympus nickel-metal hydride alkaline battery or a rechargeable battery rechargeable battery (BR404). other than one specified. can't charge_2 A bus power error occurred.
-
Page 68: Troubleshooting
Troubleshooting Problem Possible cause Solution Check that the positive and negative The battery is not inserted properly. terminals of the battery are placed correctly (☞ P.7). The display is blank. Replace or charge the battery The remaining battery power is low. (☞ P.7, P.10). - Page 69 Troubleshooting Problem Possible cause Solution You must unlock the file before you can erase The file is locked. it (☞ P.37). Unable to erase a file Unlock the file, or undo the read-only setting The file is a read-only file. on a PC. Connecting a speaker with a built-in amplifier may cause feedback during recording.
- Page 70 Troubleshooting Problem Possible cause Solution [File] has been selected for Set the [Playback Range] setting to [Folder] [Playback Range]. (☞ P.41). Unable to skip to the next or previous file [ON] has been selected for [Repeat]. Set the [Repeat] setting to [OFF] (☞ P.42). during playback The [Skip Space] is set to other than Set the [Skip Space] setting to [File Skip]...
-
Page 71: Other
Other Recorder care Accessories (optional) s Exterior BR404 nickel-metal hydride AAA Wipe gently with a soft cloth. If the rechargeable battery recorder is very dirty, soak the cloth in A high-efficiency, long-lasting mild soapy water and wring well. Wipe the rechargeable battery. -
Page 72: Copyright And Trademark Information
• Note that Olympus will assume no liability in the event of damages, lost earnings, or any claims from third parties resulting from improper use of the product. Trademarks and registered trademarks •... -
Page 73: Safety Precautions
1 Remove the battery immediately. 2 Contact your place of purchase or an Olympus service center for repair. Continued use may result in fire or electric shock. - Page 74 Contact your place of It may cause overheating, electric shock purchase or an Olympus repair center or or fire. service center. (Do not touch the battery s Do not connect the battery directly with bare hands when removing it.
- Page 75 Safety precautions s Do not insert the battery with its 2 Have the voice recorder repaired by your place of purchase or an Olympus positive/negative terminals in the service center. Continued use may opposite direction. result in fire or burns.
- Page 76 • Do not leave the voice recorder in hot or or other recording media is recommended. humid locations such as in direct sunlight • Note that Olympus will assume no liability inside a vehicle, or on a beach during for damages or lost earnings resulting from summer.
-
Page 77: Specifications
4 Power source General items Standard voltage: 1.5 V 4 Recording formats Battery: One AAA dry cell battery (model LR03), or one Olympus nickel-metal Linear PCM (pulse-code modulation) hydride rechargeable battery format 4 External dimensions MP3 (MPEG-1 Audio Layer 3) format 17 mm ×... - Page 78 23 hours (approx.) NOTE • The battery life figures shown here were determined using an Olympus test method (When [LED] is set to [OFF]). Actual battery life figures will vary greatly according to the battery used and usage conditions (Changing the playback speed, or using the [Noise Cancel], [Voice Balancer], [Rec Scene], [Play Scene] and [Rec Standby] functions may affect the battery life).
- Page 79 Specifications Recording time The figures below are guideline values. 4 Linear PCM format Recording mode Internal memory (4 GB) Linear PCM format 22.05 kHz/16 bits 12 hours (approx.) 4 MP3 format Recording mode Internal memory (4 GB) MP3 format 128 kbps 66 hours (approx.) 4 WMA format Recording mode...
- Page 80 Specifications Maximum recording time per file • The maximum file size is limited to about 4 GB in the MP3 format, and to about 2 GB in the linear PCM (WAV) format. • Regardless of the amount of remaining memory, the maximum recording time per file is restricted to the following values.
- Page 81 FCC Notice Trade Name: OLYMPUS • This equipment has been tested and Responsible Party: OLYMPUS AMERICA INC. found to comply with the limits for a Class Address: 3500 Corporate Parkway, P.O. Box B digital device, pursuant to Part 15 of the FCC Rules.
- Page 82 Our phone customer support is available from 9 am to 9 pm (Monday to Friday) ET 24/7 online automated help: http://www.olympusamerica.com/ http://www.olympusamerica.com/ contactus support Olympus software updates can be Phone customer support: obtained at: Tel.: 1-888-553-4448 (Toll-free) http://www.olympusamerica.com/digital EN-BD4114-01 AP1412...
Need help?
Do you have a question about the VP-10 and is the answer not in the manual?
Questions and answers
A got a Olympus vp-10 the screen is black how can a hard reset
To perform a hard reset on an Olympus VP-10:
1. Go to the Device menu.
2. Select [Reset Settings] under LCD/Sound.
3. Press the + button to select [Start].
This will restore factory default settings, but the clock setting and file numbers are retained.
If the screen is black and you cannot access the menu, try removing and reinserting the battery or replacing it with a fully charged one. If the device still does not power on, it may require service.
This answer is automatically generated