Advertisement
Quick Links
Advertisement

Related Manuals for Krix Epix - Back Box


Summary of Contents for Krix Epix - Back Box
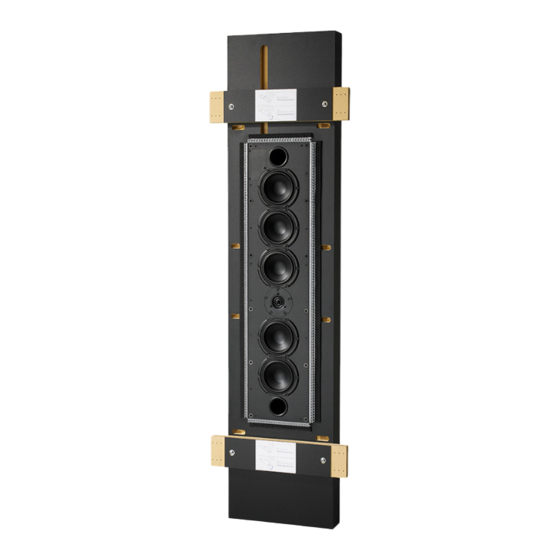
- Page 1 Owner’s Manual Epix - Back Box...
- Page 2 Congratulations on choosing Krix setup in brief The following setup procedure will help you achieve the best performance from your inwall speaker: 1. unpacking Remove your speaker from the packaging 2. before you begin Ensure correct tools are used and precautions are made 3.
-
Page 3: Before You Begin
To allow the speakers to be installed at the Safety optimum positions in the wall, timber stud It is recommended that the Krix Epix is installed positions should be mapped out prior to by a qualified installer. construction by the installer (see page 5). - Page 4 positioning front left and right speakers loudspeaker dimensions epix dimensions As a guide, the placement of left and right *Do not build studwork with 390mm spacing. 390* speakers used for two-channel stereo should The enclosures have been optimised for use 225** form an equilateral triangle with the primary with 450mm stud centers (see page 5).
- Page 5 positioning studwork preparation Below are recommendations for constructing a suitable timber stud frame for the Epix. Consult with a professional installer for further recommendations. Refer to page 6 for recommendations when using acoustically transparent screens. 450mm 450mm centers refer to local building code centers alternate center channel position Determine the ideal screen height...
- Page 6 positioning - acoustically transparent screens studwork preparation be appropriate to install left, center and Below are recommendations for constructing right speakers behind the screen. Consult a suitable timber stud frame when using an with a professional installer for further acoustically transarent screen. The diagram recommendations.
-
Page 7: Installation
installation install enclosure using temporary braces The installation braces are supplied factory fitted for 10mm plaster board installation. If 13mm plasterboard is to be used, follow the instructions printed on brace. This ensures the front baffle of the speaker will sit flush with the plasterboard 3. - Page 8 installation install timber Phillips screws Install the coated Phillips drive screws using an extended Phillips bit. 8 x coated Phillips drive Removed temporary cross braces 4. 4. 4. 4.
- Page 9 installation routing speaker cable Route speaker cable through studwork to speaker. Securely screw cable into to binding posts. Take care to assign the same cable colour or trace to the positive (+) connector on the amplifier, as the positive (+) connector on the speaker. Repeat connection process with negative (-) binding post and negative (-) wire.
- Page 10 installation installing plasterboard Cut plasterboard to size and slide under metal edging. Attach plasterboard to stud work. Using flushing compond flush over metal capping. Paint plasterboard wall. flushing compound...
-
Page 11: Specifications
(Refer to the details on the warranty card supplied) queries If you have any queries regarding the Epix setup procedure or any other Krix product, please contact your nearest Krix retailer or Krix directly. Contact details are on the back cover of this booklet. - Page 12 Krix Loudspeakers Pty Ltd 14 Chapman Road Hackham SA 5163 Australia T 61 8 8384 3433 F 61 8 8384 3419 listen@krix.com Rev #10003 krix.com...
Need help?
Do you have a question about the Epix - Back Box and is the answer not in the manual?
Questions and answers