Table of Contents
Advertisement
Quick Links
Model: ROOM-I
USER GUIDE
HD Recording PIR Spy Camera
TECHNICAL SUPPORT:
.
For Technical Support please contact your local distributor
LIMITED WARRANTY:
This product is supplied with a 1 Year warranty. The Warranty excludes products
that have been misused, (including accidental damage) and damage caused by
normal wear and tear. In the unlikely event that you encounter a problem with
this product, it should be returned to the place of purchase.
Version 1.0
Advertisement
Table of Contents

Subscribe to Our Youtube Channel
Related Manuals for IQ CCTV ROOM-I

Summary of Contents for IQ CCTV ROOM-I
-
Page 1: User Guide
Model: ROOM-I USER GUIDE HD Recording PIR Spy Camera TECHNICAL SUPPORT: For Technical Support please contact your local distributor LIMITED WARRANTY: This product is supplied with a 1 Year warranty. The Warranty excludes products that have been misused, (including accidental damage) and damage caused by normal wear and tear. -
Page 2: Table Of Contents
CONTENTS Safety Instructions …..………………….……. Product Contents ………..……….………….…. Product Description ..….……………………….. Remote Control ……….…………...….…..……. Installation …..….…………...………….………. Configuration ………….………………….….…. Recording ….……………………..…………..…. Playback ………………………..………….….… Specification Table ……….…………….….……... -
Page 3: Safety Instructions
As a result of version changes the user manual may differ from the original product. PRODUCT CONTENTS The following items are included: • ROOM-I ‘PIR’ Camera • Camera Bracket • Remote Controller • Power Adapter • AV Cable •... -
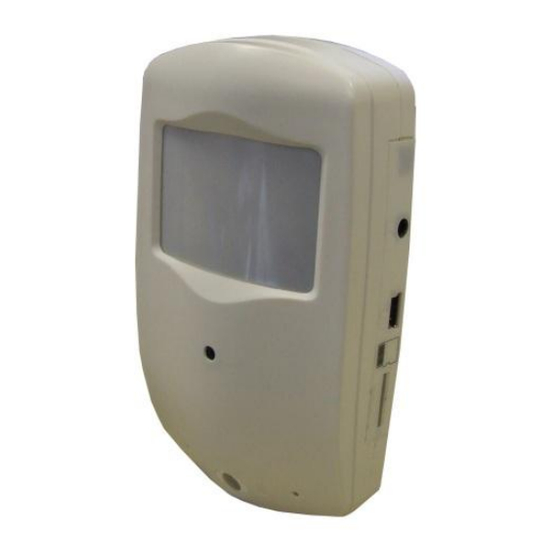
Page 4: Product Description
PRODUCT DESCRIPTION LED Lights AV Output Camera USB Port Micro Microphone SD Slot Standby Indicator IR Receiver Power Indicator Power ON/OFF Bracket Motion Detection (Trigger) -
Page 5: Remote Control
REMOTE CONTROL Stop Manual Recording Recording Enable Motion Disable Detection Motion Detection When using the remote control aim it directly to the unit’s receiver module: - By pressing A, C buttons the unit will make two ‘Tick’ sounds - By pressing B, D buttons the unit will make one ‘Tick’ sound Please Note: The sounds confirming the unit has received instructions from the remote control can be switched on/off by the user. -
Page 6: Installation
INSTALLATION Step 1: Fasten the mounting brackets with the supplied screws, and place the unit onto the mounting brackets. Step 2: Once the unit is securely attached to the bracket , adjust the unit to the desired viewing angle. The user can also connect the unit directly to a monitor, using the supplied AV cable, to confirm the required positioning and view angle. -
Page 7: Configuration
CONFIGURATION Step 1: Connect the unit to a computer using the USB cable provided and switch on the power to the unit. USB CABLE Step 2: Once connected the PC will find the unit as a new removable hard disk. If it is not detected automatically the user can search for the unit via ‘My Computer’... -
Page 8: Recording
RECORDING Step 1: Insert a Micro SD Card into the unit. Step 2: Insert the provided power supply plug into the DC socket and place the power switch to the ‘ON’ position to start the unit. The power and standby indicators will light up to confirm the unit is ready to use. -
Page 9: Playback
PLAYBACK Step 1: Connect the unit to a PC, using the provided USB cable, and ensure that the unit is switched on. USB CABLE Step 2: Once connected the PC will find the unit as a new removable hard disk. If it is not detected automatically the user can search for the unit via ‘My Computer’... -
Page 10: Specification Table
SPECIFICATION TABLE Resolution 1280x720, 720x480, 640x480 Internal Memory N/A (Micro SD Card required) Motion Detection Recording Modes Continuous Weather Resistant Vandal Resistant Mounting Type Wall Dimensons (mm) 60 (Width) x 103 (Height) x 29.5 (Depth) Weight (Kg) 0.08 Warranty 1 Year Limited Warranty Sensor Type CMOS DSP Type...
Need help?
Do you have a question about the ROOM-I and is the answer not in the manual?
Questions and answers