
Related Manuals for Grace ONE


Summary of Contents for Grace ONE
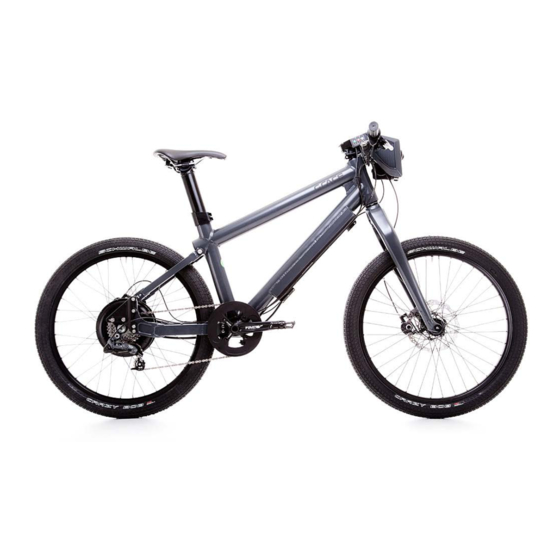
- Page 1 GRACE ONE Manual Stand 04/2013 GRACE ONE 2013 This user manual is valid for the GRACE ONE with the City and Universal frame variations (type number WGRACEUXDB) delivered in the 2013 model year.
- Page 2 Information! This sign shows you useful information on how to handle your product. Please note! This symbol indicates that your vehicle could suffer damage. GRACE ONE 2013 Manual...
-
Page 3: Table Of Contents
Table of contents Your GRACE ONE E-Motorbike About this user manual ........................... 47 Before the first use ..........................48 Description of the devices ........................49 Scope of delivery ............................. 50 Accessories/options ..........................50 Safety instructions and tips ........................51 Initial operation Charging the battery packs ........................ - Page 4 Torques ..............................78 Rear-view mirror installation guide ......................79 Side reflector installation guide ......................80 Use in compliance with the regulations ....................81 Warranty conditions ..........................82 Attachment A: Delivery checklist Attachment B: GRACE Service booklet GRACE ONE 2013 Manual...
-
Page 5: Your Grace One E-Motorbike
About this user manual The content of this user manual refers exclusively to the GRACE ONE City und GRACE ONE Universal range of models (type number WGRACEUXDB) delivered in the 2013 model year. -
Page 6: Before The First Use
Helmets are required for riders of mopeds. Apart from the requirement of wearing a safety helmet, it is also necessary to have an insurance sticker on the GRACE ONE E- Motorbike and to be the holder of a class M driver’s licence. -
Page 7: Description Of The Devices
11. Top tube with integrated battery packs integrated battery packs 22. Motor Plug-Connector 23. USB-Port (only for the service) 24. Charging-Port Luggage racks and mudguards are available as optional features. Scope of delivery GRACE ONE 2013 Manual 22 22 22 22... -
Page 8: Accessories/Options
Please consult the completed transfer protocol, which has been prepared for you by your dealer, to find out about the individual equipment of your GRACE E-Motorbike. (Attachment A) Accessories/options... -
Page 9: Safety Instructions And Tips
Please note that the E-Bike for safety reasons only responds to the throttle operation when the rear wheel will be moved contemporaneously. To save energy the GRACE ONE turns off automatically when not in use after 10 minutes. Even when switched off electrical currents can still be in the system. If you need to separate electrical connections please make always sure to disconnect and to connect the contacts cleanly. - Page 10 Important tips and instructions for handling lithium ion batteries If you don’t wish to use your GRACE ONE for an extended period of time (> 1 month), make sure that the battery voltage is not below 44 volts. In this way, you can extend the length of the life span of your battery pack.
-
Page 11: Initial Operation
Initial operation Charging the battery pack The battery packs of your GRACE ONE E-Motorbike are integrated securely inside the frame. In the top tube there is a large lithium ion cell battery installed and two small batteries are housed in the down tube. All of the batteries are connected in parallel. -
Page 12: Switching The Bike On And Off
4. The Grace One E-Motorbike is switched off if the display light has gone out. Your GRACE ONE E-Motorbike will turn itself off automatically, if the battery voltage falls below 32 volts! This safety shutdown mechanism prevents damage to the batteries due to deep discharge. -
Page 13: Checking The Tyre Pressure
Exceeding the maximum permissible air pressure when you pump your tyres can lead to their bursting. The GRACE ONE E-Motorbike is equipped with the following standard tyres: SCHWALBE Crazy Bob special street legal edition (26 x 2.35) The manufacturer recommends the following readings for operating pressure for the tyres used: 2.0 –... -
Page 14: Setting The Seat Height
Pull the seat post no further than 30 cm out of the seat tube at the most. 3. Make sure that the seat is aligned parallel to the top tube of your GRACE ONE. max. 30 cm 4. -
Page 15: Setting The Seat Angle
3. Now you can slide the seat back and forth in the clamp guide… ... and adjust the angle. Finally, tighten all four screws equally. GRACE ONE 2013 Manual... -
Page 16: Functional Description
The right side of the handlebars: The throttle grip the horn High beam changeover switch Brake lever for the rear wheel brake The left side of the handlebars: Left handlebar grip Gear twist grip Brake lever for the front wheel brake GRACE ONE 2013 Manual... -
Page 17: The Motor
You can request power from the motor by means of a throttle handle. A regulator that is located in the control unit of your GRACE ONE under the top tube regulates the power output of the motor and limits the latter when the maximum permissible speed for this class of bicycle, which is 45 km/h, is reached. -
Page 18: The Cockpit
The cockpit The stem of your GRACE ONE E-Motorbike forms the connection between the handlebars and the steerer tube. The cockpit, the front lights and the on-board computer are all integrated into the stem. The operating elements for the on-board computer are located on the left hand side at the stem. -
Page 19: The Derailleur System
There are nine different gear ratios available. The throttle handle You can start your motor drive on the back wheel of your GRACE ONE E-Motorbike with a rotary motion of the throttle handle. The further the throttle handle is rotated, the more energy gets directed to the motor and the greater the acceleration or the speed is. -
Page 20: The Brakes
If you squeeze the front wheel brake too hard, this can lead to a rollover or fall due to the front wheel breaking loose! The brake disks and the brake callipers of your GRACE ONE E-Motorbike can become very hot when you are braking and can cause burns if they are touched. -
Page 21: The Display
The display The GRACE ONE display informs you about the speed, the route covered, energy consumption and the state of charge of the batteries. All of the information will be displayed on a panel with background lighting. Riding mode [Sport (SRT), City (CTY), Economic (ECO)]... - Page 22 Keep the enter key pressed down for approx. 3 - 4 seconds and the display of the last trip will be set to zero. History Under the menu heading History the information about the bike’s history is listed. Total km: Total kilometres travelled Total Wh: Total watt hours consumed GRACE ONE 2013 Manual...
-
Page 23: Prior To Any Maintenance Work
Maintenance Prior to any maintenance work Prior to any maintenance work make sure that the GRACE ONE E-Motorbike is disconnected from any power supply. To do this, press the red OFF button on the right hand side of the stem. -
Page 24: Disassembling The Front Wheel
3. Loosen the front wheel and remove it from the fork against the rotational direction. When the front wheel has been disassembled, insert the brake pad retainer between the brake pads in order to avoid unintentionally adjusting the distance between them. GRACE ONE 2013 Manual... -
Page 25: Disassembling The Rear Wheel
If the chain is dry (without lubrication) or dirty, clean it with a clean or slightly oily cloth and then coat it with a bicycle chain oil that is commercially available and leave it overnight. Remove any excess oil the following day with a cloth. GRACE ONE 2013 Manual... -
Page 26: Changing The Tyres
Replace the tyre or the defective tube. If you are putting on a new tyre, change the tube as well! 4. Pull one side of the tyre onto the rim. In the process, please pay attention to the running direction of the tyre that was printed by the manufacturer. - Page 27 Pump the tyre in accordance with the manufacturer’s information and check again that the tyre is sitting correctly in the rim. Tighten the knurled nut and screw the valve cap onto the valve. GRACE ONE 2013 Manual...
-
Page 28: Switching Gears
The suspension fork If you ride a GRACE ONE E-Motorbike with a suspension frame, it is advisable to adjust it to suit your weight and your personal needs. For more specific information about this, please consult the particular suspension fork manufacturer’s user manual. -
Page 29: Changing The Lights
3. Unlock the metal springs in order to be able to remove the light source. 4. To do that, pull the light source backwards out of the housing. GRACE ONE 2013 Manual... -
Page 30: Adjusting The Lighting
Adjusting the lighting Adjust low beam and high beam lamps so that the cones of light hit a wall at a distance of 5 m at the specified height. Lowbeam Highbeam GRACE ONE 2013 Manual... -
Page 31: Wearing Parts, Maintenance, Bike Inspection After A Fall
Wearing parts include the following: Tyres Wear to the tyres depends on how the GRACE ONE E-Motorbike is used and can be very strongly influenced by the rider. The lifespan of a tyre is considerably shortened by sharp braking which leads to the blocking of a tyre and reduces its life span considerably. - Page 32 Gear switching cables The Bowden cables of the gears must be regularly maintained and replaced, if applicable. This can be the case, especially if the GRACE ONE E-Motorbike is often stored outdoors and exposed to the elements. Lights Flawless functioning of the lighting systems is very important for traffic safety. As lights are susceptible to wear due to their function, they should be checked before every trip to see how they are functioning.
-
Page 33: Replacing Parts
GRACE vehicle. Inspection of your bike after an accident or fall After a fall or an accident on your GRACE ONE E-Motorbike, you should bring your bike to your authorized dealer for close examination in any event. -
Page 34: Technical Data
Battery charger GRACE Charger 250 x 140 x 90 mm, 2140 g Computer GRACE computer with a display of the power, speed, kilometres for the day, state of charge, charging cycles and statistics Crank Truvativ Firex Single 48 with chain guard ring... -
Page 35: Frame Sizes
Inside leg measurement D Seat tube height 640 mm 885 mm 885 mm 548 mm GRACE ONE Universal Top tube Standover height Inside leg measurement Seat tube height 630 mm 830 mm 800 mm 427 mm GRACE ONE 2013 Manual... -
Page 36: Torques
Post mount adapter 6 Nm Rear derailleur fastening (manufacturer’s specifications from) 8 – 10 Nm Gear cable fastener (manufacturer’s specifications from SRAM) 4 – 5 Nm Bottom bracket (manufacturer’s specifications from SRAM) 48 – 54 Nm GRACE ONE 2013 Manual... -
Page 37: Rear-View Mirror Installation Guide
The drawing shows how to mount the mirror for riding on the right side of the road The mirror must be mounted symmetrically on the right hand side for left hand traffic. GRACE ONE 2013 Manual... -
Page 38: Side Reflector Installation Guide
Side reflector installation guide Mount the reflectors supplied on the position shown in the drawing. GRACE ONE 2013 Manual... -
Page 39: Use In Compliance With The Regulations
Use in compliance with the regulations Due to its design and its equipment, your GRACE ONE E-Motorbike is designated for use on public roads and on paved paths. The required safety-related active and passive lighting systems are installed in accordance with the German Regulations Authorising the Use of Vehicles for Road Traffic (StVZO). -
Page 40: Warranty Conditions
500 charging cycles and ensures a residual capacity of at least 80% of the rated capacity within the warranty period. This period begins when the GRACE ONE is handed over by your dealer, who is also the person to contact in case of a warranty claim. - Page 41 Notices GRACE ONE 2013 Manual...
- Page 42 GRACE ONE 2013 Manual...
Need help?
Do you have a question about the ONE and is the answer not in the manual?
Questions and answers