Advertisement
Quick Links
Instruction Manual
Model No. MT-988
Electric Snow Thrower
IMPORTANT: Read and understand this manual before assembling or
operating this Electric Snow Thrower. Improper use of Snow Thrower can
cause severe injury. Keep this manual for future reference.
TABLE OF CONTENTS
I- Specifications
II- Parts List
III-Safety Instructions
IV-Getting Started
V- Operation
VI-Maintenance and storage
Advertisement

Summary of Contents for Maztang MT-988
- Page 1 Instruction Manual Model No. MT-988 Electric Snow Thrower IMPORTANT: Read and understand this manual before assembling or operating this Electric Snow Thrower. Improper use of Snow Thrower can cause severe injury. Keep this manual for future reference. TABLE OF CONTENTS...
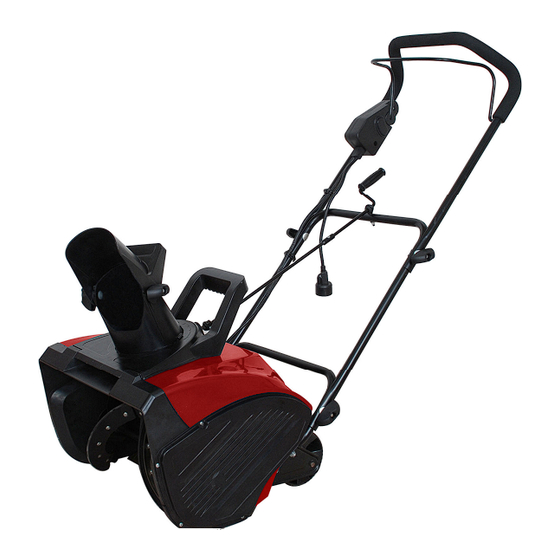
- Page 2 I .Specifications Rated Voltage: 120v~60Hz Amperage: 13Amp Speed: 2100rpm Clearing Width: 18” Clearing Height: 10” Max Spraying Distance: 30 ft. Weight: 36 lbs II. Parts List 1. Handle bar 2. Upper frame 3. Upper chute crank 4. Joint fixing T-bolt and knob 5.
- Page 3 16. Lower chute crank 17. Switch housing 18. Switch key III-Safety Instructions GENERAL SAFETY INSTRUCTIONS Warning: Read all instructions. Failure to follow all instructions listed below may result in electric shock, fire and/or serious personal injury. The term “power tool” in all of the warnings listed below refers to your mains-operated (corded) power tool or battery-operated (cordless) power tool.
- Page 4 ensure that these are connected and properly used. Use of these devices can reduce dust-related hazards. 4) POWER TOOLS USE AND CARE a) Do not force the power tool. Use the correct power tool for your application. The correct power tool will do the job better and safer at the rate from which it was designed. b) Do not use the power tool if the switch does not turn it on and off.
- Page 5 them from flying out and causing personal injury. ● In case of following conditions, please turn off the machine and pull out the power plug: When not used, being repaired, replaced of some parts, being cleaned and checked as well as any other conditions in which dangerous factors exist. If cord is damaged in manner while plugged in, pull extension cord from wall receptacle.
- Page 6 from getting in contact with any revolving part of the machine. ● Keep children and visitors away. Visitors should wear safety glasses and be kept a safe distance from work area. ● Use right tool. Don’t force small tool or attachment to do the job of a heavy duty tool.
- Page 7 Upper, Middle and Lower Frame Assembly 1. Loosen and remove the four sets of joint fixing T-bolts, washers, and joint fixing knobs to separate the upper frame from the lower frame. 2. Hold the middle frame so that the screw holes align with the holes on the lower frame.
- Page 8 connection on both sides. 4. Locate the cable clips in the parts bag. Secure the power cord to the frame of the unit by clipping them onto the frame at evenly spaced intervals. Discharge Chute and Chute Crank Assembly 1. Lift the chute deflector so that it snaps and locks securely onto the discharge chute.
- Page 9 Discharge chute Chute deflector Chute deflector knob Raise or lower the chute deflector to the desired height of the snow stream and tighten the chute deflector knobs. Note: Do not over-tighten the chute deflector knobs. Chute deflector knob 3. Locate the low and upper chute crank in the parts bag. Loosen the screw and nut located on the upper chute crank with screwdriver and wrench.
- Page 10 wrench. 5. Slide the lower crank into the chute base hole. Slide into chute base hole 6. Remove the washer and nut from the eye bolt with rubber grommet found on the upper chute crank. Position the chute crank so that the eye bole with rubber grommet inserts into the center hole of the middle frame.
- Page 11 V. Operation Note: Before using the machine, please make sure the power source you will use is in accordance with the specifications shown in this manual. Before inserting the plug into the socket, make sure the machine’s roll shaft and the snow thrower’s rubber plates are all fixed firmly with screws, and the rubber plates are facing to the correct direction.
-
Page 12: Powering On And Off
Powering on and off 1. Release the handle bar, insert the switch key into his position. Handle bar Switch Key 2. Press the switch button at the side. Switch button 3. Then pull the handle bar backward, and catch hold of the handle bar firmly with both hands and the machine is started. - Page 13 4. To power off, release your grip on the handle bar. Moving the Machine and Plowing the Snow WARNING Foreign objects, such as rocks, broken glass, nails, wire, or string, can be picked up and thrown by the snow thrower, causing serious personal injury.
- Page 14 surface material along with the snow, push down on the handle to raise the scraper at the base of the unit above the pebbles or gravel. Changing Snow Exit Direction WARNING: Never direct the snow discharge chute at the operator, at bystanders, at vehicles or at nearby windows.
- Page 15 WARNING: Make sure to turn off the switch and disconnect the extension cord before performing any maintenance task on your snow thrower. Lifetime Lubrication Lubrication is not necessary and may damage the unit. The snow thrower is lubricated for lifetime use at the factory before shipment. General Maintenance Tips 1.
- Page 16 Replacing the Scraper 1. The scraper is located at the base of the snow thrower beneath the rotor housing. 2. Detach the worn scraper from the snow thrower by removing the 3 screws that hold it in place. 3. Install the new scraper and fasten it securely to the snow thrower with 3 screws.
- Page 17 behind the unit in the normal operating position. 1. Remove the screws from the left panel of the snow thrower. 2. Lift the belt tension and roll the large belt off the big pulley. 3. Replace the large belt by following instructions in reverse order. Storage 1.
Need help?
Do you have a question about the MT-988 and is the answer not in the manual?
Questions and answers