
Related Manuals for Mark Levinson N380


Summary of Contents for Mark Levinson N380
- Page 1 Operating Manual Mark Levinson ® Nº380 Preamplifier Madrigal Audio Laboratories, Inc.
- Page 2 WARNING: TO REDUCE THE RISK OF FIRE OR ELECTRIC SHOCK, DO NOT EXPOSE THIS APPLIANCE TO RAIN OR MOISTURE. CAUTION: TO REDUCE THE RISK OF ELECTRICAL SHOCK, DO NOT REMOVE COVER. NO USER-SERVICEABLE PARTS INSIDE. REFER SERVICING TO QUALIFIED PERSONNEL. The lightning flash with arrowhead symbol, within an equilateral triangle, is intended to alert the user to the presence of uninsulated “dangerous voltage”...
-
Page 3: Important Safety Instructions
Important Safety Instructions Please read all instructions and precautions carefully and completely before operating your Mark Levinson power amplifier. 1. ALWAYS disconnect your entire system from the AC mains before connecting or disconnecting any cables, or when cleaning any component. 2. - Page 4 From all of us at Madrigal Audio Laboratories, thank you for choosing the Mark Levinson Nº380 Preamplifier. A great deal of effort went into the design and construction of this precision device. Used properly, it will give you many years of enjoyment.
-
Page 5: Table Of Contents
Table of Contents Unpacking and Placement ... 6 unpacking ... 6 installing the batteries in the remote control ... 6 placement ... 6 ventilation ... 6 Operating Voltage ... 7 A Quick Start… ... 8 Front Panel ... 9 Rear Panel ... 12 building a link cable ... -
Page 6: Unpacking And Placement
Unpacking and Placement unpacking Unpack your Nº380 Preamplifier and keep all packing materials for future trans- port. Locate and remove all accessory items from the cartons. Accessories include: Included with your new Mark Levinson product is a pair of knit, white gloves designed to assist you in the initial unpacking and placement of your new pur- chase. -
Page 7: Operating Voltage
Operating Voltage The Nº380 Preamplifier is set at the factory (internally) for 100V , 120V , 200V , 230V , 220V , or 240V AC mains operation @ 50 or 60Hz. (230V/50Hz only in European Union countries, in compliance with CE regulations.) This voltage setting cannot be changed by the user. -
Page 8: A Quick Start
A Quick Start… We recognize that many people are understandably eager to begin listening to their new components, and that reading the manual is often done (if at all) at a later time—perhaps while listening to music through the new product itself. We strongly recommend that you read this manual thoroughly , as the Nº380 Preampli- fier incorporates many unusual features which enhance its operation. -
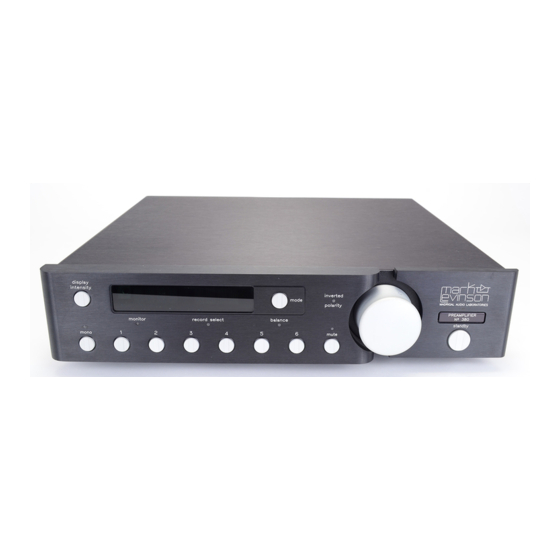
Page 9: Front Panel
display intensity monitor record select mono Front Panel DISPLAY INTENSITY BUTTON Cycles among four levels of brightness (including “off”) for the display, al- lowing adjustment for various ambient lighting conditions. When “off,” the display will turn on for a few seconds whenever a setting is changed. When used in conjunction with certain compatible Mark Levinson components, this button will control the display intensity of all linked components. -
Page 10: Mode Indicators
MODE INDICATORS Three LEDs give visual confirmation of the operational in at any moment. When the balance remains lit as a reminder, in addition to other balance LED that might be on to indicate either cators MODE BUTTON Cycles among the three primary operational (the source being listened to);... -
Page 11: Standby Button
If you adjust the volume with either the volume knob or the remote control while is engaged, the preamplifier will adjust its volume from the mute muted volume and disengage the pleasant surprise when, having increased the volume while muted, some- one un-mutes the system.) The factory default setting of the Mute circuit is -20 dB. -
Page 12: Rear Panel
right balanced right balanced right balanced main out input 1 input 2 PUSH PUSH right main out Rear Panel Note: All left-channel inputs and outputs are on the left of the rear panel as seen from the front, and all right-channel inputs and outputs are on the right of the rear panel as seen from the front. - Page 13 If your system calls for multiple outputs from the Nº380 (as might be the case for “passive” biamplification, for example), you may use balanced Y- adapters to split each balanced output into two balanced outputs. The low output impedance (6 ) of the Nº380 can easily drive multiple power am- plifiers.
-
Page 14: Record Outputs
processor master 8 to 8 Link Cable slave in transport slave out 8 to 8 Link Cable slave preamp master 6 to 6 Link Cable slave in power amp(s) MADRIGAL AUDIO LABORATORIES MADRIGAL AUDIO LABORATORIES RE FE R E NC E R E FE R E NC E M ON AU RA L M O N AU RA L... -
Page 15: Using A Turntable
Warning! using a turntable tip polarity for external IR input Connecting the communication ports other than as described in this manual can damage the Nº380 and the associated Mark Levinson components, and will void those products’ warranties. INPUTS 3-6 Accepts right-channel and left-channel (single-ended) inputs from line-level source equipment such as tuners, CD players, and tape decks. -
Page 16: Remote Control
Remote Control MADRIGAL AUDIO LABORATORIES mono polarity display mode volume mute MONO Pressing this button will toggle the Nº380 in and out of the having the same effect as pressing the front panel mode activates circuitry which combines Left and Right input signals, and sends the resulting monophonic signal to both Left and Right outputs. - Page 17 MUTE Toggles between normal output level and the user-programmable mute function, reducing the level by 1 to 60 decibels (depending on the user’s programming). The factory default setting gives a 20 decibel reduction in output.
-
Page 18: Setup And Installation
Setup and Installation connections and cables The Nº380 incorporates both RCA-type and XLR-type connectors for audio signal input and output. The Madrigal-designed RCA-type connectors used for single-ended audio intercon- nection are a great improvement over ordinary RCA-type connectors, offering supe- rior contact integrity and mechanical locking when used in conjunction with the Madrigal cable-mounted RCAs. -
Page 19: Setup Overview
setup overview The Nº380 Preamplifier has many provisions for custom-tailoring the system’s op- eration to match your preferences. The consistent method for modifying any of these settings is to enter a • pressing and holding a button for several seconds; •... -
Page 20: Naming An Input "Eq
The factory default input name is (for “cassette in input 3” , the most common recording device); these were config- ured for the Quick Start portion of this manual. Any or all input names (includ- ing these) may be changed easily to match the configuration of your particular system. -
Page 21: Assigning Record Outputs
IF THE SOURCE IN QUESTION IS A RECORDABLE DEVICE… assigning record outputs Y ou will be further prompted to associate a particular this particular device. Instead of showing “ “ Y ou may elect not to use either may be the case if you have several devices in your system that are capable of recording. -
Page 22: Results Of Unrealistic Tests
The Nº380 Preamplifier has been optimized to yield optimum sonic performance results of unrealistic tests under normal, real-world operating conditions. This approach involves no disad- vantage when the unit is used as designed. Unrealistic tests such as listening at full gain to an unterminated input which has been associated with an unterminated record output may result in some small amount of noise at the main output which does not occur when the Nº380 is used correctly . -
Page 23: Programming An Automatic Output (Volume) Level
programming an automatic The Nº380 also features the ability to remember a “preferred” output level setting, to which it will return whenever you select a particular input. This capability is a output (volume) level great convenience when used with tuners, for example, since their output level is often more consistent than other sources, and since tuners may be used primarily for background (rather than critical) listening. - Page 24 In order to take advantage of this below: automatic output level SELECT THE INPUT WHOSE LEVEL YOU WOULD LIKE TO “AUTOMATE” ADJUST THE VOLUME TO YOUR PREFERRED LEVEL This will be the preferred, programmed level. PRESS AND HOLD THE MODE BUTTON ON THE FRONT PANEL Hold the mode button until the display reads “...
-
Page 25: Programming The Mute Function
PRESS AND HOLD THE MODE BUTTON AGAIN… until the display reads This indicates that your new nonvolatile memory . Your Nº380 will now automatically return to this vol- ume setting whenever this input is selected. To reverse this situation, simply readjust the sets”). -
Page 26: Volume Lock
level and a level which is as many decibels below that level as you have elected to use as your However, if you adjust the volume with either the volume knob or the remote control while in the muted volume and disengage the pected (and possibly unpleasant) large increases in volume when the ton is disengaged after raising the volume with the knob. -
Page 27: Standby Timer
mal volume mode of operation. The display will read return to normal operation. In a similar fashion, you may elect to have the preamplifier (and the entire sys- standby timer tem, if Linked) go into Timer” on many alarm clocks. To engage the PRESS AND HOLD THE STANDBY BUTTON UNTIL THE DISPLAY READS TIME OFF. -
Page 28: Operational Modes
Operational Modes the monitor mode The majority of time you spend with your Nº380 will be spent in the monitor mode. In this mode, the display indicates the name of the input you have se- lected and the listening volume (in decibels). The output control acts as a vol- ume knob, increasing or decreasing the volume in 0.1 dB increments above 39.0 (with gradually increasing increments below this low level). -
Page 29: The Balance Mode
record outputs selector button of the currently selected (to-be-recorded) input a second time. Doing so will toggle the read the name of the chosen input and Defeating the pedance of a recording device could have an effect on the sound quality of the preamplifier. -
Page 30: Balance Control Tip
balance control tip Precise balance control is essential for obtaining accurate soundstaging. Output imbalances due to asymmetrical placement of the loudspeakers in the room are common, and degrade imaging accuracy . To correct this problem, place the Nº380 in mono mode and center the resulting image (which should be quite small) directly between the loudspeakers, using control. -
Page 31: Using Surround Sound Processors
Using Surround Sound Processors The Nº380 Preamplifier incorporates a special surround sound processor mode which makes it uniquely capable of integrating the highest performance audio with surround sound—that is, dual-purpose music and movie systems. In order to better understand the value of this design, it is essential to understand a bit about the nature of a surround sound processor. -
Page 32: The Ssp Must Not Be In A Tape Loop
the SSP must not The last remaining alternative would seem to be to insert the decoder “within” a preamplifier by hooking it up in a tape loop. Unfortunately , this setup returns the be in a tape loop Left and Right outputs of the decoder to the preamplifier, where they can be in- appropriately changed without changing the Center and Surround outputs. -
Page 33: Wiring Diagram Using An Ssp
wiring diagram using an SSP In some cases, connecting your audio and video systems together can result in noise in a/v systems noise, typically a 50/60 Hz or 100/120 Hz hum. The most common cause for this noise is a “ground loop” caused by the presence of two ground references in the system: one from the power company and another from the cable-television com- pany . -
Page 34: Linked Functions
Linked Functions The Nº380 has the ability to “link” several of its functions to certain compatible Mark Levinson components (such as the Nº30.5 or Nº36S digital processors and the Nº31.5 and Nº37 CD transport). Note: There are four linked functions in the Nº380: Adjusting the display intensity in the other Linked components as well, keeping them all at a consistent bright-... -
Page 35: Care And Maintenance
Care and Maintenance To remove dust from the cabinet of the Nº380, use a feather duster. To remove dirt and fingerprints, we recommend isopropyl alcohol and a soft cloth. Apply the alcohol to the cloth first and then lightly clean the surface of the Nº380, going with the grain of the brushed aluminum. -
Page 36: U.s. And Canadian Warranty
U.S. and Canadian Warranty ® 90-day limited warranty This Mark Levinson product is warranted to be free from defects in material and workmanship under normal use for a period of ninety (90) days from the date of purchase. To extend the warranty of this Mark Levinson product, return the war- ranty registration card along with a copy of the original receipt of purchase to Madrigal Audio Laboratories, Inc., P . -
Page 37: Obtaining Service
Obtaining Service We take great pride in our dealers. Experience, dedication, and integrity make these professionals ideally suited to assist with our customers’ service needs. If your Mark Levinson component must be serviced, please contact your dealer. Y our dealer will then decide whether the problem can be remedied locally , or whether to contact Madrigal for further service information or parts, or to obtain a Return Authorization. -
Page 38: Specifications
Specifications The correlation between published specifications and sonic quality is unreliable. A list of numbers reveals virtually nothing. All technical measurements must be sub- ject to qualitative as well as quantitative interpretation. Measurements of the Nº380 yield excellent results by any standards. However, only those specifications that apply to its actual operation are included here. -
Page 39: Dimensions
Dimensions 13.38" 34 cm 7.68" 2.85" 19.5 cm 7.24 cm 2.00" 5.1 cm 15.55" 39.5 cm 11.55" 29.3 cm 0.875" 2.2 cm 2.00" 5.1 cm 13.38" 34 cm 2.96" 7.5 cm (AC input) 3.76" 9.5 cm 2.25" 5.7 cm 0.425" 1.1 cm 0.10"... - Page 40 Madrigal Audio Laboratories, Inc. 2081 South Main Street, P.O. Box 781 Middletown, Connecticut 06457 USA Telephone: (860) 346-0896 Fax: (860) 346-1540 http://www.madrigal.com/ MADRIGAL AUDIO LABORATORIES is a registered trademark of Madrigal Audio Laboratories, Inc. a Harman International company 630264-2 © 6/1998 Madrigal Audio Laboratories, Inc. All rights reserved. Printed in U.S.A.
Need help?
Do you have a question about the N380 and is the answer not in the manual?
Questions and answers