Table of Contents
Advertisement
www.3dfactories.com
Before any manipulation with the printer please carefully
T Y P E :
T Y P E :
T Y P E :
T Y P E :
Thank you for purchasing our 3D printer
read this user guide
U S E R ' S
P R O F I 3 D M A K E R
P R O F I 3 D M A K E R
P R O F I 3 D M A K E R
P R O F I 3 D M A K E R
G U I D E
1
Version 1/2013
© Aroja s.r.o. 2013
Advertisement
Table of Contents

Summary of Contents for 3Dfactories Profi 3D Maker
- Page 1 Thank you for purchasing our 3D printer Before any manipulation with the printer please carefully read this user guide U S E R ‘ S G U I D E T Y P E : T Y P E :...
-
Page 2: Table Of Contents
Content IMPORTANT SAFETY NOTICE ..............................3 PACKAGE CONTENTS ................................4 DESCRIPTION OF PARTS ................................5 MINIMUM PC REQUIREMENT ..............................6 INSTALLATION G3DMAKER ..............................6 CONNECTION ..................................6 USB DRIVER INSTALLATION ..............................7 G3DMAKER SETTINGS ................................10 BEFORE FIRST PRINT................................11 9.1. F ................................11 EW STEPS BEFORE FIRST PRINT 9.2. -
Page 3: Important Safety Notice
1. IMPORTANT SAFETY NOTICE 1. CAUSING DAMAGE A 3D PRINTER DUE TO FAILURE OF FOLLOWING INSTRUCTION IN THIS USER MANUAL, EXPIRING THE WARRANTY VOID. 2. SECOND MATERIAL FOR DAMAGES AND PERSONAL INJURY CAUSED BY THE PRINTER MISAPPLICATION IN VIOLATION OF THIS USER'S MANUALS OR FAILURE TO SAFETY REGULATIONS IS FULLY RESPONSIBLE USER OF THIS DEVICE. -
Page 4: Package Contents
2. PACKAGE CONTENTS 1X 3D printer PROFI3DMAKER 1X CD 1x Allen key 1x 3D glue 2X power source 1x Spatula 1X USB Version 1/2013 © Aroja s.r.o. 2013... -
Page 5: Description Of Parts
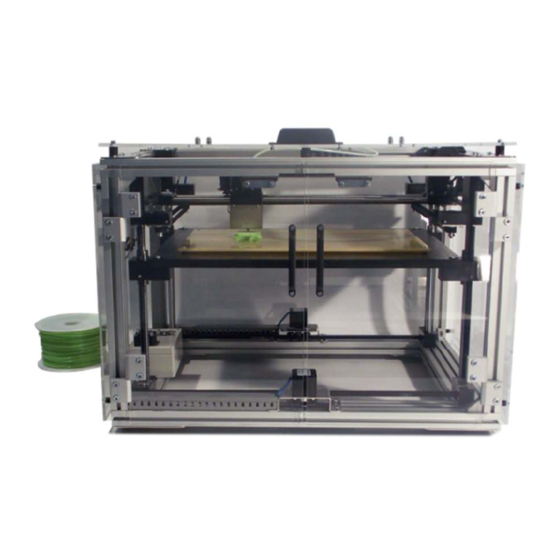
3. DESCRIPTION OF PARTS Extruder Axis Y Axis X Axis Z Print bed Version 1/2013 © Aroja s.r.o. 2013... -
Page 6: Minimum Pc Requirement
4. MINIMUM COMPUTER REQUIREMENT CPU 2,8Ghz RAM1GB Intel HG Graphics or better HDD 50GB CD ROM USB port Windows XP and newer Screen resolution 1200x800 5. INSTALLATION OF G3DMAKER Put CD into CR ROM and open it. There you can find installation for G3D MAKER. Choose installation for your system (32 bit or 64 bit ). -
Page 7: Usb Driver Installation
7. USB DRIVER INSTALLATION Connect the printer to the computer and switch printer on. Some operation system will install USB driver automaticly. Or ask you for driver. Than link the OS to the folder on CD "../drivers USB/FTDI USB drivers". - Page 8 Click right mouse on USB serial port or on icon with warning triangle. Choose actualize driver software and link to the CD driver folder. Version 1/2013 © Aroja s.r.o. 2013...
- Page 9 Version 1/2013 © Aroja s.r.o. 2013...
-
Page 10: G3Dmaker Settings
8. G3DMAKER settings Start G3DMAKER. First time the software will control if is on server some actualization. If is, download and installation will run automatically. After this the program will start and you can configure it. You will see this window: Before first start of printer click on printer setting icon. -
Page 11: Before First Print
9. BEFORE FIRST PRINT 9.1. Few steps before first print Before print is necessary to do this few steps. Please pay attention to this. • Double check if the print bed is clean • Remove all debris and rests of material •... -
Page 12: Introductions Of Filament
9.3 introductions of filament a) Insert the filament into the white tube (pic 9.3.1) b) Set temperature of extruder in control panel (1a). Be sure that heater is on (2a) c) Set speed on 100 ad length 50-100. d) After temperature is reached, press forward button and put filament into the extruder (pic 9.3.2) be sure that filament is going between... -
Page 13: How To Use 3D Glue
9.4. How to use 3d glue 3DGlue is holding model on the platform. Use it before each print on area where you will print. If is on platform too fat layer of glue remove it with spatula or scraper. -
Page 14: Removing Model From The Platform
10. REMOVING MODEL FROM THE PLATFORM If print is ready remove model from the platform with spatula. 11. G3D MAKER PRINT SETTINGS 11.1. Functions G3Dmaker icons Setting of printing Open save Preheat options Pause G-code Extruder/platform Start/stop Open Save... -
Page 15: Load Model
Move object on the platform Rotate object Scale object Change view 11.2. load model a) Start the program G3DMAKER and connect to the printer. b) Click on folder icon in left top Conner c) Load model from your directory 11.3. -
Page 16: Advanced Printing Settings
BRIM SKIRT Skirt is for properly extrusion start Brim for hold small models on platform Set your desired print options and press “Generate G-code” . After generation press “print button. 12. ADVANCED PRINTING SETTINGS 12.1. Common settings Click on icon for open setting window. -
Page 17: Cooling
Extra length on restart (mm): filament is going back to extruder after retract (length of retract + this number) Do not put here too high number. Usually is O only in some cases use some like 0.1 or 0.2 no more. Filament would be broken in extruder. -
Page 18: Advanced
Solid infill: speed of solid infill can be higher no problem put here 80mm/s besides layer thickness 0.25mm here let the value 40-50mm/s Top solid infill: value for speed of top solid layer can be lower. About 40-50 for precision creation of top surface. -
Page 19: Material Editor
Support material Overhang threshold: change of minimum angle for support generation. For example if you put here 40° the support will not created for angle over 40° like 41° and higher. Patternt spacing: space between support lines. If you put here higher value the support will be sparser. -
Page 20: Shaft Lubrication
Hold the belts in right tensions. If tensions are low correct it. Under Y motors are 4 screws loosen them and push the motor backwards. Than tighten the screws again. 13.1. Shaft lubrication Hold the shafts oiled. Use for this Silicone or Teflon oil. -
Page 21: Low Amount Of Material
14.3. Low amount of material If you see the print result like is on the picture, probably this has two reasons. a) Too low material. Decrease the filament diameter number in the material editor. b) Retract is too long, you can decrease length of the retract or increase the number for extra length on restart. -
Page 22: Retract
On this picture you can see the low material and too big of retract, material is not properly set back on nozzle after retract. 14.4. Retract This parameter can have good or bar impact on print result. Like on the picture higher. Set the extra length on restart.
Need help?
Do you have a question about the Profi 3D Maker and is the answer not in the manual?
Questions and answers