
Summary of Contents for salus sports S-Belt Bike
- Page 1 S-Belt Bike™ USER MANUAL Please read the User Manual carefully before using this product and retain for future reference. If you misplace the manual, you can download it from the Salus Sports website...
-
Page 2: Table Of Contents
CONTENTS Technical Specs ....................................1 Product Features ..................................1 Safety Instructions ..................................2 What’s in the Box ..................................3 Components ....................................3 Tool Kit ......................................4 Assembly Instructions ................................5 Operating Instructions ................................8 Maintenance ....................................10 Troubleshooting ..................................11... -
Page 3: Technical Specs
Black saddle (PU leather) with foam insert • Exercise Bike and Fitness e-book • Fully adjustable saddle (up/down/ • Salus Sports Health & Fitness e-newsletters forwards/backwards) including mini workouts, fat-burning workouts you can do anywhere, anytime • Adjustable handlebars and motivational tips •... -
Page 4: Safety Instructions
Please read carefully prior to using this product. You should consult a physician before beginning any exercise program including a program involving the use of the S-Belt Bike™ – this is especially important if you are pregnant, sick, injured or have a pre- existing medical condition. -
Page 5: What's In The Box
Remove all the components from the packaging – please save the packaging until you have fully assembled and tested the S-Belt Bike™ as you may have to return it. Note, all items must be returned in the original packaging for safety reasons. -
Page 6: Tool Kit
TOOL KIT • Allen Key x 1 • Spanner x 1 • Handlebar safety lock x 1 • Various nuts, bolts and washers • User Manual Nylock Nut Domed Nut Fixing Screw (M8) (M8) (M5x12mmL) Key Head Bolt Fixing Bolt (M8x60mmL) (M8x16mmL) Washer... -
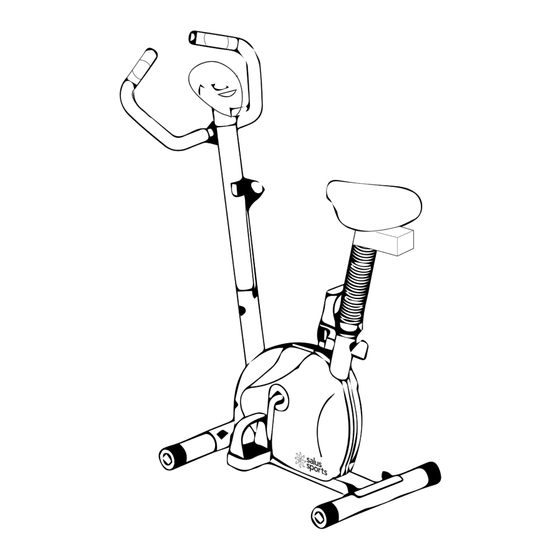
Page 7: Assembly Instructions
ASSEMBLY INSTRUCTIONS 7 easy steps to assemble then you’re ready to workout – it takes approx 30 mins to assemble. Step 1 Attach the front (17) and back (19) stabilizers to the main frame (25) with the domed nuts, washers (12 and 20) and key-head bolts (21 and 18) provided. - Page 8 Step 3 Turn the handlebars with the heart rate sensors to face you then attach the handlebars (4) to the front support pole (5). Lift the metal flap (29), centre the handlebars in the space provided, close the flap over the handlebars and lock in place with the handlebar safety lock (3) –...
- Page 9 Step 6 Remove the saddle height adjustment lock (24) from the main frame. Insert the saddle support pole (20) into the main frame (25). Push the concertina up and adjust to suit your height. Lock into place with the saddle height adjustment lock (24).
-
Page 10: Operating Instructions
OPERATING INSTRUCTIONS Adjusting the saddle The height and length of the saddle can easily be adjusted to accommodate a range of heights. To adjust the saddle up or down – remove the saddle height adjustment lock, hold the saddle in your hands and slide it up or down the saddle support pole, find the correct level for your height, insert the lock in the hole and tighten. -
Page 11: Using The Console
Using the console Insert the batteries provided. To turn on the display - press the MODE button or start pedalling. To turn off the display – stop pedalling and it will automatically turn off after 4 minutes. MODE – Press to select a function, or hold for 4 seconds to reset. SCAN –... -
Page 12: Maintenance
MAINTENANCE Regular maintenance will prolong the life of your bike and prevent injury. We strongly recommend that you do the following on a regular basis – Clean the bike after use with a soft cloth and cleanser - then dry it. Clean the Console display with a soft cloth and anti-static computer spray to remove dust or finger prints. -
Page 13: Troubleshooting
TROUBLESHOOTING PROBLEM SOLUTION THE PEDALS ARE ADD MORE RESISTANCE BY TURNING THE TENSION CONTROL SPINNING OUT OF TO THE RIGHT. CONTROL OTHERWISE, IT COULD BE AN ISSUE WITH THE BELT DRIVE – CONTACT CUSTOMER CARE FOR INSTRUCTIONS. THE BIKE IS UNSTABLE ADJUST THE FRONT AND BACK STABILISERS UNTIL THEY ARE FLAT ON THE SURFACE.
Need help?
Do you have a question about the S-Belt Bike and is the answer not in the manual?
Questions and answers