Table of Contents
Advertisement
Available languages
Available languages
OWNER'S MANUAL
FOR OUTDOOR USE ONLY
!
Please read manual carefully before assembly
Retain this manual for future reference
North Atlantic Imports LLC | 513 W. 2500 N. North Logan, UT 84321 | www.blackstoneproducts.com
WARNING
BLACKSTONE PATIO OVEN
Manuel De L'Utilisateur En Français
Manual Del Usuario En Español
!
1
MODEL# 1575
Página 57
1-AA Battery required for ignitor (not included)
VIDEO ASSEMBLY
Watch an actual
BLACKSTONE Patio Oven assembly.
Use a QR code app and scan the QR
code above. You will be taken to the
Patio Oven resource page.
www.blackstoneproducts.com/patio-oven
Page 29
Advertisement
Chapters
Table of Contents

Related Manuals for Black Stone 1575

Summary of Contents for Black Stone 1575
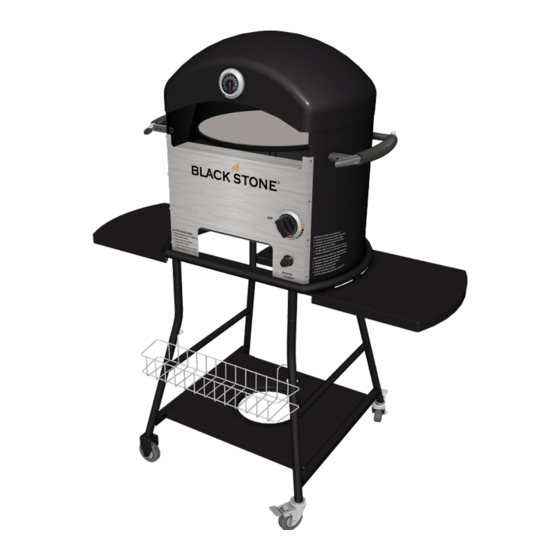
- Page 1 OWNER’S MANUAL BLACKSTONE PATIO OVEN MODEL# 1575 Manuel De L’Utilisateur En Français Page 29 Manual Del Usuario En Español Página 57 1-AA Battery required for ignitor (not included) VIDEO ASSEMBLY FOR OUTDOOR USE ONLY Watch an actual BLACKSTONE Patio Oven assembly.
- Page 2 DANGER WARNING If you smell gas: Do not store or use gasoline or other flammable liquids or vapors in the vicinity of this or any Shut off gas to the appliance immediately. other appliance. Extinguish any open flame. An LP cylinder not connected for use shall not be If odor continues, keep away from the appliance stored in the vicinity of this or any and immediately call your gas supplier or your...
- Page 3 Installation Safety Precautions DANGER • Use Patio Oven, as purchased, only with LP (propane) gas and the regulator/valve assembly supplied. If you smell gas: • Patio Oven installation must conform with local codes, Shut off gas to the appliance immediately. or in the absence of local codes, with either the Nation- al Fuel Gas Code, ANSI Z223.1/ NFPA 54, Natural Gas Extinguish any open flame.
-
Page 4: Table Of Contents
TABLE OF CONTENTS FOR YOUR SAFETY......2-3 USE AND CARE........5-10 ILLUSTRATED PARTS LIST....11-13 ASSEMBLY........14-23 USING AND TUNING ......25 CARE AND MAINTENANCE....25 WARRANTY..........26 CUSTOMER SERVICE......27 REORDERING PARTS......27 CONTACT INFO........27... -
Page 5: For Your Safety
Canada, DANGER CAN/CSA-B339, tanks, spheres and tubes for transportation of dangerous goods. Transport Canada (TC). See LP Tank collar for marking. • • LP Tank valve must have: NEVER store a spare LP cylinder under or near the • appliance or in an enclosed area. Type 1 outlet compatible with •... - Page 6 LP Tank Exchange Connecting Regulator To The LP Tank • Many retailers that sell Patio Ovens offer you the op- tion of replacing your empty LP tank through an ex- 1. LP tank must be properly secured onto Patio change service. Use only those reputable exchange Oven.
- Page 7 Leak Testing Valves, Hose and Regulator 1. Turn all oven control knobs to OFF. 2. Be sure regulator is tightly connected to LP tank. 3. Completely open LP tank valve by turning OPD hand wheel counterclockwise. If you hear a rushing sound, turn gas off immediately. There is a major leak at the connection.
- Page 8 Safety Tips 1. Before opening LP cylinder valve, check the coupling nut for tightness. 2. When Patio Oven is not in use, turn off control knob and LP cylinder valve. 3. Never move Patio Oven while in operation or when hot. 4.
- Page 9 • WARNING Important: Make sure gas is off at LP cylinder before checking valves. Knobs lock in OFF position. To check valve, first push in knob and release. Knob should spring back. If knob does Turn controls, gas source and tank OFF not spring back, replace valve assembly before when not in use.
- Page 10 Storing Your 11. Attach burners to brackets on firebox. Patio Oven • 12. Reposition carryover tubes and attach to Clean cooking stone. • burner. Store in dry location. • When an LP cylinder is connected to Patio Food Safety Oven, store outdoors in a well-ventilated space and out of reach of children.
-
Page 11: Illustrated Parts List
ILLUSTRATED PARTS LIST 1-8 1. Main body (1pc) 2. Left feet assembly (1pc) 3. Right feet assembly (1pc) 4. Base Plate (1pc) 5. Leg Rack (1pc) 6. Side tray (2pcs) 7. Rotating motor (1pc) 8. Igniter cover (1pcs) - Page 12 ILLUSTRATED PARTS LIST 9-16 9. Temperature knob (1pc) 10. Upper cover (1pc) 11. Heat shielf (1pc) 12. Aluminum cover (1pc) 13. Upper cooking stone (1pc) 14. Handle (2pcs) 15. PF ring (4pc) 16. Lower cooking stone (1pcs)
-
Page 13: Illustrated Parts List
ILLUSTRATED PARTS LIST 17-23 17. M6 Bolt (4pc) 18. Fasten knob (4pcs) 19. Rotating tray (1pc) 20. Thermometer (1pcs) 21. M8 Bolt (4pc) 22. Wingnut screw (1pc) 23. Drive Shaft (1pc) Tool Required for assembly Phillip screw driver... -
Page 14: Assembly
WARNING: The manufacturer has made every effort to eliminate any sharp edges. However, you should handle all components with care to avoid accidental injury. Tools required: The only tool needed is a Phillips Screwdriver for minimal assembly on the cover and main body handles. ASSEMBLY: Please read all instructions thoroughly before proceeding. - Page 15 Step 2 Flip the assembled body on to the legs. Assemble the handles as show below. M8 Bolt Handle PF Ring Step 3 Lower the rotating tray down into the oven. The table shaft will fit into the colar located in the center of the main body.
- Page 16 Step 4 Take out the rotating motor and assemble it as pictured below. Adjust the slot on the shaft of the rotating tray as pic- tured below.
- Page 17 Insert the drive shaft into the motor Drive shaft Rotating motor Slide the rotating motor until the drive shaft inserts into the cut out in the shaft of the rotat- ing tray completely. No fastening is required...
- Page 18 Step 5 Take out the pizza stone and put it on the rotating tray. Cooking stone Step 6 Take out the heat shield and insert it into the main body as pictured below. NOTE: It is important that the heat shield lines up correctly. Heat shield...
- Page 19 Step 7 Place the upper pizza stone into the heat shield as pictured below. Upper cooking stone Step 8 Take out the aluminum cover and put it on top of the heat shield (upper pizza stone). Aluminum cover...
- Page 20 Step 9 Take out the thermometer and assemble on the upper cover as pictured below. Upper cover Thermometer Step 10 Place the upper cover on the main body as show below.
- Page 21 Step 11 Take out the two side boards, assemble them on the main body and fix them with fasten knobs. Side board Side board Fasten knob Fasten knob Step 12 Take out the base plate and knob, assemble as pictured below. Base Plate Wingnut Screw...
- Page 22 Lock the base plate on the legs as pictured Step 13 Take out the rack and insert it into the front legs. Rack...
- Page 23 Step 14 Attach the temperature knob by lining up the grove in the know and the valve stem. Push on knob securely. Insert 1-AA battery into the ingnition slot with the positive terminal facing out. Then screw on the ingnition cover button. Pushing the button should create a “zapping” sound. Temperature Knob Igniter cover...
- Page 24 HOW TO USE YOUR PATIO OVEN 1. Turn the Patio Oven on high heat and let it warm up. It’s fully warmed up when the thermometer hits 300° (approx. 5-10 minutes). 2. Turn temperature knob down to medium heat and let the temperature settle between 350°- 400° (approx.
-
Page 25: Care And Maintenance
CARE AND MAINTENANCE Clean your Patio Oven regularly between uses and especially after extended periods of storage. Ensure that the Patio Oven and its components are sufficiently cool before cleaning. • Never handle hot parts with unprotected hands. • In order to extend and maintain the life and condition of your Patio Oven, we strongly recommend that the unit be covered when left outside for any length of time, especially during the winter months. -
Page 26: Warranty
North Atlantic Imports LLC 90-Day Warranty North Atlantic Imports LLC, the manufacturer, will warranty for 90 days from purchase all parts, workmanship and finishes (against rust). It will be the manufacturer’s option as to whether to repair or replace any of the above items. All warranties are limited to the original purchaser only. -
Page 27: Customer Service
We are here to help you! For questions regarding your BLACKSTONE Patio Oven, or if in need of replacement parts, you may contact us at: For USA Support Call: 435.252.3030 | For Canada Support Call: 801.656.2041 or send an email to: support@blackstoneproducts.com We’re pleased to help you with any questions concerning replacement parts or your warranty. - Page 29 MANUEL DE L’UTILISATEUR BLACKSTONE PATIO OVEN MODEL# 1575 1 pile AA requise pour l’allumeur non incluse. VIDEO USAGE EN PLEIN AIR UNIQUEMENT Pour visionner une vidéo de mon- tage du BLACKSTONE Patio Oven, AVERTISSEMENT scanner ce QR code. Celui-ci vous dirigera vers le site d’information pour...
- Page 30 DANGER AVERTISSEMENT En cas d’odeur de gaz : Ne pas stocker d’essence, autres liquides inflam- mables ou vapeurs à proximité de cet appareil ou Ouvrir le capot. de tout autre appareil. Couper l’alimentation de gaz. Ne pas conserver de bouteille de gaz non con- Eteindre toute flamme.
- Page 31 Précautions d’installation DANGER • N’utiliser le Patio Oven qu’avec une bouteille de gaz propane liquide et le régulateur/valve fournis. • L’utilisation du Patio Oven doit respecter les codes lo- IEn cas d’odeur de gaz: caux en vigueur. En l’absence de code local, respecter Couper l’alimentation de gaz.
- Page 32 TABLE DES MATIERES SÉCURITÉ..........30-31 UTILISATION ET PRÉCAUTIONS..33-38 SCHÉMA DES PIÈCES DÉTACHÉES........39-41 ASSEMBLAGE........42-51 UTILISATION ET REGLAGES....52 ENTRETIENT ET MAINTENANCE..53 GARANTIE..........54 SERVICE CONSOMMATEUR....55 COMMANDER DES PIÈCES....55 CONTACT..........55...
-
Page 33: Utilisation Et Précautions
et tubes de transport pour matières dangereuses. DANGER Transport Canada (TC). Voir informations sur le col de protection de la bouteille.La valve de la bouteille doit avoir : • • Une sortie de type 1 compatible avec un régulateur Ne pas stocker de bouteille de gaz sous, à coté de l’appareil ou dans un espace clos. - Page 34 Echange de bouteille de gaz Connecter le régulateur à la valve de la bouteille • De nombreux revendeurs proposent de replacer une 1. La bouteille doit être correctement fixée sur le bouteille vide par une nouvelle bouteille au lieu de la Tailgater.
- Page 35 Test de recherche de fuite pour la valve, le tuyau et le régulateur 1. Tourner tous les boutons de contrôle sur OFF. 2. S’assurer que le régulateur est fermement con- necté à la bouteille. 3. Ouvrir le robinet de protection triangulaire (OPD) entièrement en le tournant dans le sens inverse des aiguilles d’une montre.
-
Page 36: Sécurité
Conseils de sécurité 1. Vérifier le serrage de la molette du régulateur avant d’ouvrir la valve de la bouteille. 2. Tourner tous les boutons de contrôle sur OFF et fermer la valve de la bouteille lorsque le Patio Oven n’est pas utilisé. - Page 37 Vérification des valves AVERTISSEMENT • S’assurer que l’arrivée de gaz de la bouteille est fermée avant de vérifier les valves des boutons de contrôle. Les boutons doivent être en position OFF. Fermer les boutons et l’arrivée de gaz Pousser les boutons puis les relâcher. Ils devraient re- lorsque l’appareil est hors service.
- Page 38 Ranger le 10. Replacer les bruleurs. Patio Oven • 11. Attacher les bruleurs aux crochets sur le bac. Nettoyer la pierre de cuisson. • 12. Repositionner les tubes et les attacher aux bruleurs. Stocker dans un endroit sec. • Si la bouteille de gaz reste connectée, stocker Sécurité...
-
Page 39: Schéma Des Pièces Détachées
SCHEMA DES PIECES DETACHEES 1-8 1. Element principal (1pc) 2. Pied gauche (1pc) 3. Pied droit (1pc) 4. Plateau inférieur (1pc) 5. Panier (1pc) 6. Plateau latéral (2pcs) 7. Moteur rotatif (1pc) 8. Couvercle d’allumeur (1pcs) - Page 40 SCHEMA DES PIECES DETACHEES 9-16 9. Bouton de contrôle (1pc) 10. Couvercle supérieur (1pc) 11. Bouclier anti-chaleur (1pc) 12. Couvercle d’aluminum (1pc) 13. Pierre de cuisson supérieure (1pc) 14. Poignés (2pcs) 15. Rondelles (4pc) 16. Pierre de cuisson inférieure (1pcs)
- Page 41 SCHEMA DES PIECES DETACHEES 17-23 17. Vis M6 (4pcs) 18. Molettes de serrage (4pcs) 19. Plateau rotatif (1pc) 20. Thermomètre (1pcs) 21. Vis M8 (4pcs) 22. Ecrou papillon (1pc) 23. Thermomètre (1pc) 23. Axe(1pc) Outils nécessaires pour le montage Phillip tournevis...
-
Page 42: Assemblage
AVERTISSEMENT : Cet appareil a été conçu avec le souci d’éliminer tout bord pointu ou tran- chant. Cependant il convient de manipuler les pièces avec précaution afin de prévenir les risques de blessures. Outil nécessaire : le seul outil requis pour le montage du capot et des poignés de l’élément principal, est un tournevis cruciforme (Philips). - Page 43 Step 2 Flip the assembled body on to the legs. Assemble the handles as show below. M8 Bolt Handle PF Ring Step 3 Lower the rotating tray down into the oven. The table shaft will fit into the colar located in the center of the main body.
- Page 44 Etape 3 Assembler le moteur comme ci-dessous. Aligner l’encoche de l’axe sur le plateau rotatif.
- Page 45 Moteur Faire glisser le moteur de façon à em- boiter l’axe dans l’encoche du plateau rotatif.
- Page 46 Etape 4 Placer la pierre de cuisson sur le plateau rotatif. Pierre de cuisson Etape 5 Insérer le bouclier anti chaleur dans l’élément principal. A NOTER : Il doit être correctement aligné. Bouclier...
- Page 47 Etape 6 Placer la pierre de cuisson supérieure sur le bouclier anti chaleur. Pierre supérieure Etape 7 Poser le couvercle d’aluminium sur le bouclier anti chaleur. (De façon à couvrir la pierre supérieure). Couvercle d’aluminium...
- Page 48 Etape 8 Fixer le thermomètre à l’intérieur du couvercle supérieur. Couvercle Thermomètre Etape 9 Placer le couvercle supérieur au dessus de l’élément principal comme montré ci-dessous.
- Page 49 Etape 10 Insérer les deux plateaux latéraux dans l’élément principal puis les fixer à l’aide des molettes de ser- rage. Side board Plateau latéral Fasten knob Molette de sérage Etape 11 Fixer l’écrou papillon sur le plateau inférieur comme ci-dessous. Plateau inférieur Ecrou papillon...
- Page 50 Fixer le plateau inférieur sur les pieds. Etape 12 Fixer le panier sur les pieds. Panier...
- Page 51 Etape 13 Fixer le couvercle de l’allumeur et le bouton de contrôle comme ci-dessous. Bouton de contrôle Couvercle d’allumeur...
-
Page 52: Utilisation Et Reglages
COMMENT UTILISER LE PATIO OVEN 1. Allumer le Patio Oven sur High et le laisser chauffer. Il sera chaud au bout de 5-10 minutes lorsque la température atteint 300°. 2. Tourner le bouton de contrôle sur medium et laisser la température se stabiliser entre 350° et 400° (environ 5 minutes). -
Page 53: Entretient Et Maintenance
ENTRETIENT ET MAINTENANCE Nettoyer le BLACKSTONE Tailgater Combo régulièrement, entre chaque utilisation ou après une période d’inutilisation prolongée. Attendre que les différentes parties du Patio Oven aient refroidi avant de les nettoyer. • Ne jamais toucher les parties chaudes sans protection adaptée. •... -
Page 54: Garantie
North Atlantic Imports LLC Garantie 90 jours North Atlantic Imports LLC garantie les pièces, main d’œuvre et finitions (contre la rouille) pendant un an a partir de la date d’achat. Le constructeur se réserve le droit de remplacer ou réparer les pièces en cas de prise en charge. La garantie est limitée au premier propriétaire uniquement. -
Page 55: Service Consommateur
Notre équipe est là pour vous aider En cas de questions au sujet de votre BLACKSTONE Patio Oven ou en cas de besoin de pièces de rechange, vous pouvez nous contacter au : Pour les Etats Unis : 435.252.3030 | Pour le Canada : 801.656.2041 Ou par email : support@blackstoneproducts.com C’est un plaisir de répondre à... - Page 57 MANUAL DEL USARIO HORNO PARA PATIO BLACK ST MODELO# 1575 Necessita una batteria AA no incluida para el encendedor VIDEO DE ENSAMBLADO Mire un video actual de ensamblado de un Horno para Patio BLACKSTONE. Utilice una aplicacion para código QR y escanee el codigo de arriba.
- Page 58 PELIGRO ADVERTENCIA Si nota un olor a gas: No almacene o utilice gasolina o cualquier otro Cierre el gas conectado al electrodoméstico. líquido o capor flamable cerca de este o cual- Apague o extinga cualquier flama. quier otro electrodoméstico. Si el olor continúa, aléjese del electrodméstico e Un tanque de gas LP no conectado para usarse inmediatamente llame a su compañía de gas o al no deberá...
- Page 59 • La Instalación de el Horno para Patio deberá concor- PELIGRO dar con los códigos locales, o en ausencia de éstos, con el Código Nacional de Combustible en Gas, ANSI Z223.1/ NFPA 54, Código de Instalación de Gas Natu- ral y Propano, CSA B149.1, o el Código de Almace- Si nota un olor a gas: namiento y Manejo, B149.2, ó...
- Page 60 TABLA DE CONTENIDO PARA SU SEGURIDAD....58-59 USO Y CUIDADO......61-66 LISTA DE PARTES CON ILUSTRACINES........67-69 ENSAMBLADO........70-79 USO Y AFINACIÓN....... 80 CUIDADO Y MANTENIMIENTO..80-81 GARANTÍA..........82 SERVICIO AL CLIENTE......83 COMO ORDENAR PARTES EXTRAS..........83 CONTACTO..........83...
- Page 61 patio cubierto, cochera u otro edificio. Nunca deje PELIGRO un tanque de gas LP dentro de un vehículo el cual pueda sobre calentarse con el sol. • No almacene un tanque de gas LP en un área en la • NUNCA almacene un cilindro extra de gas LP de- cual jueguen o tengan acceso niños.
- Page 62 erse inesperadamente al ser mezclado con aire. electricidad para encender. Llenado de Tanques de Gas LP Durante una prieba de fugas, mantenga el horno • alejado de flamas o chispas. Utilice sólo distribuidores autorizados. • • Utilice una brocha limpia y jabon y agua en las par- El distribuidor de gas LP deberá...
- Page 63 Cómo Conectar el Regulador al Tanque de Gas 1. El tanque de gas LP deberá estar conectado apropiadamente al Horno para Patio. (Refiérase a la sección de ensamblaje página 14). 2. Gire todas las perillas de control a la posicion de apagado u OFF.
- Page 64 Tips de Seguridad Llame al (435) 252-3030 para ordenar partes de reem- plazo idénticas. 1. Antes de abrir la válvula del tanque de gas LP, re- vise que la tuerca de unión este bien apretada. Válvula de Prueba de Fugas, Manguera y Regu- 2.
- Page 65 ADVERTENCIA Deberá escuchar un clic y ver una chispa entre cada electrodo y cada quemador. Consulte la sección de Solución de Problemas si no escucha un click y ob- serva una chispa. Apague los controles, fuente de gas y el Revisión de Válvula tanque cuando no estén en uso.
- Page 66 8. Revise que el quemador no tenga daños. Debido al Almacenamiento de su Horno para Patio desgaste normal, algunos orificios podrían • Limpie la piedra para cocinar. agrandarse. Si encuentra alguna quebradura grande u • Almacene en un lugar seco. orificios, reemplace el qumador.
- Page 67 LISTA DE ILUSTRACIONES DE PARTES 1-8 1. Cuerpo Principal (1pza) 2. Ensamblado de pie izquierdo(1pza) 3. Ensamblado de pie derecho (1pza) 4. Repisa inferior (1pza) 5. Cesta (1pza) 6. Repisa de al lado (2pzas) 7. Motor Rotador (1pza) 8. Cubierta de Encendedor (1pza)
- Page 68 LISTA DE ILUSTRACIONES DE PARTES 9-16 9. Perilla de Temperatura (1pza) 10. Cubierta Superior (1pza) 11. Protector de Calor(1pza) 12. Cubierta de Aluminio (1pza) 13. Piedra de Cocina Superior (1pza) 14. Manija (2pzas) 15. Anillo PF (4pzas) 16. Piedra de Cocina Inferior (1pza)
- Page 69 LISTA DE ILUSTRACIONES DE PARTES 17-20 17. Perno M6 (4pzas) 18. Perilla Sujetadora (4pzas) 19. Repisa Rotadora (1pza) 20. Termómetro (1pza) 21. Perno M8 (4pzas) 22. Tuerca de mariposa 23. Eje (1pc) 22. Thermometer (1pc) Herramientas necesarias para el montaje Destornillador Phillip...
- Page 70 ADVERTENCIA: El fabricante ha hecho todos los esfuerzos posibles para eliminar extremos afi- lados. Sin embargo, usted deberá manejar todos los componentes con cuidado para evitar lesiones accidentales. Herramientas requeridas: La única herramienta requerida es un Desarmador Phillips para un ensamblado mínimo en la cubierta y las manijas del cuerpo principal. ENSAMBLADO: Por favor lea las instrucciones cuidadosamente antes de proceder.
- Page 71 Step 2 Flip the assembled body on to the legs. Assemble the handles as show below. M8 Bolt Handle PF Ring Step 3 Lower the rotating tray down into the oven. The table shaft will fit into the colar located in the center of the main body.
- Page 72 Paso 3 Extraiga el motor rotador e instale lo como se muestra abajo. Ajuste la ranura en el eje de la repisa rotadora como se muestra abajo.
- Page 73 Eje motor Motor rotador Mueva el motor rotador hasta que el eje motor se deslice dentro de la ranura en el eje de la repisa rotadora completamente.
- Page 74 Paso 4 Extraiga la piedra de cocina y colóquela en la repisa rotadora. Piedra de cocina Paso 5 Inserte el protector de calor en el cuerpo principal como se muestra abajo. NOTA: Es importante que el protector de calor esté alineado correctamente. Protector de calor...
- Page 75 Paso 6 Coloque la piedra de cocina superior en la parte posterior del protector de calor. Piedra de cocina superior Paso 7 Extraiga la cubierta de aluminio y colóquela sobre el protector de calor ( cubriendo la piedra de cocina). Cubierta de aluminio...
- Page 76 Paso 8 Inserte el termómetro en la cubierta superior como se muestra abajo. Cubierta superior Thermometer Paso 9 Extraiga la cubierta superior y colóquela sobre el cuerpo principal como se muestra abajo.
- Page 77 Paso 10 Deslice las dos repisas laterales al cuerpo principal y asegúrelas con el perno de fijador. Side board Repisa laterale Fasten knob Perno de fijador Paso 11 Extraiga la repisa inferior y asegura con la tuerca de mariposa como se muestra abajo. Repisa inferior Tuerca de mariposa...
- Page 78 Asegure la repisa en el ensemblado de pies. Paso 12 Extraiga el cesto y colóquelo en el ensemblado de pies como se muestra abajo. Cesto...
- Page 79 Paso 13 Extraiga la cubierta de encendedor y la perilla de temperatura. Asegure los como se muestra abajo. Perilla de temperatura Cubierta de encendedor...
- Page 80 CÓMO UTILIZAR SU HORNO PARA PATIO 1. Prenda el Horno para Patio en alto y déjelo calentarse. Estará listo cuando el termómetro marque aproximadamente 300ª (entre 5 y 10 minutos). 2. Gire la perilla de la temperatura hasya medium heat y deje que la tenperatura se reduzca a entre 350ª...
- Page 81 Mantenimiento de quemadores: A menudo, la quema de residuos después de cocinar mantendrá el horno limpio. El quemador deberá ser removido y limpiado anualmente o cuando note acumulación de residuos, para asegurarse de que no halla bloqueos (residuos, insectos) en los orificios de los quemadores o los tubos. Utilice un limpia- dor para tubos para remover obstrucciones.
- Page 82 North Atlantic Imports LLC Garantía de 90 Días North Atlantic Imports LLC, el fabricate, le da una garantía de 90 días en la compra de partes, fabricación y termi- nados (oxidación). Será decisión del fabricante si reemplaza o repara cualquiera de las opciones antes mensionadas. Todas las garantías son limitadas al consumidor original solamente.
- Page 83 Estamos aquí para ayudarle! Para preguntas en relación al Horno para Patio BLACKSTONE, o si necesita partes de repuesto, puede contactarnos al: Para Ayuda en USA llame al : 435.252.3030 | Para Ayuda en Canadá llame al: 801.656.2041 o Escríbanos a: support@blackstoneproducts.com No complace el poder ayudarle con cualquier pregunta con respecto a el reemplazo de partes o su garantía.
Need help?
Do you have a question about the 1575 and is the answer not in the manual?
Questions and answers