Table of Contents
Advertisement
Advertisement
Table of Contents

Summary of Contents for ArtPro Nail V6.1
- Page 1 PRINTER V6.1 U s e r M a n u a l...
- Page 2 (Please note that prior to use) Before using remove one screw as below. Fixed them before transportation to avoid damage to the unstable components. Pull it out of the round sheath Remove the one screw...
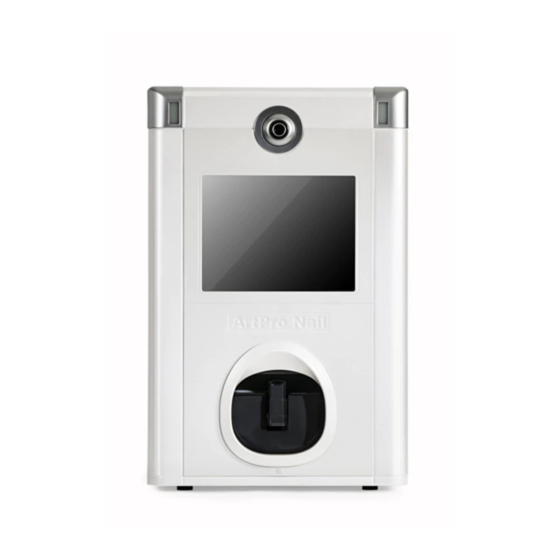
- Page 4 The nail printer is a machine printing color patterns on real nails and artificial nails. It is an innovative product that applies modern digital technology to nail art. The nail printer is suitable for use in image design center, beauty parlour, wedding studio, fashion store, nail salon, hair salon, shopping mall,etc.
- Page 5 LCD+ 12" Touch Screen Nail Holder Carrying Handle 25kg...
- Page 6 Open the carton and accessory box. Check the items according to the list of forms: -04-...
- Page 7 When the machine is power off,take out sheath, and put your hand into the machine to make the cartridge carriers move to the middle of the front of machine Do not touch the copper sheet -05-...
- Page 8 -06-...
- Page 9 Operation Instruction Single Nail placement Steps: Press down the slider Nail Tips Installment Steps: Press slider and put finger inside Put into the nail holder. Slider rebound and fix Slider Select one piece of one Fix in the nail tips holder. set of nail tips Nail Holder -07-...
- Page 10 Start the machine, the screen will appear the standard pattern interface. Interface layout as follows: preview of selection Template Zone (left column is Gallery folder cutting template preview and tool bar and right column is frame template) Page Flip Key for pattern folders and pattern pages.
- Page 11 Click the pattern, it will be added to the preview of selection Click the pattern, it will be added to the painting preview frame. Click, pattern will be automatically positioned on the nail area. -09-...
- Page 12 preselection Click the pattern, it will be added to the preselection zone Click to remove the pattern Click, expand the category of pattern Flip pages to view more folders Shift to pattern page and tool bar Flip pages to view more patterns Shift to pattern folders -10-...
- Page 13 Click, add the template to the patterns on the current page Flip pages to view more templates -11-...
- Page 14 Click, spread out the current pattern Flip pages to view more patterns Adjust the selection frame movement:up, down, left and right Click to obtain the desired area,the template will be moved here -12-...
- Page 15 Click to obtain the desired area,the template will be moved here -13-...
- Page 16 -14-...
- Page 17 A d j u s t u s e r s Click,select p o s i t i o n s o r the photo camera angle, determine the select the photo p h o t o g r a p h to the preview of composition selection...
- Page 18 Corresponding pattern to preview of selection Select control point, can control the two edges of control point. Show/Hide pattern key. Hide the pattern for observe the nail size conveniently. Adjust the related direction key, align the positioning frame edges match the nail edges.
- Page 19 Cancel template and restore the pattern Design Template Application 2 Cancel template and restore the pattern Fill color into the excision part. -17-...
- Page 20 Click the pattern in preview selection to add the pattern to Painting Preview Zone Select the type of Nail Tip Select whole set of Nail tips Delete the chosen pattern Mirror Images Key Start painting Click,enter the Multi-nails Painting Interface Note:Mirror Images Key(Default setting, the upper design is lower design’s mirror images;...
- Page 21 Software version Serial Number The prompt volume adjustment area Light Color/ Standard Color/ Dark Color Restore Factory Default area Restore Factory Default Click" " will pop-up the frame, click the "ok" button to return to the default settings and reboot the system.. -19-...
- Page 22 When touch screen has more deviation on responding to the contact, adjust the screen contact by the screen calibrator. The “+” icon appears in the center of the screen. Tapping it moves it to the upper left corner. Tap it to adjust the touch screen contact in that corner. The“+” symbol automatically moves to lower left corner.
- Page 23 Holder Attaching to Restrict of Test Card Restrict of Test Card Click" ", a black solid-line frame is printed.The four edges of the solid-line frame should be shown perfectly on the test card.(Remarks: If there are big deviation, select" " status and press the right "...
- Page 24 -22-...
- Page 25 -23-...
- Page 26 Name the pictures(the number from the 0001~~ 9999) Copy this folder to your USB disk or Memory Card , then plug it into the machine’s USB port, the Nail Printer will be updated automatically Notes:(V6.1 can choose from 4 to 9.) -24-...
- Page 27 -25-...
- Page 28 1.Check whether two protected screws have been removed (refer to Page1); Check whether two protected screws have been removed (refer to Page1); Apply Pre-print coat Miss to apply pre-print coat Nozzle blocked -26-...
- Page 29 -27-...
- Page 32 2013-01-A GUANGZHOU...
Need help?
Do you have a question about the V6.1 and is the answer not in the manual?
Questions and answers
請問這台指甲機多少錢