Table of Contents
Advertisement
Quick Links
Advertisement
Table of Contents

Summary of Contents for E-ride Industries 2009 EXV2
- Page 1 2009 Model Owner Manual...
- Page 2 Register your e-ride vehicle on-line at www.e-ride.com. Click on warranty vehicle registration, fill out the form, and click on the submit button. If you have no access to the internet please contact the e-ride Industries Customer Assistance Center at 800-950-4351 to register.
-
Page 3: Table Of Contents
Table of Contents Heading Page Introduction General Specifications Lighting Driver Controls Vehicle Operation Maintenance Transporting the Vehicle Customer Assistance Information Warranty Information Vehicle Options___________________________________87 e-ride Industries Page 1... -
Page 4: Introduction
Electric Vehicle (NEV) from e-ride Industries. Customer satisfaction and safety are the primary concerns of e-ride Industries. For this reason, it is recommended that you take the time to read through this entire manual for important information about the safe use and maintenance of your electric vehicle. - Page 5 It will also give you important information about maintenance and the associated safety information. This manual is applicable to the two e-ride Industries models: the two passenger EXV2 and the four passenger EXV4. e-ride Industries...
- Page 6 The VIN contains information such as the model year, type, GVWR, tire pressure, and other useful information. Please record the 17 character vehicle identification number in the space below: Vehicle Identification Number (VIN): Date Purchased: ______/_____/______ e-ride Industries Page 4...
-
Page 7: General Specifications
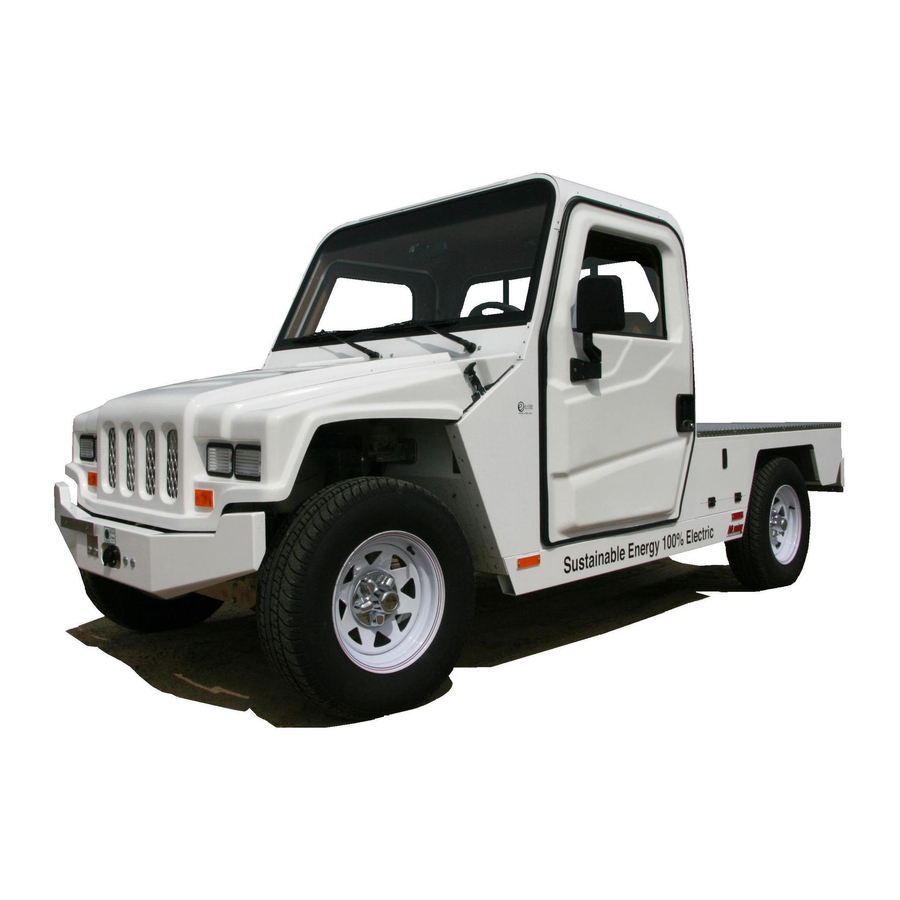
Section 2: General Specifications Specifications for: 2.1 e-ride Industries Flatbed Utility Vehicle (EXV2) Curb weight 1,855 pounds GVWR 3,000 pounds Length 156 inches Width 60 inches Height 70 inches Flatbed bed size 72 inches x 58 inches Drive system voltage... - Page 8 72 volt DC separately excited (optional 72 volt AC) Top Speed 25 miles per hour Tires 14” street rated Brakes Hydraulic front disc and rear drum Steering Rack & pinion Chassis Riveted aluminum Bumpers Steel front and rear e-ride Industries Page 6...
- Page 9 72 volt DC charger Charge time 8-12 hours depending on discharge Charging energy requirements 220 volt AC for best charge and 110 volt AC for emergency use only Lights Headlights w/bright, taillights, turn signals, hazard lights, and brake lights e-ride Industries Page 7...
- Page 10 2.2 e-ride Industries Coach Transportation Vehicle (EXV4) Curb weight 1,855 pounds GVWR 3,000 pounds Length 145 inches Width 60 inches Height 70 inches Flatbed bed size 28 inches x 55 inches Drive system voltage 72 volt Batteries 8 volt lead acid – qty. 9...
- Page 11 Rack & pinion Chassis Riveted aluminum Bumpers Steel front and rear Suspension Independent front suspension, leaf spring solid axle in rear Speed Controller 72 volt with regenerative braking (optional 72 volt AC) Charger 72 volt DC charger e-ride Industries Page 9...
- Page 12 Charge time 8-12 hours depending on discharge Charging energy requirements 220 volt AC for best charge and 110 volt AC for emergency use only Lights Headlights w/bright, taillights, turn signals, hazard lights, and brake lights e-ride Industries Page 10...
-
Page 13: Lighting
Headlights should be kept clean and in good operation at all times as not to impair night visibility. e-ride Industries Page 11... - Page 14 These operate on their dim setting as the taillights with the light (headlight) switch turned on. They flash with the corresponding turn signal and hazards and also illuminate when the brake pedal is pushed. e-ride Industries Page 12...
- Page 15 3. Remove the wire connector from the headlight. 4. Turn the bulb counter-clockwise and pull it straight out to remove it from the housing. 5. To put back together, go through steps 2 – 4 in reverse order. e-ride Industries Page 13...
- Page 16 2. Turn the socket counter-clockwise to release it from the housing. 3. Pull the bulb straight out to remove it from the socket. 4. To put back together, go through steps 2 and 3 in reverse order. e-ride Industries Page 14...
- Page 17 3. Remove it from its plug housing and replace. 4. To put back together, go through steps 2 and 3 in reverse order. Note: The turn signals and hazards use the same flasher. e-ride Industries Page 15...
-
Page 18: Driver Controls
The digital dash display is the large flat screen monitor located in the center of the dash between the selector switch and the 12 volt accessory power outlet. This display shows multiple functions and includes all the dash instrumentation. e-ride Industries Page 16... - Page 19 (See section 5.3 Charging of this manual for the charging procedure) e-ride Industries Page 17...
- Page 20 On the digital dash display, it is located at the bottom left side of the screen. To set the clock, press and hold the select button for 3 seconds and then release when the main menu appears. Press the up and down buttons to e-ride Industries Page 18...
- Page 21 These illuminate when the left, right or hazard turn signals are turned on. 4.1.7 Park Brake Indicator This illuminates when the parking brake is engaged. 4.1.8 High Beam Indicator This illuminates when the high beam headlights are turned on. e-ride Industries Page 19...
- Page 22 2 ½ gallon container provided after the next charge cycle. (See section 6.1.1 Battery Water Filling in this manual for battery filling procedure) *Note: Do not rely on this light for battery watering routine maintenance purposes. e-ride Industries Page 20...
- Page 23 Keep outlet covered when not in use to prevent anything unintended from entering. The accessory outlet accepts a standard automotive 12-volt accessory plug and is intended for accessories, such as cell phones. Maximum current usage from the outlet is 15 amps. e-ride Industries Page 21...
- Page 24 Press the bottom of the switch to move vehicle in reverse. The center position of this switch is neutral. To prevent damage to the motor, do not at any time change the direction of the selector switch unless the vehicle is at a complete stop. e-ride Industries Page 22...
- Page 25 Always remember to turn on your headlights at dusk or dawn and during inclement weather. Failure to activate your lights under these conditions could result in a collision. e-ride Industries Page 23...
- Page 26 The high beams only work when the low light switch is turned on. When approaching another vehicle or person, be sure to turn off the bright headlights to avoid blinding, which may cause an accident. e-ride Industries Page 24...
- Page 27 The turn signal lever is the longer of the two on the left side of the steering column. Push the lever up to engage the right turn signal and pull it down to engage the left turn signal. e-ride Industries Page 25...
- Page 28 4.3.3 Hazard Light Switch The hazard light switch is the small knob on the right side of the steering column. Push the lever in to turn on the hazard lights; pull it out to shut them off. e-ride Industries Page 26...
- Page 29 The vehicle is equipped with electronic assist braking. The electric motor regens at a proportionally higher percentage the more the brake pedal is pressed. This makes braking easier as well as adding more vehicle range. e-ride Industries Page 27...
- Page 30 When the park brake is engaged, a parking brake symbol will be illuminated in the middle left location of the digital dash display. Be sure to set the parking brake when parking the vehicle to prevent rolling. e-ride Industries Page 28...
- Page 31 *Note: Rear seats (if equipped) are not adjustable. Do not attempt to adjust the driver seat while the vehicle is in motion. Always make sure that the seats are locked in place before operating the vehicle. e-ride Industries Page 29...
- Page 32 If the tab is pulled toward you it is in day mode; if it is pushed toward the windshield it is in night mode. e-ride Industries Page 30...
- Page 33 All occupants of the vehicle, including the driver, should always properly wear their safety belts. b. Lap belts should fit snugly and as low as possible around the hips, not across the waist. e-ride Industries Page 31...
- Page 34 It is extremely dangerous to ride in the cargo area of the vehicle. In a collision, people riding in these areas are more likely to be seriously injured or killed. Do not allow people to ride in any area of your vehicle that is not equipped with seats and seat belts. e-ride Industries Page 32...
- Page 35 Safety belt assemblies not used during a collision should also be inspected and replaced if damaged or improper operation is found. Failure to inspect and if necessary replace the safety belt assembly following a collision could result in severe personal injuries in the event of another collision. e-ride Industries Page 33...
- Page 36 Never let a passenger hold a child on his or her lap while the vehicle is in motion. The passenger cannot protect the child from injury in a collision. e-ride Industries Page 34...
-
Page 37: Vehicle Operation
This vehicle contains a high voltage electrical system. If this vehicle is not used properly or serviced as stated in this manual, serious injury or death may result. Read this manual prior to charging or servicing this vehicle. e-ride Industries Page 35... - Page 38 This switch should be disengaged before any maintenance is performed on the vehicle. *Note: Also, if the vehicle is equipped with a 12 volt battery it should be disconnected prior to maintenance. (See Section 6: Maintenance) 5.2 Vehicle Drive Sequence e-ride Industries Page 36...
- Page 39 5. Release the brake when you are ready to drive and lightly depress the accelerator pedal. When driving the vehicle, be careful not to take corners too fast because the vehicle may flip. 5.3 Vehicle Drive Characteristics/Behaviors e-ride Industries Page 37...
- Page 40 2. When braking, the vehicle will electronically assist (regen) more than when just decelerating. (AC drive models only) 3. Initially drive the vehicle in a safe environment to help you fully understand how it performs. e-ride Industries Page 38...
- Page 41 (wet) lead acid batteries with this charger. Normal charging at the finish charge rate for the last three to five (3-5) hours is important to achieve equalization of all battery cells every time the batteries are charged. e-ride Industries Page 39...
- Page 42 WARNING: Lead acid batteries generate gases which can be explosive. Charge the batteries only in well ventilated areas. Do not disconnect charger DC output terminals from battery when charger is on. The resulting arching and burning will damage the e-ride Industries Page 40...
- Page 43 DANGER: To reduce the risk of fire, do not use the charger near flammable materials or vapors. If the charger must be stopped, always disconnect the input supply cord from its outlet to terminate the charge. e-ride Industries Page 41...
- Page 44 AC supply cord from the outlet. Never plug in both 120 volt and 220 volt cords at the same time. When one cord is plugged into one receptacle the other receptacle has live power also. e-ride Industries Page 42...
- Page 45 Only use an extension cord if it is absolutely necessary. Always use a three- conductor, No. 12 AWG heavy duty cord with ground that is properly wired. The extension cord should be in good electrical condition, and kept as short as possible. e-ride Industries Page 43...
- Page 46 Please read all of the safety information before using the charger. Some important safety information and warnings are given below: a. To reduce the risk of injury, charge only liquid electrolyte (wet) lead acid rechargeable batteries. Other types of batteries may burst causing personal injury and damage. e-ride Industries Page 44...
- Page 47 Turning off controls will not reduce the risk of electric shock. f. DO NOT use jumper cables to the batteries on this vehicle. g. Only charge this vehicle with the appropriate battery charger that is supplied with the vehicle. e-ride Industries Page 45...
- Page 48 Therefore, it is mandatory that water be added to cells ONLY when they are fully charged. Older batteries may require more frequent watering than new batteries. (See section 6.1.1 Battery Water Filling for battery watering procedure) e-ride Industries Page 46...
- Page 49 Do not excessively discharge batteries. Excessive discharge can cause polarity reversal of individual cells resulting in complete failure shortly thereafter. The batteries state of charge should not drop below 50% for maximum battery life. Limited use of e-ride Industries Page 47...
- Page 50 If you allow the vehicle to sit in conditions of 0 degrees C (32 degrees F) or less with a state of charge of 20% or less, the battery could freeze. If the batteries happen to e-ride Industries Page 48...
- Page 51 Make sure the cables are tight to the terminals but be careful not to over tighten. Any corrosion present on the batteries or terminals should be cleaned promptly by brushing them off with a wire brush. The acid can be neutralized with a solution of baking soda and water. e-ride Industries Page 49...
-
Page 52: Maintenance
Batteries normally produce explosive gases which can cause personal injury. Therefore, do not allow flames, sparks or lighted substances to come near the battery. When working near the battery, always shield your face and protect your eyes. Always provide ventilation. e-ride Industries Page 50... - Page 53 Avoid contact with skin, eyes or clothing. Shield your eyes when working near the battery to protect against possible splashing of acid solution. If acid comes in contact with eyes or skin, flush immediately with water for e-ride Industries Page 51...
- Page 54 Never smoke or allow a spark or flame in the vicinity of batteries. g. Be extra cautious to reduce risk of dropping a metal tool onto battery. It might spark or short-circuit battery or other electrical part that may cause explosion. e-ride Industries Page 52...
- Page 55 Never charge a frozen battery. j. Do not lift a battery by the terminal posts, or internal damage may result. e-ride Industries Page 53...
- Page 56 Take the cap off the connector. 3. Place the supplied 2 ½ gallon tank on the roof of the vehicle with the tank fill hose hanging over the front of the windshield. e-ride Industries Page 54...
- Page 57 Once the wheel has slowed down or stopped, the batteries are full of water. Disconnect the water bottle hose by pressing the button on the coupler and re-attach the battery pack fill hose to the vehicle with the cap in place. e-ride Industries Page 55...
- Page 58 EXV2 Models: The EXV2 model is equipped with a battery access panel in the flat bed for easy maintenance and service of the rear batteries. e-ride Industries Page 56...
- Page 59 2. Unplug center console wire harness at the rear driver’s side of the console. (Only if supplied with options in the console) 3. Unplug heater hoses. (Only if supplied with heater) 4. Remove the center console. 5. Remove the battery covers. e-ride Industries Page 57...
- Page 60 3. Unplug center console wire harness at the rear driver’s side of the console. (Only if supplied with options in console) 4. Unplug heater hoses. (Only if supplied with heater) 5. Remove the center console. 6. Remove the battery cover in the center of the vehicle. e-ride Industries Page 58...
- Page 61 If you find any signs of a loose cable connection, they must be tightened by a trained professional before the main battery disconnect is turned back on. *Note: The main battery disconnect does not disconnect power from battery to battery. e-ride Industries Page 59...
- Page 62 Always dispose of batteries in a responsible manner. Follow your local authorized standards for disposal. Call your local authorized recycling center to find out more about recycling batteries. You may also call your local Interstate Battery Dealer to pick up used or dead batteries. e-ride Industries Page 60...
- Page 63 DANGER: To reduce risk of electric shock, always disconnect the AC supply cord from its outlet and the DC output cord from the battery before attempting any maintenance or cleaning of the battery charger. e-ride Industries Page 61...
- Page 64 -Note: The vehicle is equipped with a four-wheel hydraulic braking system, only use standard Dot 3 brake fluid from an unopened container. e-ride Industries Page 62...
- Page 65 Make sure that the blade is still pliable and not stiff or cracked. c. If there are any defects, be sure to replace the blades to ensure safety. d. The wiper blade is adjustable in length and angle. e-ride Industries Page 63...
- Page 66 Mis-aligned tires will also cause uneven tire wear which could be a safety hazard. e-ride Industries Page 64...
- Page 67 3 miles. c. Adjust the tire pressure according to the recommended specifications listed on the sidewall of the tires and on the VIN label on the driver’s seat base. e-ride Industries Page 65...
- Page 68 All 72 volt rated fuses are located in the rear motor compartment of the vehicle. In most cases, if these fuses fail there is another issue with your vehicle. Problems that cause fuse failure should be diagnosed by a trained professional. e-ride Industries Page 66...
- Page 69 The fuse panel is a small black box in the center. Remove the weather cover by pressing both of the side tabs and lifting upward. The fuse circuit, size and panel locations are given in the following table: e-ride Industries Page 67...
- Page 70 25 Amp Headlights 20 Amp Horn, Backup Alarm, Backup light 15 Amp Brake Lights, Wiper Motor, 12 Volt Accessory Outlet 15 Amp Heater Coil, Heater Fan, Radio Ignition 10 Amp 2-Speed Fan, Beacon Light 10 Amp e-ride Industries Page 68...
- Page 71 (seats, glass, dash, etc.). Also, make sure to use a soft clean towel to avoid surface scratches and water spotting. Caution: Do not rinse the interior of your vehicle. Direct water on the charger plug, windshield, dash panel or instrument panel could damage the electrical system. e-ride Industries Page 69...
- Page 72 4. Check brake fluid for proper level 5. Check brake lines for leaks 6. Check headlights, blinkers, brake lights, wipers 7. Check seat belts for proper operation 8. Check battery terminals for tight connections and corrosion e-ride Industries Page 70...
-
Page 73: Transporting The Vehicle
Towing the vehicle at speeds in excess of 25 miles per hour with any of the wheels in contact with the ground is not recommended. e-ride Industries will void all warranties if vehicle is towed in this manor. -
Page 74: Customer Assistance Information
Section 8: Customer Assistance Information Customer satisfaction is a primary goal of e-ride Industries. If you have any questions or concerns with your e-ride vehicle, please contact the e-ride Industries Customer Assistance Center. By Mail: e-ride Industries Customer Assistance Center... - Page 75 When contacting the Customer Assistance Center, please have the following information available: The vehicle identification number (VIN) The year and model of your vehicle The date you purchased the vehicle The current odometer reading The name of the dealer the vehicle was purchased from e-ride Industries Page 73...
-
Page 76: Warranty Information
Section 9: Warranty Information e-ride Industries Limited Warranty Policy e-ride will repair or replace, at its option, all genuine e-ride parts found faulty in material and/or workmanship under normal use and under the understanding that the vehicle has had the appropriate maintenance and service with genuine new or rebuilt parts, at e-rides option, for parts and labor, at any authorized e-ride retailer during the warranty coverage period. - Page 77 Contact your local e-ride authorized dealer. (which may be the dealer you purchased your vehicle from) A vehicle owner can elect to service or repair their own vehicles, but must contact e-ride directly for warranty or parts. e-ride Industries Page 75...
- Page 78 Contact e-ride customer service to help you find a local authorized service center. By Mail at: e-ride Industries Customer Assistance Center 3171 92 Avenue Princeton, MN 55371 By Phone: 1-800-950-4351 By e-mail: customer.assistance@e-ride.com Customer Assistance Center hours: Monday through Friday CST, 8am to 5pm...
- Page 79 Damage resulting from improper repairs, modifications or use of non approved parts or repairs. Damage resulting from continued use of vehicle after defect is or should have been discovered. e-ride Industries Page 77...
- Page 80 Any water leaking into the vehicle or damage to personal property because of any leakage. e-ride will only pay up to 20 miles in transportation expenses for any vehicle needing repair under warranty. Limited warranty may differ for vehicles exported outside the United States. Any damage to personal property e-ride Industries Page 78...
- Page 81 Industries is not responsible for any injury to person or property if any such above modifications and alterations are made.
- Page 82 Extended limited warranties e-ride industries has available an extended (1) year and (2) year limited warranty that starts at the date of the original expired warranty. All extended limited warranties purchased through e-ride industries will follow the same stipulations of the original warranty except that each service item will have a $100.00 deductible that will be...
- Page 83 Warranty of parts after cancellation of warranty e-ride replacement parts that are replaced under warranty are only warranted the same length as the warranty it was replaced under. Parts purchased from e-ride Industries All parts purchased from e-ride are given a 6 month warranty. e-ride Industries...
- Page 84 Industries’ allowed time and labor hourly charge. In any case where e-ride Industries rejects any warranty work or replacement of parts, e-ride has the choice...
- Page 85 Disclaimer This limited warranty is exclusive, e-ride Industries makes no other warranty of any kind, expressed or implied. Any implied warranties of merchantability or fitness for a...
- Page 86 Industries has the authority to make or imply any representation, promise, or agreement which in any way varies the terms of this warranty. e-ride Industries reserves...
- Page 87 Industries option, of a vehicle component thereof that e-ride Industries deems to be defective. Replacement shall mean furnishing, during the applicable limited warranty period, a new vehicle or victory reconditioned vehicle or component thereof which is identical or reasonably equivalent to the warranted product or component at no cost to the purchaser.
- Page 88 75). Please have the following information available: The vehicle identification number (VIN) The year and model of your vehicle The date you purchased the vehicle The current odometer reading The name of the dealer the vehicle was purchased from e-ride Industries Page 86...
-
Page 89: Vehicle Options
Section 10: Vehicle Options 10.1 EXV2 & EXV4 Models 10.1.1 AC Drive System The AC drive system upgrades your drive system to a 35 H.P. motor and a Curtis 550 amp controller. e-ride Industries Page 87... - Page 90 This option is for typical applications where the entire cab is enclosed and possibly heated. It is available to have non- e-ride Industries Page 88...
- Page 91 The radio features two front mounted speakers and an AM/FM radio with a compact disc player. The faceplate is detachable for added security. View the radio manual for detailed instructions on use of the radio. The radio will function with the ignition key in e-ride Industries Page 89...
- Page 92 To turn the fan on medium speed, rock the switch to the center position. To turn the fan on high speed, rock the switch to the top position. To turn on the heating element, rock the HEATER switch to the top position. When the heating element is on low speed, e-ride Industries Page 90...
- Page 93 To turn on the beacon light, rock the switch to the top position. For beacon light protection, there is a beacon light guard available. This option is most commonly used on vehicles with a ladder rack. The beacon will only function with the ignition key turned on. e-ride Industries Page 91...
- Page 94 Use standard ¼-20 hardware to mount the license plate to the bracket. 10.1.9 Backup Alarm The backup alarm sounds when the ignition key is on and the forward/reverse selector switch is in the reverse position. The alarm provides safety to others when backing up. e-ride Industries Page 92...
- Page 95 The dome light is mounted on the interior of the b-pillar. It provides light inside the vehicle cab. The light will illuminate with the key is on or off. To toggle the light on or off, push the black button located on the drivers side of the dome light. e-ride Industries Page 93...
- Page 96 To turn the fan on low speed, rock the switch to the center position. To turn the fan on high speed, rock the switch to the top position. The two speed fan will only function with the ignition key turned on. e-ride Industries Page 94...
- Page 97 15 amps at 120 volts. 10.1.15 Trailer Hitch This is a receiver tube that is mounted to the rear bumper and allows a 2” receiver to be inserted with the appropriate hitch ball size to attach a trailer. e-ride Industries Page 95...
- Page 98 30 days from the original invoice date. This warranty has the same stipulations as the original 12 month warranty given with the purchase of your vehicle. See e-ride Industries limited warranty policy in section 9 of this manual for details.
- Page 99 See e-ride Industries limited warranty policy in section 9 of this manual for details. 10.1.18 Tube Bumpers This is a welded tube bumper that is painted black. It is a cosmetic replacement for the standard sheet metal bumper.
- Page 100 10.2.2 Ladder Rack This is a full steel frame to allow the storage of ladders on top of the vehicle. Tie down and fully secure anything placed on the ladder rack before moving the vehicle. e-ride Industries Page 98...
- Page 101 10.2.4 Aluminum Stake Sides Constructed of aluminum, these stake sides help keep cargo on the flat bed. Available in two different lengths depending on if the vehicle is equipped with a rear enclosure. e-ride Industries Page 99...
- Page 102 10.2.6 Locking enclosure For added security locking doors are available. This includes the main passenger’s access doors and the storage compartments under each side of the EXV2 flat bed. e-ride Industries Page 100...
- Page 103 Flip down foot rests that fold up for easy transporting of the vehicle without passengers. Never, at any time, exceed the gross vehicle weight of 3000 lbs. e-ride Industries Page 101...
- Page 104 Lift the box until all of the material in box is emptied. Press the down button on the remote switch to lower the box. Never drive the vehicle unless the box is completely lowered. When access to the batteries is needed, lift e-ride Industries Page 102...
- Page 105 Both sides open the same way. Make sure the gates are completely latched in the closed position before moving the vehicle. Never at any time exceed the gross vehicle weight of 3000 lbs. e-ride Industries Page 103...
- Page 106 This is a plastic tool box that fits inside the rear cargo box and is accessible from both sides of the vehicle. The box is lockable for security purposes. To lock or unlock the tool box insert key and turn on quarter turn. Push latch button to open the tool box. e-ride Industries Page 104...
Need help?
Do you have a question about the 2009 EXV2 and is the answer not in the manual?
Questions and answers