Table of Contents
Advertisement
Quick Links
HD DIGITAL RECORDER
USER MANUAL
subsidiaries. All rights reserved. Curve is a trademark of Maka GPS Technologies Group
including Maka Corporation USA Inc. in one or more countries. All trademarks mentioned
belong to their owners, third party brands, product names, trade names, corporate names. And
company names mentioned may be trademarks of their respective owners or registered
trademarks of other companies and are used for purpose of explanation and to owner's
benefit, without implying a violation of copyright of law.
The information in this manual is subject to change without notice.
.
6/2014.
R1.1
www.makacorp.com
1
2014 Maka Technologies Group. All Rights Reserved.
Advertisement
Table of Contents

Subscribe to Our Youtube Channel
Related Manuals for Curve QB5

Summary of Contents for Curve QB5
- Page 1 HD DIGITAL RECORDER USER MANUAL subsidiaries. All rights reserved. Curve is a trademark of Maka GPS Technologies Group including Maka Corporation USA Inc. in one or more countries. All trademarks mentioned belong to their owners, third party brands, product names, trade names, corporate names. And company names mentioned may be trademarks of their respective owners or registered trademarks of other companies and are used for purpose of explanation and to owner’s...
-
Page 2: Safety Information
Safety information To prevent injury to yourself and others or damage to your device, read the safety information about your device before using the device. Warning Failure to comply with safety warnings and regulations can cause serious injury or death. Do not use damaged power cords or plugs, or loose electrical sockets Unsecured connections can cause electric shock or fire. - Page 3 Use manufacturer-approved batteries, chargers, accessories, and supplies Using generic batteries or chargers may shorten the life of your device or cause the device to malfunction. They may also cause a fire or cause the battery to explode. Use only Maka GPS Technologies Group-approved battery and charger specifically designed for your device.
- Page 4 ・Extreme temperatures can damage the device and reduce the charging capacity and life of your device and battery. ・Prevent the battery from coming into contact with metal objects, as this can create a connection between the + and – terminals of your battery and lead to temporary or permanent battery damage.
- Page 5 Caution Failure to comply with safety cautions and regulations can cause injury or property damage Do not use your device near other electronic devices Most electronic devices use radio frequency signals. Your device may interfere with other electronic devices. Do not expose the device to heavy smoke or fumes Doing so may damage the outside of the device or cause it to malfunction.
- Page 6 Do not store your device in very hot or very cold areas. It is recommend- ed to use your device at temperatures from 0 °C to60 °C and humidity from 10% to 80% Doing so may cause the screen to malfunction, result in damage to the device, or cause the battery to explode.
- Page 7 • Leaving batteries unused over time may reduce their lifespan and perfor- mance. It may also cause the batteries to malfunction or explode, or cause a fire. • Your device may wear out over time. Some parts and repairs are covered by the warranty within the validity period, but damages or deterioration caused by using unapproved accessories are not.
- Page 8 Correct disposal of this product (Waste Electrical & Electronic Equipment) (Applicable in countries with separate collection systems) This marking on the product, accessories or literature indicates that the product and its electronic accessories (e.g. charger, headset, USB cable) should not be disposed of with other house- hold waste.
- Page 9 Disclaimer Some content and services accessible through this device belong to third parties and are protected by copyright, patent, trademark and/or other intellectual property laws. Such content and services are provided solely for your personal non-commercial use. You may not use any content or services in a manner that has not been authorised by the content owner or service provider.
- Page 10 content or service will remain available for any period of time. Content and services are transmitted by third parties by means of networks and transmission facilities over which Maka GPS Technologies Group has no control. Without limiting the generality of this disclaimer, Maka GPS Technologies Group expressly disclaims any responsibility or liability for any interruption or suspension of any content or service made available through this device.
-
Page 11: About This Manual
About this manual This device provides high quality digital recording device using Maka’s high standards and technological expertise. This user manual is specially designed to detail the device’s functions and features. ・ Please read this manual before using the device to ensure safe and proper use.Descriptions are based on the device’s default settings. -
Page 12: Table Of Contents
Overview of your QB5 HD Digital Roadcorder Device Layout Understanding of your QB5 HD Digital Roadcorder Buttons Status Icons Standard Packaging of your QB5 HD Digital Roadcorder Package Contents Installation of your QB5 HD Digital Roadcorder Installation Charging the Battery... - Page 13 Table of Contents Operation of your QB5 HD Digital Roadcorder Microphone Screen Saver Auto On/Off Motion Detector Gravity Sensor Light Frequency Output USB Mode Restore Factory Setting Take a Photo Playback Mode Delete Files Volume General Troubleshooting © 2014 Maka Technologies Group. All Rights Reserved.
-
Page 14: Product Specifications
Product Specifications Image sensor 1.3 Mega pixels, CMOS Sensor LCD screen 1.41 inch TFT LCD HD display screen, 128x128 resolution Lens 135 degree A+level High resolution, multilayer film ,filtering wide-angle lens Photo resolution 3.0 Mega pixels Photo format JPEG format Image resolution 2048x1536 3M 1920x1080 Video format... -
Page 15: Getting Started
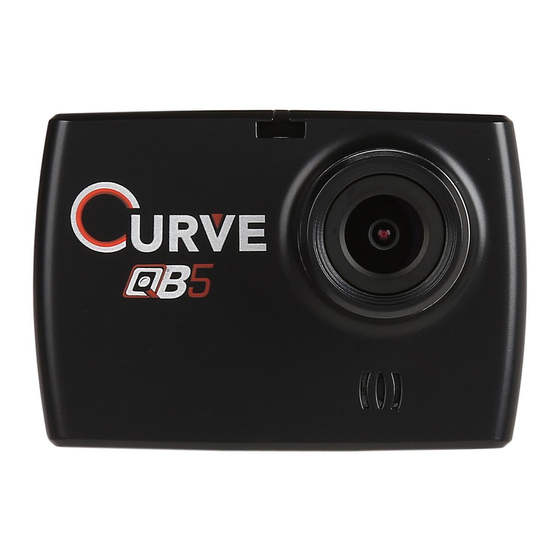
Getting Started Overview of your QB5 HD Digital Roadcorder Device Layout FRONT VIEW TOP VIEW Camera Lens Microphone Reset Button © 2014 Maka Technologies Group. All Rights Reserved. - Page 16 Getting Started Overview of your QB5 HD Digital Roadcorder BACK VIEW Status Indicator Power On/ Off Switch Menu Button Mode Button Microphone Up Navigation Button OK (Confirm) Button Down Navigation Button © 2014 Maka Technologies Group. All Rights Reserved.
- Page 17 Getting Started Overview of your QB5 HD Digital Roadcorder BASE VIEW RIGHT VIEW LEFT VIEW MicroSD Card Slot USB Charging Port © 2014 Maka Technologies Group. All Rights Reserved.
-
Page 18: Understanding Of Your Qb5 Hd Digital Roadcorder
Getting Started Understanding your QB5 HD Digital Roadcorder and Buttons Buttons Button Functions Press and hold to turn the device on or off. MENU Press to enter and exit Setting mode. MODE Press to toggle between Recording/Camera/Playback mode. Press to navigate UP to the preferred functions required. -
Page 19: Status Icons
Getting Started Understanding the status icons Status Icons Icon Meaning Video Resolution set to HD720P (1280X720) Video Resolution set to VGA (640X480) Photo Resolution set to 3MP/2MP/1.3MP/VGA Photo Mode Video Recording Mode Video/ Photo Playback Mode Charging Battery Battery Level Status Microphone Mute Microphone On ©... -
Page 20: Standard Packaging Of Your Qb5 Hd Digital Roadcorder
Getting Started Standard Packaging of your QB5 HD Digital Roadcorder Package contents Check the product box for the following items: QB5 Camera Operating Manual Mounting suction holder for camera (included 3M & Suction Mount) USB Cable ... -
Page 21: Installation Of Your Qb5 Hd Digital Roadcorder
Getting Started Installation of your QB5 HD Digital Roadcorder Installation 1 Fixing the camera to the window mount It is compulsory for window mount to be fixed up before using the device in a car. Make sure that you place the recorder in an appropriate place, so as not to obstruct the driver’s view. -
Page 22: Charging The Battery
Getting Started Installation of your QB5 HD Digital Roadcorder Charging the battery Use the charger to charge the battery before using it for the first time. Charge the device by connecting front camera via the USB car charger. Use only Maka-approved chargers, batteries, and cables. -
Page 23: Inserting A Memory Card
Getting Started Installation of your QB5 HD Digital Roadcorder Inserting a memory card Your device accepts memory cards with maximum capacities of 32 GB. Depending on the memory card manufacturer and type, some memory cards may not be compatible with your device. -
Page 24: Removing Memory Card
Getting Started Installation of your QB5 HD Digital Roadcorder Reformatting a memory card keeps data and the structure of files stored on it clean, helping to prevent error messages and missing images. Reformatting also restores the memory card, which can prevent it from becoming corrupted. - Page 25 Getting Started Installation of your QB5 HD Digital Roadcorder 4 Press on OK to confirm your selection 5 Press on DOWN button once 6 Press on OK once the word EXECUTE is highlighted Before formatting the memory card, remember to make backup copies of all important data stored on the device.
-
Page 26: Operation Of Your Qb5 Hd Digital Roadcorder
Getting Started Operation of your QB5 HD Digital Roadcorder Turning the device on and off Press and hold the Power button for a few seconds to turn on the device. A welcome message will be displayed on screen as shown in the image below. -
Page 27: Date/ Time Setup
Getting Started Operation of your QB5 HD Digital Roadcorder Date/ Time Setup Access the following settings to change the device’s time and date. If the battery remains fully discharged or removed from the device, the time and date is reset. -
Page 28: Take A Video
Getting Started Operation of your QB5 HD Digital Roadcorder Take a Video With QB5 HD Digital Roadcorder , you can take both still photos and videos. Recording Mode 1 Press on MENU to enter Video Output Mode 2 Press on UP or DOWN button to navigate to the function that shows... -
Page 29: Loop Recording
Getting Started Operation of your QB5 HD Digital Roadcorder Loop Recording The device will continue to record by erasing the previously recorded videos. All old videos will be replaced with the new ones. It is recommended to reformat a memory card every time images are... -
Page 30: Microphone
Getting Started Operation of your QB5 HD Digital Roadcorder Microphone You may choose to turn off the microphone so that all the recorded videos will be muted. 1 Press on MENU twice to enter SETUP mode 2 Press on UP or DOWN button to navigate to the function that shows... -
Page 31: Screen Saver
Getting Started Operation of your QB5 HD Digital Roadcorder Screen Saver Select timer duration for the LCD to turn off after recording starts. 1 Press on MENU twice to enter SETUP mode 2 Press on UP or DOWN button to navigate to the function that shows... -
Page 32: Motion Detector
Getting Started Operation of your QB5 HD Digital Roadcorder Motion Detector This function enables you to use your device as a remote surveillance camera with motion detection functionality. It uses the built-in camera to detect movements in the surrounding area using an advanced motion detection algorithm. -
Page 33: Light Frequency
Getting Started Operation of your QB5 HD Digital Roadcorder Light Frequency Please set according to the local power supply respectively; 50Hz or 60Hz. 1 Press on MENU twice to enter SETUP mode 2 Press on UP or DOWN button to navigate to the function that shows LIGHT FREQ.: 50Hz/ 60Hz... -
Page 34: Restore Factory Setting
Getting Started Operation of your QB5 HD Digital Roadcorder Restore Factory Setting Set the system parameters to the default value. 1 Press on MENU twice to enter SETUP mode 2 Press on UP or DOWN button to navigate to the function that shows... -
Page 35: Take A Photo
Getting Started Operation of your QB5 HD Digital Roadcorder Take a Photo With QB5 HD Digital Roadcorder , you can take both still photos and videos. 1 Press on MODE to enter Photo-taking mode 2 Press on MENU to enter Photo Size Setting... -
Page 36: Delete Files
Getting Started Operation of your QB5 HD Digital Roadcorder Delete Files 1 Press on MODE twice to switch from recording to playback mode 2 Press on UP or DOWN button to navigate thru the video files 3 Press on MENU once you have selected the file to delete... -
Page 37: Volume
Getting Started Operation of your QB5 HD Digital Roadcorder Volume Press the Volume button up or down to adjust the sound volume when playing video. 1 Press on MODE twice to switch from recording to playback mode 2 Press on MENU... -
Page 38: General Troubleshooting
General Troubleshooting Question Reason Solution The captured image is not 1 MicroSD card might be Make sure to stop recording stored full. before shutting down. 2 Image is not saved before the power outage. All buttons are invalid Procedural error or faulty Press RESET button to restart operation the DVR. - Page 39 General Troubleshooting Question Reason Solution Hazy Images Lens might be dirty. Check if there are fingerprints or dust on the lens. Clean it with a micro fabric cloth if necessary. There are horizontal stripes This could be due to wrong Please set according to the interference on the image light frequency setting...
Need help?
Do you have a question about the QB5 and is the answer not in the manual?
Questions and answers