Table of Contents
Advertisement
Quick Links
Advertisement
Table of Contents

Subscribe to Our Youtube Channel
Summary of Contents for SKIKE V7 FIX
- Page 1 MANUAL-ENGLISH SKIKE V7 FIX ALL MODELS...
-
Page 3: Table Of Contents
Table of Contents TABLE OF CONTENTS A. CONGRATULATIONS! ............A.1 Now fun may begin! ............B. WARRANTY ................B.1 Provisions of warranty ............. B.2 Warranty as GOLD Support customer ......B.3 Product key RFID card serial number ....... B.4 Warranty as a non-GOLD Support customer .... - Page 4 J.1 What is skiking? .............. J.2 First steps ............... J.3 Braking exercises ............J.4 Start rolling ..............J.5 Skating or skike techniques ..........K. SETTINGS ................K.1 Changing tyres and tubes ..........K.1.1 Removing tyres ............ K.1.2 Putting on tyres ...........
-
Page 5: Congratulations
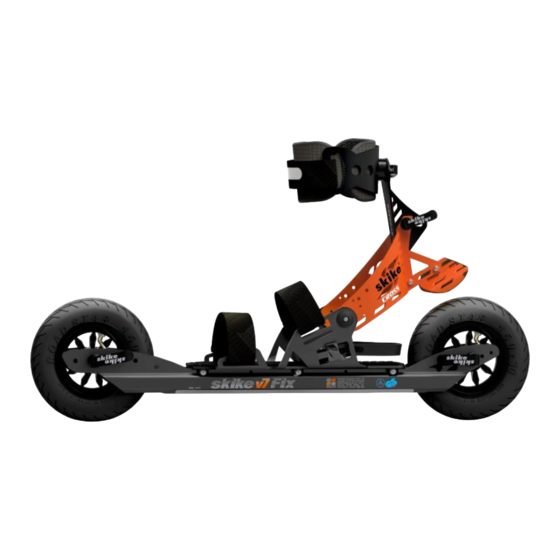
The new v7 FIX Poly Urethane wheel option adds the capability to participate in roller ski and inline skating events on smooth dry land surfaces. -
Page 6: Warranty As Gold Support Customer
Skike Sports warrants to the original purchaser that the skikes are free from material or manufacturing defects. The warranty does not cover damage to the skike that arise due to damages, wear and tear of wearing parts, violence, abuse and / or improper use, accident, loss, technical changes, use in inappropriate environment, inadequate maintenance and care, or by products Skike Sports is not responsible for. -
Page 7: Product Key Rfid Card Serial Number
Please register your skike purchase on our internet portal www. skike.com. You need both: the skike product key (Fig. 1) on the skike RFID card (Figure 2) and the skike serial number which is the same on both skikes (Figs. 3 and 4) B.3 Product key RFID card serial number... -
Page 8: Warranty As A Non-Gold Support Customer
You must agree with the retailer if the spare parts should be supplied by direct delivery to your home address or via your retailer. Then the warranty claim will be sent to Skike Sports, processed quickly and the relevant part(s) will be sent to the required delivery address. -
Page 9: Points Before Starting
Highway Code / normal road traffic! Avoid skiking on roads where there is vehicle traffic. Use routes that are reasonably free from other traffic. Skike at the side of the track / road and in single file. Select only routes, terrain and surfaces that correspond to your actual riding skills! Start on solid, flat, clean and dry surfaces. -
Page 10: Your New Skikes
D.2 First steps Before you can use your new skike you must first insert and lock in the wheels supplied. Please follow to the following instructions carefully. Installing the wheels is completely straightforward and easy to do. - Page 11 (threaded bolt), up against the tension lever. Insert wheel into the fork From the outside of the skike (i.e. the side which will have the outside of your shoe), push the quick release spear through the shaft hole in the frame, then the wheel and lastly through the axle hole in the frame at the other side.
-
Page 12: Quick Release
Then firmly push the lever all the way down until it rests as flat as possible on the skike frame or fork. By adjusting the wound up postion of both the nut and the lever, you can finish with level being locked firmly in place. -
Page 13: Equipment And Clothing
Best footwear is usually running or walking shoes. A wide splayed out heel may be hard to fit into the skike. Note: If the muscles in the ankles are weak or in need of support, it is recommneded a high cut shoe be worn that provides ankle support. -
Page 14: Clothing
Protective sleeves worn around knees and elbows are recommended so that even when falling at higher speeds, sufficient protection is provided. Skike protector sets are flexible and have Kevlar sections over the joints, designed to protect against abrasions. Note: The use of elbow and knee protectors or pads is recommended, especially for beginner skikers, children and extreme rider safety reasons. -
Page 15: Poles
Just like skikes can be fitted to different shoe sizes, skike poles can be adjusted to different length people and activities. -
Page 16: Screws, Nuts, Quick Releases, Joints
Regularly check the correct position of the hinge screws. Never replace only one joint, always replace both joints at the same time on a single skike! The replacement of only one joint on a skike places a resulting much greater burden of both joints and therefore inevitably leads requiringmore frequent changes of both joints. -
Page 17: Wheelbase Setting
( see brake adjustment section: D). The skike has a wing nut on one side (5.c). By loosening the wing nut and moving the heel strap (6), the position of the foot is also changed. -
Page 18: Straping In And Unstraping
Beginner and less experienced skikers should start by sitting down to put the skikes on. Begin on flat ground. First, slide the foot below the two over foot straps when the skike is on the ground, then slide the foot backwards into the heel strap (6). -
Page 19: Unstraping
Manual-English F.2.2 Unstraping Unstraping takes place in reverse order. Note: Optimal is a sitting position. If this is not the case, make absolutely sure the calf shell is undone last! Front retaining strap (3.a) undo it until it is fully removed from the slot at the tightening end Middle strap (3.b) undo it until it is fully removed from the slot at the tightening end... -
Page 20: Orthotic Adjustment
Take a normal upright and relaxed posture intuitively feel, how vertical the skike feels with this setting. ( Is it vertical or rolling onto a wheel edge?) Repeat step 2, but push the calf shell completely to the right and quick release (5.a) tighten slightly. -
Page 21: Braking Technique
Tip: Imagine, you want the skike to slide forwrd under you body - this automatically ensures proper weight transfer of the body to the rear. -
Page 22: Skike Techniques
- regardless of season, weather and terrain. The skike v8 LIFT now provides a free heel for skating, as is done on XC skating skis. -
Page 23: Braking Exercises
Braking (see section Breaking Technique) J.5 Skating or skike techniques Once you can safely control the rolling skike, can brake effectively and have learn how to change directions whilst moving, then skating techniques used in cross country ski skating should be learnt and mastered. -
Page 24: Removing Tyres
FIX all models K.1.1 Removing tyres Deflate the tube and while pressing on the tyre so that the air escapes as completely as possible. Press the tyre casing, opposite the valve as far as possible into the rim and lift with a suitable tool (e.g. -
Page 25: Straight Or Track Tuning
(e.g a parking bay line painted on the ground) and then push the skike along the edge of that line. If the skike deviates away form the edge of the line as you push it along, then press the front wheel accordingly in the direction oppostie to the way the skike deviated. -
Page 26: Technical Specifications
FIX all models L. TECHNICAL SPECIFICATIONS L.1 Specifications Tires: pneumatic tyres with tube, optional Poly Urethane (PU) speed wheels 145/24 Wheel diameter: 150 mm (145mm for PU wheels) Bearings: 6901 2RS industrial quality for pneumatic wheels Weight per skike: approx 2.0 kg... - Page 27 26 Anthony Ave distribution: Doncaster Vic 3108 Australia Four Ace International Ltd. Ph +61394678039 Rm. 301-2, 3rd floor, Mob +61417352845 Hang Seng Wanchai Building, enquiries@skike.com.au 200 Hennessy Road, Wanchai, www.skike.com.au Hong Kong Facebook Skike Australia www.skike.com www.facebook.com/skikeOriginal www.youtube.com/skikeTV www.instagram.com/skikeNow Version 1.4.0303.2016...
Need help?
Do you have a question about the V7 FIX and is the answer not in the manual?
Questions and answers