Advertisement
Basys
Getting Started
1. Carefully unpack all the speaker cabinets, accessories and the B3 or B4 amplifier.
Check that you have all of the following :
2 B15 Sub cabinets
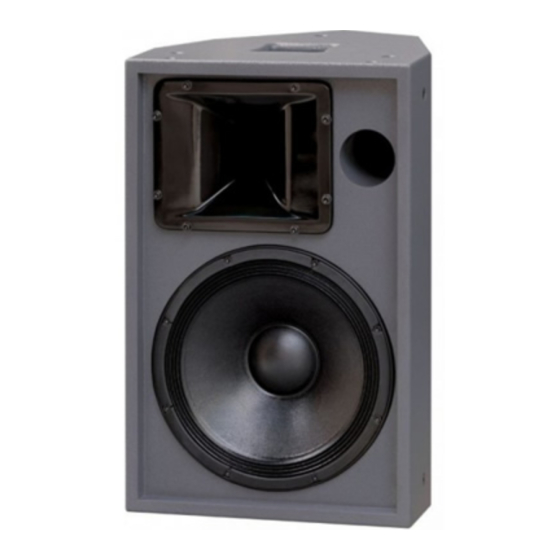
2 B12 Mid Hi cabinets
1 B3 or B4 power amplifier
2 Speaker poles
8 Wheels for B15 cabinets (4 with brakes)
2. Mount the B12 cabinets on top of the B15 cabinets by using the supplied poles.
3. Connect the left and right outputs from your mixer to the CH1 and CH2 inputs on the rear of the B3 amplifier.
4. Connect one of the thick 8 meter speaker cables to the SUB & HI, CH1 output on the B3 amplifier. Connect the
other end of this cable to one of the speakons on a B15 cabinet. Both speakons on a B15 are wired together, so
you can connect to either speakon. Connect the other 8 meter cable to the SUB & HI, CH2 output on the B3 and
its other end to the remaining B15 cabinet in the same way.
5. Use a 2 meter speaker cable and connect one end to the unused speakon on the B15 and the other end to the
B12 cabinet. Use the lower speakon that has not been blanked off. The upper blanked off speakon is for linking to
another B12 or for connection in a permanent installation via pins +1 and -1. If you do link to other B12 cabinets
make sure you only connect via the top input speakons on both B12 cabinets.
6. Switch on your mixer, connect the power lead to the B3 and switch it on by turning the power on control clockwise.
Set both CH1 and CH2 levels controls to the same position just below maximum and set the SUB level control
around half way. Slowly turn up the output on your mixer and set it to a moderate listening level. Use the SUB
level control to either increase or decrease the level of bass to mid hi. Once the desired setting has been found,
control the systems output level from your mixer.
7. If your Basys system is going to be used in a fixed installation, the top hat on the B15 cabinet can be replaced by
the top hat blanking plate found in the accessory pack. For road or mobile use, consider fitting the wheels and metal
corners to the B15 cabinets. Screws and bolts for the corners and wheels can be found in the screw pack. An
optional road bag kit can be purchased and includes covers for two B12's and two B15 cabinets.
Precautions
Do Not connect the 8 meter cable from the SUB & HI outputs on a B3 amplifier directly to a B12 cabinet.
Always connect to a B12 via a B15 when using the SUB & HI outputs on a B3 amp.
Warranty Registration
Please take time to fill out the warranty registration form at the back of the manual and return it to Void Acoustics
16 Metal corners for the B15 cabinet
2 B15 top hat blanking plates
2 8 meter speaker cables
2 2 meter speaker cables
1 Screw pack
Advertisement
Table of Contents

Related Manuals for Void BASYS B12


Summary of Contents for Void BASYS B12
-
Page 1: Getting Started
Always connect to a B12 via a B15 when using the SUB & HI outputs on a B3 amp. Warranty Registration Please take time to fill out the warranty registration form at the back of the manual and return it to Void Acoustics... - Page 2 OWNER'S MANUAL BASYS B12 - B15 V2...
- Page 3 OWNER'S MANUAL BASYS B12 - B15 V2 Basys...
-
Page 4: System Connections
Basys Features Close tolerance and durable components provide increased reliability and greater output. Accurately machined 15 laminate birch plywood cabinets for superior strength. Top Hat fittings on all enclosures enables quick and easy mounting. Built in Electronic protection device for the HF driver. 12 x M8 flying points for fast and accurate installation. -
Page 5: Technical Specifications
Basys TECHNICAL SPECIFICATIONS B12 V2 B15 V2 Frequency Response : 65 Hz - 18 KHz -3dB 40 Hz - 200 Hz -3dB Sensitivity : 99.5 dB 1w/1m 98 dB 1w/1m Impedance : 8 ohms 8 ohms Power Handling : 300 watts rms 600 watts rms Maximum Output : 124 dB cont... -
Page 6: Worldwide Service
Failure to do so could delay the repair of your product. Warranty Registration Please take time to fill out the warranty registration form at the back of this manual and return it to Void Acoustics. Environmental WEEE Mark If you want to dispose of this product, do not mix with general household waste. -
Page 7: Limited Warranty
Authorised Void Dealer) that it is free of defects in materials and workmanship and that each product will meet or exceed all factory published specifications for each respective model. Void agrees to repair or replace (at its discretion) all defective parts at no charge for labour or materials; subject to following provisions:... - Page 9 Void Acoustics Unit 10B Dawkins Road Ind Est Poole Dorset BH15 4JD...
Need help?
Do you have a question about the BASYS B12 and is the answer not in the manual?
Questions and answers